








Page Table of Contents
Reviews and Awards
I have a very expensive design program, and during our last move, the installation CD was misplaced. I have an old hard drive that has the program installed on Windows XP, and I have the USB dongle for activation.
I am wondering if there is a way to create a new installation CD from that hard drive, or just move the program to the new computer's hard drive, or connect that old hard drive to the new computer and run the program from where it is now? I believe I still have that licensed copy of Windows XP that is installed on that old hard drive with the design program. What if I install that copy of XP onto the new computer, can it run that old hard drive and access the design program like a 2nd hard drive or slave drive?
From the Microsoft community
Quick Answer
You can transfer some installed programs to a new computer even without the original installation discs, but simply copying the program folder is usually not enough. Traditional desktop applications often rely on registry entries, AppData, dependent components, drivers, and license information.
- Both computers are available: Use the "EaseUS PC-to-PC" transfer feature to directly migrate supported programs, files, accounts, and settings via a network or compatible cable.
- Computers cannot connect directly: Use the "Transfer via Backup" feature to create a transfer image, save it to an external hard drive or USB flash drive, and then restore it on the new computer.
- Old computer won't boot: Use the "Transfer via Disk" feature to migrate supported applications and files from the old system's disk.
- Software needs reactivation: Before migrating, use the "Product Key" feature to locate keys for Windows, Microsoft Office, and Adobe products.
After the transfer is complete, restart the new computer and test the applications. Depending on software compatibility and licensing requirements, you may still need to reinstall missing dependencies, log in to accounts, or reactivate the software.
Can You Manually Transfer an Installed Program?
Yes, of course. Manual transfer is possible in some cases, but it can be complicated and is not recommended for most users. Unlike portable apps, traditional Windows programs may store files, settings, Registry entries, and other dependencies in different locations.
Simply copying a program's installation folder may therefore leave behind important components that the program needs to run on the new computer. If you still want to try a manual transfer, you may need to move several parts of the application separately.
Method 1: Copy the program files
Start by locating the application's installation folder on the old computer. Most traditional Windows desktop programs are installed in one of these locations:
C:\Program Files\C:\Program Files (x86)\
64-bit applications are commonly installed under C:\Program Files, while many 32-bit applications use C:\Program Files (x86).
Find the folder associated with the program you want to move, then copy the entire folder to an external drive or directly to the new computer. Keep the original folder structure and, if possible, place it in the same location on the new PC.
However, copying the program folder alone is usually not enough. The application may depend on Registry entries, files in AppData, shared system components, services, or other dependencies that are not stored in the installation folder.
This method works most reliably for portable applications or unusually self-contained programs that do not require a traditional installation process.
Method 2: Transfer application-specific registry entries
Some Windows applications store configuration information and other settings in the Windows Registry. Common locations include:
HKEY_CURRENT_USER\SoftwareHKEY_LOCAL_MACHINE\SOFTWARE
Advanced users can use Registry Editor (regedit) to search for entries associated with the application and export them from the old computer.
To do this:
Step 1. Press Windows + R to open the Run dialog.
Step 2. Enter regedit and press Enter.
Step 3. Look under HKEY_CURRENT_USER\Software and HKEY_LOCAL_MACHINE\SOFTWARE for entries associated with the application.
Step 4. Select the relevant Registry key.
Step 5. Choose File > Export and save the Registry file.
Step 6. Move the exported file to the new computer.
After verifying that the key belongs to the application, use File > Import on the new computer.
- Important Note
- Do not export or modify registry keys indiscriminately. Windows Registry settings vary depending on the application, Windows version, and system architecture. Incorrect registry changes can cause system or application malfunctions.
Advanced users can attempt to identify and export application-specific registry keys; however, this method is highly dependent on the specific application and is prone to failure if other related files or dependencies are missing.
👉 Figure out the Detailed Guide on Transferring Programs & Apps from Old PC to New PC
Method 3: Transfer application data from AppData
Applications often store user-specific settings, configuration files, caches, templates, and other data outside the main installation folder. You can quickly access the user's AppData folder by pressing the Windows + R keys and typing %AppData%, then pressing Enter.
This typically opens the following path:
C:\Users\AppData\Roaming
The AppData directory also contains the following folders:
C:\Users\AppData\Local C:\Users\AppData\LocalLow
Which folder—Roaming, Local, or LocalLow—stores the specific data depends on the application itself. Look for folders named after the application or the developer, and copy the relevant data to the corresponding location on the new computer.
For example, an application might store user preferences or configuration files at this path: C:\Users\
- Notice:
- Do not blindly copy the entire AppData folder. Different applications use AppData in different ways, and copying unrelated system or application data could cause conflicts. Additionally, please note that AppData contains temporary files and caches, which generally do not need to be migrated.
In addition to these three methods, you can also try transferring required dependencies and recreating program shortcuts; however, as these processes are quite complex, we will not cover them in detail here. Please contact us directly if you need assistance.
However, many users report that manual migration frequently fails. Why is this the case? We have conducted in-depth research and analysis into this issue.
Why Manual Program Transfer Often Fails?
Manually migrating installed programs is often difficult because most applications do not store all their data solely within their own installation folders.
During installation, programs may write DLL files, runtime components, registry entries, drivers, and license data to various locations across the Windows system; simply copying the program folder can result in these essential files being left behind.
01
Missing Dependencies
For instance, the new computer might display an error message such as "The program cannot start because xxx.dll is missing." Furthermore, some applications require specific runtime environments—such as the .NET Framework, Microsoft Visual C++ Redistributables, or DirectX—to function; without these components, the program may fail to launch or crash during operation.
02
Registry Settings
Even if the program launches successfully, issues such as lost settings, unrecognized licenses, or broken file associations may arise. This occurs because many programs store configuration and activation details in the Windows Registry rather than within the program folder itself.
03
Relies on Specific Hardware or Drivers
These applications may require specific drivers, plugins, codecs, or hardware dongles—such as CAD tools, engineering software, audio/video processing applications, and specialized business software.. Additionally, even if the files are successfully transferred, the software may still require re-activation on the new computer, particularly if the license is tied to the old machine.
04
License Reactivation
A successful file transfer does not always mean the software will remain activated. Some licenses are tied to a specific device or hardware configuration, so the application may require reactivation, a product key, or account verification on the new computer.
Further Reading: How to Transfer Windows 11/10 License to Another PC Easily?
Is There Any Free Way to Transfer an Installed Program from One Windows Computer to Another, without the Installer?
Certainly! EaseUS free Todo PCTrans can help you migrate installed programs, user profiles, system settings, files, and folders to a new computer. EaseUS offers a seamless, automated transfer process, allowing you to set up your new PC without having to reinstall programs from scratch. Additionally, EaseUS Todo PCTrans offers a free plan, so you can try out the app and program transfer feature directly.
Free Download
100% Secure
Technical Chat 24/7
Free Inquiry
If you don't want to manually locate program files, Registry entries, AppData, and dependencies, EaseUS Todo PCTrans can automate much of the migration process for supported applications.
Before you start transferring files to a new PC, prepare the following:
- An old Windows PC
- A new Windows PC
- EaseUS Todo PCTrans installed on both computers
- A network connection or compatible Ethernet cable
- Enough free space on the new PC
Condition 1: Simply transfer Apps and programs to a new PC
If both your old and new computers are operational, a "PC-to-PC" transfer is usually the most straightforward and convenient option.
Step 1. Install and set up PCTrans on both computers
At the very beginning, install and launch EaseUS Todo PCTrans on both computers
- On the old PC: Install and launch EaseUS Todo PCTrans. This computer will serve as the Source.
- On the new PC: Install and launch the same application. This computer will serve as the Target. Before proceeding, ensure both computers are powered on and connected to the network.
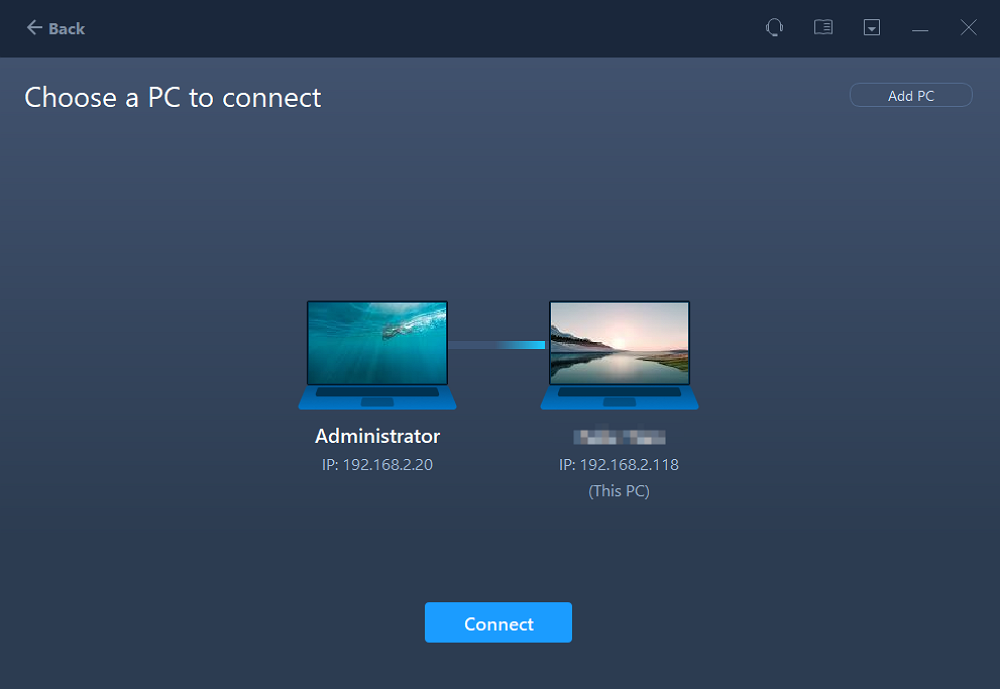
Step 2. Connect the two PCs
PCTrans offers two ways to connect the computers:
- Network: Connect both computers to the same Local Area Network (LAN). This is a convenient option when both computers have access to the same network.
- Cable: You can also connect the two computers directly using a supported Ethernet cable.
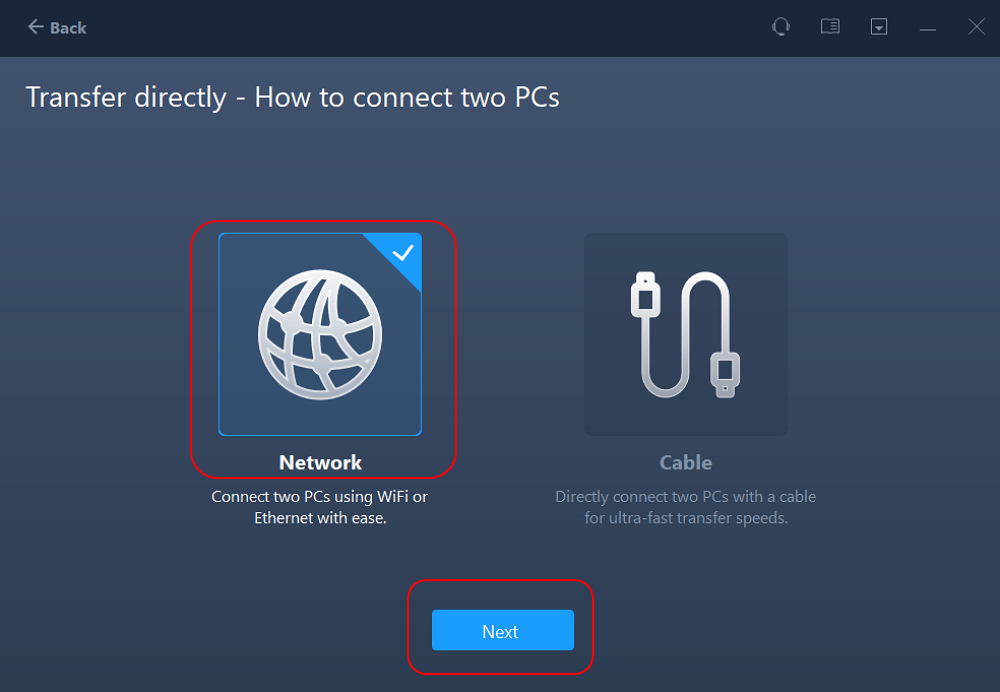
Choose the connection method that best suits your setup and follow the on-screen prompts to establish the connection.
Step 3: Scan the old PC
Once connected, PC to PC Transfer analyzes the source computer and lists the data available for transfer. Depending on the amount of data stored on the old computer, this analysis process may take some time.
The scan can identify items such as:
- Applications
- Files
- User accounts
- Account settings
- Other transferable data
This saves you from manually searching through Program Files, Registry entries, AppData folders, and other locations.
Step 4. Select the applications and files to transfer
After the scan is complete, select the applications you wish to transfer to the new computer.
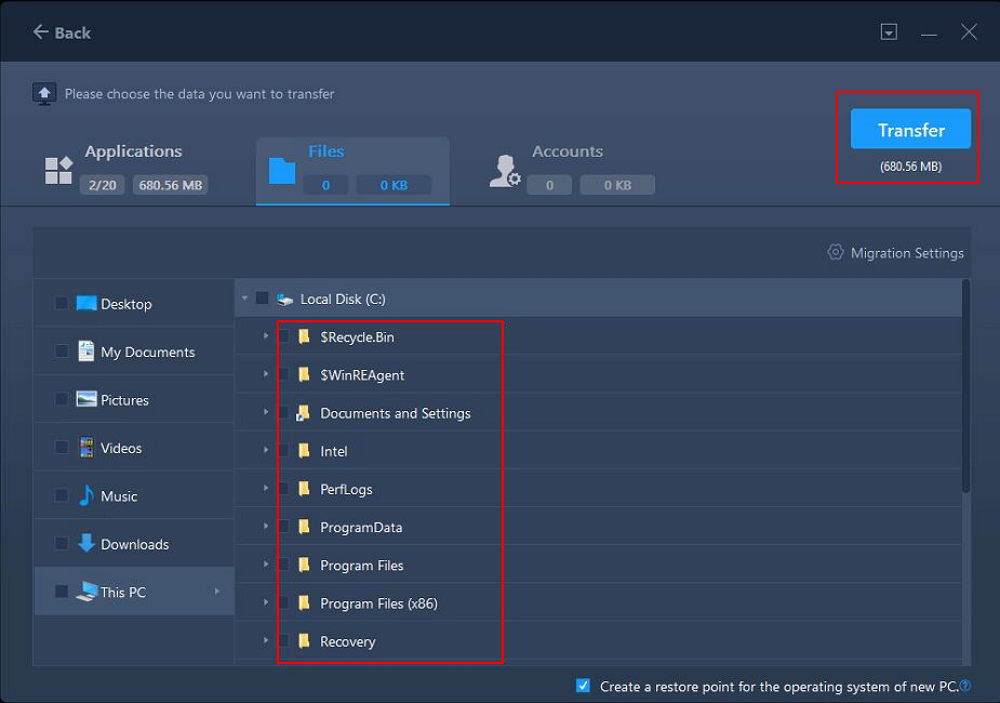
PCTrans also displays the compatibility status of the applications, helping you understand which programs can be transferred.
|
Status |
Meaning |
|
Supported |
Compatible with the new PC |
|
Unsupported |
Not compatible |
|
Existing |
Already exists on the new PC |
It is particularly useful when you have a large number of files and applications to transfer from your old computer. Instead of blindly migrating everything, you can review the status of each item and select the programs that are suitable for the new system. For example, you can migrate design applications along with their project files and associated user data, allowing you to continue working seamlessly on the new computer.
Step 5. Start the transfer
Once you have confirmed the selected applications and data are correct, click Transfer. PCTrans will begin migrating the selected items from the old computer to the new computer.
During this process:
- Do not turn off either computer.
- Do not disconnect from the network or unplug cables.
- Avoid interrupting the migration process.
- Wait for PCTrans to indicate that the migration is complete.
The time required for migration depends on the volume and type of data. Then, select "Network" and click Next to continue. This will automatically scan the old PC. (Make sure the two PCs are connected to the same LAN.)
Step 6. Restart and test migrated programs
After the migration is complete, restart the new computer to refresh the migrated information.
Then, test each migrated program:
- Open the migrated program.
- Check if the program launches correctly.
- Verify your settings and preferences.
- Check that files and user data are accessible.
- Log in again if the application requires an account login.
- Activate the software if necessary.
- Notice:
- Please note that migrating an application does not bypass its licensing or activation requirements. Some programs may still require you to log in, enter a product key, reconnect a hardware dongle, or reactivate the software on the new computer.
Condition 2. Transfer Programs Without Connecting Two Computers
What if my old and new computers cannot be connected at the same time? For example, the two computers might be in different locations, or you may not have the appropriate network or cable connection.
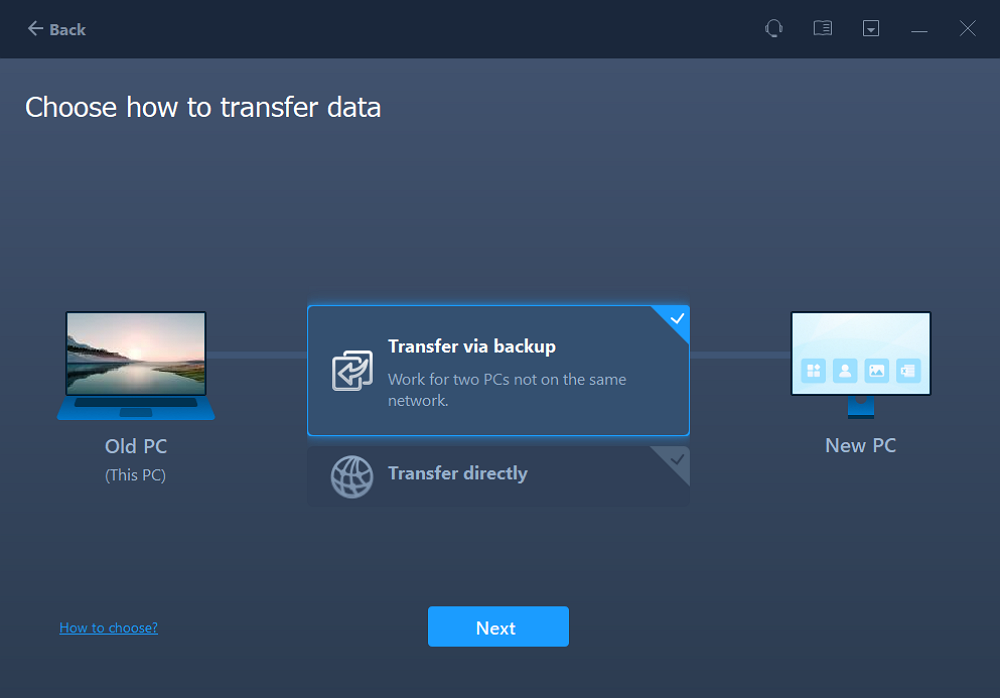
In this case, you can use the "Transfer via backup" (also known as "Backup & Restore") in EaseUS Todo PCTrans. It allows you to create a migration image file containing selected applications, files, and accounts, save it to an external storage device, and then restore it on the new computer.
You can save the transfer image to:
- An external HDD
- A USB drive
- Other available storage
Follow the steps below to complete data migration using PCTrans:
1STEP 1Launch PCTrans on the old PC, select Data Transfer, and choose Transfer via Backup. Select a destination such as a USB drive, external hard drive, or SD card, then create a name for the backup image and click Confirm.
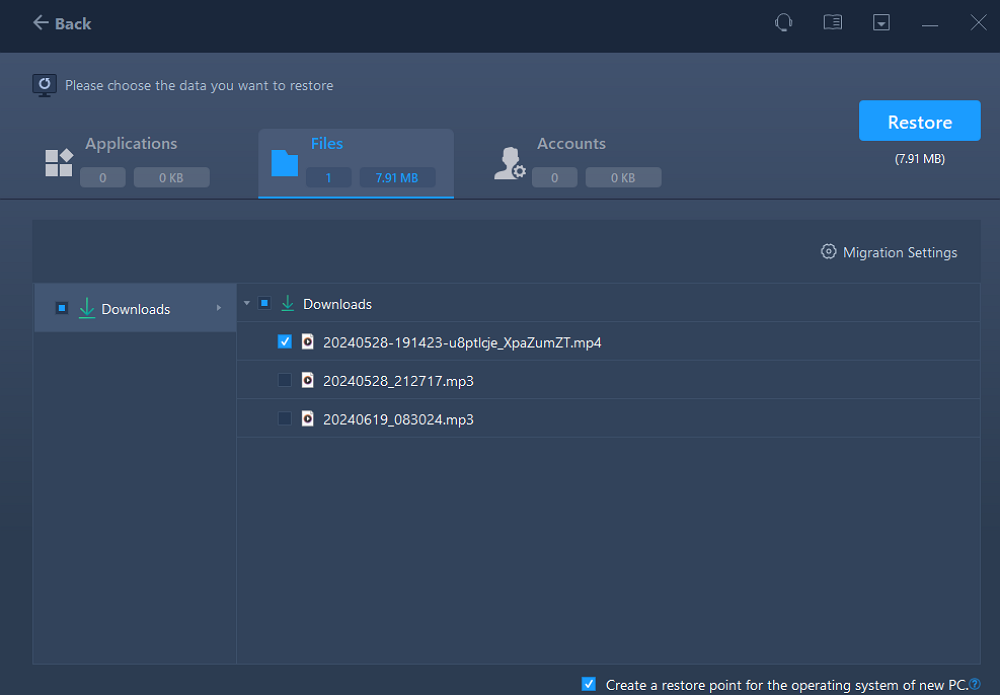
2STEP 2In the Applications tab, select the programs you want to transfer. Then go to the Files tab, choose the files you want to move, and click Back up to create the transfer image.
3STEP 3Once the backup is complete, safely move the backup image to the new PC using the USB drive, external hard drive, SD card, or other available storage.
4STEP 4Launch PCTrans on the new PC, select Transfer via Backup, and click Next. Select the backup image you created on the old PC.
5STEP 5Choose the applications and files you want to restore, then start the restore process. Wait for the transfer to complete before launching the transferred programs.
Condition 3. Transfer Programs from an Old or Unbootable Computer
What if my old computer cannot boot up or Windows is not running correctly?
In this case, standard "PC to PC" migration may not be possible because the source computer cannot start up properly. PCTrans also offers a "Transfer via Disk", which is designed for transferring data from an old system drive.
Consider using this method in the following situations:
- The old computer cannot boot up.
- Windows is corrupted or fails to start properly.
- You can still access the old computer's system disk.
- You need to recover files or supported applications from the old computer.
Here you can follow my steps:
Step 1. Remove/connect the old system drive.
Step 2. Connect it to the new PC.
Step 3. Open PCTrans on the new PC.
Step 4. Select This is New PC.
Step 5. Choose Transfer via Disk.
Step 6. Scan the old system drive.
Step 7. Select recoverable applications/files.
Step 8. Start the transfer.
- Important Note
- "Transfer via Disk" differs from standard "PC to PC" migration because it does not require the old Windows system to boot up. Instead, PCTrans directly reads the accessible old system disk to identify data available for transfer.

How to Transfer Programs Without Losing Product Keys
Transferring a program successfully does not always mean that its license will transfer with it. Some applications require a product key, account verification, or device activation before you can use them on the new computer.
Depending on the software, you may need:
- A product key
- A serial number
- An account login
- Device activation
- Subscription verification
To avoid activation problems after migration, find and save your license information before transferring your programs.
EaseUS Todo PCTrans includes a Product Key feature that can scan supported product keys and save them for later use. Its current documentation lists support for products including:
- Windows
- Microsoft Office
- Adobe products
Save the recovered keys somewhere accessible before starting the migration. This gives you a backup if the transferred application asks for its license information again.r
After transferring an application:
- Launch the application.
- Sign in if required.
- Enter the saved product key or serial number if requested.
- Follow the software vendor's activation process.
Some software licenses are tied to a specific device or account, so you may need to deactivate the old computer or contact the software vendor before activating the application on the new one.
Common Problems After Transferring Programs
Even when a program is successfully transferred, you may need to troubleshoot a few issues on the new PC.
- Problem 1. The program won't start
If the application does not open, check for:
- Missing dependency
- An unsupported application
- Missing DLL files
- License or activation issues
- Missing drivers or required services
If the application is not compatible with the new Windows version, transferring it again may not solve the problem.
- Problem 2. The program starts, but Settings Are missing
If the application opens but your preferences or personal data are missing, check:
- AppData
- Account data
- User profile
Some applications store configuration files separately from the main program folder.
- Problem 3. The program asks for activation
If the software starts but asks you to activate it again, check:
- Product key or serial number
- Account login
- Subscription status
- Device activation
- Hardware-based activation
If the license is tied to a hardware device or dongle, make sure the required device is connected and supported by the new computer.
- Problem 4. The program is listed as unsupported
If PCTrans marks an application as Unsupported, do not force the migration.
Instead, check whether the software vendor provides a compatible version or installer for the new Windows system. You can also contact the vendor if you need help transferring the license or application.
- Problem 5. Transferred files seem to be missing
If files appear to be missing after migration, first check their actual storage location.
For example, if OneDrive is enabled on the new PC, folders such as Documents, Pictures, and Videos may be redirected to a OneDrive location such as:
C:\Users\
FAQs about Transferring Apps and Programs to a New Computer
1. Will my programs still work?
2. Do I need to reinstall transferred programs?
3. Will my settings be transferred?
4. Can I transfer games?
5. Can I transfer programs from Windows XP to Windows 11?
6. What should I do if the program is unsupported?
Final Takeaway
About the Author

Oliver is an EaseUS professional writer who dares explore new areas. With a passion for solving tech issues with straightforward guides for common users, Oliver keeps honing his writing craft by developing in-depth solutions for disk and partition management, computer boot-up issues, file transfer, etc.
Reviews and Awards
-
EaseUS Todo PCTrans Free is a useful and and reliable software solution created to serve in computer migration operations, be it from one machine to another or from an earlier version of your OS to a newer one.
Read More -
EaseUS Todo PCTrans is by the folks at EaseUS who make incredible tools that let you manage your backups and recover your dead hard disks. While it is not an official tool, EaseUS has a reputation for being very good with their software and code.
![]() Read More
Read More
-
It offers the ability to move your entire user account from your old computer, meaning everything is quickly migrated. You still get to keep your Windows installation (and the relevant drivers for your new PC), but you also get all your apps, settings, preferences, images, documents and other important data.
Read More

Related Articles
-
HomeGroup Not Showing Up Windows 10/11? All Fixes Here!
![author icon]() Cedric/2026/04/22
Cedric/2026/04/22 -
How to Move Genshin Impact to Another Drive | 2 Ways
![author icon]() Cici/2026/08/14
Cici/2026/08/14 -
Transfer Microsoft Office to New Computer [Full Guide]
![author icon]() Tracy King/2026/08/23
Tracy King/2026/08/23 -
How to Move Windows Apps to Another Drive - 2 Way
![author icon]() Tracy King/2026/08/14
Tracy King/2026/08/14
 Cedric/2026/04/22
  Cici/2026/08/14
  Tracy King/2026/08/23

