Featured Articles
- 01 GPT vs MBR: Which Is Better
- 02 Set Up the Boot Mode in MBR for BIOS, Legacy or UEFI
- 03 Convert MBR to GPT Without Data Loss (Windows 11 Available)
- 04 Running [Bootrec /fixboot] Returned Error 'Access is denied'
- 05 How to Install Windows 11 on MBR?
- 06 Fix 'Windows Cannot Be Installed to This Disk MBR'
- 07 Fix MBR2GPT Conversion Failed
- 08 How to Rebuild MBR
- 09 FREE MBR Repair Tool
| Workable Solutions | Step-by-step Troubleshooting |
|---|---|
| 1. Check If Your PC Meets Windows 11 System Requirements | Before installing Windows 11, you need to ensure that your PC meets the minimum system requirements...Full steps |
| 2. Convert Disk from MBR to GPT for Windows 11 Installation | Step 1. Download and launch EaseUS Partition Master on your Windows computer; Step 2. Right-click the MBR disk...Full steps |
| 3. Configure and Get PC Ready for Installing Windows 11 |
Steps to Enable Secure Boot Mode...Full steps Steps to Enable TPM 2.0...Full steps |
| 4. Download and Install Windows 11 with ISO File |
Step 1: Download Windows 11 ISO file; Step 2: Now select the 64-bit download of the ISO file and save it...Full steps |
Can Windows 11 run MBR, Yes or NO
MBR stands for Master Boot Record. The MBR holds the information about your operating system and helps your computer boot or load the OS into the RAM for execution. In simple words, MBR is what drives your OS to execution.
As for the question, Windows 11 do run MBR but only as a 2nd disk. That means you can not have MBR as the primary disk for Windows 11. Unfortunately, Microsoft has set GPT (GUID Partition Table) configuration UEFI, and secure boot enables running and installing Windows 11.
Therefore, you need to have GPT as your OS disk type to install Windows 11. However, MBR can work as your second drive with Windows 11. Don't worry if you do not have a GPT disk. For now, let's see below how to install Windows 11 on the MBR partition.
How to Install Windows 11 on MBR Partition
If you have an MBR partition disk and wish to run Windows 11, reading our article will help you successfully do it. Make sure to read carefully and do not miss any step.
1. Check If Your PC Meets Windows 11 System Requirements
Before installing Windows 11, you need to ensure that your PC meets the minimum system requirements to run Windows 11. Following are the list of Windows 11 System and Hardware requirements for installation:
- Storage Space: You need at least 64 GB or more free space in your C drive to install Windows 11.
- TPM 2 Enabled: You need to ensure that TPM (Trusted Platform Module) runs Windows 11. If that is not enabled, don't worry. You will see how to enable it in the upcoming section.
- Support UEFI and Secure Boot Modes in BIOS: As stated earlier, Microsoft has required UEFI support and secure boot modes in BIOS for Windows 11 installation. Therefore, make sure you meet this requirement before proceeding with the installation.
- GPT Disk Type for OS Drive: Your OS drive should be the GPT type to install Windows 11. But, nothing to worry about here because this article is all about installing Windows 11 on the MBR partition.
2. Convert Disk from MBR to GPT for Windows 11 Installation
Microsoft's limitation of MBR is something that you can not avoid while installing Windows 11. But, you can convert your MBR disk to GPT for Windows 11 installation. There is nothing to panic about, as this process is much easier to do with EaseUS Partition Master than it seems.
EaseUS Partition Master gives a one-in-all solution to help you convert your MBR disk partitions into GPT format. It also gives you tons of features to do other partition management and creation tasks.
So, download EaseUS Partition Master now and follow the below steps to convert the disk from MBR to GPT:
Step 1. Download and launch EaseUS Partition Master on your computer.
Step 2. Go to Disk Converter, select "MBR => GPT" and click "Next" to continue.

Step 3. Select the target MBR disk that you tend to convert to GPT, and click "Convert" to start the conversion.

3. Configure and Get PC Ready for Installing Windows 11
Before installing, one more essential step is to configure Windows boot modes and enable the TPM 2.0. Let's see how you can do that.
Steps to Enable Secure Boot Mode
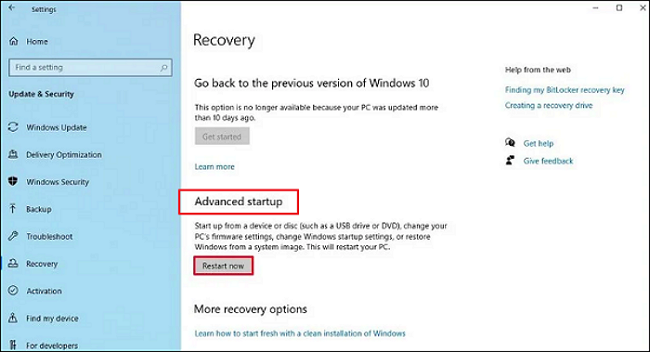
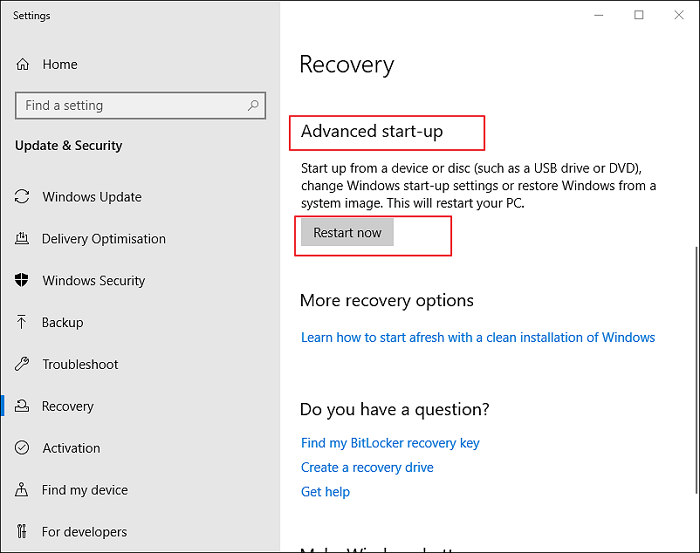
Step 1: Go to Settings and select Update & Security. Once there, select the Recovery option.
Step 2: In the "Advanced Startup," select the Restart now button.
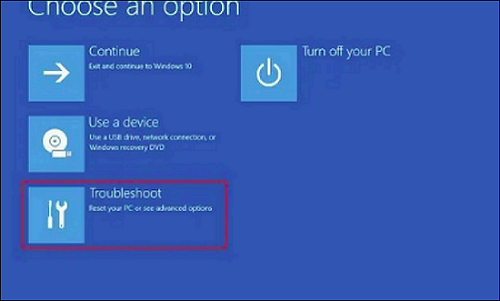
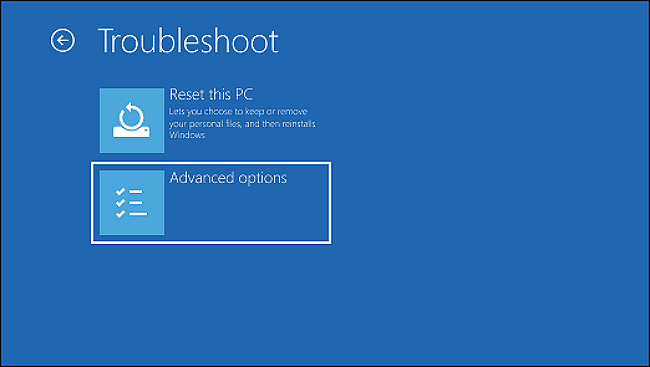
Step 3: After Restart, select the Troubleshoot from the Advanced Startup menu.
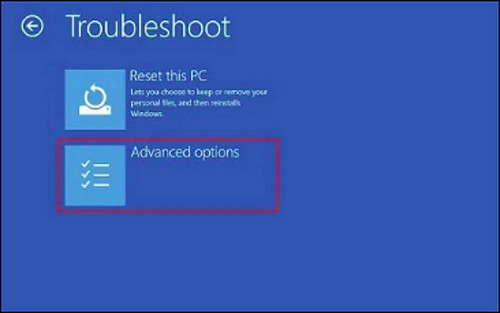
Step 4: Go to Advanced Options.
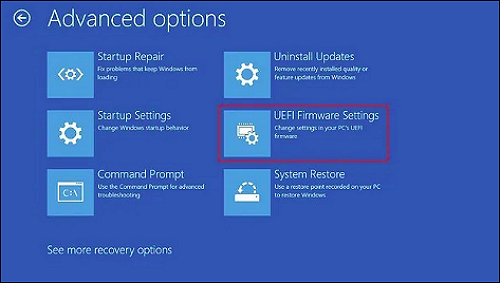
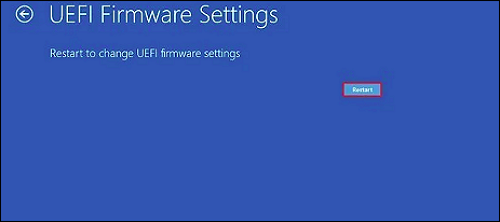
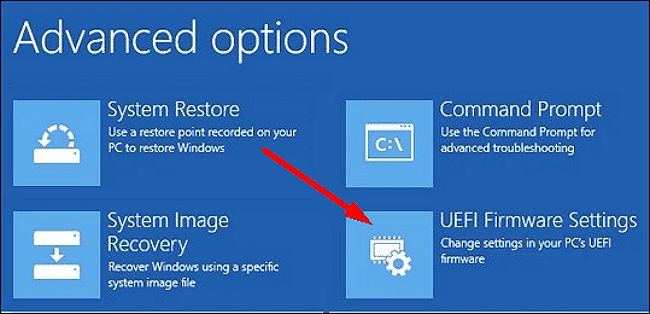
Step 5: You need to open the UEFI Firmware Settings option.
Step 6: Click on the Restart button.
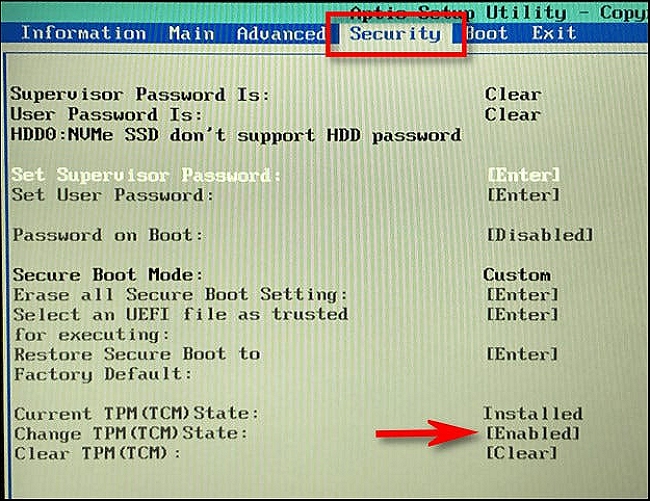
Step 7: You have to open the boot or security settings page. There, you have to move to the Secure Boot option. Once there, press your Enter key.
Step 8: Choose Enabled as an option. After that, simply press the Enter key.
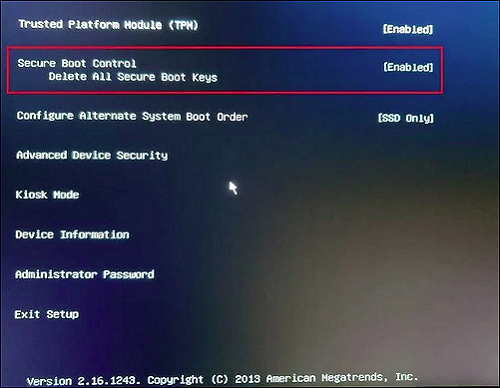
Step 9: Now exit the UEFT settings by confirming the new changes.
Your system will restart, enabling the secure boot on your computer.
Step 1: Go to Settings again and choose Update & Security. From there, you have to select the Recovery option.
Step 2: Restart from Advanced Start-up.
Step 3: Choose the Troubleshoot.
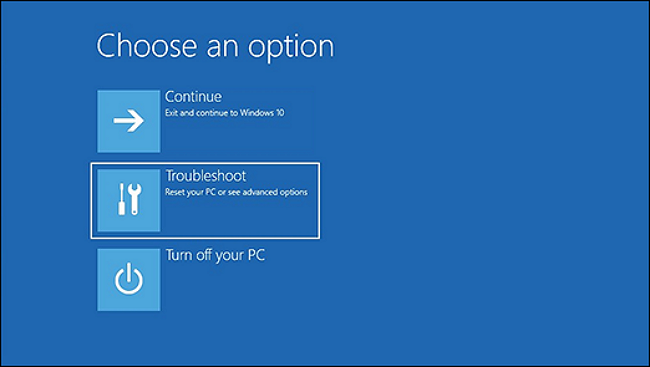
Step 4: Go to Advanced Options.
Step 5: Now, you have to open the UEFI Firmware Settings.
Step 6: Click on the Restart button.
Step 7: Go to the boot or the security settings page.
Step 8: Now go to the change TPM state, choose Enabled, and press enter.
Step 9: Exit UEFI settings and confirm your new changes.
Your system will restart now. It will have the TPM enabled for Windows 11 installation.
4. Download and Install Windows 11 with ISO File
Now you are all set to download and install Windows 11. Follow the below steps:
Step 1: Download Windows 11 ISO file by clicking here.
Sign in to your Microsoft account. You have to select Windows 11 from the menu.
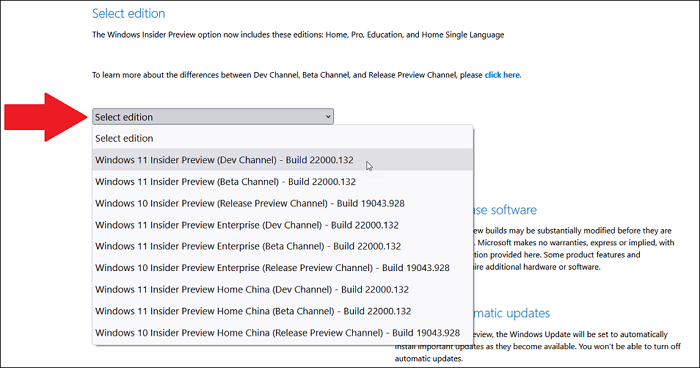
Step 2: Now select the 64-bit download of the ISO file and save it on your disk.
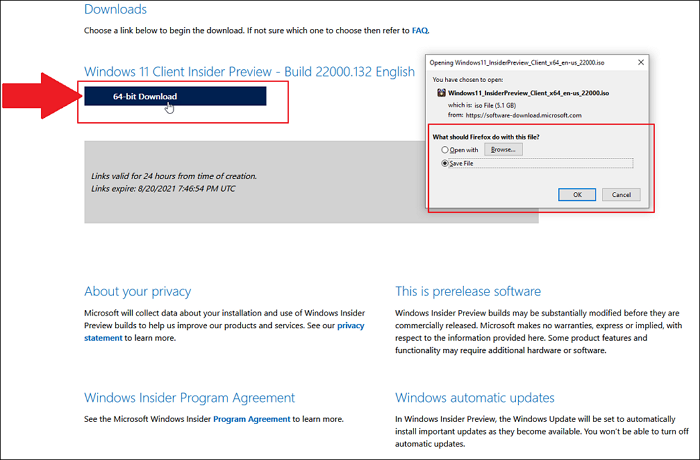
After that, it will ask you to select a product language. Choose that and click on confirm. It will take a while, and your Windows 11 ISO file will download on your computer.
Step 3: Now, burn your ISO file to a USB drive or a Disc for Windows 11 installation.
Insert a USB drive or Disc into your computer. Then, select the Windows 11 ISO file, right-click on it and click and select burn disc image. Select the location of your USB or Disc from here and click on the burn button.
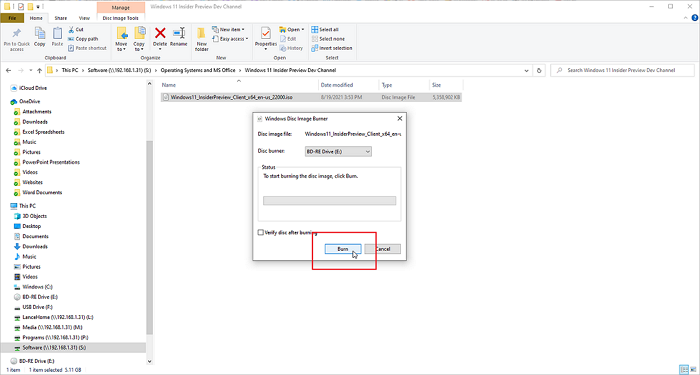
After waiting for a while, the Windows 11 file will burn on your USB drive or Disc.
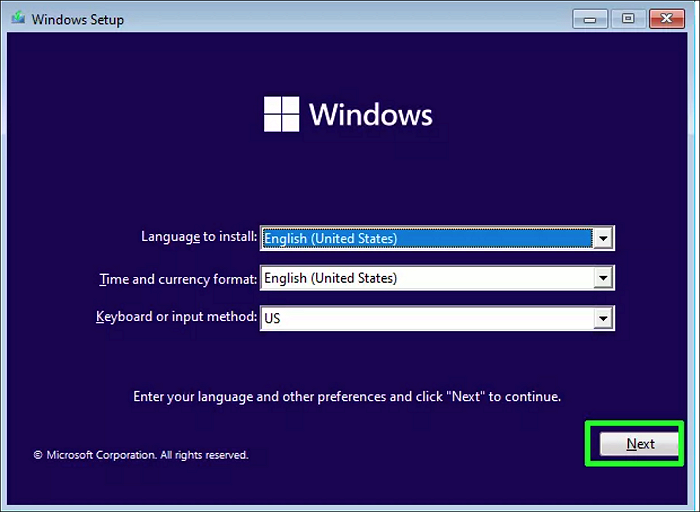
Step 4: Restart your computer and boot it through the USB drive or Disc that has Windows 11 burned on it.
Step 5: Now, you will see Windows 11 setup in place. Select your language and click the Next button.
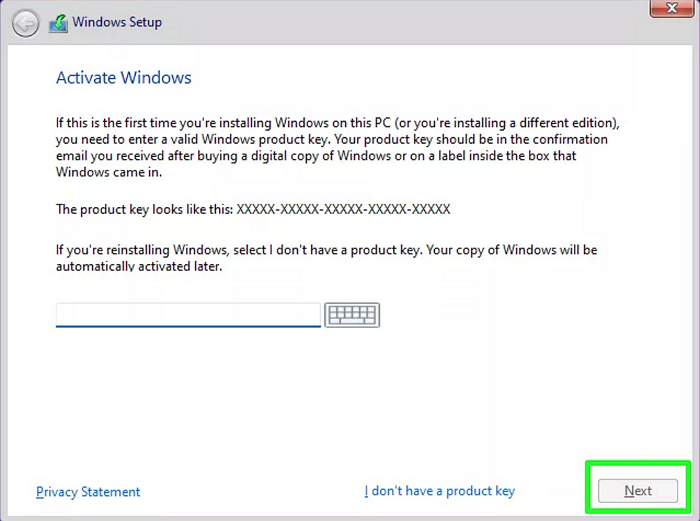
Step 6: Add the Windows 11 product key and hit Next.
Step 7: Proceed by accepting the license and agreement.
Step 8: Choose the Custom Install option.
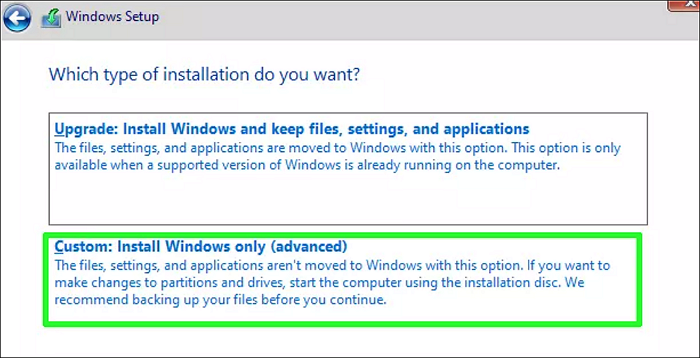
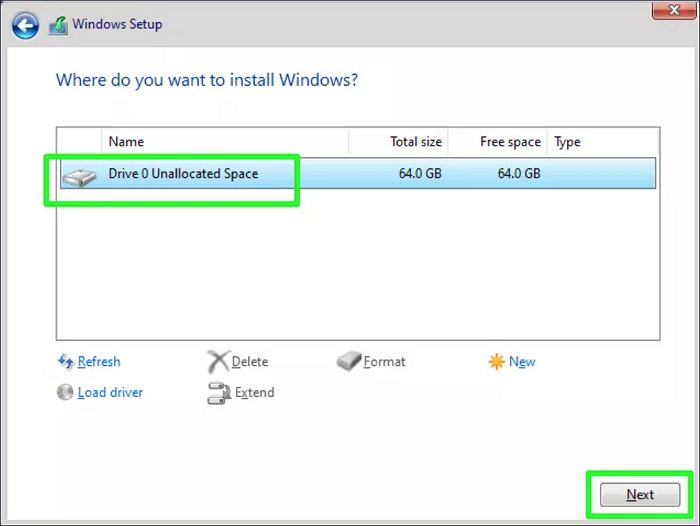
Step 9: Choose your GPT converted MBR drive for installation and hit Next.
That's it. After that, you have to proceed with basic installation steps to complete Windows 11 setup. Once done, Windows 11 will install on your drive that was MBR before.
Request Online Assistance to Install Windows 11 on MBR Disk
It doesn't matter if the whole process seems too complex for you. You can customize an online remote assistance, and let EaseUS experts to guide you through the entire moment and get Windows 11 successfully installed on the MBR disk.
EaseUS Windows Configuration Services
Click here to contact EaseUS Partition Master experts for free
EaseUS experts are available to provide you with 1-on-1 manual services (24*7) and help fix different Windows configuration issues. Our experts will offer you FREE evaluation services and efficiently diagnose and resolve Windows update errors, Windows installation, or daily OS issues using their decades of experience.
- 1. Fix Windows update errors, such as update failure, unable to upgrade Windows, etc.
- 2. Serve to download and install the latest Windows operating system on PC with success.
- 3. Provide fixes for daily Windows system errors with drivers, permission, account settings, etc., issues.
Tips to Optimize Windows 11 Disk Performance
Windows 11 is the latest version of Windows Microsoft. It has far improved in terms of UI and performance. So, it is best if you optimize Windows 11 disk performance. Some essential tips for optimization of Windows 11 are mentioned below:
- Free-up C Drive: Try to have at least 120 GB of free space or more in your system's C drive.
- Run Disk Cleaner: Use the Windows disk cleaner utility to clean extra and useless files from your C drive regularly.
- Migrate Large Files: Make sure all the large files are present in some other drive other than where your Windows 11 is installed.
- Antivirus: It is also best practice to run a good Antivirus now and then on your computer.
Conclusion
Microsoft has made Windows 11 run only if specific hardware and software requirements are met. Some key things are to have free storage space, TPM enabled, Secure Boot, enabled, and also have GPT disk drive.
So, if you are running an MBR disk drive, you need to convert it to GPT first to install Windows 11. The task gets a lot easier by using EaseUS Partition Master software which automatically converts MBR to GPT within a few clicks.
Once you are all set with the requirements, download the Windows 11 ISO file and follow the steps mentioned in this article to install Windows 11.
Was This Page Helpful?
Updated by Tracy King
Tracy became a member of the EaseUS content team in 2013. Being a technical writer for over 10 years, she is enthusiastic about sharing tips to assist readers in resolving complex issues in disk management, file transfer, PC & Mac performance optimization, etc., like an expert.
Related Articles
-
Convert MBR to GPT: One Pic to Master MBR to GPT Conversion
![author icon]() Sherly/Mar 06, 2026
Sherly/Mar 06, 2026 -
Tutorial: Check Disk Space on Windows 10 Using CMD 2026
![author icon]() Sherly/Jan 29, 2026
Sherly/Jan 29, 2026 -
Defaultuser0 Password? Fix It Now! [5 Efficient Ways🔥]
![author icon]() Cici/Jan 29, 2026
Cici/Jan 29, 2026 -
How to Burn ISO to DVD on Windows 10/11 (Step-by-Step Tutorial)
![author icon]() Cedric/Mar 01, 2026
Cedric/Mar 01, 2026