Let's face this scenario: You have saved a lot of pictures on your Mac computer, but now that you are trying to open the folder, you receive the message that the Library could not be opened. It is no wonder that you become anxious in this situation.
Recover Photos from Mac When the Library Could Not Be Opened
Opening damaged images on a Mac may be challenging, and the issue becomes more serious if you have lost the photos. Therefore, it is best to count on recovery software. Suppose you have lost important pictures due to the Mac library opening issue. In that case, there is a simple solution called EaseUS Data Recovery Wizard for Mac, a data recovery software. With this useful software, you can recover your data without trying many complicated technical fixes.
- The main benefits of the EaseUS Data Recovery Wizard for Mac include its ability to support all devices and recover all types of picture formats without the user's expertise in handling software applications.
- The software also has advanced recovery features that help recover data files from unbootable Mac and restore them to cloud storage.
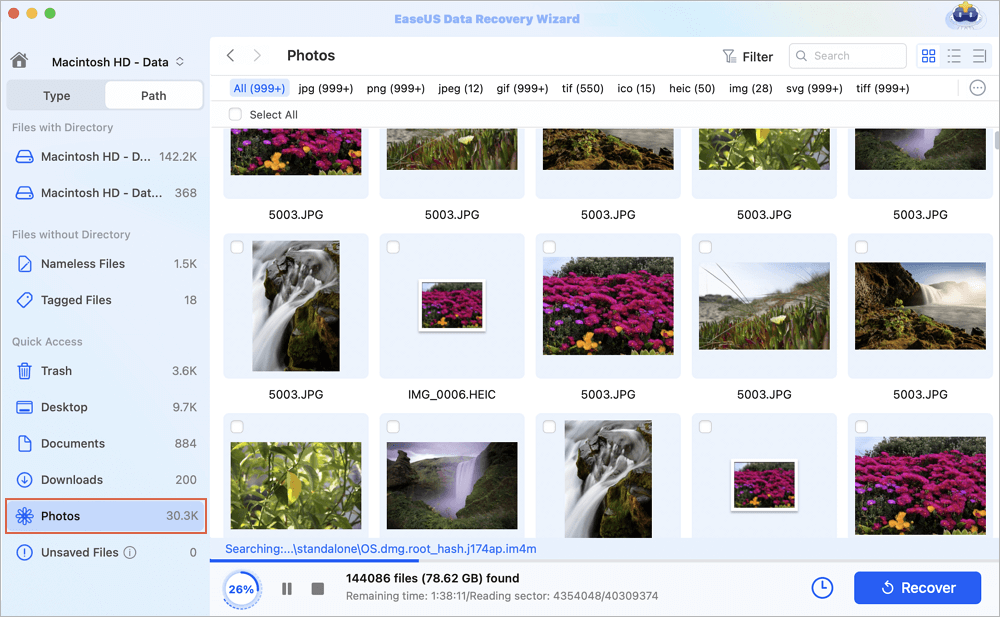
Step 1. Search for lost photos
Launch EaseUS Data Recovery Wizard for Mac, hover the mouse over the system drive where the Photos Library is, and click "Search for lost files".

Step 2. Find pictures from the library
After finishing the scan, click "Photos" under the "Path" tab. All your lost photos will list here.
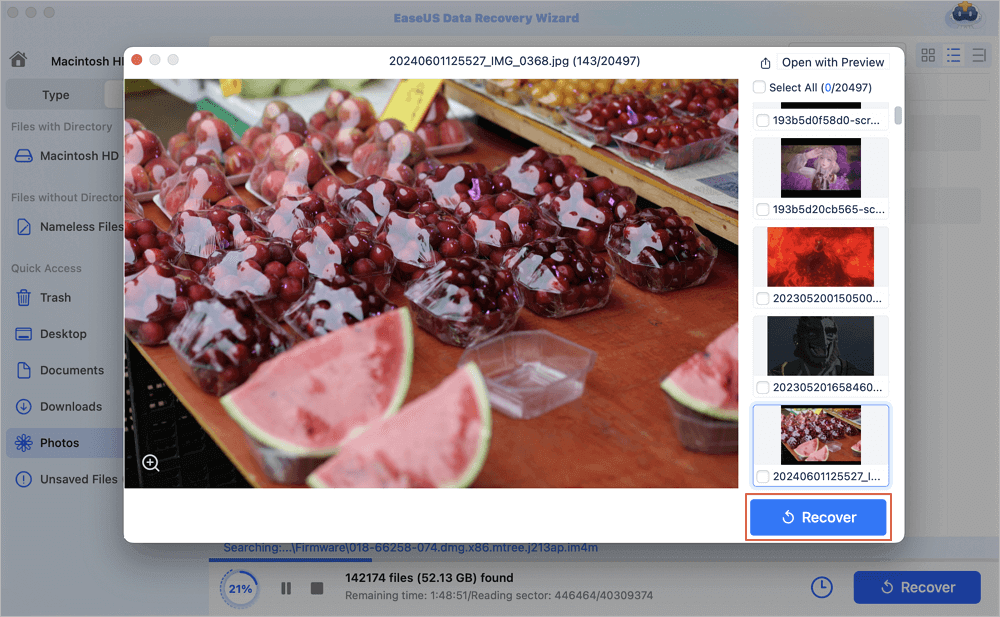
Step 3. Recover photos from the library
Double-click to preview the photo, select the right one and click "Recover" to save the images to another secure location on your Mac.
If you find the EaseUS Data Recovery Wizard for Mac useful, you can share it on your social media profile and help others find solutions to similar problems.
How to Fix the Library Could Not Be Opened on Mac
This article will give five simple tips to help you restore your Mac's photo library.
- 1. Try Your iCloud Photo Backup
- 2. Restore the Photos Library with Time Machine
- 3. Examine the Extensions
- 4. Create a System Photos Library
- 5. Establish a Primary Library
1. Try Your iCloud Photo Backup
You can save your whole collection of images in iCloud, which automatically saves them from your computer. You can also recover Photos from your Mac by accessing this iCloud storage.
Step 1. Holding down the Option key when launching "Photos" will create a new "System Photo Library".
Step 2. Make the "System Photo Library" your primary library.
Step 3. Click the "Create New" button to start creating a new library.
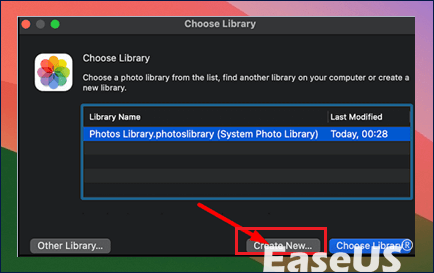
Step 4. After that, turn on iCloud Photos in the newly created library.
Your Mac computer will download all the pictures you have saved in the cloud to this new library without any error, and voila, you have restored all your lost pictures.
2. Restore the Photos Library with Time Machine
As an alternative to the previous method, you might use the Time Machine to restore your Photos Library and maintain your internal links this way.
Step 1. Select and open the Pictures folder by clicking on it.
Step 2. After that, start Time Machine and go to the backup's creation.
Step 3. Choose your photo library, then click "Restore" to get the photos back.
It's also possible that the permissions on the recovered Photos Library need to be adjusted and to do so, you need to follow the steps mentioned below.
Step 1. Navigate to the Photos Library.
Step 2. Choose the "Get Info" from File.
Step 3. Verify that you have read and write access to the library by checking the Info Panel.
Step 4. If you do not have read and write access, adjust the configuration.
Step 5. Choose the Photos Library by using the "Control" key.
Step 6. Click on "Display Package Contents".
Step 7. Verify that you have access privileges to all of your Library subfolders.
Step 8. Shut down the system and reboot your Mac device.
3. Examine the Extensions
File corruption may arise if any data extensions are renamed incorrectly, and this problem can be resolved by appropriately formatting the faulty file. You can move everything to an external hard drive, which is not case-sensitive, restore everything to your Mac, and then review the outcomes.

Photos App Is Unable to Open Photos Library? Recover from iCloud Drive
This post will introduce how to fix the Photos app is unable to open photos library error and how to recover photos from iCloud Drive on a Mac. Read more >>
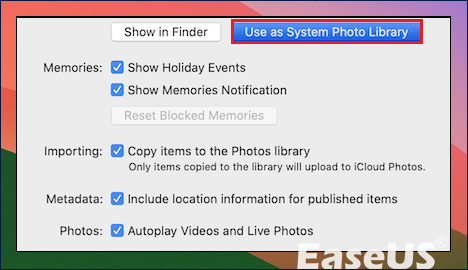
4. Create a System Photos Library
To fix the issue of the library not being opened, you must designate one of your picture libraries as the System Picture Library. The System Photo Library is the only library compatible with My Photo Stream, Shared Albums, and iCloud Photos.
Step 1. Press and hold the "Option" key to open "Photos".
Step 2. Select the library you wish to use for the System Photo Library designation.
Step 3. Once "Photos" has opened the collection, select "Preferences" from the menu bar.
Step 4. Select the "General" tab and press the button labeled "Use as System Photo Library."
5. Establish a Primary Library
If you're using an older version of macOS, you may follow the instructions below if you can't open the Mac library.
Step 1. Right-click on your "Photos Library" and then choose "Show Package Contents".
Step 2. In the former library, find the "Masters" folder.

Step 3. To establish a new library, select the folder and drag it onto the "Photos" icon on the "Dock."
Step 4. Go to the "Originals" folders if you're on macOS Catalina or a later operating system version.
Why Can't I Open the Mac Library
The Library folder on a Mac is hidden by default because Apple believes you usually don't require access. However, on rare occasions, you might need it for certain purposes. Access permission issues, visibility issues, and other problems usually cause this frustrating situation.
🗝️Turn on macOS Permissions
These are the steps to enable macOS permissions:
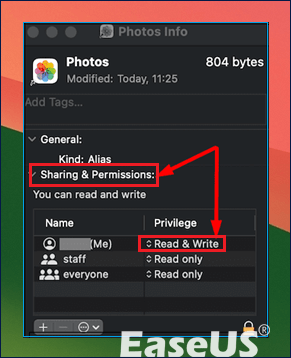
Step 1. Select the Library folder with a right-click.
Step 2. Click the menu item "Get Info".
Step 3. Extend the "Sharing & Permissions" section when the info panel appears.
Step 4. Your current account is shown at the top of the "Names" column in the "Sharing & Permissions" table, next to the "(Me)".
Step 5. In the "Privileges" column, click the associated dropdown section and choose "Read & Write."
🔓Enable Restricted Permissions
These are the steps to enable restricted permissions:
Step 1. To allow editing of restricted options, click on the Info panel's lower-right corner.
Step 2. Enter the password for your MacOS account.
Step 3. Press the gear symbol to see more choices.
Step 4. Depending on your MacOS version, click "Apply" to Make account name (Me) the Owner.
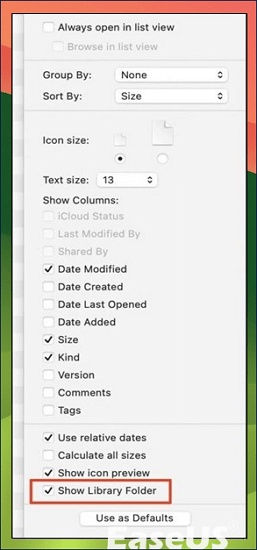
👁️🗨️Make the Mac's Library Folder Permanently Visible
These are the steps to follow:
Step 1. Ensure that "Finder" is open or that you are in a "Finder" folder.
Step 2. Click "Go" and select "Home" from the menu bar at the top.
Step 3. Use the Control/Right mouse button to select "Show View Options", or you can select "View" and then go to "Show View Options" from the menu bar at the top.
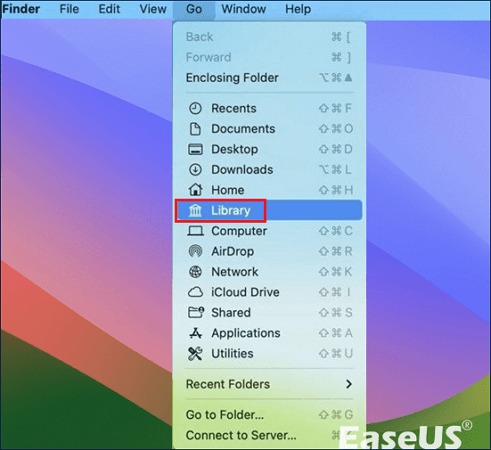
🔎Use Finder Go Menu
Step 1. Ensure that "Finder" is open or that you are in a Finder folder.
Step 2. Click "Go" from the top menu bar while holding the "Option" key.
Step 3. You will see the "Library" option; click on it to select "Library."
Final Thoughts
If you receive a notification that "the library could not be opened" when you open the Photos program on a Mac, the system cannot locate your Photo library. There might be several reasons for this scenario, and we have discussed those and the solutions above. This problem can also arise from memory integrity issues, which occur when System Integrity Protection, a security technology specifically designed to protect the Mac system from malicious software, fails.
All the steps mentioned above are fairly easy to execute; therefore, go through the above-mentioned steps carefully. However, if you have lost data while trying out these fixes above, use file repair software such as EaseUS Data Recovery Wizard for Mac to solve the issue in seconds. This software will fix your issues, restore all your beloved files to your Mac, and give you full access.
Library Could Not Be Opened FAQs
You may have multiple questions regarding the "the library could not be opened" issue, so we have answered the most pressing questions in just a few sentences.
1. Why can't I open my library folder on Mac?
The library folder in macOS contains user account settings, preference files, and other crucial information that keeps your Mac system operating properly. If any of these settings are altered or files get corrupted, you will have difficulty opening the library.
2. Why can't I open my photo library on Mac?
Most photo library problems occur when you use an older macOS version; upgrading your macOS can resolve the problem. You may also extensively take a few other steps discussed above to restore the pictures.
3. How do I fix my library on my Mac?
The most simple steps to fix the problem are to update macOS and delete the empty Library folder. After that step, restart the Mac in Safe Mode.
4. How do I fix my Photos library on my Mac?
To fix the photo library on Mac, press the "Command and Option" keys simultaneously and the "Repair" button. You can also go to "System Preferences" and choose "System Update" to perform an update check. After restarting Mac in safe mode, you must create a "System Picture Library" to open a new picture library.
Was This Page Helpful?
Jaden is one of the editors of EaseUS, who focuses on topics concerning PCs and Mac data recovery. Jaden is committed to enhancing professional IT knowledge and writing abilities. She is always keen on new and intelligent products.
-
EaseUS Data Recovery Wizard is a powerful system recovery software, designed to enable you to recover files you’ve deleted accidentally, potentially lost to malware or an entire hard drive partition.
Read More -
EaseUS Data Recovery Wizard is the best we have seen. It's far from perfect, partly because today's advanced disk technology makes data-recovery more difficult than it was with the simpler technology of the past.
Read More -
EaseUS Data Recovery Wizard Pro has a reputation as one of the best data recovery software programs on the market. It comes with a selection of advanced features, including partition recovery, formatted drive restoration, and corrupted file repair.
Read More
Related Articles
-
Mac Audio File Recovery: 3 Steps to Recover Deleted/Lost Audio Files
![author icon]() Daisy/Jun 17, 2026
Daisy/Jun 17, 2026 -
PDF File Recovery: How to Recover Deleted/Unsaved PDF Files on Mac
![author icon]() Daisy/Jun 17, 2026
Daisy/Jun 17, 2026 -
How to Recover Data from Crashed Hard Drive Mac
![author icon]() Dany/Jun 30, 2026
Dany/Jun 30, 2026 -
Seagate External Hard Drive Not Showing Up on Mac [Solved]
![author icon]() Jean/Jun 16, 2026
Jean/Jun 16, 2026