This article will guide you on how to mount a Seagate hard drive on a Mac if it is unmounted after inserting. Mounting a disk on a Mac means macOS offers a mount point to the disk so you can access its stored data. When you use a Seagate hard drive on your Mac to store essential data, you should ensure it's mounted successfully.
But sometimes, due to different causes, such as the common mounting error "Couldn't mount the Seagate disk (com.apple.DiskManagement.disenter error -119930868)" showing up in Disk Utility, the Seagate hard drive will be unmountable on your Mac.
Read on, and we will show you how to mount a Seagate hard drive on a Mac via Disk Utility and using the Terminal command line.
Recover Data from the Unmountable Seagate Hard Drive with Software
To avoid data loss when the Seagate hard drive can't be mounted on your Mac, consider using professional and trusted data recovery software, EaseUS Data Recovery Wizard for Mac, which can recover the stored data from a Seagate hard drive that is not mounted on a Mac due to Mac system corruption, incompatible file system on the hard drive, bad sectors, and more.
This powerful external hard drive recovery tool can recover data from an unmountable drive on a Mac in clicks. Its powerful data recovery capabilities remain effective in a wide range of situations when your Seagate hard drive faces a mount failure, including the common unmounting errors:
- Couldn't mount "Seagate hard drive". (com.apple.DiskManagement.disenter error 0)
- Couldn't mount "com.apple.Diskmanagement.disenter error 49218".
- com.apple.DiskManagement.disenter error 49244: Facing compatibility errors that prevent the connecting process of external drives.
EaseUS software can recognize almost all the file systems on an external hard drive and locate the recoverable data on it. Check out the following steps to perform a Seagate file recovery on a Mac:
Step 1. Search for recoverable files on the Seagate hard drive
Launch EaseUS Data Recovery Wizard for Mac, and select the Seagate external hard drive. Then, click "Search for lost files" to find the recoverable files on it.

Step 2. Filter and find files you want
After the scan, all file types will be presented in the left panel. Select the file type to find wanted files on your Seagate external hard drive.

Step 3. Recover data from the Seagate hard drive
Choose the file and preview it. Then, check the boxes before the files to select them, and recover them by clicking the "Recover" button.

Solution 1. Check the Connection Issues and Re-insert the Disk
Linking problems can also cause Seagate drives not to mount successfully when plugged into a Mac. In this case, you should check the USB cable and the USB port, wipe them, and plug the Seagate hard drive into your Mac again to check if it is mounted successfully.
Share this article on social media to help others learn how to mount a Seagate hard drive on a Mac and recover its stored data with software to avoid data loss.
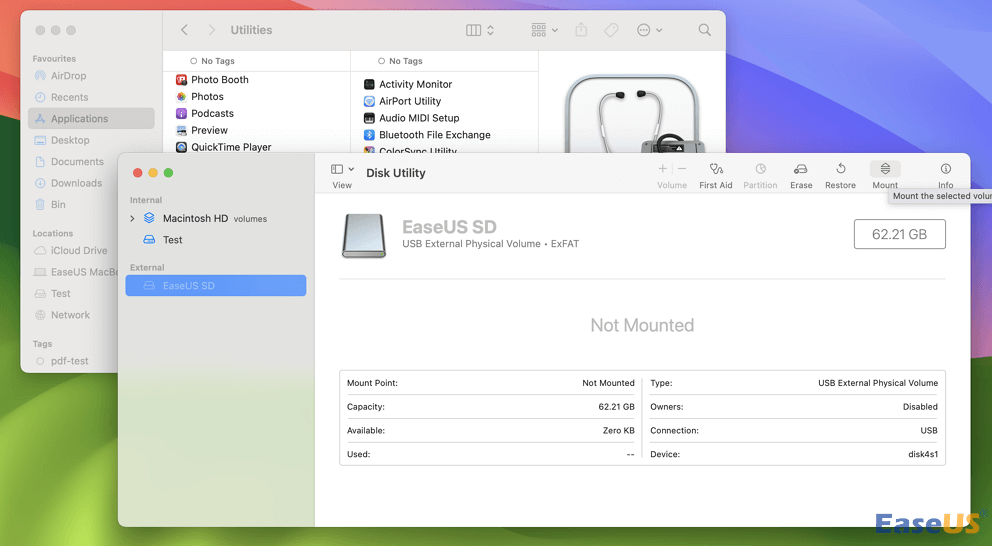
Solution 2. How to Mount a Seagate Hard Drive on a Mac via Disk Utility
A Seagate hard drive that is compatible with macOS will show up in Disk Utility; if the Seagate external hard drive is not showing up on a Mac, consider using the EaseUS software to recover files from it as soon as possible.
Here's how to mount a Seagate disk in Disk Utility:
Step 1. Navigate to "Finder > Applications > Utilities" and open "Disk Utility".

Step 2. Choose the Seagate hard drive in the left sidebar. If you can't find it, click the "Show All Devices" option first.

Step 3. Click "Mount" at the top menu. When your Seagate hard drive is mounted successfully, the "Mount" button will change to the "Unmount" button.
If this method is working, you can try the next method using a Terminal command to force-mount an external hard drive on a Mac.
Solution 3. Use Terminal to Mount a Seagate Hard Drive on a Mac
Mac Terminal allows users to mount a disk on a Mac with commands. Here's how to mount a disk using Terminal commands on your Mac:
Step 1. Navigate to "Finder > Applications > Utilities" and open "Terminal".

Step 2. Enter the command line diskutil list in the Terminal window. Hit "Enter".
Step 3. Type the following command line: diskutil mount /dev/disk1s2 or diskutil mountDisk disk_identifier.
Remember to replace the "identifier" with the unmounted disk identifier.
Final Words
This post introduces 3 effective ways to mount a Seagate hard drive on a Mac: re-inserting the Seagate hard drive, clicking the "Mount" button in Disk Utility, and using a Terminal command to mount a hard drive. Besides, we also provide an effective solution to rescue the stored data from the unmounted Seagate hard drive: running EaseUS Data Recovery Wizard for Mac to perform a Seagate hard drive recovery.
How to Mount a Seagate Hard Drive on a Mac FAQs
Here are questions people frequently ask when they search for how to mount a Seagate hard drive on a Mac. Take a look.
1. Why won't my Seagate hard drive show up on Mac?
The leading causes of a Seagate hard drive not showing on a Mac include virus attacks, accidental formatting, file system corruption, physical attacks on the hard drive, etc.
2. How do I manually mount a hard drive on a Mac?
You can manually mount a hard drive on a Mac by going to the "Disk Utility", choosing the hard drive that is not mounted by default on your Mac, and clicking the "Mount" button at the top menu.
Was This Page Helpful?
Brithny is a technology enthusiast, aiming to make readers' tech lives easy and enjoyable. She loves exploring new technologies and writing technical how-to tips. In her spare time, she loves sharing things about her game experience on Facebook or Twitter.
-
EaseUS Data Recovery Wizard is a powerful system recovery software, designed to enable you to recover files you’ve deleted accidentally, potentially lost to malware or an entire hard drive partition.
Read More -
EaseUS Data Recovery Wizard is the best we have seen. It's far from perfect, partly because today's advanced disk technology makes data-recovery more difficult than it was with the simpler technology of the past.
Read More -
EaseUS Data Recovery Wizard Pro has a reputation as one of the best data recovery software programs on the market. It comes with a selection of advanced features, including partition recovery, formatted drive restoration, and corrupted file repair.
Read More
Related Articles
-
How to Remove Write Protection from SD Card on Mac (2026 Updated)
![author icon]() Dany/Jun 30, 2026
Dany/Jun 30, 2026 -
How to Recover Deleted iWork Files on Mac
![author icon]() Jean/Jan 19, 2026
Jean/Jan 19, 2026 -
(Easy!) How to Delete Apps on Mac
![author icon]() Jean/Jun 30, 2026
Jean/Jun 30, 2026 -
Where Are Notes Stored on Mac | Verify or Recover
![author icon]() Dany/Jun 30, 2026
Dany/Jun 30, 2026