Photo corruption is a common issue for Mac users. If you edit or transfer photos incorrectly, the photos may be damaged. JPEG repair on Mac is very important because JPEG and JPG files are widely used. How do you know the JPEG photos are corrupted or damaged? When you are trying to open a JPEG photo on Mac, error codes appear. Or your JPEG photos can be opened but appear in a weird condition.
Before JPEG repair on Mac, it is better to know why your photos get damaged on Mac:
- 🔌Transformation failed. When you are using a card reader or a cable to copy JPEG photos to MacBook Air or Pro, it is possible that the connection suddenly breaks and the JPEG files are damaged.
- 👿Blackmail viruses and malware attacks. It is to encounter JPEG file corruption when viruses infect your computer. It is also possible to lose JPEG photos because of a virus attack.
- 🚫Bad sectors. The bad sectors can also cause corruption issues in your JPEG files, and you may encounter data loss when you find bad sectors on your hard drive.
- ❌Wrong file extension. When you cannot open JPEG photos successfully, it may be because the JPEG file extension is incorrect.
It is necessary for Mac users to learn JPEG repair because they may encounter this issue someday. To help you solve JPEG corruption quickly, we will provide five possible solutions to perform JPEG repair on Mac.
Method 1. Use Software to Perform JPEG Repair Mac
The simplest way to repair corrupted JPEG files on Mac is by applying professional repair software. It is the best method for most Mac users when encountering tricky issues like JPEG damage. EaseUS Fixo Photo Repair can help you repair damaged photos automatically, and it won't take too long to fix the corrupted photos on Mac.
This handy software supports photo repair; you'll need it when your JPEG files are deleted or damaged.
- You can repair corrupted JPEG, PNG, and GIF photos with the EaseUS Fixo Photo Repair.
- Support Mac video repair. This software can repair corrupted Mac MOV and MP4 video files cannot open.
- Repair corrupted RAW photos from Canon camera, Fujifilm camera, Sony, and Nikon camera.
Now, you can follow the written tutorial to repair JPG photos on Mac:
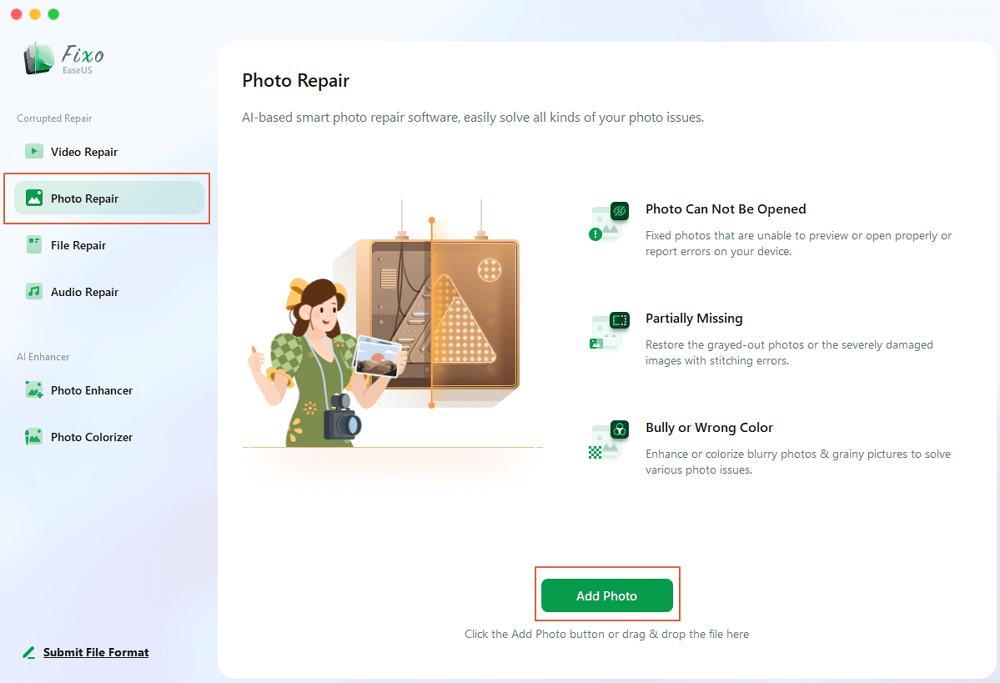
Step 1. Launch EaseUS Fixo on your Mac, go to the "Photo Repair" tab and click the "Add Photo" button to add the corrupted photos, including JPEG, PNG, JPG, CR3, CR2, NEF, NRW, RAF, etc.
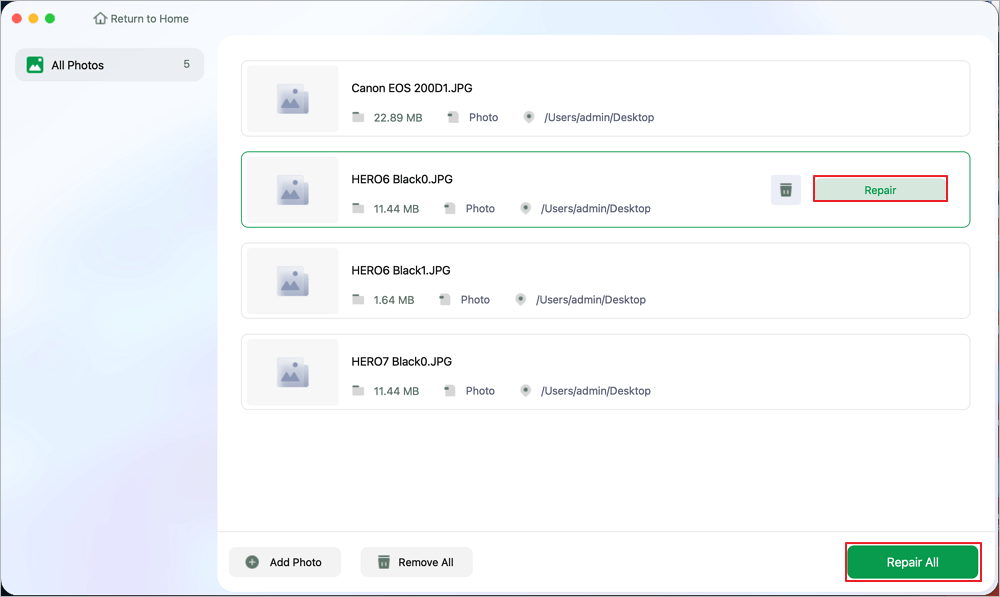
Step 2. Select a photo and click the "Repair" button to start the single photo repair process. If you want to repair all the corrupted photos, click "Repair All".
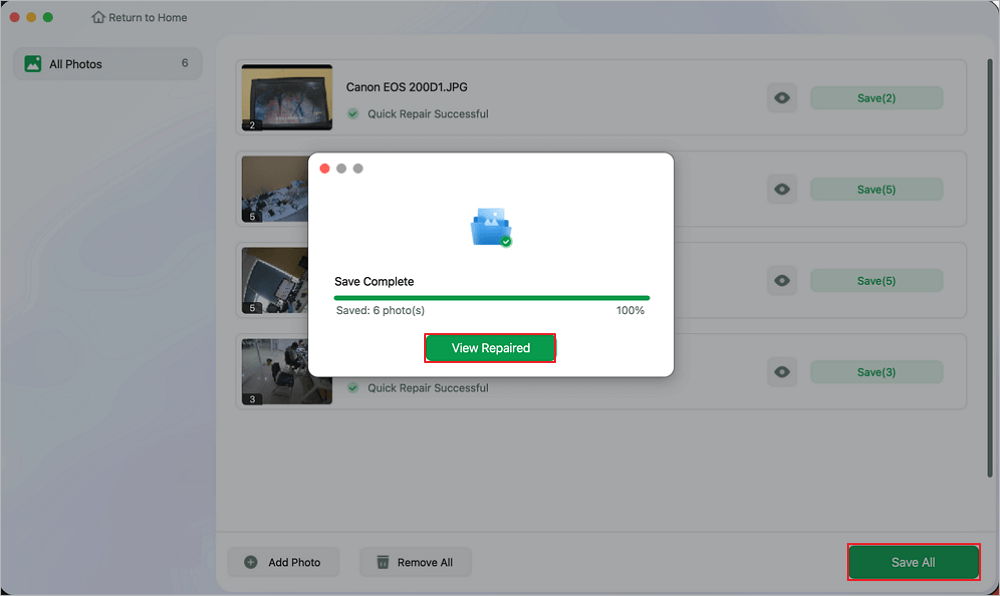
Step 3. Click on the eye icon to preview a repaired photo and click "Save" to save it on your Mac. Choose "Save All" to save all the repaired photos. Click "View Repaired" to locate the repaired folder.
Always remember to share this post if you find it helpful:
Method 2. Update Photos App to Open JPEG Photo
Sometimes all the JPEG photos on Mac cannot be opened with the macOS Photos application because the Photos app needs to update. You can open JPEG photos after updating your Photos app to the latest version. You cannot update the Photos application individually and must perform the latest macOS update.
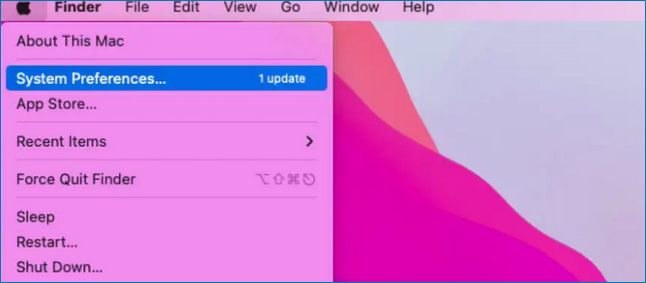
Step 1. To upgrade to the latest macOS version, click the "System Preferences" from the menu bar.
Step 2. Click "Software Update". You'll see a red notice if you need to update your Mac.
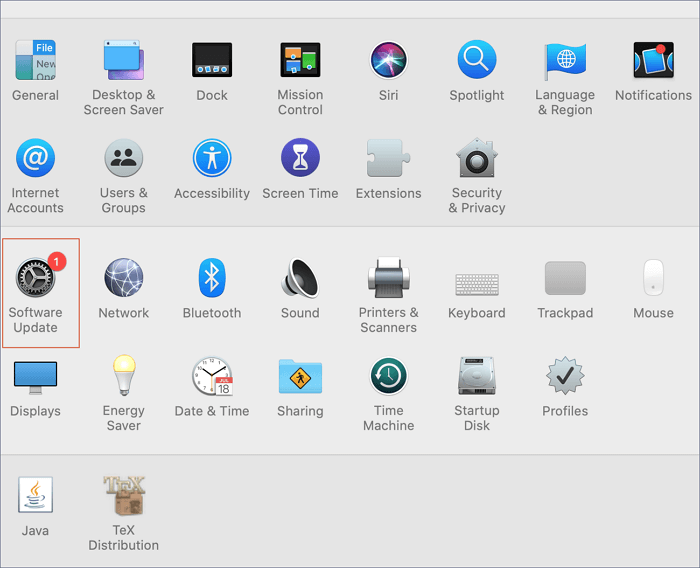
Step 3. Then it will automatically check the available updates. Click "Update Now" to upgrade to the latest macOS version.
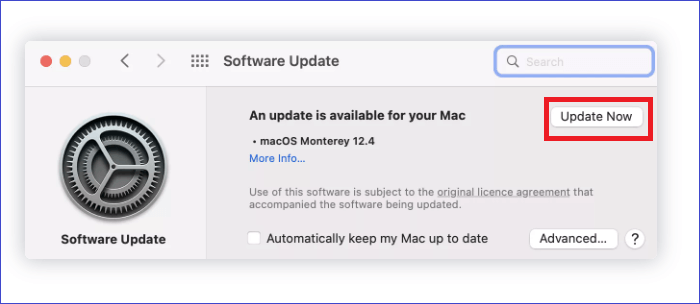
Step 4. After updating, you can reopen your JPEG files with the Photo app.
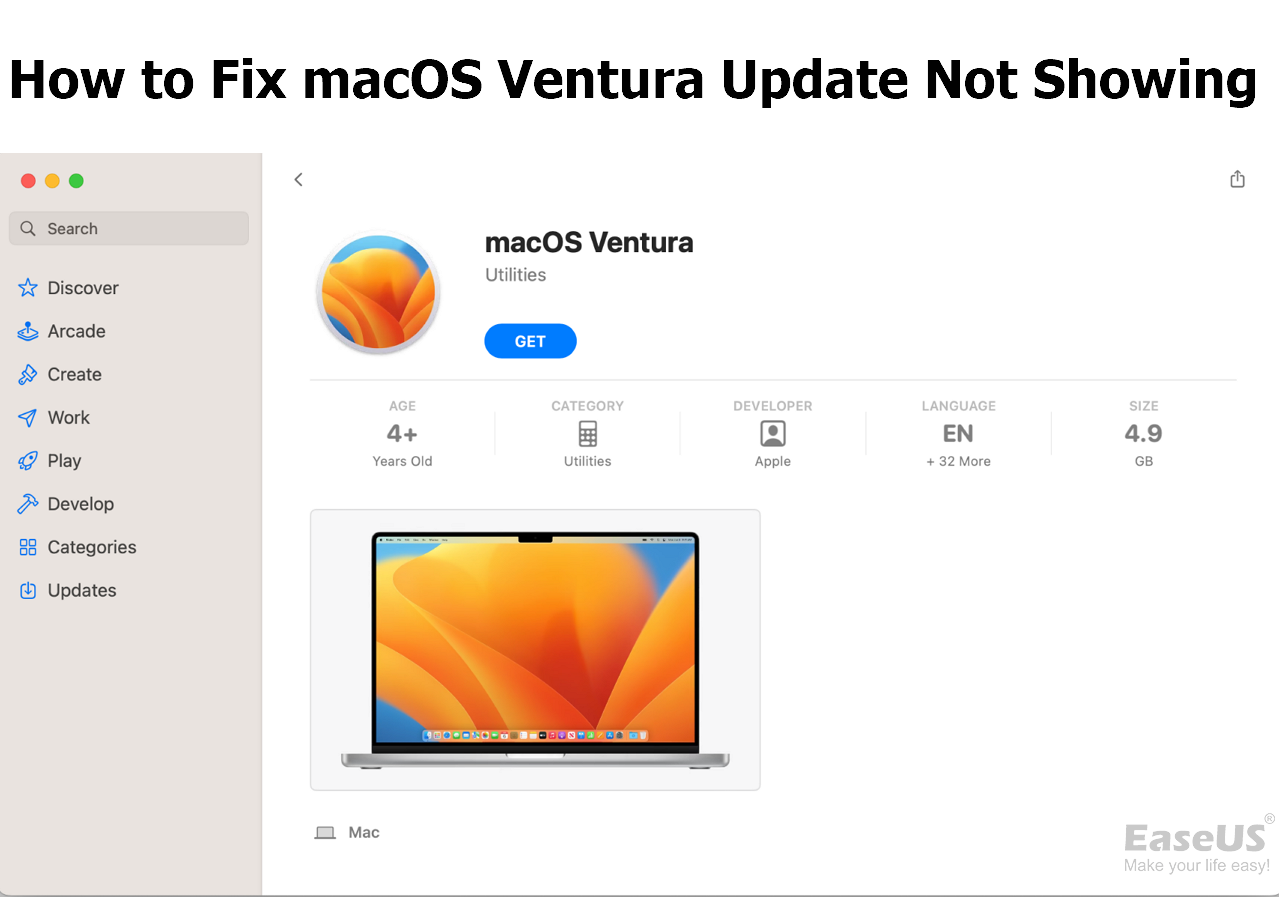
Note: If you encounter some upgrading issues, such as macOS updating not showing up in the software update, check this page to learn more:
Fix macOS Ventura Update Not Showing Up on Mac in 5 Proven Ways
When you need to upgrade from a lower macOS version to macOS Ventura, and you cannot find the Ventura update in Software Update, how to fix it?
Method 3. Change Photo Extension to Repair JPEG/JPG on Mac
If your JPEG photos are saved on Mac with the wrong file extensions, it is quite normal that you cannot open them. You may think they are damaged, but you just need to change the file extensions to the correct ones. Let us check how to change the photo extension to repair JPEG on Mac:
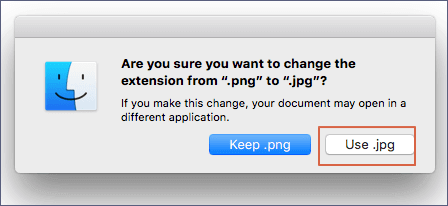
Step 1. Find the target folder and select the JPEG files that you cannot open.
Step 2. Right-click the JPEG photo and choose "Rename".
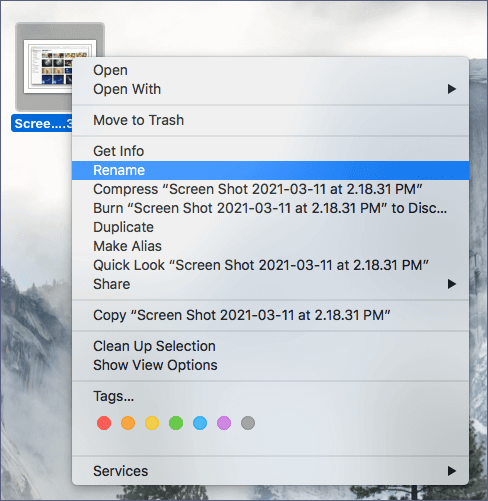
Step 3. Change the file extension to .jpg and confirm your changes.
Note: Don't forget to share this tutorial with other Mac users who encounter JPEG corruption, just like you!
Method 4. JPEG Repair on Mac with Photos Repair Library Tool
Many Mac users don't know that there is a Photo Repair Library tool on the macOS base system. It is a handy hidden utility to help users fix unexpected issues in Photo Library. Creating a backup of your Photo Library is better to avoid data loss.
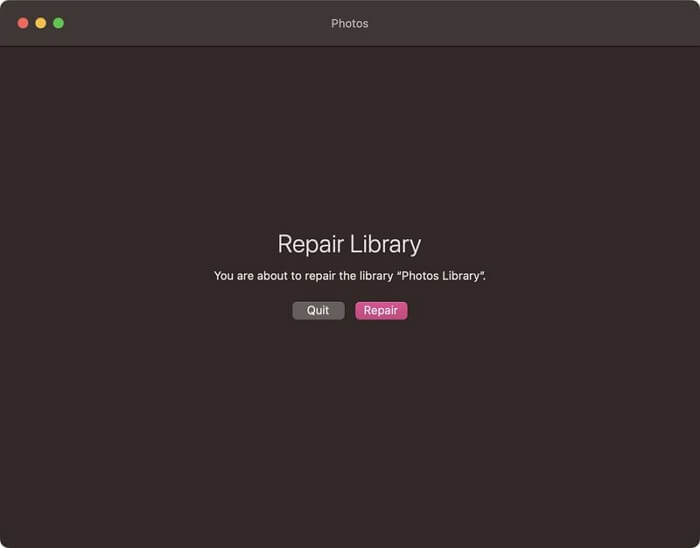
Step 1. Shut down the Photos application on Mac.
Step 2. Re-launch the Photos app and press Command + Option simultaneously.
Step 3. Click "Repair" to start the repair process of the Photo Library. Reopen your JPEG files when the repair is complete.
Method 5. Use Disk Utility to Fix JPEG Corruption on Mac
When you encounter some disk errors that cause your JPEG files cannot to be opened, you can fix disk errors in Mac Disk Utility. A repair option called First Aid can automatically check and fix disk errors. Let us find out how to repair errors with Disk Utility:
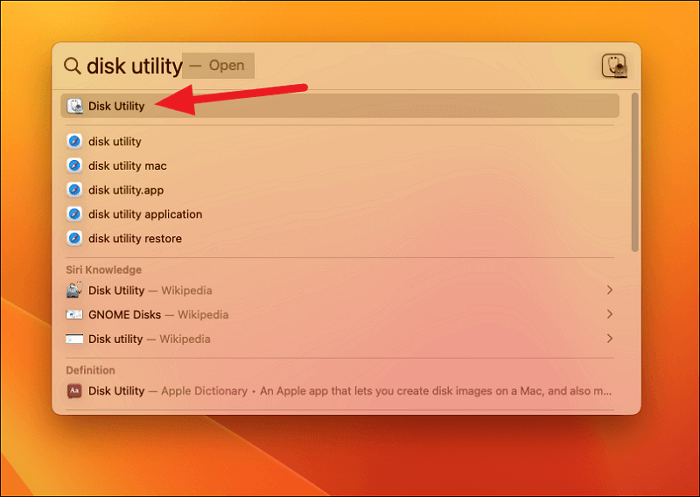
Step 1. Use the Spotlight to launch Disk Utility.
Step 2. After launching the Disk Utility, click the icon to show all devices on Mac.

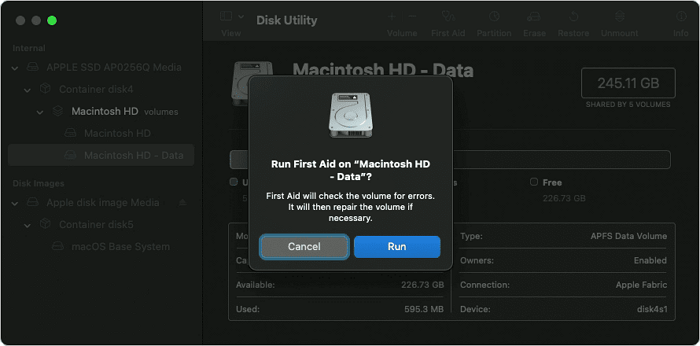
Step 3. Choose the disk on which the corrupted JPEG files are located.
Step 4. Activate First Aid and click "Run". Then, this utility will repair disk errors automatically.
LEARN MORE
After running First Aid on your disk, you should check the JPEG files to see if everything is going right or not. To learn more information about how to repair Mac disks with Disk Utility, you can click this link to learn more.
To Wrap Up
After learning the five methods, you should know how to repair JPEG/JPG photos on Mac now. The first method should be the most convenient method, repairing corrupted JPEG photos on Mac with EaseUS Fixo Photo Repair. If you haven't downloaded thisphoto repair tool yet, click the download button below for a free trial.
JPEG Repair Mac FAQs
There are four frequently asked questions and answers about JPEG repair on Mac:
1. How to repair JPEG by repairing Photo Library?
If you encounter JPEG corruption, repairing JPEG after repairing Photo Library on Mac is workable. You can use the following methods:
- 1. Use the Mac Photos Library Repair tool.
- 2. Rebuild Photo Library on Mac
- 3. Update Photo Library on Mac
- 4. Use Disk Utility to repair Photo Library
2. How to repair corrupted JPEG files on Mac?
You can use five methods to repair corrupted JPEG files on Mac:
- 1. Use software to perform JPEG repair on Mac
- 2. Update the Photos app to open JPEG photo
- 3. Change photo extension to repair JPEG/JPG on Mac
- 4. JPEG repair on Mac with the Photos Repair Library tool
- 5. Use Disk Utility to fix JPEG corruption on Mac
3. Why my JPEG photos cannot be opened on Mac?
Cannot open JPEG photos on Mac? There may have been specific problems or faults in your JPEG files, and there could be some faulty sectors on your storage device. Or there are times when unexpected power outages on your device impact your files.
4. How to recover deleted JPEG files on Mac?
EaseUS Data Recovery Wizard for Mac should be your first choice to recover deleted JPEG files on Mac:
- 1. Install the EaseUS JPEG recovery tool on Mac and select a folder or disk to scan.
- 2. You can choose photos to show all the deleted images on Mac.
- 3. Preview the lost JPEG files and click 'Recover'.
Was This Page Helpful?
Finley is interested in reading and writing articles about technical knowledge. Her articles mainly focus on file repair and data recovery.
Dany is an editor of EaseUS who lives and works in Chengdu, China. She focuses on writing articles about data recovery on Mac devices and PCs. She is devoted to improving her writing skills and enriching her professional knowledge. Dany also enjoys reading detective novels in her spare time.
-
EaseUS Data Recovery Wizard is a powerful system recovery software, designed to enable you to recover files you’ve deleted accidentally, potentially lost to malware or an entire hard drive partition.
Read More -
EaseUS Data Recovery Wizard is the best we have seen. It's far from perfect, partly because today's advanced disk technology makes data-recovery more difficult than it was with the simpler technology of the past.
Read More -
EaseUS Data Recovery Wizard Pro has a reputation as one of the best data recovery software programs on the market. It comes with a selection of advanced features, including partition recovery, formatted drive restoration, and corrupted file repair.
Read More
Related Articles
-
Fix Slow External Hard Drive on Mac
![author icon]() Jean/May 19, 2026
Jean/May 19, 2026 -
Undo Replaced File on Mac - Full Guide in 2026
![author icon]() Tracy King/Jun 30, 2026
Tracy King/Jun 30, 2026 -
Can't Access exFAT on macOS Sonoma? 5 Proven Ways to Fix It
![author icon]() Brithny/Jun 17, 2026
Brithny/Jun 17, 2026 -
4 Fixes to Recover Unsaved Photoshop Files Mac Now!
![author icon]() Tracy King/Jun 30, 2026
Tracy King/Jun 30, 2026