-
![]()
-
![]()
-
![]() How to Recover Deleted Call Recordings on Android [2026 Guide]
How to Recover Deleted Call Recordings on Android [2026 Guide] July 23,2026
 6 min read
 -
![]() [Answered] Where Do Deleted Files Go on PC/Mac/Android/iPhoneJuly 23,20266 min read
[Answered] Where Do Deleted Files Go on PC/Mac/Android/iPhoneJuly 23,20266 min read -
![]() How to Recover Permanently Deleted Files in Windows 11 [Top Methods]July 23,20266 min read
How to Recover Permanently Deleted Files in Windows 11 [Top Methods]July 23,20266 min read -
![]()
-
![]() Shift Delete Recovery: Recover Permanently Deleted Files NowJuly 23,20266 min read
Shift Delete Recovery: Recover Permanently Deleted Files NowJuly 23,20266 min read -
![]()
-
![]()
-
![]()
Page Table of Contents
| Workable Solutions | Step-by-step Troubleshooting |
|---|---|
| Where Do Deleted Files Go in Linux | Deleted files in Linux are typically sent to a particular folder called the "trash can"...Full steps |
| Recover Deleted Files with EaseUS | Install and Launch EaseUS Data Recovery Wizard > choose "Linux Recovery"...Full steps |
| Recover with Command Prompt | Install the TestDisk software device > recover deleted documents using TestDisk...Full steps |
Have you ever wanted to recover your files in Linux? Maybe you accidentally deleted an important file or folder and wished you had a simple solution to recover it. A large number of users install Linux without even realizing it. Their computer works better for various reasons, such as better battery life and no crashes, at least the perception is about using Linux. Often these users (or their friends) will accidentally delete files they don't realize were ever on their system or didn't know how to back up. That's where this guide comes into play. This article will show you the step-by-step method to recover your data in Linux.
Where Do Deleted Files Go in Linux
When you delete a file or a directory in Linux, that doesn't mean it's gone forever. There are a few layers of folders where the deleted files can go before being erased from your system entirely.
They may be corrupt, outdated, sensitive, or user-created. Whatever the reason for deletion, deleted files and folders can still occupy space on your hard drive after deletion (even if it's "empty").
Deleted files in Linux are typically sent to a particular folder called the "trash can". The folder is available as "TRASH" in the system and can not only be accessed by enabling the hidden folder view option.
If you want to access the TRASH folder in Linux, you can use the following command:
sudo su
cd /.TRASH
ls -l
You can also directly access them by navigating to ~/. local/share/Trash/files/
However, depending on how your system is configured, they may also be permanently deleted.
How to Recover Deleted Files from Ext4 Linux
Learn how to recover deleted files from Ext4 Linux here. EaseUS data recovery software makes it easy to get back Linux data.
How to Recover Deleted Files in Linux with Data Recovery Software
There are several methods and software tools you can use to scan your hard drive for data, but the situations differ. These situations all have their requirements that may make the whole process more complicated than it needs to be.
You can restore deleted files or directories in Linux using EaseUS Data Recovery Wizard. It is designed with the primary goal of recovering all types of data loss. Data loss usually occurs accidentally deleted files, programmers, viruses, and other damaging factors that may lengthen the recovery time. Using this recovery software, you can save all your important documents, pictures, videos, and additional valuable information from being lost forever.
EaseUS is compatible with Linux in all versions, including MX Linux, Manjaro, Linux Mint, Ubuntu, Debian, etc. With this program, users can recover deleted files from Linux on Windows PC. In simple words, you can connect the Linux drive to a Windows PC, and then recover files.
Here is the list of things you can recover using EaseUS Data Recovery Wizard:
- Deleted photos, videos, documents, audio, and other files.
- Formatted or Crashed hard drive
- Unbootable Windows PC or Laptop
To Take benefits of the features of EaseUS and to restore your lost files for free, you can download EaseUS. You can access free recovery from various data loss situations and preview before recovery by downloading. Follow the steps listed below to recover your deleted files in Linux with EaseUS Data Recovery software:
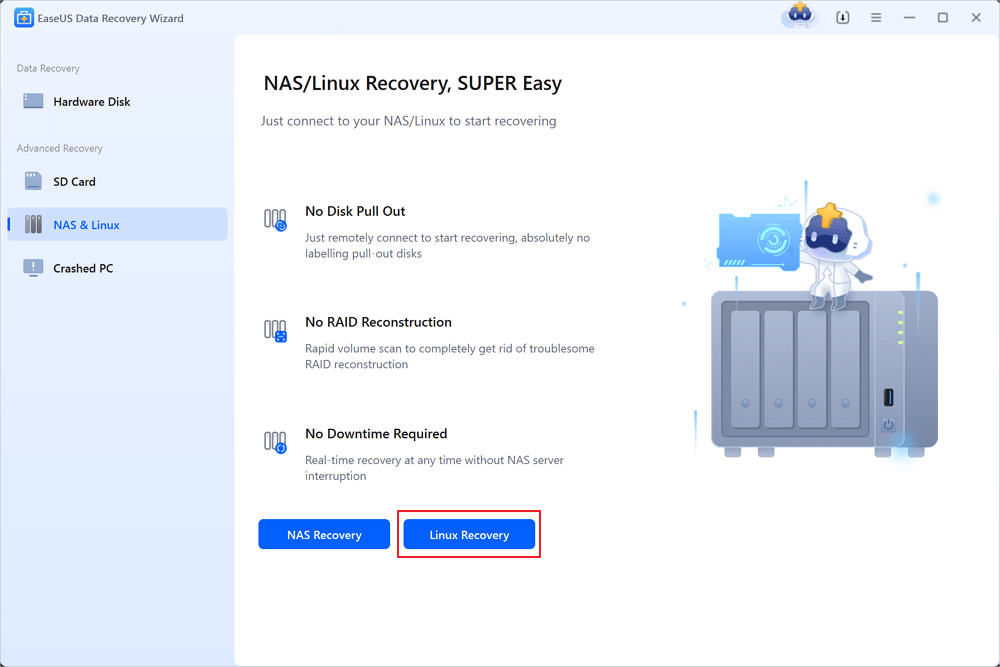
Step 1. Install and Launch EaseUS Data Recovery Wizard on your Windows PC. Choose "NAS & Linux" on the left panel and click "Linux Recovery". This software will detect your IP and Port automatically. You need to input the user name and password. If the IP address or Port is not right, you can correct it manually.
Step 2. After successfully connecting to your Linux device, select the deleted files you want to recover. You can click on the filter to display only the file types you want. If you remember the file name, you can also search in the search box, which is the fastest way to find the target file.

Step 3. You can preview the scanned files first. Then, select the target data and click the "Recover" button to restore lost files in Linux.

How to Recover Deleted Files in Linux Using Command Prompt
While one document is accidentally deleted, the lsof command can provide life-saving assistance to recover it. A duplicate is generated of the deleted report before it may be closed because it becomes shut by using the application conserving it open after it is accidentally deleted. Let's see how:
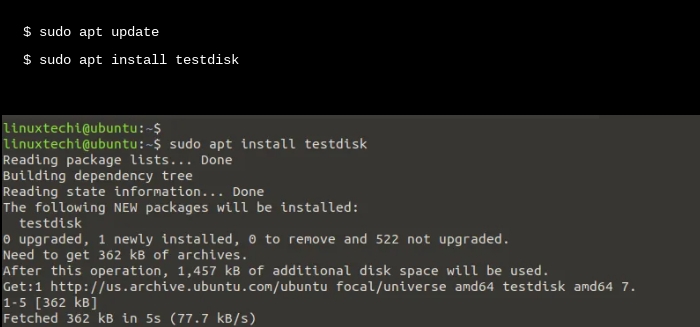
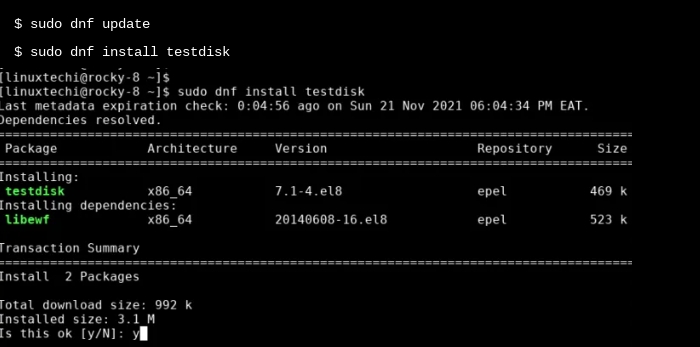
Step 1. Installing the TestDisk software device.
Step one is to put in TestDisk. To achieve this on Debian/Ubuntu distributions, replace the package deal lists and set up TestDisk.
Images from: https://www.linuxtechi.com/how-to-recover-deleted-files-in-linux/
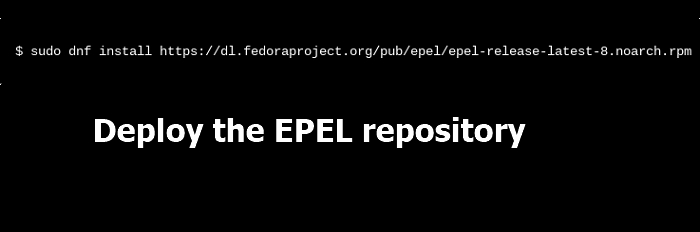
If you are running CentOS eight, RHEL 8, Rocky Linux eight, and AlmaLinux eight, you want to, first, deploy the EPEL repository.
Next, update the gadget and deploy the check disk as follows.
As soon as set up, you may verify that Testdisk is set up by checking the version of TestDisk as follows.
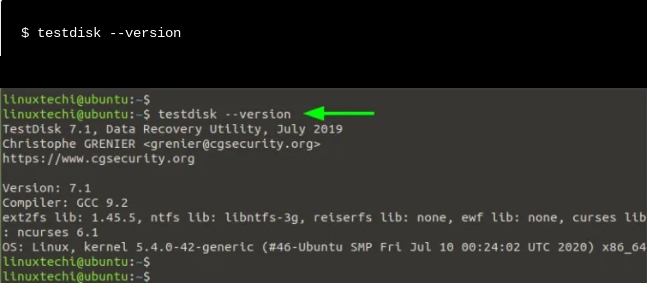
From the output, you may see that we have set up TestDisk 7.1. Now, allowing you to simulate how you could recover deleted files from pressure.
Step 2. Recover deleted documents using TestDisk.
To illustrate how you may recover documents deleted from a Disk, we've deleted files from a USB drive. The papers are not even within the trash bin, and our goal is to recover them.
You can have a similar setup where you've deleted a few files in your pen drive/ USB force. To get better them, observe along.
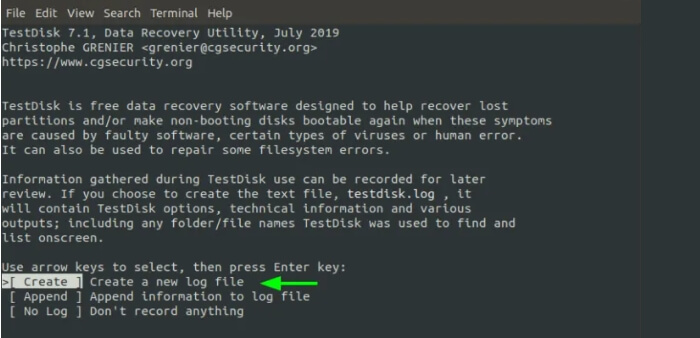
in your terminal, run the subsequent command to launch TestDisk
$ testdisk
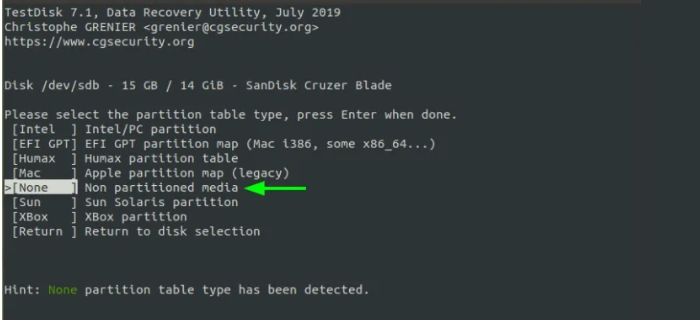
Being a command-line device, TestDisk provides a list of options as shown. By default, it highlights the maximum logical chance to take as you get began out. So, press input on the "Create" choice.
The following screen offers you the installed volumes. However, to view all the disks and walls, you need sudo permissions.
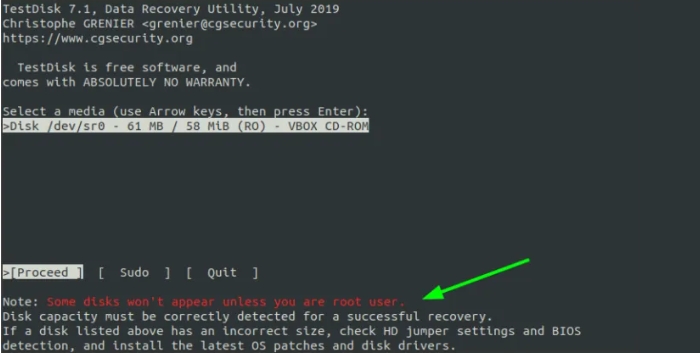
Consequently, using the forward arrow key, pick "Sudo" and press input.
Observe: To avoid the hassle, you can genuinely run the testdisk utility as a sudo person from the terminal.
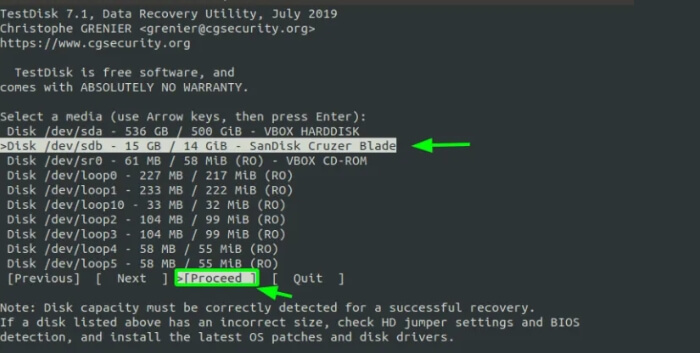
Now, this time around, all the setup partitions could be displayed. Choose your selected force. In our case, we have decided on our detachable USB power. Using the arrow forward key, choose "continue" and press input.
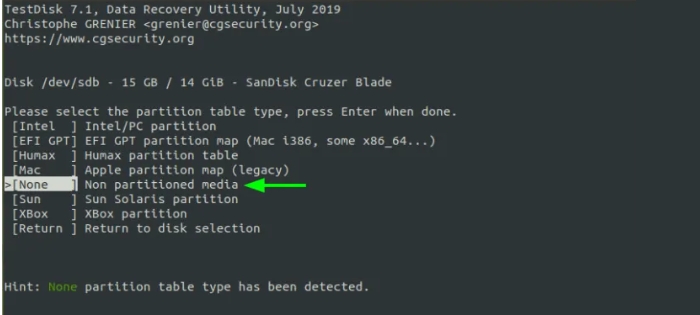
TestDisk robotically detects the partition desk kind. For non-partitioned disks, including USB drives, a non-partitioned media kind may be detected. So, press input.
Your removable force's partition table could be indexed as indicated. At the lowest, pick "Undelete".

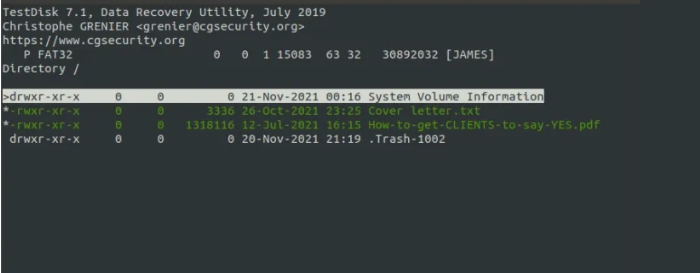
TestDisk scans your force for undeleted documents and highlights them in purple.
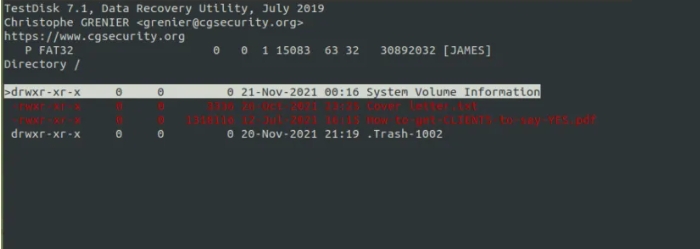
To recover these files, you want to choose them first. So, scroll down and quite the entire colon (:) for every choice. You may discover that every record is highlighted in green.
Now, to copy the files, press "SHIFT + C" for a capital "C". You will then be able to choose your desired location to store the files. In this case, we have chosen to save the documents in the "Public" listing. Next, decide on the directory and press input.
The modification dates of the target listing can be displayed. You can pick out any choice and, once again, press input.
TestDisk will notify you that the files have been successfully copied.
To confirm that the files were copied, head over to the vacation spot listing and verify that the documents exist.
The recovered documents are saved with root permissions and ownership. You may change the permissions with the chown command.
To go out TestDisk, press "q" again and again until you ultimately pass again to your bash shell.
How to Recover Linux Partition in Windows
EaseUS data recovery software fully supports recovering lost, deleted and formatted data from the ext2, or ext3 Linux partition.
Conclusion
Recovering the accidentally deleted files is very significant; it might prove life-saving sometime. This article covers all the information to recover your data in Linux using EaseUS and Command prompt. It is a quick and easy option for file recovery. With this software, you can recover files in a fraction of the time it would take using other methods.
Was this page helpful?
-
Cedric Grantham is a senior editor and data recovery specialist of EaseUS. He mainly writes articles and how-to tips about data recovery on PC and Mac. He has handled 10,000+ data recovery cases and is good at data recovery of NTFS, FAT (FAT32 and ExFAT) file systems, and RAID structure reorganization. …


20+
Years of experience

160+
Countries and regions

72 Million+
Downloads

4.9 +
Trustpilot Score


