Page Table of Contents
Key Takeaways: How to install SSD as the primary drive
This EaseUS blog will outline an ultimate guide on how to install SSD as the primary drive with step-by-step guides, including installing SSD into the computer, transferring OS to SSD, and seting SSD as the primary in Windows.
An Overview of the Primary Drive
The primary drive, also called the boot drive, is the drive in the computer for storing and accessing the operating system, software applications, and user data. It is typically an HDD or SSD that provides the main storage for the computer. The primary drive plays a crucial role in the overall performance and efficiency of the system, as it determines how quickly data can be read and written.
So, it is important to choose a reliable and high-capacity primary drive to ensure smooth and efficient operation of the computer. SSD outperforms traditional HDD in many aspects, including faster read and write speed, longer service life, more durable exterior design, more flexible usage, etc.
This is why many users prefer to install a new SSD as the primary drive instead of using the old hard drive. But they may wonder: How do I change my main drive to SSD? Don't worry; keep reading, and follow the steps below to install a new SSD as the primary boot drive. We'll also show you how to set the old hard drive as the secondary storage drive.
How to Install SSD as the Primary Drive
Installing SSD as the primary drive is a wise decision to upgrade your computer performance, improve speed, and get a better user experience. However, the process of installing SSD as the primary drive is not as simple as just adding a new disk. It involves three main steps: install SSD to your computer, migrate OS to the new drive, set SSD as the boot drive, and boot from it.
For those who have little computer knowledge, any mistake during the process will result in serious problems such as computer failure to start up or data loss. To avoid these mistakes, please ensure to follow the steps carefully.
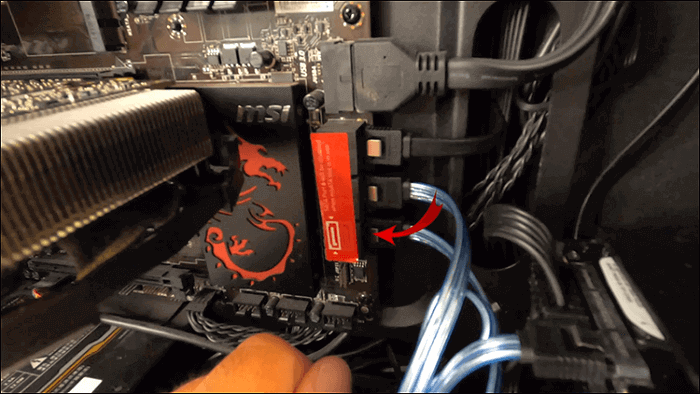
Step 1. Prepare a new SSD and install it into your computer
First of all, you need to prepare an SSD that is compatible with your computer and pay attention to the SSD's format, interface, type, size, etc. In addition, ensure the SSD has enough storage capacity to accommodate all data saved on the old hard drive.
Then, install the SSD into the PC. Here, we can divide it into two cases:
- 1️⃣If your computer has an extra SSD slot, just use the screwdriver to remove the computer case correctly> locate the SSD slot > put SSD into the slot properly.
- 2️⃣If your computer only comes with one disk slot, you need to find an SSD adapter or USB-to-SATA cable to connect your SSD to your computer.
Share the post on social media to help others install SSD as the primary drive effectively.
Step 2. Clone OS from the original hard drive to the SSD
It is a waste of time if you reinstall the Windows operating system from scratch when you have a new SSD on your computer. To save time and effort, migrating OS to the new SSD is the easiest way to help you do it without any data loss.
EaseUS Disk Copy is a reliable OS migration tool to assist you in cloning the operating system from the old hard drive to SSD without any boot issue; It will automatically select all system-related files and boot sectors on any partition of your old hard drive and create a 1-to-1 copy of your Windows OS. Besides, you can adjust the SSD layout while cloning based on your preference. Its sector-by-sector clone feature lets you selectively copy the data to the target disk. If the target SSD doesn't have enough storage, the software will notify you to avoid data loss. What are you waiting for? Download it now and move OS to SSD with the guide.
Windows 11/10/8/7
📚Step instruction to migrate Windows OS to SSD:
Before cloning:
- Install or connect the destination disk that you want to move OS to your computer, and make sure it can be appropriately recognized.
- Ensure the target HDD or SSD has enough capacity to accommodate your system files.
Step 1. Launch EaseUS Disk Copy and choose System Mode.
Install EaseUS Disk Copy system migration software on your computer, launch it, and choose System Mode. EaseUS Disk Copy will select the current system you use by default, including all system-related files and boot sectors.
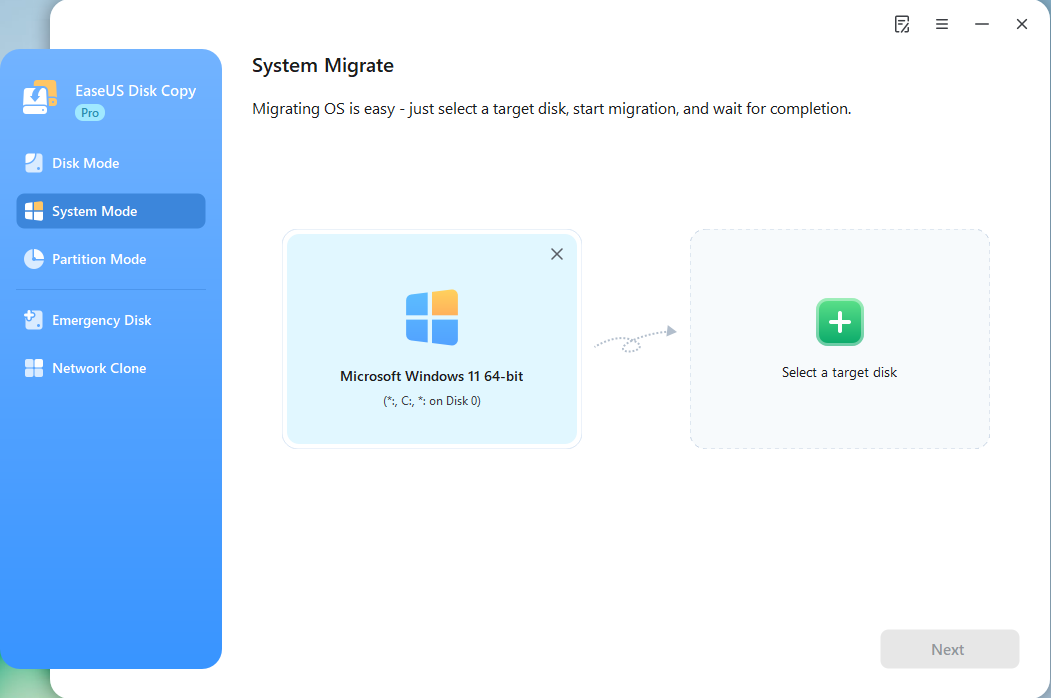
*If you apply dual-boot system, you can select another system by yourself.
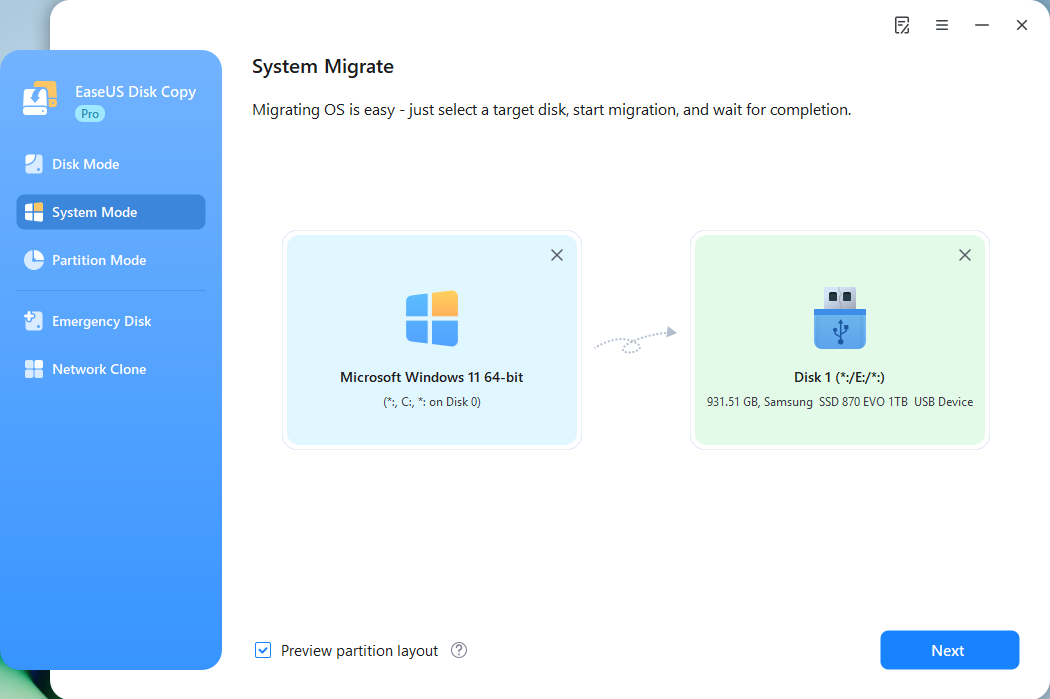
Step 2. Select the target HDD/SSD.
Choose the destination HDD/SSD that you want to move OS to.
Step 3. Adjust target disk layout.
Specify the target layout as your preference. You can choose among:
- Autofit the disk: makes some changes by default on the destination disk layout so that it can work at its best.
- Copy as the source: create a 1-to-1 copy of your source disk, the layout is the same as the source disk.
- Edit disk layout: allows you to manually resize/move the partition layout on this destination disk.
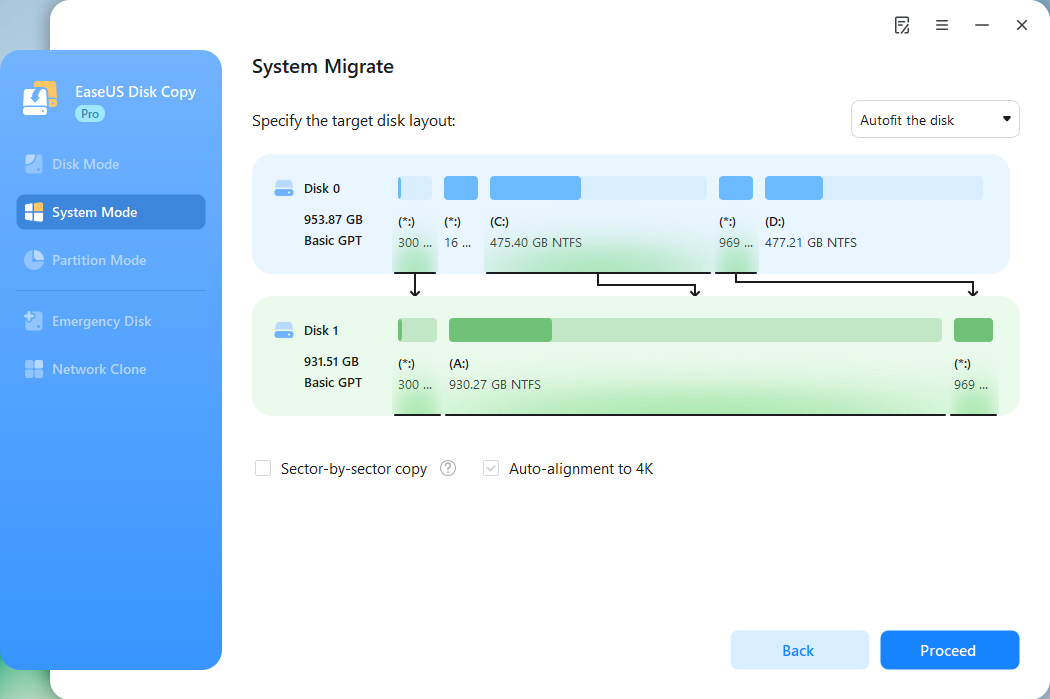
*The option Auto-alignment to 4K will be checked automatically to optimize the performance of your SSD.
Step 4. Start cloning OS.
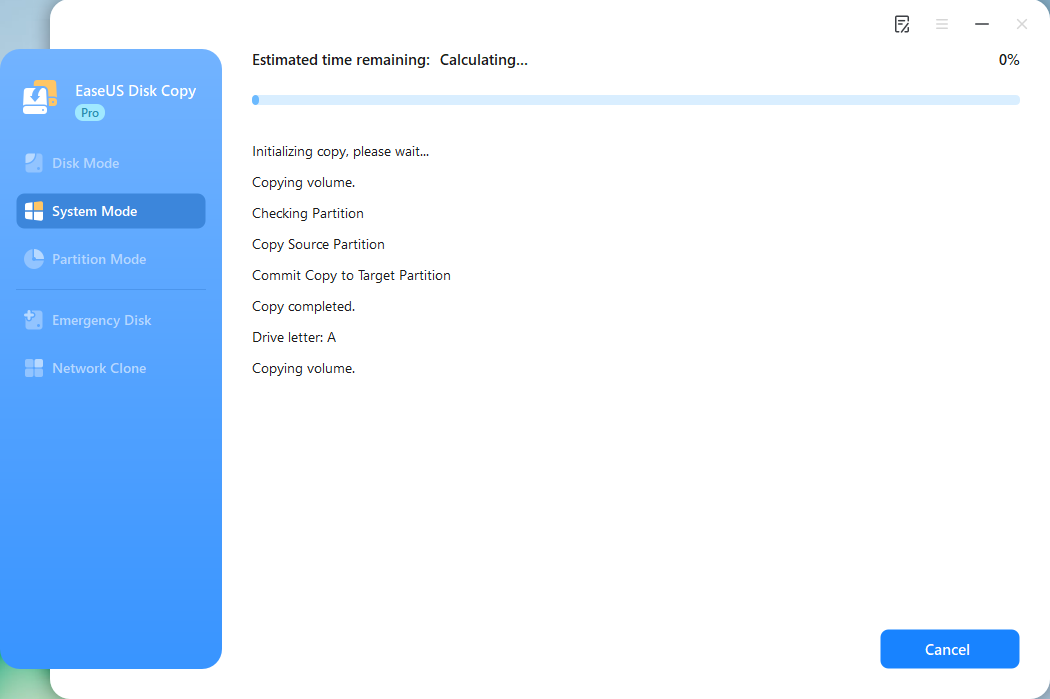
Click Proceed, and a message will appear, warning you that data will be lost. Confirm the message by clicking Continue. Now, it will start cloning OS to the new disk.
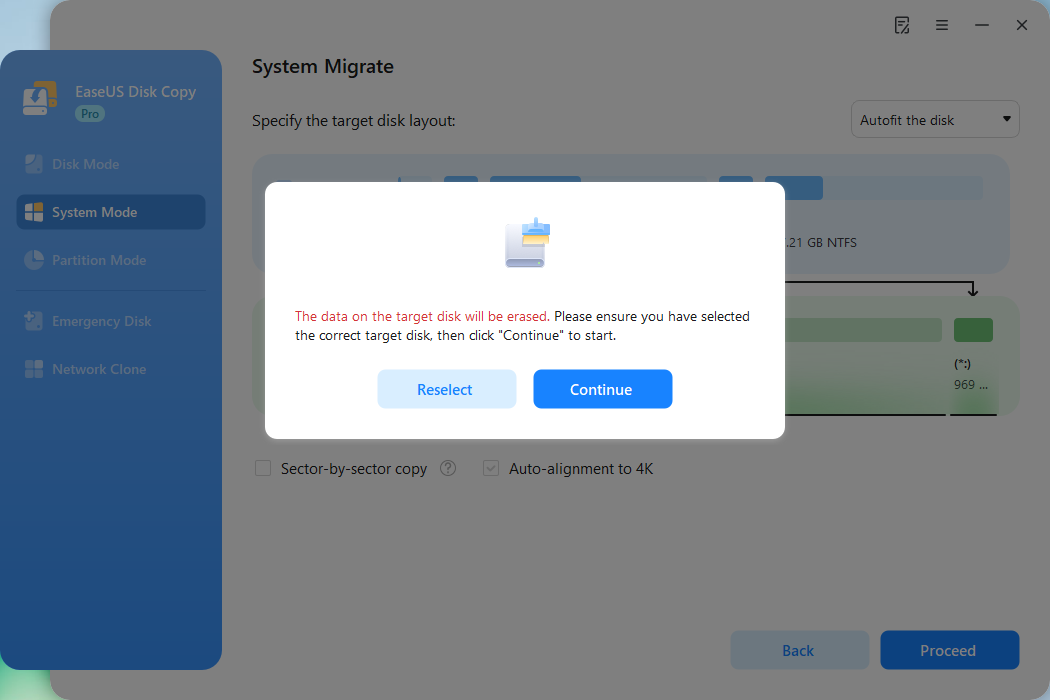
Now, it will start cloning OS to the new disk.
Step 3. Set SSD as the primary drive and boot PC from it
After cloning, you can now set the SSD with the cloned OS as the primary drive and boot your computer from it. Follow the steps below:
❤️Note: if your PC has only one slot for disk, you need to:
- Disconnect the SSD from you computer
- Replace the old hard drive with the new SSD
Step 1. Restart PC and press F2/F12/Del keys to enter BIOS.
Step 2. Go to the boot option, change the boot order, setting OS to boot from the new SSD.
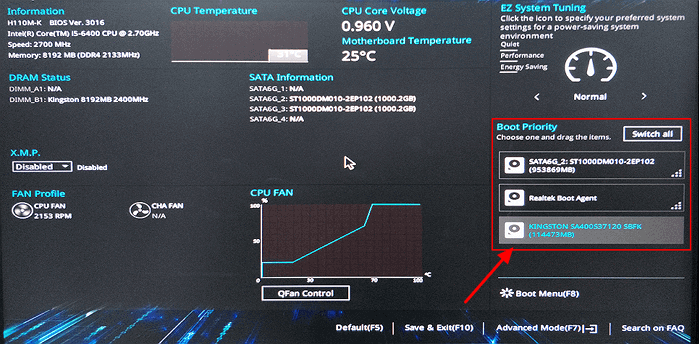
Step 3. Save the changes, exit BIOS, and restart the PC, and wait patiently to let the computer boot up. After this, you can use the new SSD as your OS disk.
It is often the case that HDD comes with larger storage capacities and lower prices, so many users prefer to keep and use the original hard drive as the secondary storage drive. How to do that? You can format the old hard drive with the following steps and save music, files, videos, personal information, and applications on this drive.
- Click the Windows button - Control Panel - System and Security - Administrative Tools.
- Right-click Computer Management and open it.
- Under the Storage option on the left panel, click Disk Management.
- When Disk Management is open, select the partition you want to format, right-click it, choose the "Format" option.
- Wait for the process to finish.
Share the post on social media to help others install SSD as the primary drive effectively.
Final Words
Installing an SSD as the primary drive can greatly improve system performance. By following the steps outlined in this guide, you can successfully set up your SSD for optimal use. For a seamless migration of your operating system and data to the new SSD, we recommend using EaseUS Disk Copy, a reliable and user-friendly tool that simplifies the process and ensures a smooth transition.
Windows 11/10/8/7
Install SSD as Primary Drive FAQs
1. Should I use a SSD as my primary drive?
Yes, using an SSD as your primary drive is highly recommended. SSDs offer significantly faster read and write speeds compared to traditional hard disk drives, resulting in quicker boot times, faster application loading, and overall improved system performance. Additionally, SSDs have no moving parts, making them more reliable and durable than HDDs.
2. How do I format my SSD for main drive?
To format your SSD as the main drive, you can use the built-in Disk Management tool in Windows. Simply locate the SSD in the Disk Management utility, right-click on it, and select the option to format. Choose the file system (NTFS for Windows) and follow the on-screen instructions to complete the formatting process.
3. Why isn't my SSD showing up in Disk Management?
If your SSD is not showing up in disk Management, it could be due to a few reasons:
- SSD is not properly connected to the computer
- The SSD could be faulty
- The drive may need a driver update,
- Compatibility issue with your system.
Try checking the connections, updating drivers, or testing the SSD on another computer to troubleshoot the issue.
-
Updated by
![]()
Larissa
Larissa has rich experience in writing technical articles and is now a professional editor at EaseUS. She is good at writing articles about data recovery, disk cloning, disk partitioning, data backup, and other related knowledge. Her detailed and ultimate guides help users find effective solutions to their problems. She is fond of traveling, reading, and riding in her spare time.…Read full bio