-
![]()
-
![]() Data Recovery Software with Original File Names [Full Guide in 2026]
Data Recovery Software with Original File Names [Full Guide in 2026] July 23,2026
 6 min read
 -
![]() How to Fix Excel Found Unreadable Content Error (Easy Guide)July 23,20266 min read
How to Fix Excel Found Unreadable Content Error (Easy Guide)July 23,20266 min read -
![]() Look! 5 Methods to Fix PNG Files Not Opening in Windows 10/11July 23,20266 min read
Look! 5 Methods to Fix PNG Files Not Opening in Windows 10/11July 23,20266 min read -
![]()
-
![]()
-
![]() How to Recover Video File When Power Off Before Stopping RecordingJuly 23,20266 min read
How to Recover Video File When Power Off Before Stopping RecordingJuly 23,20266 min read -
![]() How to Fix Steam Uninstalled My Game Automatically [PC Solutions]July 23,20266 min read
How to Fix Steam Uninstalled My Game Automatically [PC Solutions]July 23,20266 min read -
![]() How to Empty Recycle Bin on Windows 10 (On a Schedule)July 23,20266 min read
How to Empty Recycle Bin on Windows 10 (On a Schedule)July 23,20266 min read -
![]() Free Download Professional Data Recovery Software with CrackJuly 23,20266 min read
Free Download Professional Data Recovery Software with CrackJuly 23,20266 min read
Page Table of Contents

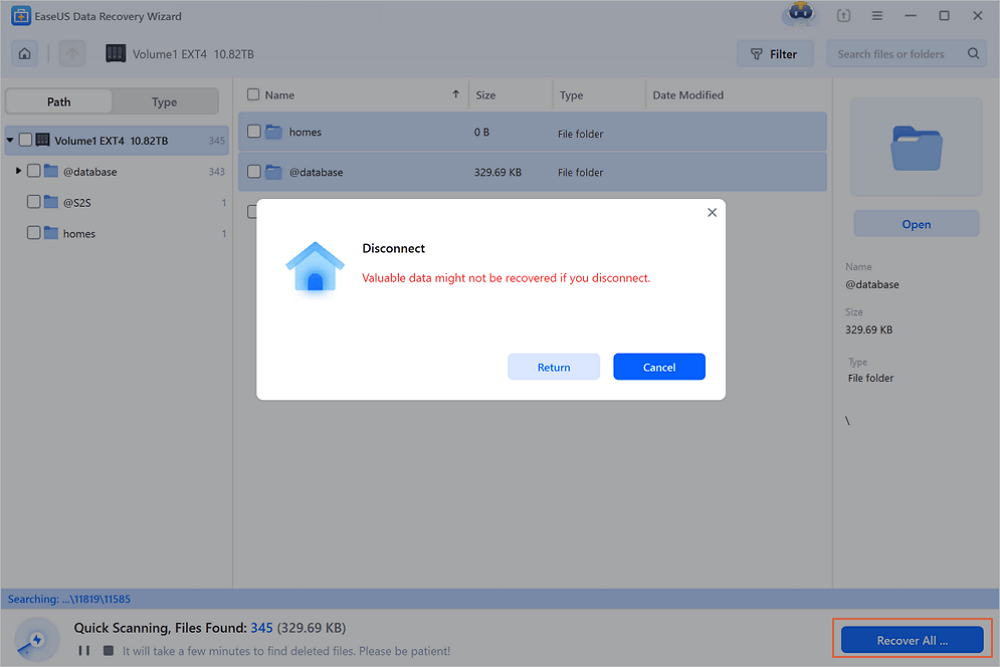
To empty all Recycle Bins in Synology NAS:
- Navigate to "Control Panel," then "Shared Folder," and select "Action." From there, choose the option to "Empty all Recycle Bins".
- After clicking the "Empty all Recycle Bins" selection, you'll see a new pop-up window displaying a cautionary message. It will state that the Recycle Bins available on all user home directories and shared folders will be cleared. You'll be asked to confirm your decision. Click "Yes" to proceed.
PAGE CONTENT:
If you're wondering how to free up disk space and optimize your Synology NAS, one essential task is to empty the Recycle Bin Synology. We'll walk you through manual and automatic methods to help you manage your storage efficiently.
Synology NAS devices are renowned for their storage capabilities, but over time, the Recycle Bin can accumulate unnecessary files.
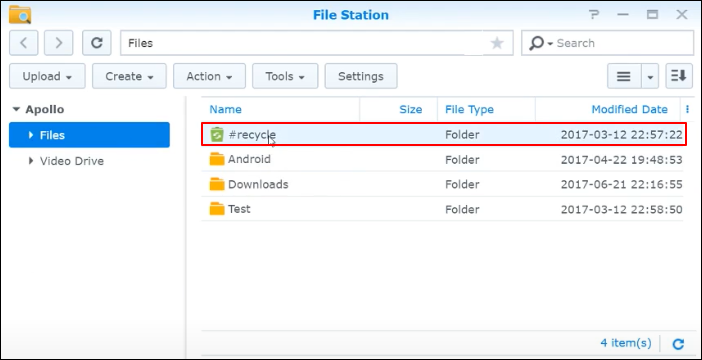
Synology Recycle Bin Location
The Synology Recycle Bin is a feature that provides a safety net for your deleted files on Synology Network Attached Storage (NAS) devices. When files are deleted, they are typically moved to a hidden folder called the "#Recycle" folder within the shared folder from which they were deleted.
The exact location of this folder is "/volume1/#Recycle" on the primary shared folder, but it may vary depending on your NAS setup.
You can check the size of your Synology Recycle Bin by navigating to the "DSM" (DiskStation Manager) web interface.
Log in to DSM, go to the "Main Menu," and open the "File Station" app. From there, locate the "#Recycle" folder within the shared folder you're interested in. Right-click on it and select "Properties" to view the size of the Recycle Bin.
Emptying the Recycle Bin on Synology is essential for several reasons. First, it reclaims storage space on your NAS storage device.
When files are deleted, they still occupy space in the Recycle Bin until it's emptied. Second, it helps maintain system performance by preventing excessive storage usage.
Lastly, emptying the Recycle Bin permanently deletes files, reducing the risk of unplanned data recovery from the bin. If you have lost some important files on Synology NAS and want to perform NAS data recovery, download EaseUS Data Recovery Wizard and recover data from your Synology NAS now!
How to Empty Recycle Bin for a Shared Folder
To efficiently clear all files from the Recycle Bin on your Synology NAS, you can utilize the Control Panel. There are two methods for this: individual shared folder deletion and bulk deletion.
Deleting Individual Shared Folder:
Step 1. Start by accessing the "Control Panel" and choosing "Shared Folder".
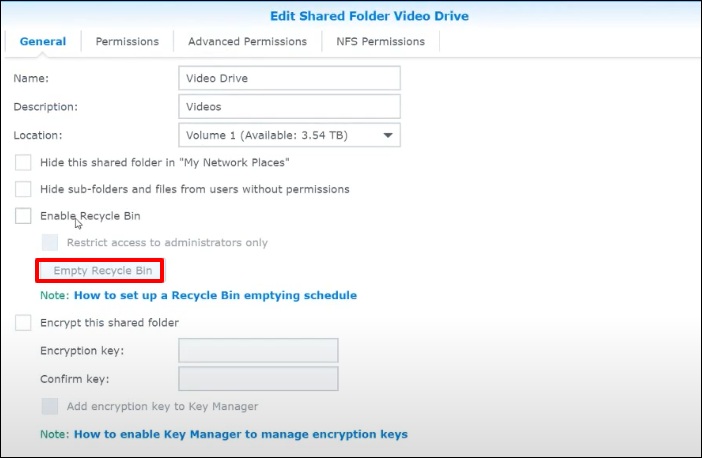
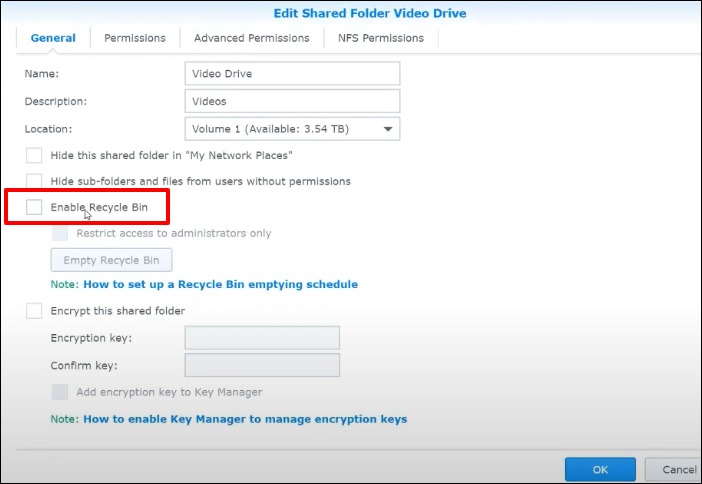
Step 2. Locate the specific shared folder you want to empty the recycle bin for and select "Edit".
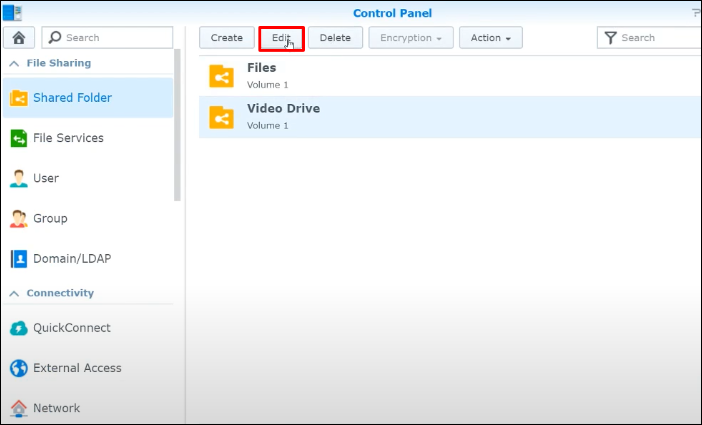
Step 3. Select "Empty Recycle Bin". This action will clear all files and folders within the recycle bin of that particular shared folder. You'll need to repeat this process for each shared folder separately.
Bulk Deletion:
Step 1. First, navigate to the "Control Panel" and select "Shared Folder".
Step 2. Click on "Action" and then select "Empty all Recycle Bins".
Step 3. A warning notification will inform you that all recycle bins will be emptied. If you wish to proceed, click "Yes." This action will clear all recycle bins simultaneously.
Feel free to share this helpful guide with your friends and fellow Synology users on social media.
How to Empty All Recycle Bin on Synology NAS
Here are the steps to clear all Recycle Bins on Synology NAS:
Step 1. Navigate to "Control Panel", then "Shared Folder", and select "Action". From there, choose the option to "Empty all Recycle Bins".
Step 2. After clicking the "Empty all Recycle Bins" selection, you'll see a new pop-up window displaying a cautionary message. It will state that the Recycle Bins available on all user home directories and shared folders will be cleared. You'll be asked to confirm your decision. Click "Yes" to proceed.
Check the following passage if you encounter the Synology Recycle Bin not emptying:

[Fixed] Emptying Recycle Bin Not Working Synology Without Data Loss
When you have found that the Synology NAS device is running out of space, you may try to empty the recycle bin to spare more storage space. Read more >>
How to Create an Empty Recycle Bin Schedule
Emptying the Recycle Bin manually can be daunting. It's more convenient to automate this process, ensuring that files are removed automatically after a set period. To set up a schedule for emptying the Recycle Bin, follow these steps:
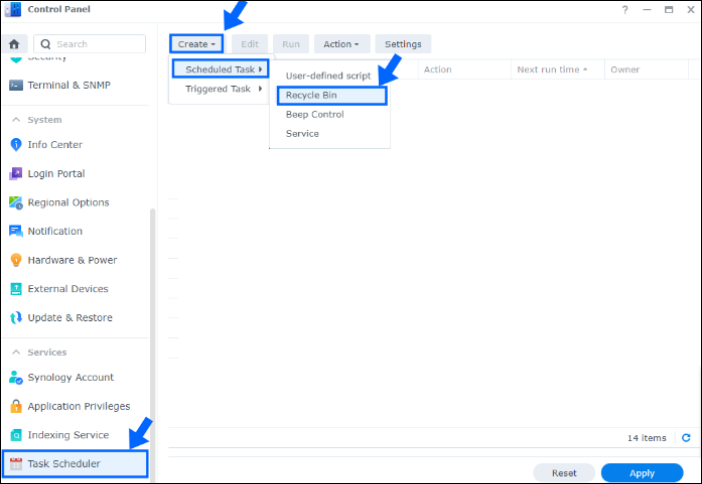
Step 1. Begin by accessing the "Control Panel" and selecting "Task Scheduler".
Step 2. Click on "Create," then choose "Scheduled Task," and finally, "Recycle Bin".
Step 3. Under "General," provide a name for the task.
Step 4. In the "Schedule" section, specify when the task should be executed.
Step 5. Under "Task Settings," determine whether you want to empty all Recycle Bins or only specific ones.
Step 6. The Retention Policy step is crucial. It defines when files will be deleted. You can choose your preference, for instance, retaining deleted files for 30 days. Advanced settings are also available for further customization.
Remember to share this guide on social media to help other people who might be wondering how to empty Recycle Bin on Synology.
How to Disable Recycle Bin for Share Folders
To deactivate the Recycle Bin on Synology, follow these steps:
Step 1. Access the "Control Panel".
Step 2. Navigate to "File Sharing" and choose "Shared Folder".

Step 3. Right-click on the folder's icon.
Step 4. Select the "Edit" option.
Step 5. Unmark the "Enable Recycle Bin" checkbox.
Recover Deleted Files from Synology NAS
Have you ever found yourself in the unfortunate situation of accidentally deleting important files from your Synology NAS? Data loss can be very frustrating and devastating.
However, you don't need to worry since EaseUS Data Recovery Wizard Pro has got you covered.
You can use this tool in the case of:
- ✅Accidentally deleted files from your Synology NAS, including shared folders, you can easily perform Synology data recovery with EaseUS.
- ✅Lost data due to a system crash, NAS drive failure, or other unexpected incidents. This software also supports Synology disk formatted recovery.
- ✅Need to recover files from the Synology Recycle Bin after it's been emptied.
This NAS recovery software is reliable and user-friendly. It's designed to handle various data loss scenarios, including those on network-attached storage devices like Synology NAS. It allows for a thorough and efficient scanning to locate your lost files quickly.
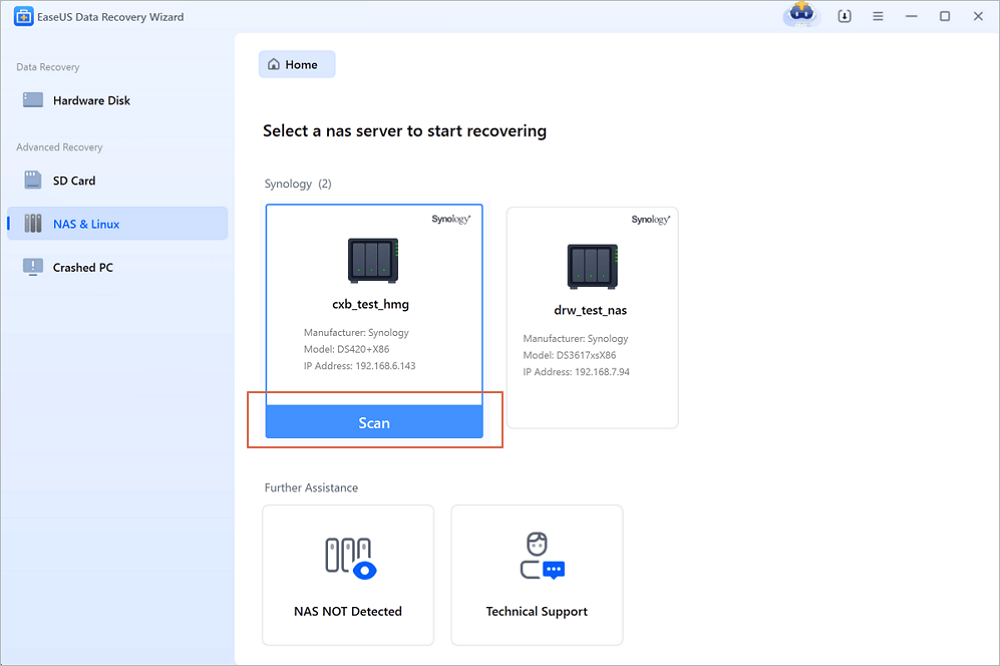
Step 1. Select a NAS server and start recovering.
Download and install EaseUS Data Recovery Wizard on your Windows 11/10 64-bit computer. When you open this software, select "NAS&Linux" and choose "NAS Recovery". All the NAS servers will be automatically listed, choose your target NAS device and click "Scan".
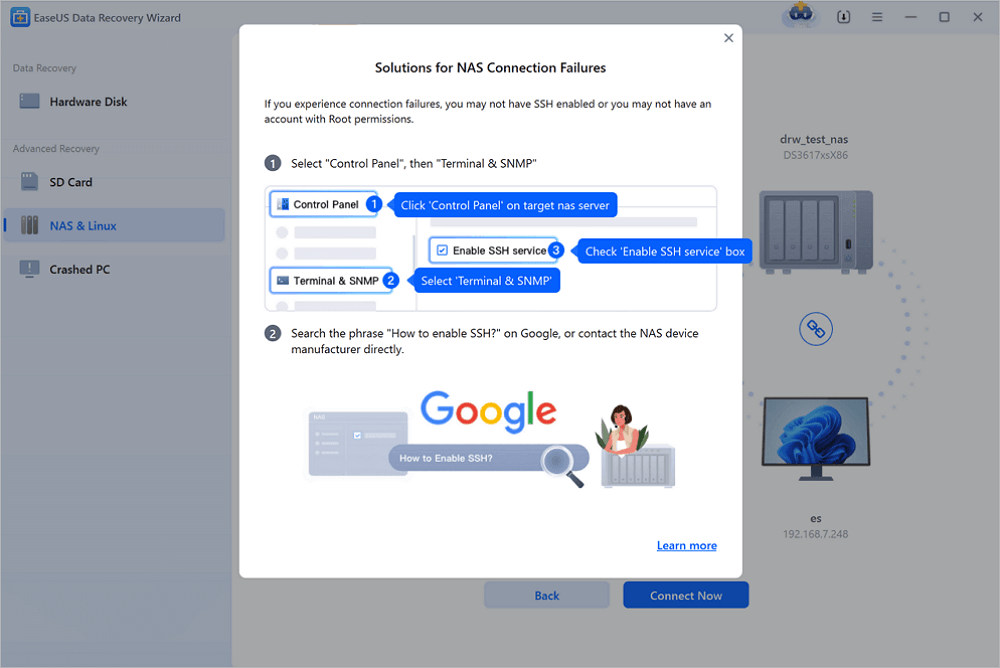
Step 2. Enable SSH service on the NAS server.
Go to "Control Panel > Terminal & SNMP" to check the "Enable SSH service" box. Then view and remember the port for remote access open EaseUS Data Recovery Wizard and click "Next".
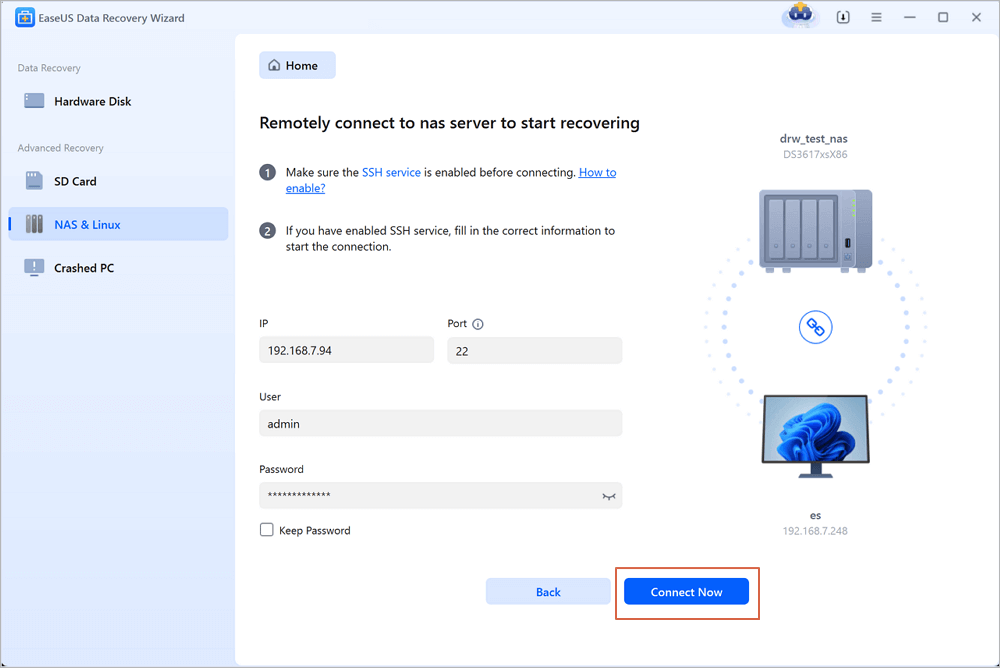
Step 3. Connect to the NAS server remotely.
This software will detect your IP and Port automatically. All you need to do is input the user name and password. If the IP address or Port is not right, you can correct it manually. Then, click "Connect Now".
Step 4. Recover lost/deleted NAS data
Then, EaseUS data recovery software will connect to your NAS and start a NAS device scanning. After the scan, you will see all the deleted, lost, or existing files on your NAS server.
You can apply the "Filter" feature or click the "Search files or folders" option to find the lost files on the hard drive. Select wanted NAS files that you lost on the server and click "Recover" to save them to another location.
Click the "Recover" button to restore deleted NAS files.
💡Tip: You can restore data on the local disks, external hard drives, and also the cloud storage.
Now, if you've found this guide helpful, share it with your friends and fellow NAS users on social media so they, too, can benefit from the power of data recovery.
Conclusion
In data storage and network-attached storage devices, like the Synology NAS, data recovery is a vital need. We've explored the crucial aspects of Synology's Recycle Bin, from its location to the essential steps of emptying it for shared folders.
However, despite the best precautions and safety measures, data loss can still occur. That's where the EaseUS Data Recovery Wizard Pro comes into play.
With its robust features and user-friendly interface, it's the go-to solution for recovering lost or deleted files from your Synology NAS, including shared folders.
So, whether you need to retrieve files accidentally deleted from your Synology NAS, lost due to system issues, or even from an emptied Recycle Bin, EaseUS Data Recovery Wizard Pro has got you covered.
Synology Recycle Bin FAQs
If you're having any doubts about how to empty the Recycle Bin on Synology, here are some questions and answers for you. Take a look!
1. How do I free up disk space on my Synology NAS?
Need to create extra storage space on your Synology NAS? Here are some steps to consider:
- Limit the number of file versions or turn off version control.
- Periodically clear the contents of the recycle bin to remove unnecessary files.
- Remove or deactivate files and folders that are rarely used or no longer required.
- Transfer shared folders to a volume with more storage capacity.
- If Synology Drive Server is no longer necessary, you can uninstall it to recover space on your NAS.
2. How to fix the Synology empty the Recycle Bin not working?
Here's what to do to troubleshoot the issue of the Synology Recycle Bin not emptying:
- Allow the retention period to expire naturally.
- Consider removing Synology snapshots and Btrfs data.
- Ensure that there are no deleted files within shared folders.
- Set up an automatic process to empty Synology Drive Recycle Bins.
3. Can I recover data from Synology NAS?
Yes, you can recover data from a Synology NAS device. Synology NAS systems typically offer data recovery features, including a Recycle Bin for shared folders, which allows you to restore deleted files. However, there might be instances where you need to recover data that is not in the Recycle Bin or has been permanently deleted. In such cases, you can use a data recovery tool like EaseUS Data Recovery Wizard Pro to retrieve lost or deleted files from your Synology NAS.
4. How to automatically delete Recycle Bin files on Synology?
To prevent the need for manual deletion of Recycle Bin files, you can set up a Recycle Bin task that will automatically clear all Recycle Bins within your Shared folders simultaneously. To do this, follow these steps:
Step 1. Navigate to the "Control Panel."
Step 2. Access the "Task Scheduler."
Step 3. Go to "Create."
Step 4. Click on the "Scheduled Task" and select "Recycle Bin."
Was this page helpful?
-
Dany is an editor of EaseUS who lives and works in Chengdu, China. She focuses on writing articles about data recovery on Mac devices and PCs. She is devoted to improving her writing skills and enriching her professional knowledge. Dany also enjoys reading detective novels in her spare time. …


20+
Years of experience

160+
Countries and regions

72 Million+
Downloads

4.9 +
Trustpilot Score


