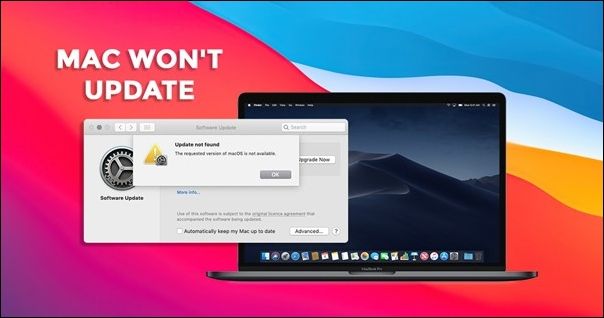
If you have updated your MacBook to the latest operating system, macOS Monterey, and find that MacBook won't turn on after macOS Monterey update, you know how nerve-wracking it can be. This problem can occur for various reasons, such as software conflicts or hardware issues.
While this can be frustrating, there are several solutions that you can try to get your MacBook up and running again. In this article, we will discuss five different solutions that range from simple fixes like rebooting your MacBook from the installer to advanced solutions like resetting PRAM on Mac.
| Workable Solutions | Step-by-step Troubleshooting |
|---|---|
| Reinstall in Recovery Mode | Restart your MacBook and hold down "Command + R" until the logo appears...Full steps |
| Boot Mac into Safe Mode | Boot up your Mac by pressing the "Power" button, and press the "Shift" key when the Mac starts...Full steps |
| Reset the PRAM | Shut down your MacBook, press and hold the "Power" button for 10 seconds, then release it...Full steps |
| Reboot Mac from the Installer | Start by turning off your MacBook completely and plugging it into a power source...Full steps |
| Remove Power Cable + Hard Reboot | Unplug the power cable from your MacBook, and hold the "Power" button for 10-15 seconds...Full steps |
These solutions can help overcome the hurdles causing MacBook won't turn on after macOS Monterey update. Whether it is a software-related issue, hardware malfunction, or something else, the solutions we will explore can help diagnose and fix them.
In addition, to prevent the inconvenience of losing important data, it is recommended that you back up your important files via the EaseUS Data Recovery Wizard for Mac Pro before installing or updating macOS.
Back Up Your Mac and Never Lose Data
Back up and restore your MacBook/iMac without Time Machine, iCloud, or external hard drives.
You can try these solutions from the comfort of your home, and you may be surprised at how easy some are. Besides this, you can save yourself a trip to the Apple Store and money on costly repairs. So let us get started and explore these solutions in more detail.

Why My MacBook Won't Turn on After macOS Monterey Update
Mac Users may have to experience a bizarre MacBook experience after installing the latest macOS Monterey update. You might have been looking forward to enjoying the new features and improvements of the latest operating system, but instead, you are left with an unresponsive device.
But why does this happen? There could be several reasons why your MacBook won't turn on after the macOS Monterey update, and some of them are mentioned below:
Software Conflicts
Software conflicts are among the most common reasons your MacBook won't turn on after the macOS Monterey update. When you update your operating system, the odds are that some of your existing software might not be compatible with the new update. This results in system instability, crashes, and in some cases, the inability to turn on your Mac.
Battery Issues
Another reason your MacBook won't turn on after the macOS Monterey update could be battery issues. If your MacBook's battery is considerably low, it might not have enough power to turn on. Additionally, if your MacBook's battery is old, it may not be holding a charge as well as it used to, leading to the inability to turn on your MacBook.
Hardware Problems
Apart from software-related issues, several hardware-related reasons could cause your MacBook not to turn on after updating to the macOS Monterey. One of the common causes is a faulty power supply, which can result in insufficient power supply to the MacBook. Additionally, a faulty logic board or a defective hard drive can also cause the MacBook not to turn on.
Installation Errors
Installing errors could be another reason your MacBook won't turn on after the macOS Monterey update. If the macOS Monterey update is stuck, causes system instability, leading to your MacBook not turning on. Additionally, any interruptions during the update process, such as a power outage, could cause problems with the update.
Corrupted System File
Last but not least, a corrupted system file or software conflict may also interrupt the normal booting of Mac after the macOS Monterey update. This can happen if the update process is interrupted or not completed successfully, leading to errors in the operating system. Additionally, incompatible software or drivers can cause conflicts with the updated macOS, resulting in the MacBook not turning on or freezing during startup.
5 Ways to Fix the MacBook Won't Boot After macOS Monterey Update
Are you feeling helpless and unable to get your Mac running again? Do not lose hope yet! In this section, we will discuss five different ways to fix the issue of the MacBook won't turn on after the macOS Monterey update. It is important to note that before proceeding with any fixes, you must ensure your data is secure.
You can do this by backing up your MacBook's data to an external drive or using a cloud-based backup service. Once you have safeguarded your data, you can proceed with the fixes below to solve the problem:
Method 1. Reinstall in Recovery Mode
Mac Recovery mode is a special bootable partition available on macOS that provides various tools for troubleshooting and repairing a malfunctioning Mac. It allows users to access the built-in macOS utilities, such as Disk Utility, Terminal, and reinstallation options, even if the primary startup disk is damaged or unbootable.
Reinstalling the macOS Monterey in recovery mode is a common solution to fix the MacBook that won't turn on after the macOS Monterey update issue and can be done using the below-mentioned easy and quick steps:
Step 1. Restart your MacBook and simultaneously hold down the "Command + R" keys until the Apple logo appears.
Step 2. This will take you to the macOS Utilities menu. From here, select "Reinstall macOS" and click "Continue".
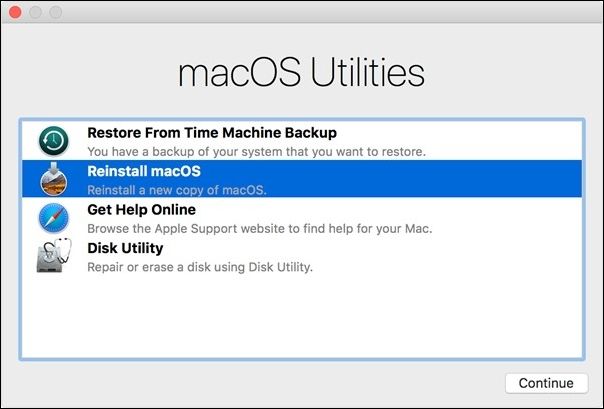
Step 3. Follow the prompts to reinstall the operating system. This will not erase your data, but having a backup before proceeding is still recommended.
Step 4. Once the installation is complete, restart your MacBook and see if it turns on successfully.
If this article helps, share this article on social media to help others.
Method 2. Try to Boot Mac into Safe Mode
Mac Safe Mode is a feature in macOS that allows users to boot their Mac with a minimum set of software and drivers. When a Mac is started in Safe Mode, it runs a series of checks and only loads essential software components, preventing third-party extensions and login items from running.
It can be useful in troubleshooting issues caused by third-party software, as it can help isolate the problem and allow users to remove or repair the software causing the issue. It can also help in the normal booting of Mac after the macOS Monterey update using the easy-to-follow steps mentioned below:
Step 1. Boot up your Mac by pressing the "Power" button.
Step 2. Press and hold the "Shift" key when the Mac starts.

Step 3. Hold the "Shift" key until the login screen appears, then release the key.
Step 4. Log in to macOS, and you may be prompted to log in again. Once you see the login window, check the upper-right corner for the words "Safe Boot" to confirm that you have successfully booted your Mac into Safe Mode.
Method 3. Reset the PRAM
PRAM stands for Parameter Random Access Memory and is a small amount of memory that stores system settings on a Mac. These settings include information about the startup disk, display resolution, time zone, volume, etc. Resetting the PRAM on your Mac can help resolve issues related to these settings. It involves freeing up RAM on Mac and resetting it to its default values.
This can be useful when a Mac is experiencing problems such as a frozen screen, the inability to adjust volume or screen resolution, or other strange behavior like Mac not turning on after macOS update Monterey. To reset PRAM on Mac, follow these steps:
Step 1. Shut down your MacBook.
Step 2. Press and hold the "Power" button for 10 seconds, then release it and wait a few seconds.
Step 3. Turn on your MacBook by pressing the "Power button" again and immediately press and hold the "Command + Option + P + R" keys before the gray screen appears.

Step 4. Hold down the keys until your MacBook restarts and you hear the startup sound twice, then release the keys.
Method 4. Reboot Mac from the Installer
Rebooting a Mac from the installer is a method of fixing booting issues when the Mac won't turn on after updating to macOS Monterey. It involves using the macOS installer on a bootable USB drive or external hard drive to hard restart your MacBook and perform repair operations.
If you don't know how to install macOS, the easiest and most effective way is to use a tool. EaseUS Data Recovery Wizard for Mac provides a free macOS installation feature to help users install new or old macOS from an external hard drive smoothly! Check out the following steps:
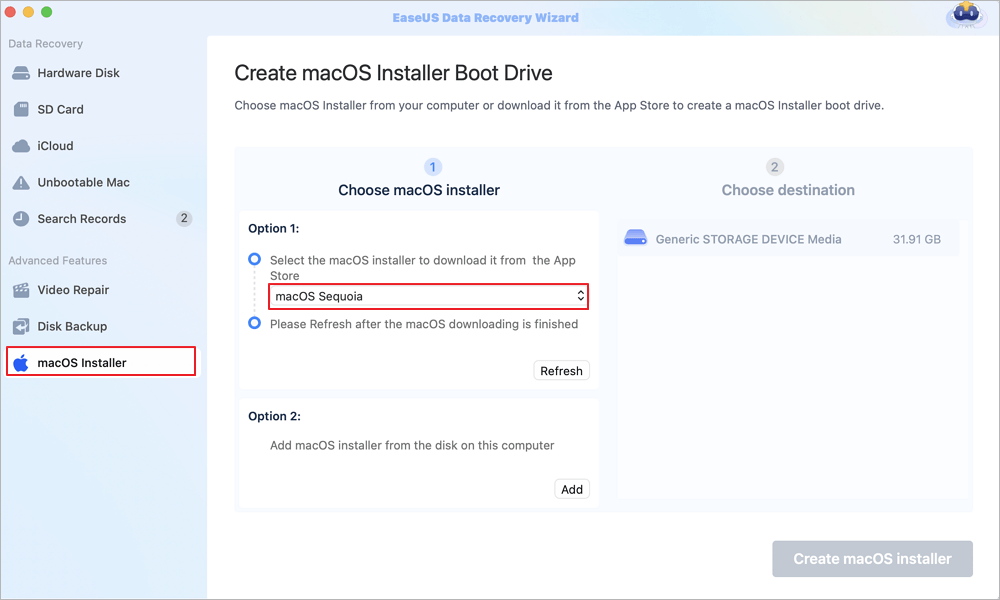
Step 1. Select a macOS version
Select a macOS version from the list, or click the "Refresh" option to get the downloaded macOS version. Or you can add a macOS installer from your disk by clicking the "Add" button. Insert a USB flash drive larger than 16 GB to save the macOS installer.
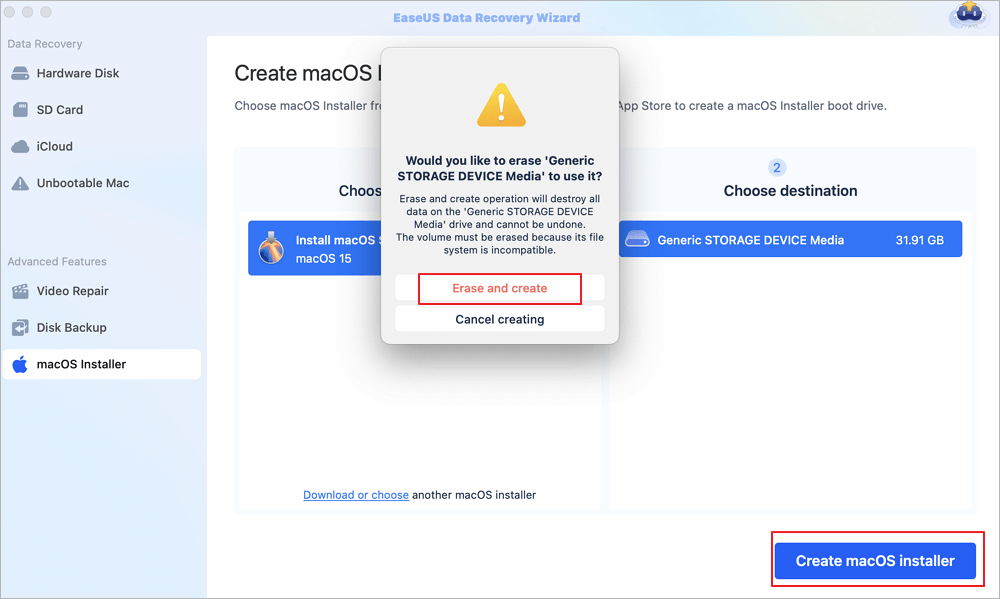
Step 2. Erase the USB flash drive
After choosing the USB flash drive, click the "Erase and create" option in the pop-up window to format your USB flash drive quickly, and then click the "Create macOS installer" button to continue.
- Note: This operation will delete all data on your USB flash drive, please back up important data in advance, or use EaseUS data recovery software to recover your data.
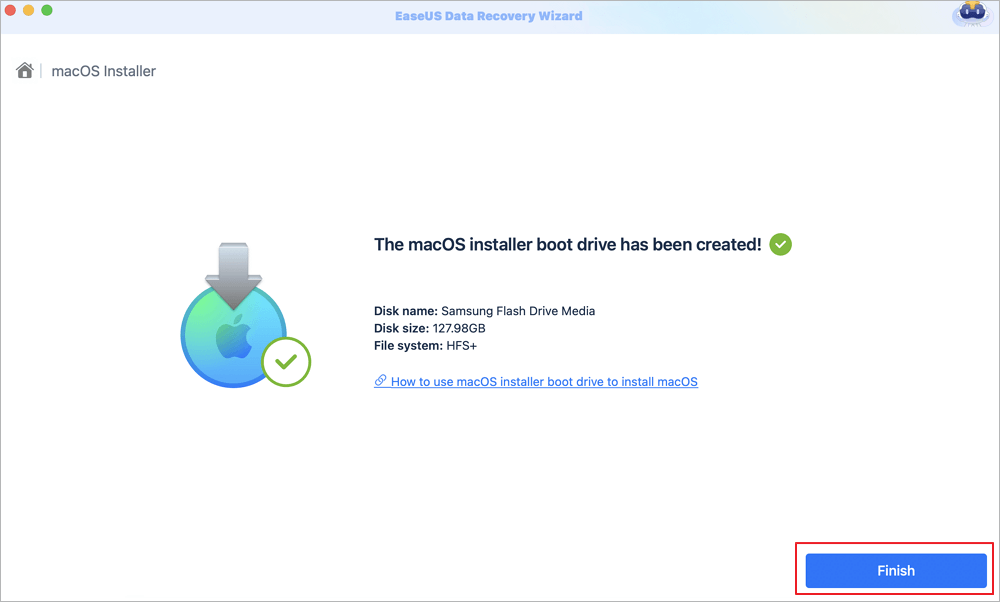
Step 3. Create the macOS installer boot drive
Wait for the process to complete, and click the "Finish" button. Your macOS installer boot drive has been successfully created!
This method is necessary when the previous methods, such as safe or recovery modes, fail to solve the issue. You can access additional tools to diagnose and repair your Mac's startup disk by rebooting from the installer.
Step 1. Start by turning off your MacBook completely and plugging it into a power source.
Step 2. Press and hold the power button until the Apple logo appears on the screen. Then, release the power button.
Step 3. Hold the "Option" key until you see the Startup Manager screen.

Step 4. Select the macOS Monterey Installer from there, and click on the arrow to boot your Mac from the installer.
Method 5. Remove the Power Cable and Hard Reboot
A hard reset on a MacBook is a forceful way to shut down and restart the device. It involves cutting off power to the MacBook completely and then turning it back on. It is the least favorable option and is used only in the hour of need when other solutions fail to fix the issue. It can help clear any temporary glitches or bugs preventing the device from functioning properly.
However, it should be noted that a hard reset can also result in data loss or damage to the device's internal components, so it should only be used when necessary. To perform a hard reset on Mac, you can follow these easy and simple steps given below:
Step 1. Unplug the power cable from your MacBook.
Step 2. Press and hold the "Power" button for 10-15 seconds.

Step 3. Release the power button, then plug the power cable back in.
Step 4. Press the "Power" button to turn on your MacBook.
How to Recover Deleted Files After MacBook Update Monterey
Data loss is a common problem many computer users face, and Mac users are no exception. Sometimes, data loss occurs due to software issues, such as a faulty operating system update, virus attack, or accidental deletion of important files. No matter the cause, it has been marked as a hectic period for users. Luckily, data recovery software tools like EaseUS Data Recovery Wizard for Mac can help users recover lost data quickly and easily.
EaseUS Data Recovery Wizard for Mac is a powerful data recovery tool originally designed to help Mac users recover lost or deleted data from their systems, such as recover deleted files from Mac Trash, recover deleted photos or videos, etc. The software features a user-friendly interface that makes it easy for even novice users to navigate and recover data. Some of the key features of EaseUS Data Recovery Wizard for Mac include:
- Supports recovery of a wide range of file formats, including photos, videos, audio files, documents, emails, and more.
- Supports data recovery from various storage devices, including recovering Mac USB drives, hard drives, SSDs, and memory cards.
- Allows users to preview recoverable files before restoring them, ensuring they only restore the files they need.
- Offers a quick and deep scan mode, allowing users to choose the best recovery method.
- Supports macOS Monterey and previous versions of the macOS operating system.
To operate this software easier, here are the data recovery steps you can follow:
Step 1. Select the drive to be scanned
In the main EaseUS Data Recovery Wizard window, there will be a list of the drives connected to your Mac. Select the drive you need to recover lost/deleted files from, and click the "Search for lost files" button.

Step 2. Select your lost data/files
EaseUS Data Recovery Wizard for Mac will immediately scan your selected disk volume and display the scanning results on the left pane. You can sort the results to find the wanted files if you are looking for certain files.

Step 3. Recover lost/deleted data
Once you have found the desired files, preview the files and then click "Recover" to begin the recovery of your deleted/lost Mac files.

Conclusion
Encountering issues with a MacBook not turning on after updating to macOS Monterey can be stressful. Still, practical solutions are available to solve the problem and prevent data loss. In this article, we have discussed five different methods to help you regain your Mac so you can continue your important work.
Additionally, using specialized data recovery software like EaseUS Data Recovery Wizard for Mac can help retrieve lost files and data caused by the update. Having this handy tool downloaded beforehand is highly recommended as a precautionary measure to keep your data safe in the hour of need.
MacBook Won't Boot After macOS Monterey Update FAQs
Are you still clueless? This section will help you answer some of the commonly asked questions to help you with any ambiguity left. So, let us look into that:
1. Why is my Mac not working after Monterey update?
Some of the reasons why Your mac is not working after the Monterey update are:
- Incompatible software.
- Faulty hardware components such as a defective hard drive.
- Corrupted system files due to an incomplete update process.
2. How do I reset my Mac after Monterey update?
To reset Mac after the Monterey update, follow these steps:
Step 1. Back up your important files and data.
Step 2. Restart your Mac and hold down "Command + R" to enter Recovery mode.
Step 3. Select Recovery mode's "Disk Utility" option and erase your Mac's hard drive. Then, exit Recovery mode and reinstall macOS.
3. How do I restore my Mac after a failed update?
If a macOS update fails, you can try restarting your Mac and attempting the update again. If that does not work, restore your Mac from a Time Machine backup or reinstall macOS using Recovery Mode. Before that, back up any important data to prevent data loss.
4. How do I restart my Mac that won't boot up?
To restart a Mac that won’t boot up, follow these easy and quick steps given below:
Step 1. Hold the "Power" button for 10 seconds until the Mac turns off.
Step 2. Wait a few seconds, then press the power button again to turn on the Mac.
Step 3. If nothing works, try other troubleshooting methods, like resetting the PRAM or SMC.
Was This Page Helpful?
Brithny is a technology enthusiast, aiming to make readers' tech lives easy and enjoyable. She loves exploring new technologies and writing technical how-to tips. In her spare time, she loves sharing things about her game experience on Facebook or Twitter.
Jaden is one of the editors of EaseUS, who focuses on topics concerning PCs and Mac data recovery. Jaden is committed to enhancing professional IT knowledge and writing abilities. She is always keen on new and intelligent products.
Related Articles
-
How to Fix Nikon 'This Memory Card Cannot Be Used' Error
![author icon]() Jean/2025-07-17
Jean/2025-07-17 -
How to Factory Reset Microsoft Surface with Every Possible Way
![author icon]() Jerry/2025-07-04
Jerry/2025-07-04 -
FIXED: PC Won't Boot to BIOS - 4 Ways Included
![author icon]() Jerry/2025-07-04
Jerry/2025-07-04 -
How to Install Sonoma on Unsupported Mac [macOS 14 Available Now]
![author icon]() Dany/2025-09-17
Dany/2025-09-17
EaseUS Data Recovery Services
EaseUS data recovery experts have uneaqualed expertise to repair disks/systems and salvage data from all devices like RAID, HDD, SSD, USB, etc.