Stay calm when you fail to transfer logged messages to the event log with status 50, on this page, you will find four fixes for this issue and one way to bring your lost files back immediately:
| Workable Solutions | Step-by-step Troubleshooting |
|---|---|
| Fix 1. Repair Bad Sectors | Run chkdsk c: /r /f /v command on your PC > Recover readable information from bad sector...Full steps |
| Fix 2. Remove Write Protection | Run list volume > select volume X > attributes disk clear readonly command to remove write protection...Full steps |
| Fix 3. Check Disk in Safe Mode | Restart PC and enter Advanced startup > Enter Safe Mode > Run CHKDSK command to check disk...Full steps |
| Fix 4. Send Disk for Repair | If the former 3 fixes failed to fix this issue, it could be physically damaged. Send it for repair...Full steps |
| Fix 5. Recover Disk Data | After fixing this error, run EaseUS Data Recovery Wizard > Scan disk and recover lost data...Full steps |
About Failed to Transfer Logged Messages to the Event Log with Status 50
CHKDSK, short for "check disk", is a command that can be used to check and repair disk errors on a local hard drive or external storage device. However, running CHKDSK cannot always be smooth. You may receive various error messages, including "Failed to transfer logged messages to the event log with status 50."
Symptoms
When you try to run CHKDSK on your computer, you may encounter a common error "Failed to transfer logged messages to the event log with status 50" during the hard disk repair process. It could happen in Windows 10/8.1/8/7/2008/XP/Vista or other versions.

Reasons
"Failed to transfer logged messages to the event log with status 50" error message usually appears due to three reasons:
- There are corruptions or bad sectors (both logical bad sectors and physical bad sectors) in Windows partition
- Your disk or partition is set as "read-only"
- Your disk is physically damaged
Part 1. Recover Data Before Fixing 'Transfer Logged Messages Status 50' Error
If the command "chkdsk c: /r /f /v" failed to repair the corruption in the hard disk but pop up a warning message with "transfer logged messages... status 50", you won't be able to access nor open the device.
To avoid unnecessary data loss and guard your vital files, you may need to find a solution to retrieve your files in case of unexpected data loss disaster first. Here, reliable EaseUS Data Recovery Wizard - EaseUS Data Recovery Wizard can help.
Keep in mind, if your internal hard disk is badly damaged and cannot boot to Windows, download EaseUS Data Recovery Wizard Pro with Bootable Media to retrieve your data.
Part 2. How to Fix CHKDSK Failed to Transfer Logged Messages Status 50
Based on the possible causes listed, there are the corresponding solutions to solve the problem "failed to transfer logged messages to the event log with status 50" while rung CHKDSK command.
Solution 1. Repair Bad Sectors
Since "Failed to transfer logged messages to the event log with status 50" error message might occur due to corruptions or bad sectors in Windows partition, you can run the "chkdsk c: /r /f /v" command to recover readable information from bad sectors & repair file system errors.
You may wonder why you still can use CHKDSK command when there is an error reported. As you may know, while running CHKDSK, you can use different parameters for different purposes. If the error message appears when you use other parameters instead of the ones used to check disk errors, you still have the chance to repair bad sectors using the CHKDSK command.
If CHKDSK cannot repair your disk, there may be physical bad sectors on your partition. In this case, you will need third-party software to block these bad sectors in order to use your hard drive.
Solution 2. Remove Write Protection
If your disk or partition is set as read-only, the system won't be allowed to transfer the logged messages. To run CHKDSK successfully, you can clean the read-only attribute on your disk. Afterward, you won't encounter the error "failed to transfer logged messages to the event log with status 50" anymore. There is more than one way to remove the write protection, the easiest one is:
Step 1. Run "Command Prompt" as an administrator.
Step 2. Enter diskpart and click "Yes" in the prompt asking for notification.
Step 3. Enter the following command in order:
When your disk is write-protected, you may also come across the error "Windows cannot run disk checking on this volume because it is write protected" while running CHKDSK.
If you don't consider yourself a pro-computer user and you're not familiar with command-lines, don't worry. There are graphical-based solutions to help you remove write-protection from your hard drives, USB drives, and even SD cards.
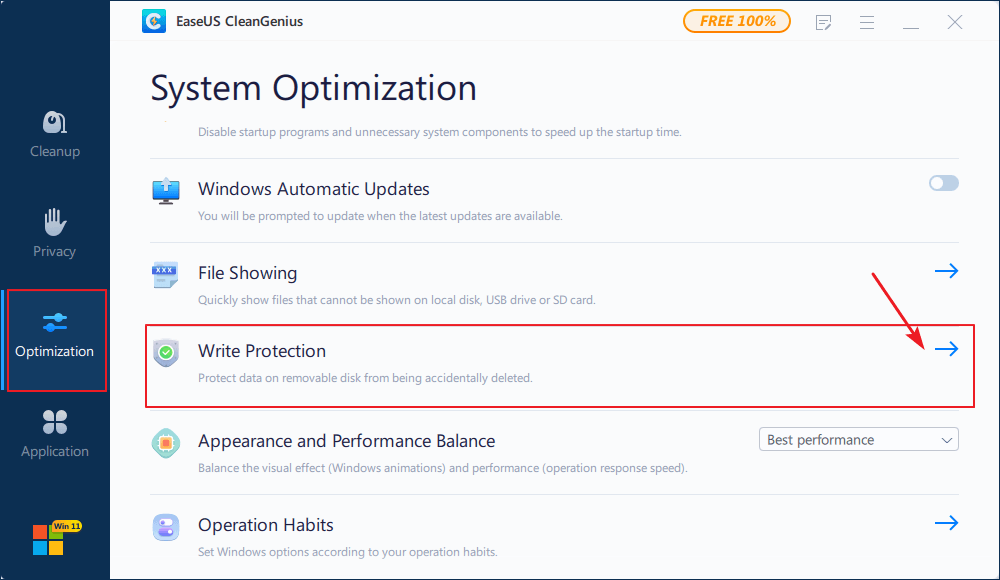
EaseUS CleanGenius is one of these tools that helps you fix aforementioned issues on your drives without knowing a thing about command-line.
Here's an easy-to-follow guide on how to use this tool to get your issues sorted:
Step 1: DOWNLOAD and install EaseUS CleanGenius (free) on your computer.
Step 2: Run EaseUS CleanGenius on your PC, select Optimization and choose the Write Protection mode.

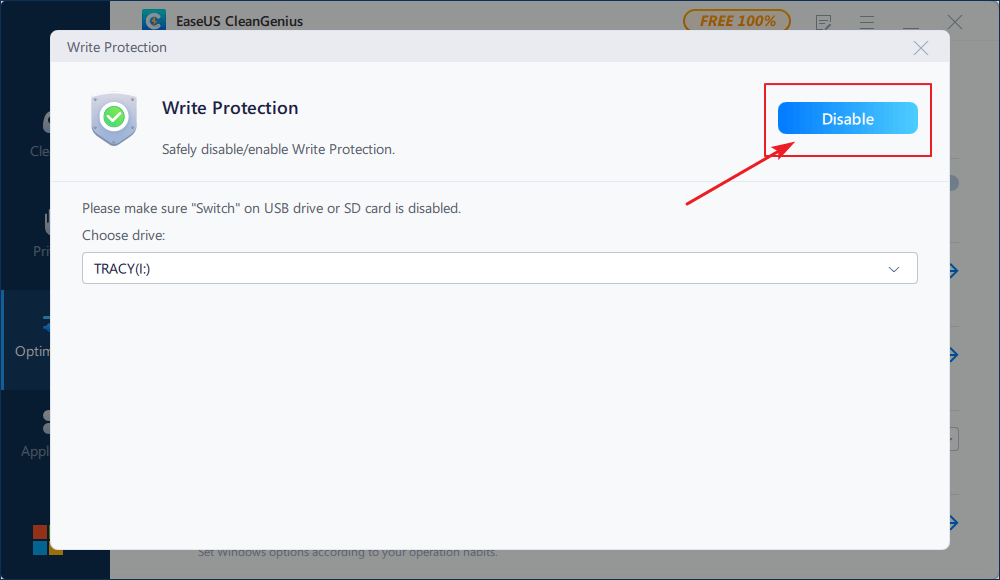
Step 3: Select the device that is write-protected and click Disable to remove the protection.

Solution 3. Run CHKDSK After Booting to Safe Mode
If you are trying to boot your PC from an installation disk and run CHKDSK, you may get the "Failed to transfer logged messages to the event log with status 50" error because the log data can not be written or copied to the installation disk. Luckily, you can try running CHKDSK after booting to Safe Mode to fix the issue. Safe Mode starts your computer with only necessary drives and services. By doing so, it limits your Windows operations to basic functions and thus can exclude other factors that lead to CHKDSK error.
- Notice:
- The steps below need to restart your computer. Thus, if you are reading this page on your computer, switch to read it on another device in order to refer to the guide during the operations.
The steps below are performed in Windows 10:
Step 1. Remove any peripherals from your computer.
Step 2. Click "Start" and choose "Settings" (the gear icon).
Step 3. Go to "Update & Security" > "Recovery".
Step 4. Under "Advanced startup", click "Restart now".
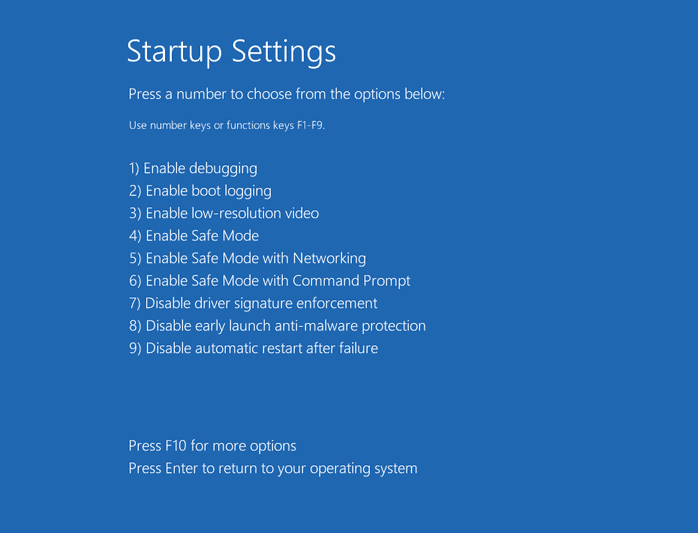
Step 5. Then your PC will restart to the "Choose an option" screen. Select "Troubleshoot" > "Advanced options" > "Startup Settings" > "Restart".
Step 6. Then your PC will start with a list of options for you. Choose "Enable Safe Mode" to boot your computer into Safe Mode.
Step 7. Run the CHKDSK command according to your needs.

Solution 4. Send the Disk for Repair
If your hard disk is damaged, running CHKDSK is likely to fail with the error message "failed to transfer logged messages to the event log with status 50". When your hard drive is physically damaged, all you can do is to send it for a repair if you want to retrieve your data. Manual repair or manual data recovery service may help rescue your disk or the data on it.
The Bottom Line
You may receive other error messages while running CHKDSK, like "cannot open volume for direct access", "chkdsk is not available for RAW drives", and more. "Failed to transfer logged messages to the event log with status 50" is only one of them. Generally, it is caused by your disk errors, be it bad sectors, corruptions, or file system errors. Grow a good habit of using your disk to minimize damage to it and back up your files regularly to avoid complete data loss.
Was This Page Helpful?
Daisy is the Senior editor of the writing team for EaseUS. She has been working at EaseUS for over ten years, starting as a technical writer and moving on to being a team leader of the content group. As a professional author for over ten years, she writes a lot to help people overcome their tech troubles.
Written by Tracy King
Tracy became a member of the EaseUS content team in 2013. Being a technical writer for over 10 years, she is enthusiastic about sharing tips to assist readers in resolving complex issues in disk management, file transfer, PC & Mac performance optimization, etc., like an expert.
Related Articles
-
Windows 11 Is Getting ReFS Support for Enhanced Data Proteciton
![author icon]() Cici/2025-07-04
Cici/2025-07-04 -
[Detailed Guides] How to Backup WeChat in 5 Ways
![author icon]() Rel/2025-07-04
Rel/2025-07-04 -
What Does Wipe Cache Partition Mean and How to Wipe the Cache Partition
![author icon]() Jaden/2025-07-04
Jaden/2025-07-04 -
Fix macOS Sequoia Keeps Crashing at Start [Easy & Secure]
![author icon]() Finley/2025-11-11
Finley/2025-11-11
EaseUS Data Recovery Services
EaseUS data recovery experts have uneaqualed expertise to repair disks/systems and salvage data from all devices like RAID, HDD, SSD, USB, etc.