Why Is Drag-and-drop Not Working
The drag-and-drop functionality helps in the smooth system working. You can go for the cut-and-paste option, while the drag-and-drop feature helps in quick system operations. However, any issues with this basic functionality can be irritating and hamper seamless working. Do you ever face the drag and drop not working issue?
Let us first understand the key causes of this problem.
- Hardware issues. The mouse or touchpad issues may be the primary cause of the drag-and-drop not working problem.
- Improper setting. The improper operating system or the program settings may cause issues with the day-to-day system functioning.
- Touchscreen issues. It is important to calibrate the touch screen driver and check for its updates while using the drag-and-drop on your system. Any touchscreen issues cause problems with this feature.
- Third-party software issues. Third-party software like antivirus or security tools interferes with the drag-and-drop feature.
- Corrupted system files. Any system file issues, like deleted or corrupted files, may cause drag-and-drop problems.
8 Ways to Fix Drag-and-drop Not Working
After having details of the drag-and-drop not working issue, it is time to understand its solutions. Then, all you need to do is use these methods one-by-one to start using the drag-and-drop feature easily. So, below are the top eight fixes for this problem.
- Way 1. Run the SFC and DISM Scans
- Way 2. Restart File Explorer
- Way 3. Check Mouse Drivers
- Way 4. Install Windows Updates
- Way 5. Run Hardware & Devices Troubleshooter
- Way 6. Edit Windows Registry
- Way 7. Perform a Clean Boot
- Way 8. Reset your PC
Way 1. Run the SFC and DISM Scans
Firstly, the problems with drag-and-drop can be due to corrupted system files. Hence, you can run the System File Checker (SFC) and Deployment Image Servicing Management (DISM) on your system. The SFC scan detects and replaces the corrupt files, while the DISM scan directly replaces these files from Microsoft.
The quick steps to run SFC and DISM scans include the following:
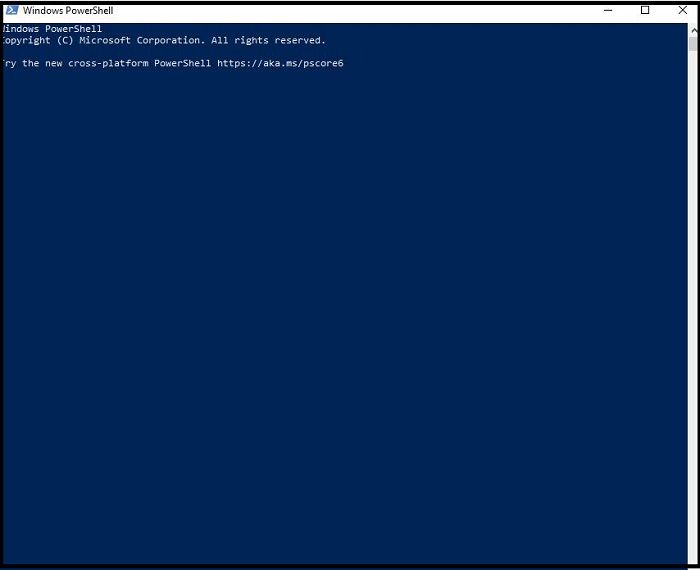
Step 1: Type "Powershell" in the search bar.
Step 2. Select the "Run as Administrator" option from the right-side menu.
Step 3. Type the command sfc / scannow and press enter.
Step 4. Wait until the SFC scan is complete.
Step 5. Now, type the command DISM /Online /Cleanup-Image /RestoreHealth and press enter.
Step 6. Wait until the DISM scan is complete, then reboot your system to check if drag-and-drop is functioning properly.
Way 2. Restart File Explorer
The File Explorer may create issues in the proper system functioning if freezing. Hence, it is easy to restart file explorer. The detailed steps for restarting your system are as follows:
Step 1: Go to the "Start" menu and select the "Task Manager" option.

Step 2: Next, select the "Processes" option and select the "Windows Explorer" option.
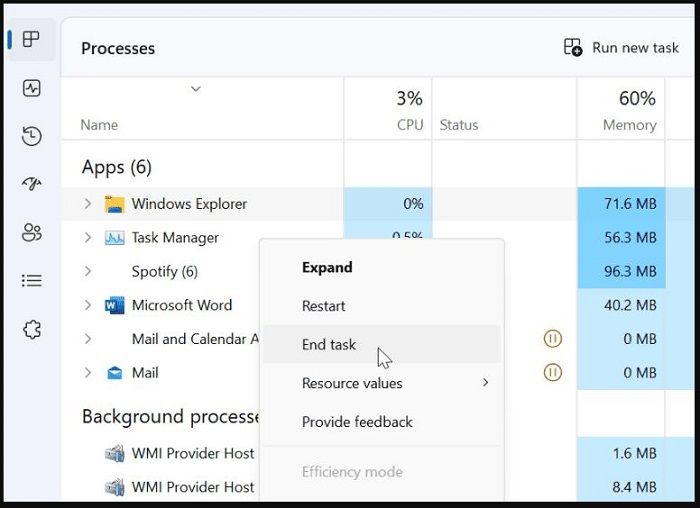
Step 3: Now select "End task" from the options. The desktop will reappear after a second.
Step 4: Select the "Run new task" option and type "explorer.exe," and select "OK."
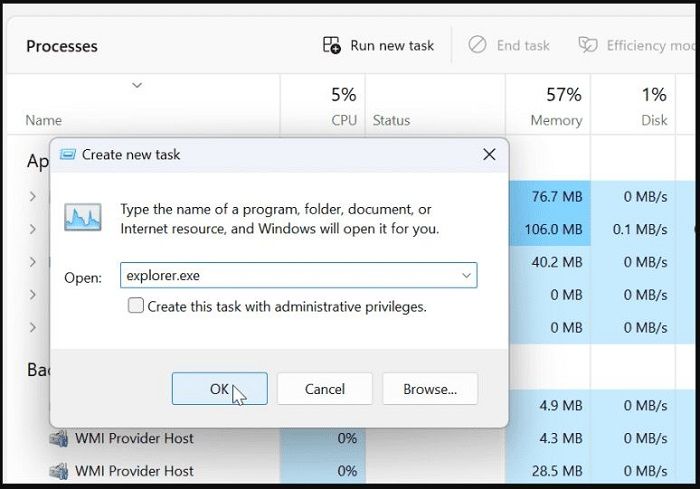
Step 5: File explorer will restart and confirm whether the drag–and–drop feature works.
Way 3. Check Mouse Drivers
The problem with the drag-and-drop feature can be due to mouse driver issues. So, all you need to do is ensure that your mouse drivers are up-to-date. The steps to check mouse drivers on your system are as below:
Step 1: Select the device manager.
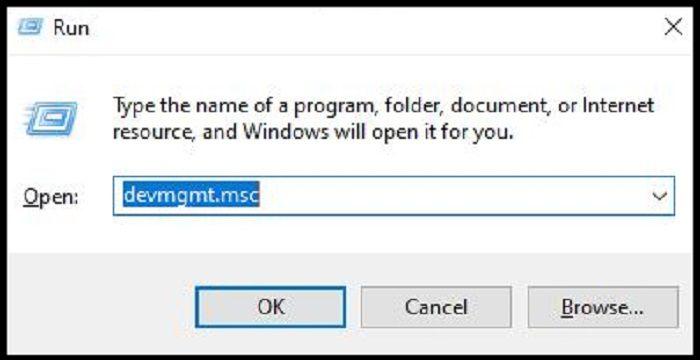
Step 2: Press "Windows + R" to open the "Run" dialogue.
Step 3: Enter the "devmgmt.msc" and select the "OK" option.
Step 4: Select and expand the "Mice and other pointing devices."
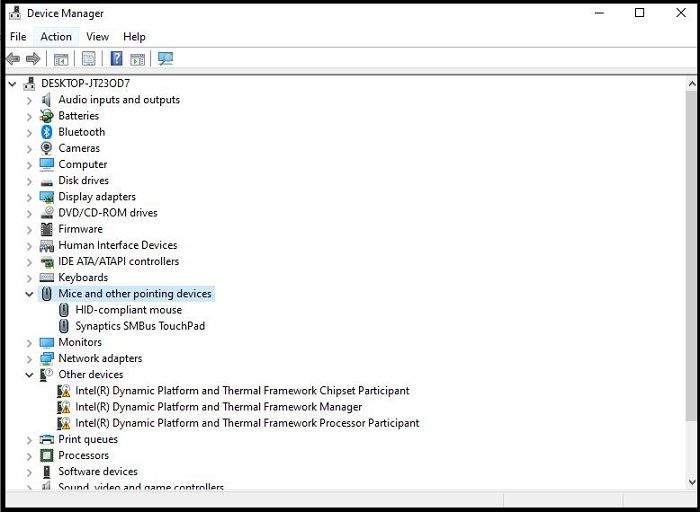
Step 5: Right-click on your mouse and then select the "Update Driver" option. You can launch the mouse custom software to check for mouse updates.
Way 4. Install Windows Updates
The drag-and-drop feature may stop functioning due to Windows update issues. So, all you need to do is install Windows updates. The quick steps to install Windows update include the following:
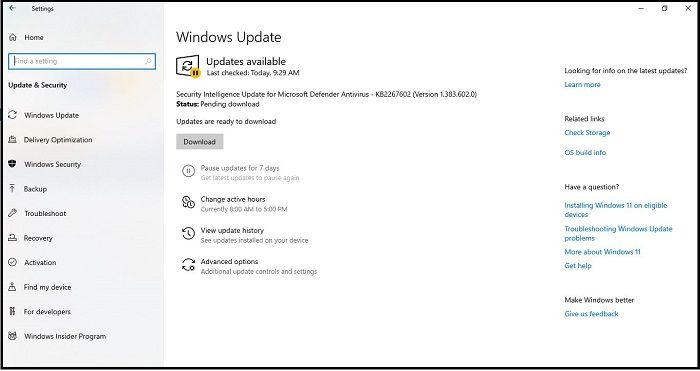
Step 1: Open the "Settings" option on your system.
Step 2: Select the "Update & Security" option.

Step 3: Check the Windows Update and then start installing the update.
Way 5. Run Hardware & Devices Troubleshooter
The following method to solve the drag-and-drop not working problem is to run the hardware and devices troubleshooter. So, below are the detailed steps to run hardware and devices troubleshooter on your system:
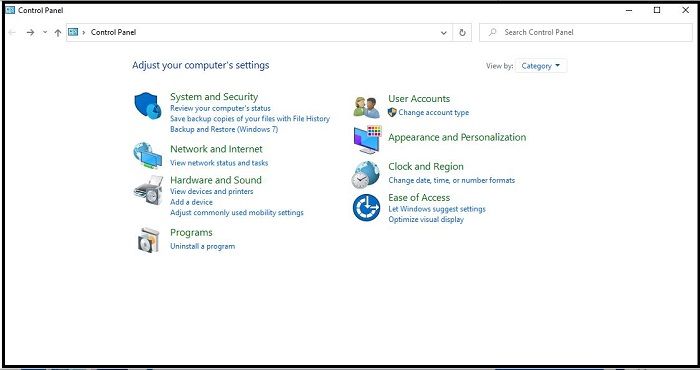
Step 1: Go to the start menu and select "Control Panel."
Step 2: Select the "View by" option and select the "Large icons" option.
Step 3: Now, select the "Troubleshooting" option.
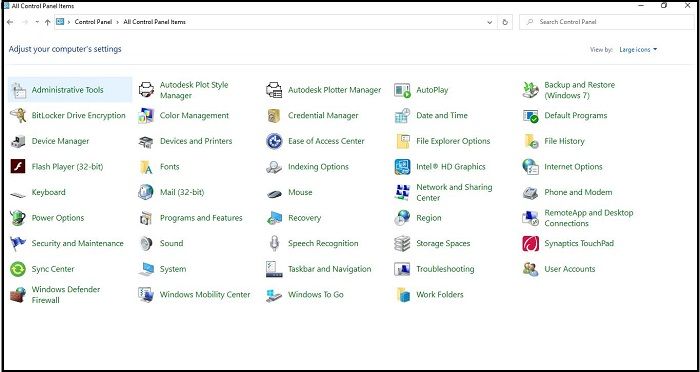
Step 4: Select the "Hardware and Sound" option.
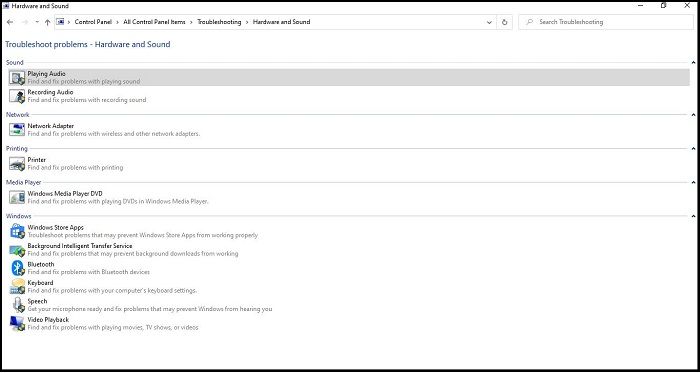
Step 5: Next, choose the "configure a device" option.
Step 6: Press the "Next" option and run the troubleshooter option.
Way 6. Edit Windows Registry
Windows Registry is a great option to recover your system from the drag-and-drop problem. It is the database of settings, information, and other settings required for software and hardware functioning. The steps to edit the Windows registry on your system are as below:
Step 1: Go to the "Start" option and select the "Run" option.
Step 2: Type "regedit" in the text bar and press enter.
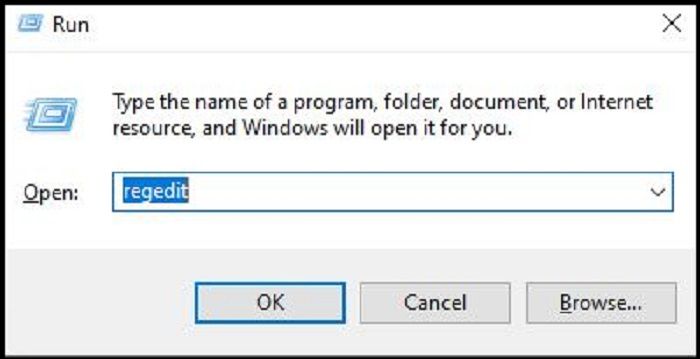
Step 3: Select the path Computer\HKEY_LOCAL_MACHINE\SOFTWARE\Microsoft\Windows\CurrentVersion\Policies\System
Step 4: Select "EnableLUA" and the "Modify" option.
Step 5: Change the "Value data" option from 1 to 0.
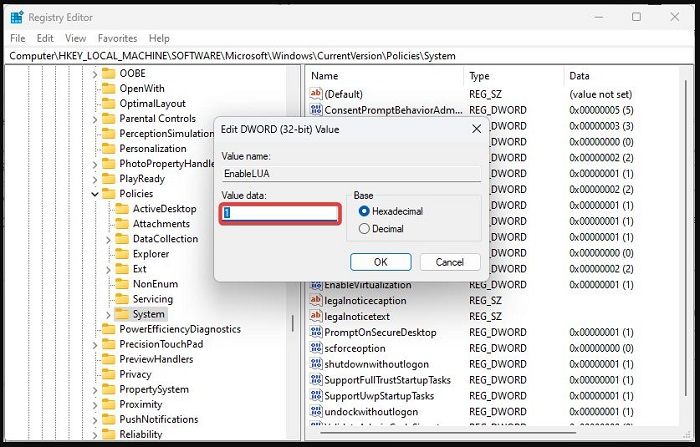
Step 6: Click on "OK" and then restart your system.
Way 7. Perform a Clean Boot
Many users go for the clean boot option when the drag and drop not working problem occurs on their system. This is because it starts Windows with the minimum startup programs and drivers.
The detailed steps to clean boot your system include the following:
Step 1: Open the System Configuration app.
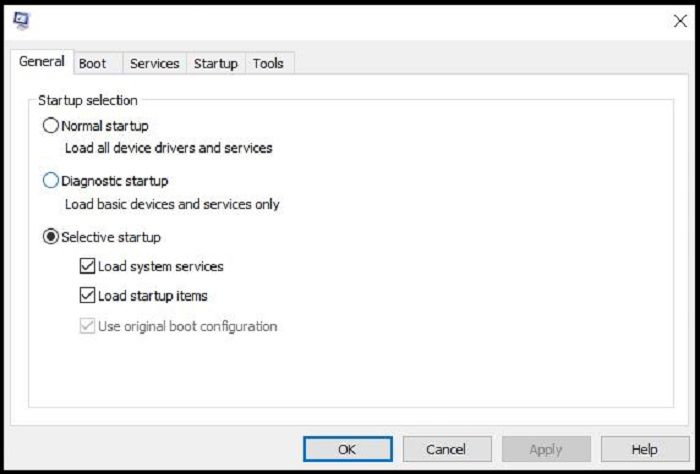
Step 2: Go to the "Services" option and select the "Hide all Microsoft services" option.
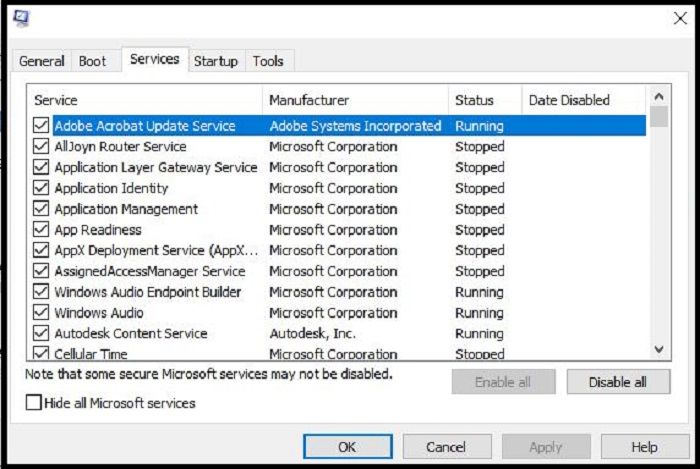
Step 3: Next, select the "Disable all" option.
Step 4: Go to the "Startup" option and select the "Open Task Manager" option.
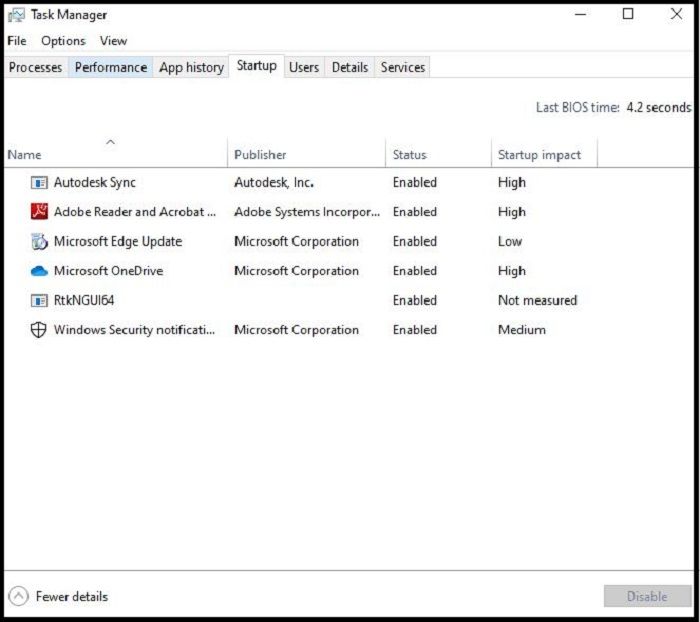
Step 5: Go to the "Task Manager" and select the "OK" option.
Step 6: Now reboot your system.
Way 8. Reset your PC
Last but not least is to reset your system to use drag-and-drop efficiently. It helps overcome any operational issues causing problems with the drag-and-drop feature. It is easy to reset your PC with the following steps:
Step 1: Go to the "Settings" option.
Step 2: Select the "Update & Security" option.
Step 3: Select the "Recovery" option and then the "Get Started" option under "Reset this PC."
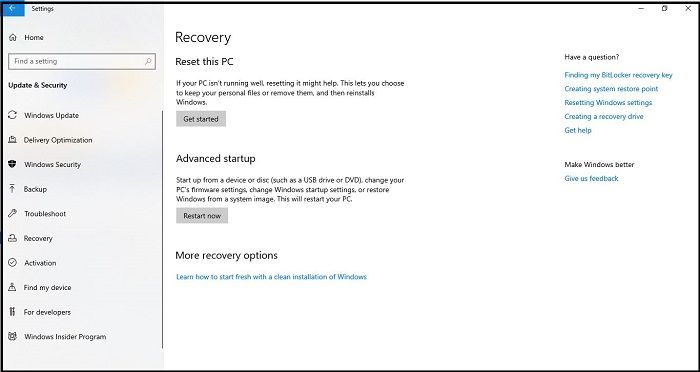
Step 4: Next, select the "Choose an option" and the "Keep my files" option.
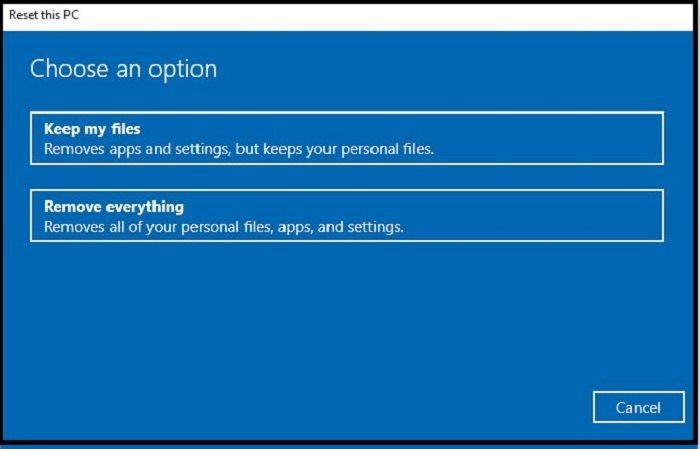
Step 5: Complete the reset option by following the screen instructions.
Additional Guide: How to Backup Files Instead of Drag-and-drop
After going through the different methods to fix the drag-and-drop not working issue, many users look for the best solutions to create a file backup. It helps users create a copy of the files or folders and protect data during power outages or system failures. You don't need to worry; you can go for EaseUS Todo Backup Home.
Secure Download
EaseUS Todo Backup Home offers a simple yet intelligent backup solution to prevent data loss. It can help you automatically back up your file, system, disk, partition, and computer app. Besides, it allows you to create various backup modes, such as full, incremental and differential backups, and save them to diverse locations, such as the local drive, NAS, Security Zone, and Cloud. And you can also use it to create an image of your SD card and compress backups for saving space. Most importantly, you can enjoy 250G free cloud storage.
Here is how to back up your files.
Step 1. To initiate a backup, click the Select backup contents option.

Step 2. There are four data backup categories, File, Disk, OS, and Mail, click File.

Step 3. On the left, both local and network files will be shown. You may extend the directory to pick the backup files.

Step 4. Follow the on-screen instructions and choose a location to store the backup.

Click Options to encrypt the backup with a password in Backup Options, then click Backup Scheme to specify the backup schedule and start the backup at a certain event. There are also other additional choices you may choose to tailor the backup process to your requirements.

Step 5. The backup may be stored on a local disk, EaseUS' online service, or NAS.

Step 6. EaseUS Todo Backup enables customers to back up data to a third-party cloud drive as well as its own cloud drive.
If you want to back up data to a cloud drive provided by a third party, choose Local Drive, scroll down to add Cloud Device, and then add and log in to your account.

You can also choose the EaseUS cloud drive. Sign up for an EaseUS Account, then click EaseUS Cloud and log in.

Step 7. Click Backup Now to begin the backup process. The backup job will be presented as a card on the left side of the panel after it has been finished. Right-click the backup job to handle it further.

Final Verdict
Hence, no more worries about using the drag-and-drop functionality on your system. It helps move different files or folders quickly for improved efficiency. It is easy to understand the key reasons causing any issues with this feature, like outdated drivers, outdated Windows, or malware. The best part is that you can quickly resolve the drag and drop not working problem on your system.
It is easy to go for any of the top eight methods mentioned above, including system reset, updates, performing a clean boot, running a troubleshooter, and other scans. Further, users can back up files instead of drag and drop functionality using the powerful EaseUS Todo Backup Home. Just download and try it!
Secure Download
FAQs
1. How do I drag and drop a file?
The steps to use drag-and-drop a file are as follows:
Step 1: Long-press the selected files using the mouse.
Step 2: A thumbnail will appear.
Step 3: Drag the files to the required location on your system.
2. How do I activate drag-and-drop?
The steps to activate drag-and-drop on your system are as follows:
Step 1: Go to the file location selected for drag-and-drop.
Step 2: Now, select the file, drag it, and keep on pressing the mouse button.
Step 3: Press and hold Alt + Tab and navigate between different windows.
Step 4: Release the Alt + Tab once the file is at the desired location.
Step 5: Release the mouse button to drop the file at the desired location.
3. How do I drag multiple files into a folder?
The steps to drag multiple files into a folder are as follows:
Step 1: Go to the location having desired files for dragging into a single folder.
Step 2: Hold the left mouse button on the top-left portion and highlight the files.
Step 3: Drag the box until all desired files are highlighted.
Step 4: Dragging the selected files to another place is easy once the selected files are highlighted.
Was This Page Helpful?
Daisy is the Senior editor of the writing team for EaseUS. She has been working at EaseUS for over ten years, starting as a technical writer and moving on to being a team leader of the content group. As a professional author for over ten years, she writes a lot to help people overcome their tech troubles.
Written by Jerry
"I hope my articles can help solve your technical problems. If you are interested in other articles, you can check the articles at the bottom of this page, and you can also check my Facebook to get additional help."
Related Articles
-
Fix 'Windows Can't Find A System Image on This Computer' Error
![author icon]() Tracy King/2025-07-04
Tracy King/2025-07-04 -
Find / Change Thunderbird Storage Location (Step-by-Step Guide)
![author icon]() Larissa/2026-06-03
Larissa/2026-06-03 -
PC Stuck on BIOS Screen - How to Fix?🔥
![author icon]() Jerry/2026-06-17
Jerry/2026-06-17 -
PowerShell Get Disk Space on Windows 10/11 [Full Tutorial]
![author icon]() Sherly/2026-06-29
Sherly/2026-06-29
EaseUS Data Recovery Services
EaseUS data recovery experts have uneaqualed expertise to repair disks/systems and salvage data from all devices like RAID, HDD, SSD, USB, etc.