macOS Monterey was launched in 2021 with several intriguing innovations and enhancements, and you may wish to install macOS Monterey on your Mac. However, having a handy bootable USB installer lets you quickly install the latest macOS on numerous devices, do a clean install, and update your present system.
This article will introduce how to create Monterey USB installer on Mac, covering the prerequisites and procedures to take.
| Main Steps | Step-by-step Troubleshooting |
|---|---|
| 1. Download macOS Monterey on Mac | Head to the Mac App Store and type "macOS Monterey"> click "Get" to download...Full steps |
| 2. Format USB Drive in Disk Utility on Mac | Plug in the USB drive, launch Finder, and check to be sure it contains nothing essential...Full steps |
| 3. Create macOS Monterey USB Installer on Mac | Launch /Applications/Utilities/Terminal.app.Input sudo followed by a space...Full steps |
| 4. Install Monterey with USB Installer on Mac | Connect the bootable installer to an online Mac that may run the desired macOS version...Full steps |
Do I Need a Monterey USB Installer
The answer is yes if you're wondering whether you need to create Monterey USB Installer on Mac. You would want to generate a bootable USB installer for the lasted macOS version for several reasons.
To prevent the inconvenience of losing important data, it is recommended that you back up your important files via the EaseUS Data Recovery Wizard for Mac Pro before installing macOS.
Back Up Your Mac and Never Lose Data
Back up and restore your MacBook/iMac without Time Machine, iCloud, or external hard drives.
Let's look at some of the most prevalent reasons:
Clean Installation on Mac
It would help if you considered reinstalling Monterey on your Mac. This entails deleting the present operating system and starting again. By creating a USB installer, you can boot your Mac from the USB flash drive and install the new macOS version without losing any data or settings from the prior system.
Multiple Macs to Update to Mac
You may wish to upgrade numerous Macs to Monterey, and building a USB installer might save you time and effort. Instead of downloading the installer on each device, you may install the updated macOS version on all your Macs using the same USB stick.
Encountering Several Problems with the Current MacOS
You may have troubles with your current macOS version, which a clean install of Monterey will help. With a USB installer, you may reinstall the latest macOS version without worrying about mistakes or damaged data from the prior system.
Upgrading Mac's Hard Drive
If you're considering upgrading your Mac's hard disk or SSD, making a Monterey USB installer may help. Without having to clone the whole system, you may utilize the USB drive to install the updated macOS version on the new storage device.
To make the process easier, we will provide a video on how to create a Monterey USB installer on Mac. The video will provide a thorough explanation of what you need to do. Here are some of the main points of the video:
- 01:33 Format the Drive Using Disk Utility
- 02:15 Locate CreatInstallmedia
- 03:52 Execute CreatInstallmedia
- 05:00 Boot USB to Install MacOS Monterey
1. Download macOS Monterey on Mac
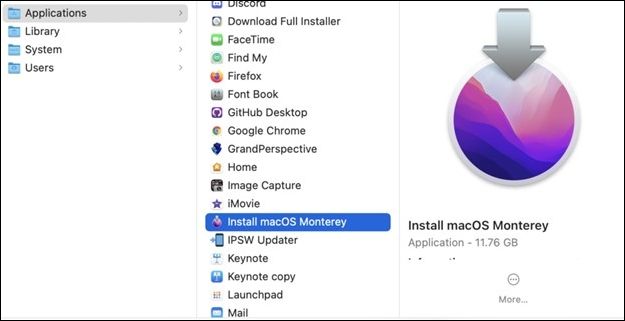
Head to the Mac App Store and type "macOS Monterey"> click "Get" to download.
Note: This will launch Software Update in Mac System Preferences>Download to start.
Once the macOS Monterey installer is completely downloaded, head to the Menu bar > Quit Install Monterey. This must be done because we don't want to install the Monterey. We want to create a Boot Disk.
Share this article on social media if it helps.
2. Format USB Drive in Disk Utility
Step 1. Plug in the USB drive. The USB drive must be at least 16GB.
Step 2. Launch Finder, and check to be sure it contains nothing essential.
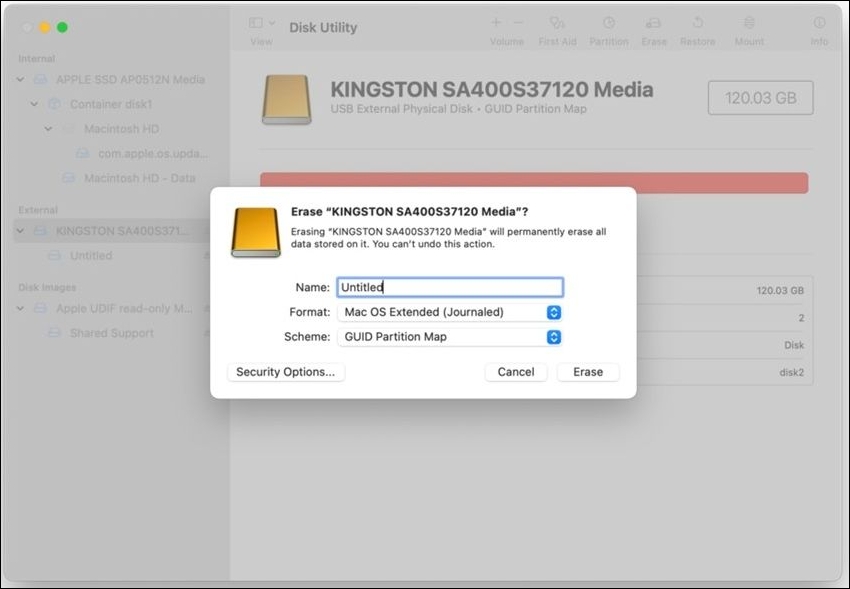
Step 3. Now, Launch Disk Utility and choose your USB drive. Your drive will be formatted as APFS.
Step 4. Click the Erase option in the bar and then click Format > Mac OS Extended (Journaled) > click Erase.
3. Create macOS Monterey USB Installer with Terminal
Step 1. Launch /Applications/Utilities/Terminal.app.
Step 2. Input sudo followed by a space.
Step 3. Drop the macOS Monterey installation program into the terminal.
Step 4. The whole command is sudo /Applications/Install macOS Monterey.app/Contents/Resources/createinstallmedia
Step 5. Drop your USB Flash Drive into the terminal window after adding the -volume command.
Step 6. To get to the final, complete path, you'll need sudo /Applications/Install macOS Monterey.app/Contents/Resources/createinstallmedia --volume /Volumes/Untitled.
Step 7. Press "Enter" after typing in your password.

Note: Once you click this button, the transfer to your USB flash drive will begin. Depending on how fast your USB Flash drive is, the whole process should take between 5 and 10 minutes.
Another option is to use a third-party program, EaseUS Data Recovery Wizard for Mac, which makes a USB drive that can be booted on a Mac. This program allows you to update the most recent macOS version, or you can choose any macOS version, like Monterey, that you'd like to modify.
✨Step 1. Connect USB Flash Drive and Choose a macOS Version
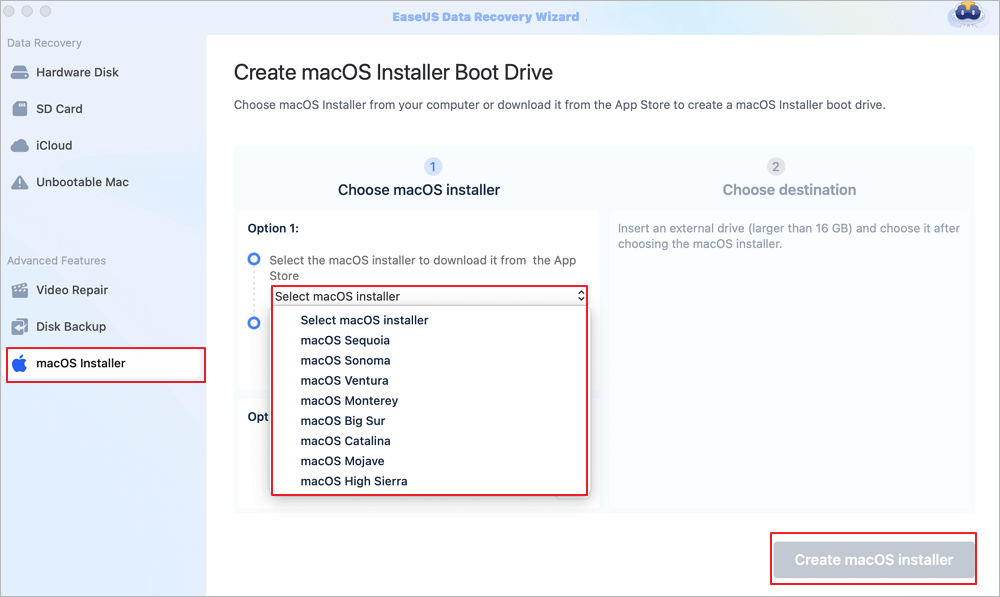
Launch EaseUS recovery software, and choose "macOS Installer" from the Advanced Features. Insert a USB that has more than 16GB of free storage space.
- Option 1: Choose a macOS version you want to install, and a new windows will ask you to download macOS installer from App Store. After downloading the installer, click "Refresh".
- Option 2: If you have already downloaded macOS installer, choose "Add" and select the installer you have downloaded.
Finally, you can choose "Create macOS Installer" to start creating the bootable installer. You can select various macOS versions like macOS Sequoia, Sonoma, Ventura, Monterey, Big Sur, and older versions.
✨Step 2. Erase the USB and Create a macOS Installer
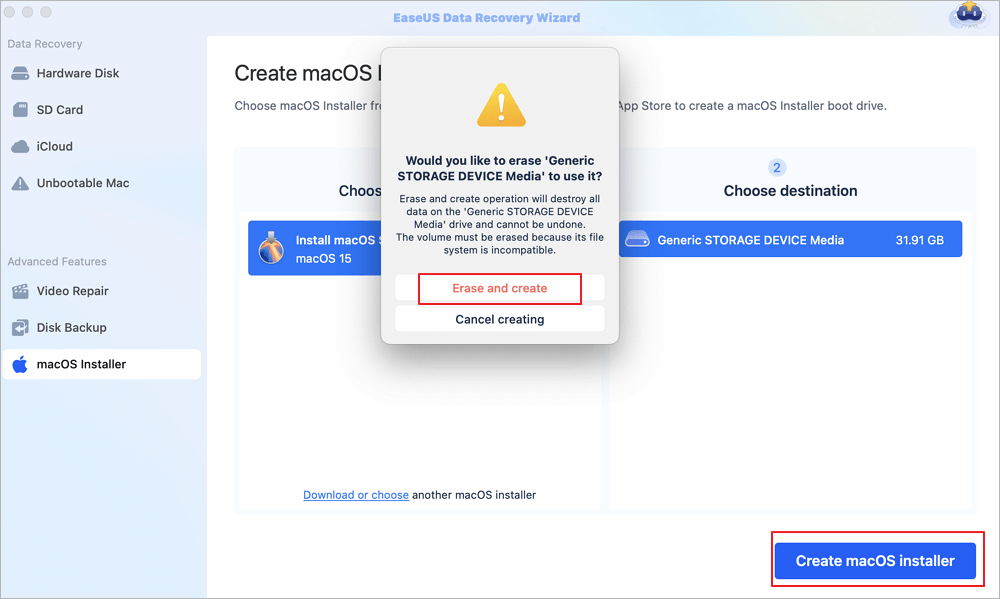
A notice window will appear to warn you this operation will remove everything on this USB. Make sure you have backed up data and nothing important is left on this USB, click the "Erase and create".
✨Step 3. Wait and Check How to Use macOS Installer
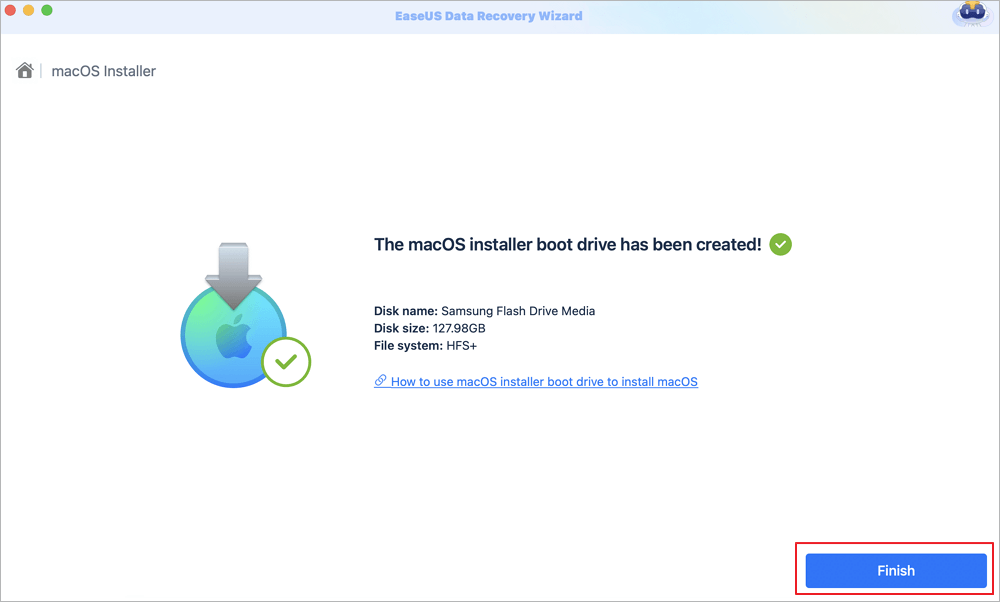
The software will automatically format the USB and download macOS installer files. After creating the bootable macOS installer, click the blue link on the interface to learn how to use the macOS Installer boot device to install macOS. Finally, click "Finish" to complete the whole process.
4. Install Monterey with USB Installer
For Apple Silicon, follow the steps below to install Monterey USB Installer:
Step 1. Connect the bootable installer to an online Mac that may run the desired macOS version.
Step 2. Start the Mac by pressing and holding the power button until the Startup Disks pane appears.
Step 3. Choose the drive that has the installation and hit Continue. When prompted, follow the on-screen instructions to install macOS.
For Intel Macs, follow the steps below:
Step 1. Connect the bootable installer to an online Mac that may run the desired macOS version.
Step 2. Launch your Mac and hold down the Option (Alt) key until you see the Apple logo.
Step 3. Let go of the Option key when a black screen displaying your bootable volumes appears.
Step 4. Choose the disk from which the installer may be launched automatically. Then either hit Return or click the on-screen arrow.
Step 5. If asked, choose the language you prefer.
Step 6. From the Utilities tab, choose to Install macOS, then click "Continue" and follow the on-screen instructions.
Recover Lost Data After Monterey Installation
Data loss is unpleasant, particularly after switching to a new operating system such as Monterey. However, there is a tool that might assist you in recovering lost data after installing Monterey: the EaseUS Data Recovery Wizard for Mac. It can recover data from a wide range of storage media, including restoring data from USB drives, external hard drives, and memory cards.
EaseUS Data Recovery Wizard
- Recover lost data of various internal or external devices, such as recovering SD cards on Mac.
- Support data recovery in special situations even when your Mac gets in trouble, such as data recovery from unbootable Mac.
- Support data recovery for suddenly disappeared files, sudden deletion, formatting, hard drive corruption, virus attack, etc.
To easily understand the operation of EaseUS data recovery software, here are the steps to recover your lost data:
Step 1. Select the drive to be scanned
In the main EaseUS Data Recovery Wizard window, there will be a list of the drives connected to your Mac. Select the drive you need to recover lost/deleted files from, and click the "Search for lost files" button.

Step 2. Select your lost data/files
EaseUS Data Recovery Wizard for Mac will immediately scan your selected disk volume and display the scanning results on the left pane. You can sort the results to find the wanted files if you are looking for certain files.

Step 3. Recover lost/deleted data
Once you have found the desired files, preview the files and then click "Recover" to begin the recovery of your deleted/lost Mac files.

The Final Words
Creating a Monterey USB installer is a quick and easy method to upgrade or repair your Mac. You may make a bootable installer for Monterey and use it to do a clean install of the latest macOS version by following the step-by-step procedure.
If you experience data loss after the installation, you may recover it using EaseUS Data Recovery Wizard for Mac. Always back up your data before installing or upgrading, and ensure you have the necessary resources and tools before beginning any operation.
Create Mac OS Monterey USB Installer FAQs
This section will help you answer some of the commonly asked questions to help you with any ambiguity left.
1. How to create macOS Ventura bootable USB?
First, format the USB drive using the Disk Utility tool on your Mac to create a macOS Ventura bootable USB. Then, use the Terminal app to generate a bootable installation.
2. How to get Monterey resources to create a bootable installer?
You'll need the Monterey installation file from the Mac App Store and a USB disk with at least 16GB capacity to make a bootable installer. The installation file is available for free download from the Mac App Store.
3. What is the Monterey USB installer for?
The Monterey USB installer is a bootable USB stick that includes the macOS Monterey installation files. It enables you to install the new macOS version clean, update numerous devices, or repair problems with your existing macOS version.
4. How do I clean install macOS Monterey?
To install macOS Monterey cleanly, boot your Mac from the Monterey USB installer, wipe the existing system drive, then install the new macOS version on the freshly formatted disk. The procedure entails utilizing the Disk Utility software and following the installation steps.
Was This Page Helpful?
Jaden is one of the editors of EaseUS, who focuses on topics concerning PCs and Mac data recovery. Jaden is committed to enhancing professional IT knowledge and writing abilities. She is always keen on new and intelligent products.
Dany is an editor of EaseUS who lives and works in Chengdu, China. She focuses on writing articles about data recovery on Mac devices and PCs. She is devoted to improving her writing skills and enriching her professional knowledge. Dany also enjoys reading detective novels in her spare time.
Related Articles
-
How to Add Storage to Steam Deck [2025 Full Guide]
![author icon]() Sherly/2025-01-24
Sherly/2025-01-24 -
Should You Compress Backups or Not [Pros & Cons]
![author icon]() Sherly/2025-01-24
Sherly/2025-01-24 -
How to Turn Off Sleep Mode on Mac/MacBook Air/iMac
![author icon]() Brithny/2025-02-25
Brithny/2025-02-25 -
Mac Won't Update? Here Are 7 Ways to Fix macOS 13 Ventura Upgrade Failed
![author icon]() Brithny/2025-02-25
Brithny/2025-02-25
EaseUS Data Recovery Services
EaseUS data recovery experts have uneaqualed expertise to repair disks/systems and salvage data from all devices like RAID, HDD, SSD, USB, etc.