Apple has recently released macOS Ventura, a new operating system version. If you are fascinated by the unique features of macOS Ventura and want to clean install macOS Ventura on Mac, you are on the right page. This article will tell you what to do before the clean installation of macOS Ventura and how to perform it with a bootable USB drive.
Part 1: Why Perform a Clean Installation of macOS Ventura
A clean install is an installation in which any previous version will be deleted. Compared with an upgrade, a clean installation seems more suitable for computer users who want a new start on their Mac devices. However, if you're going to retain your files, apps, and settings, perform an upgrade, and if you want better performance and a clean Mac OS, a clean install is a good choice.
A clean installation is always preferred among computer users. You can benefit from a clean installation of macOS Ventura on Mac.
- Enjoying better stability and responsiveness.
- Having better compatibility with applications.
- Making full use of storage space.
- Improving performance and efficiency.
Part 2: All You Need to Know Before Clean Install macOS Ventura
Before starting the clean installation process, many things need our attention. Let's check what they are:
Compatibility
Not every Mac computer is compatible with macOS Ventura. Therefore, it is essential to know whether your system will support it before installing the macOS Ventura on your Mac. The following are the devices compatible with macOS Ventura:
- Mac Studio (2022)
- Mac Pro (2019 and later)
- MacBook Air (2018 and later)
- Mac Mini (2018 and later)
- iMac (2017 and later)
- iMac Pro (2017 and later)
- MacBook (2017 and later)
- MacBook Pro (2017 and later)
Storage Requirements
Firstly, you need two external hard drives, one for creating the bootable installer and another for backing up files on your Mac. Creating a boot disk requires at least 16GB of storage space.
Secondly, before making any clean install, you should know how much storage space you need. So, ensure that you have a minimum of 16GB of free space for everything to run smoothly on your Mac because the installer of macOS Ventura is about 12GB. However, you still need extra space to install software and applications on your Mac. And if you don't have the free space required, you can use macOS Optimize Storage to clean up the junk.
Backup
If you have critical data stored on your Mac, you should back up your Mac computer. This is because a clean installation will wipe every file stored on your Mac. That is why backup is necessary. You can use any of the ways below to back up your data:
Method 1. Using Time Machine
Time Machine is a built-in backup feature of macOS. It allows you to automatically back up your data once set up and restore it after the clean installation. Time Machine can back up apps, photos, music, email, and documents. And you need an external drive to use Time Machine. It seems that Time Machine can save most personal data. However, it does have some limitations. For example, it has no cloud storage. In addition, Time Machine cannot back up:
- iOS devices.
- Network settings.
- Email messages or accounts.
- iCloud content.
- Specific system files or applications.
Method 2. Using Professional Backup Software
Time Machine is an excellent backup and recovery tool for Mac, but you should recognize its shortcomings when backing up your Mac device. And if you want to back up everything on Mac, you can turn to third-party backup software, such as EaseUS Todo Backup, for help. EaseUS Todo Backup is one of the best backup software for Mac.
EaseUS Todo Backup for Mac is great for backing up data from any Mac device. In addition, it allows you to back up the entire Mac computer, create an automated backup, change the iTunes backup location, compress the backup for saving storage space, and clone a USB drive. Besides, it is easy to use because you can back up your Mac with three simple steps.
The following are the steps to back up your Mac.
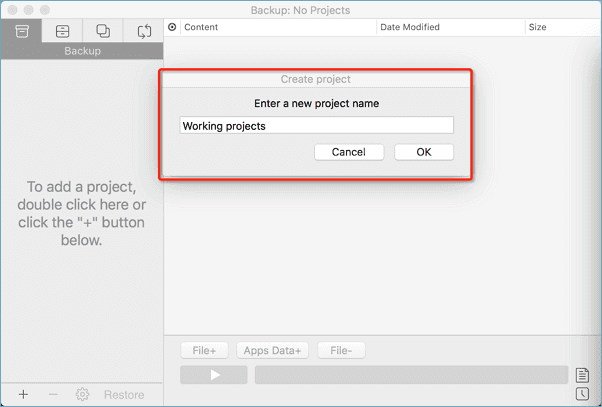
Step 1. Launch and run EaseUS Todo Backup for Mac.
Click the first Backup tab or simply click the + button in the bottom-left corner to create a backup project - name the backup project and click OK.
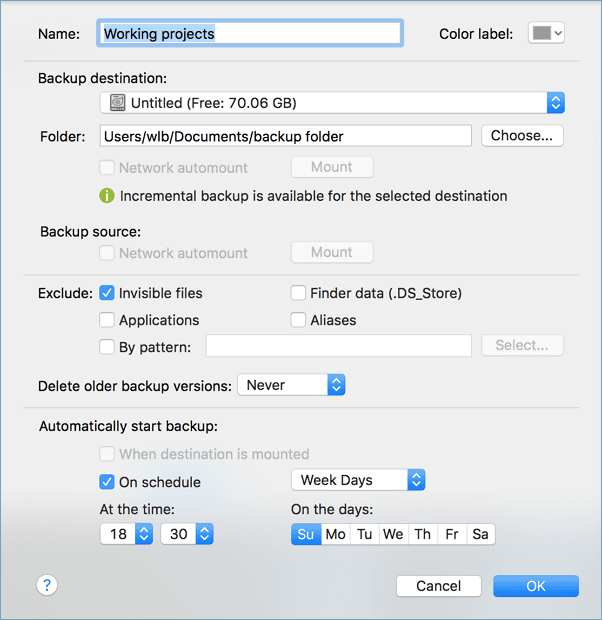
Step 2. Set up the backup destination where you want to store Mac files as backups, automatic backup frequency, etc and click OK.
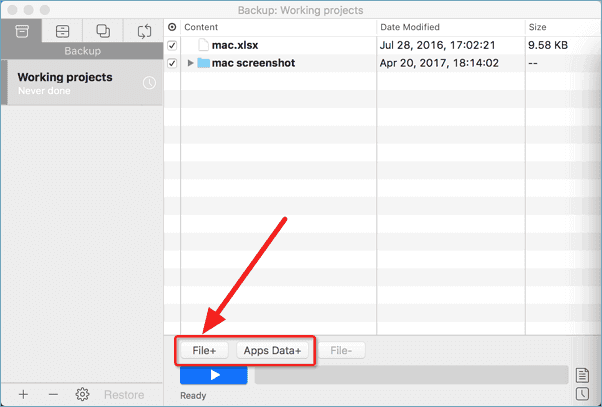
Step 3. Add files and folders to the backup project.
Click File+ to selectively choose files and folders to add to the backup and click the blue start button to back up your Mac to another drive or external device.
Part 3: How to Clean Install macOS Ventura with USB Installer Drive
Since you already know everything before installing macOS Ventura on Mac, it is time for us to come to the point: how to do a clean installation of macOS Ventura. Here, I will introduce a way to clean install macOS Ventura. Let's see how it works.
| Workable Solutions | Step-by-step Troubleshooting |
|---|---|
| Step 1. Download macOS Ventura | To download and install macOS Ventura 13.0 Final on your Mac...Full steps |
| Step 2. Create macOS Ventura USB Installer | 1. Create a macOS Ventura USB Installer by executing a few...Full steps |
| Step 3. Adjust Startup Security to Use Ventura USB Installer | 1. Reboot your Mac and start it in Mac Recovery Mode...Full steps |
| Step 4. Clean Install macOS Ventura | 1. Connect the bootable USB drive to your Mac. 2. Enter the...Full steps |
Step 1. Download macOS Ventura
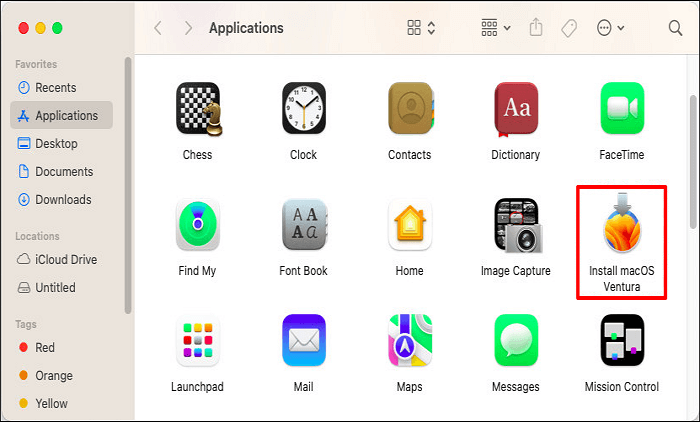
To download and install macOS Ventura 13.0 Final on your Mac, launch the App Store and find "macOS Ventura."
Step 2. Create macOS Ventura USB Installer
1. Create a macOS Ventura USB Installer by executing a few commands in the Terminal.
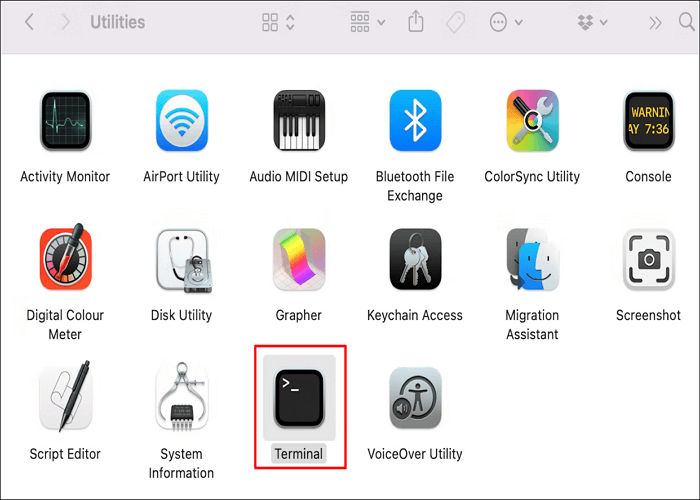
2. Launch the Terminal app on Spotlight search, then run the commands below.
sudo /Applications/Install\ macOS\ Ventura.app/Contents/Resources/createinstallmedia --volume /Volumes/Installer --nointeraction
Note: You should replace Installer with your USB drive's actual name.
3. Hit Return after the command line is written into the Terminal.
Step 3. Adjust Startup Security to Use Ventura USB Installer
1. Reboot your Mac and start it in Mac Recovery Mode.
2. Enter the Recovery Mode to adjust your Mac's security settings.
- For M1/M2 Mac: Press the Power button until you see Loading Startup Options.
- For Intel-based Macs: Hold the "Command + R" keys when Mac starts.
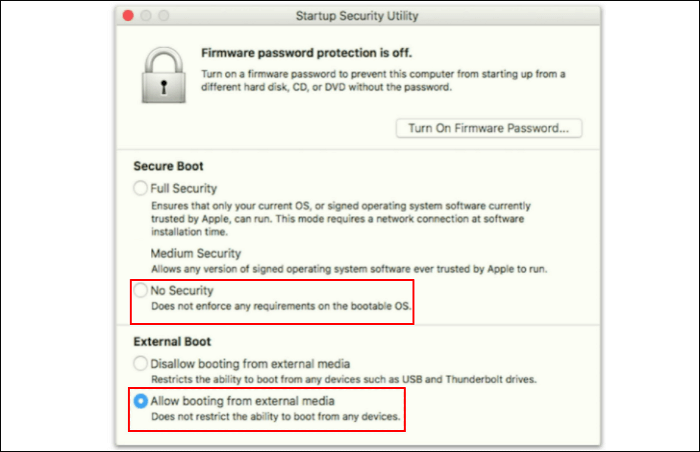
3. Click Utilities on the top menu, and then select Startup Security Utility.
4. Choose "No Security" and "Allow booting from external or removable media." Then save the settings and shut down Mac.
Step 4. Clean Install macOS Ventura
1. Connect the bootable USB drive to your Mac.
2. Turn on the Mac and hold the Option key as long as boot options appear.
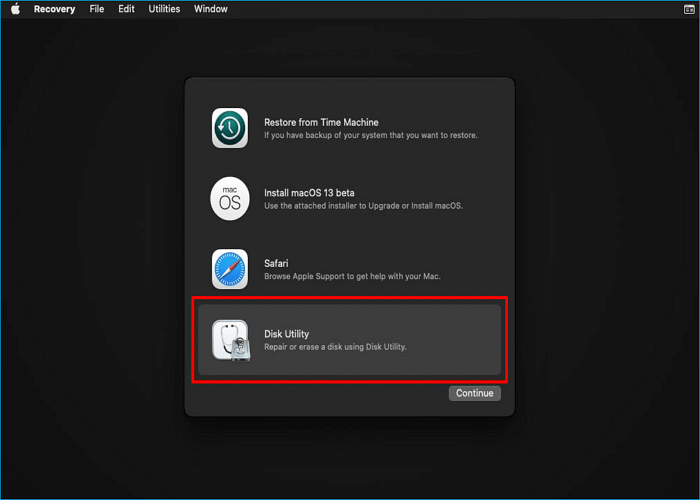
3. Choose Disk Utility from the options.
4. Click View, and select Show all devices.
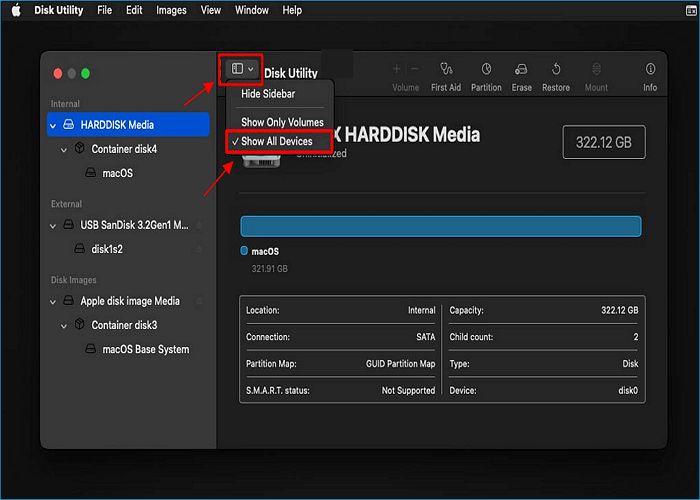
5. Choose Mac's internal disk. Click Erase and choose APFS format. Click Erase to format the disk.
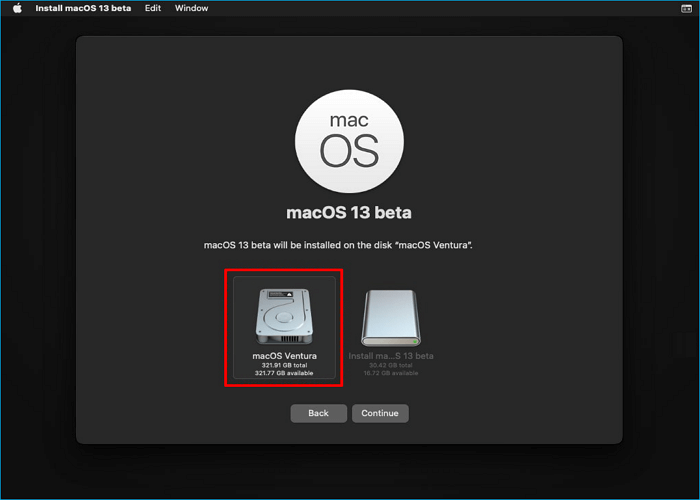
6. Close the Disk Utility after the cleaning process is complete. Then, choose "Install macOS 13 Beta" to perform a clean installation of macOS Venture.
You can also create a bootable installer using a USB drive with EaseUS Data Recovery Wizard for Mac. It features a free function that allows you to construct a macOS Ventura installer quickly. Check out and give the following guide a try:
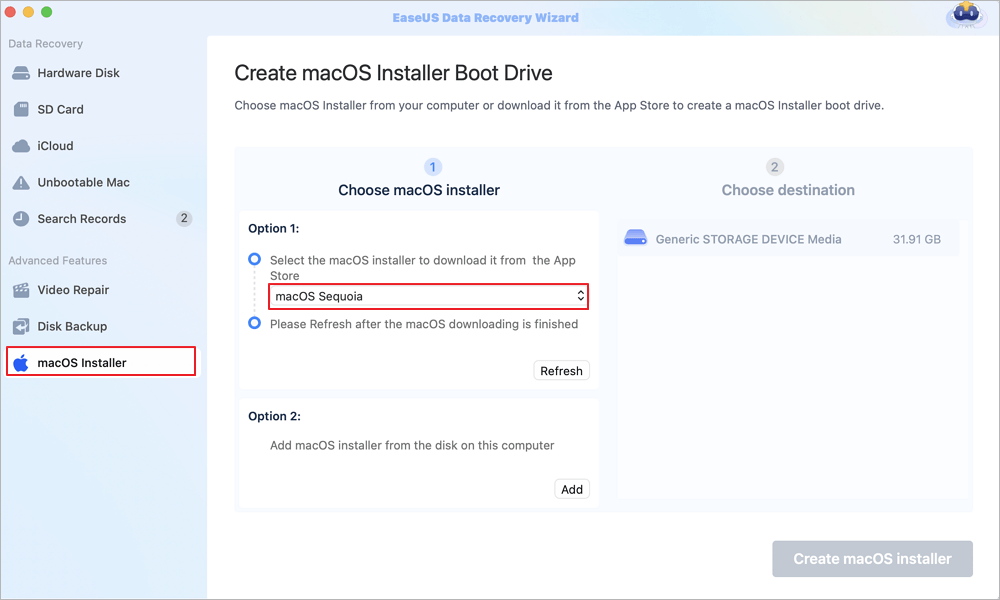
Step 1. Select macOS installer
Launch EaseUS Data Recovery Wizard for Mac and click "macOS Installer" on the left side. In tab 1, unfold the macOS version list by clicking "Select macOS intaller". You can also select "Refresh" button after downloading the macOS installer from App Store.
You can download macOS installer to upgrade or downgrade macOS, and you can find all the available versions, no matter the latest or older versions. Morever, you can apply macOS installer to dual boot Mac and run two macOS together.
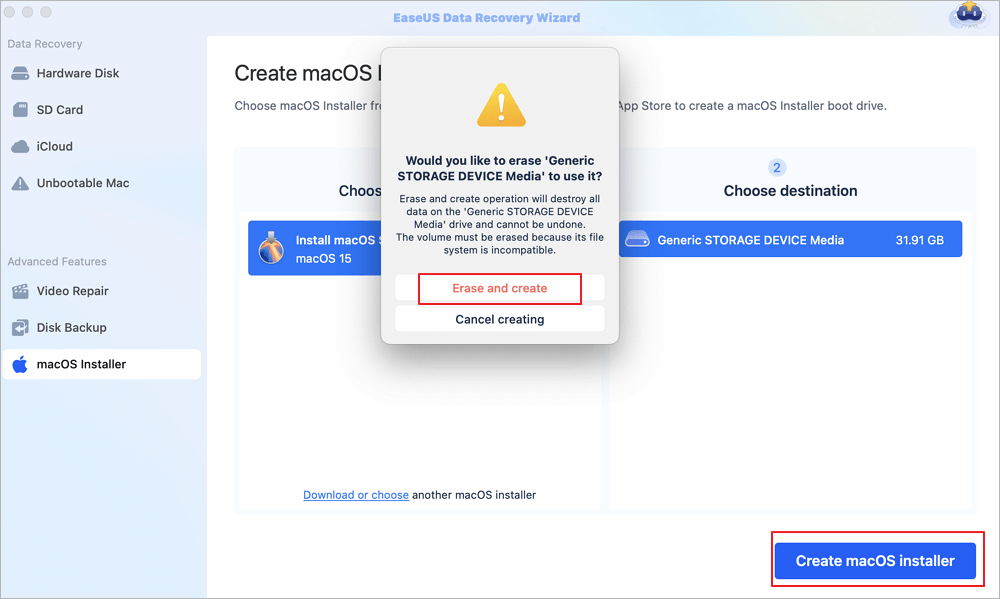
Step 2. Format the USB flash drive
Connect a USB flash drive (larger than 16 GB) to the Mac as your macOS boot drive. Choose the USB drive you prepared in tab 2 and click the "Erase and create" option in the pop-up window to format your USB flash drive. Then click the "Create macOS installer" button to start the creating.
- Important: This progress will delete all data on your USB flash drive, please back up the data before, or use EaseUS data recovery software to recover your data.
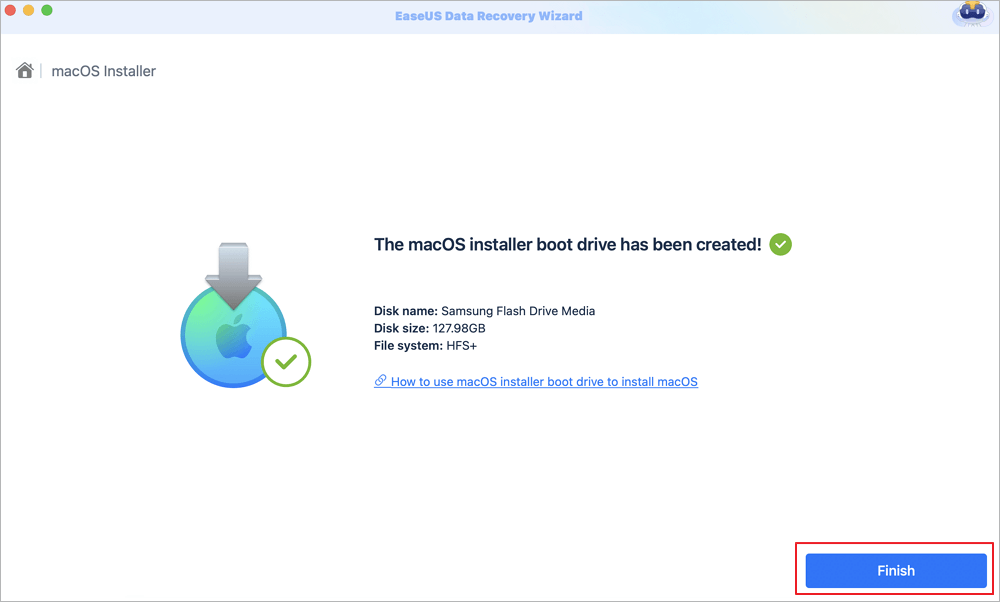
Step 3. Create the macOS installer boot drive
Click the "Finish" button after the macOS installer creating is finished. Follow the prompts on the interface to perform subsequent installation operations.
Part 4: The Bottom Line
Now you know how to clean install macOS Ventura on your Mac device. Clean install macOS Ventura is ideal for mac users to experience the new features of the latest operating system. This article tells you all about how to perform a clean installation of macOS Ventura from a bootable USB. You can follow the steps carefully to do so. Before starting the clean installation process, always back up your Mac with a reliable and safe backup tool, such as EaseUS Todo Backup for Mac. This backup software has much to offer you. Do not hesitate to try it!
FAQs
1. Is it worth doing a clean install of macOS?
A clean install lets you clear old files before installing the OS onto a freshly formatted disk. Besides, a clean install is necessary before selling your Mac or passing it on.
2. Why does my Mac keep saying error while installing?
If your Mac says an error while preparing an installation, boot into Safe Mode and check your date and time settings. Then, boot into Recovery Mode, run First Aid, and try to reinstall the OS without erasing the drive. If the issue persists, erase the drive and try to reinstall the OS.
3. Does factory resetting a Mac remove viruses?
In most cases, yes. However, it will not be helpful when your backup, recovery partition, or other devices are infected. Besides, resetting the Mac will not help if it was infected with a rootkit enabling administrator-level access to your device.
4. Should I restore from Time Machine or reinstall macOS?
If your system or startup disk is destroyed, you can restore your data by utilizing Time Machine to back up your Mac. However, it would be best if you first reinstalled macOS on your Mac before you restore your data using your Time Machine backup.
Was This Page Helpful?
Jaden is one of the editors of EaseUS, who focuses on topics concerning PCs and Mac data recovery. Jaden is committed to enhancing professional IT knowledge and writing abilities. She is always keen on new and intelligent products.
Written by Jerry
"I hope my articles can help solve your technical problems. If you are interested in other articles, you can check the articles at the bottom of this page, and you can also check my Facebook to get additional help."
Related Articles
-
Acronis Clone Disk Wizard Stuck During Cloning Process - How to Fix
![author icon]() Larissa/2025-09-04
Larissa/2025-09-04 -
You May Not Install to This Volume Because It Is Currently Being Encrypted
![author icon]() Jaden/2025-09-17
Jaden/2025-09-17 -
Do I Need to Backup OneDrive? [Why & How-to Guide]
![author icon]() Larissa/2025-07-04
Larissa/2025-07-04 -
Steam Deck SD Card Format | What's It & How to Format [Ultimate Solution]
![author icon]() Cici/2025-07-10
Cici/2025-07-10
EaseUS Data Recovery Services
EaseUS data recovery experts have uneaqualed expertise to repair disks/systems and salvage data from all devices like RAID, HDD, SSD, USB, etc.