On November 16, 2022, the sequel of Call of Duty: Warzone 2.0 caused a great upsurge once it is released. As a shooting game supporting multiplayer online, COD has constantly attracted a large number of new players by using the game mode of competition and exciting play method settings.

At present, COD is applicable to game consoles such as PlayStation 4/5, Xbox One, and Xbox Series X/S and also supports PC users using Windows systems. It is worth noting that on the PC, you need to download and play Call of Duty: Warzone through the game platform provided by Blizzard.
It is also due to the involvement of the game platform that it is very difficult for novice players to find or change the Call of Duty Warzone file location. But don't worry, this post will bring all you want to know.
Maybe you are interested in these posts:
Where is the File Location of COD: Warzone
When you download Call of Duty: Warzone to your computer, if you do not set your desired download destination, Blizzard will download the game in the default path and name it after the game name. So you can directly enter the game name in File Explorer and search for the file location.
However, this method takes a long time. We recommend you find the COD file location directly through the Blizzard platform's settings. Follow the simple steps below, and you will get the COD file in a few clicks.
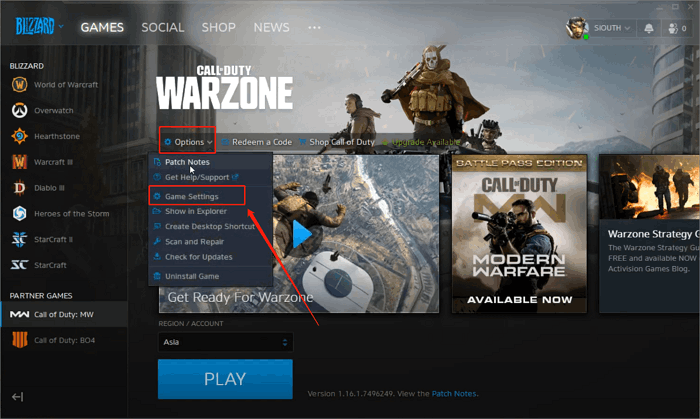
Step 1. Open the Blizzard platform(Battle.net app)
Step 2. Click the "Game Settings" button on the showing page of COD

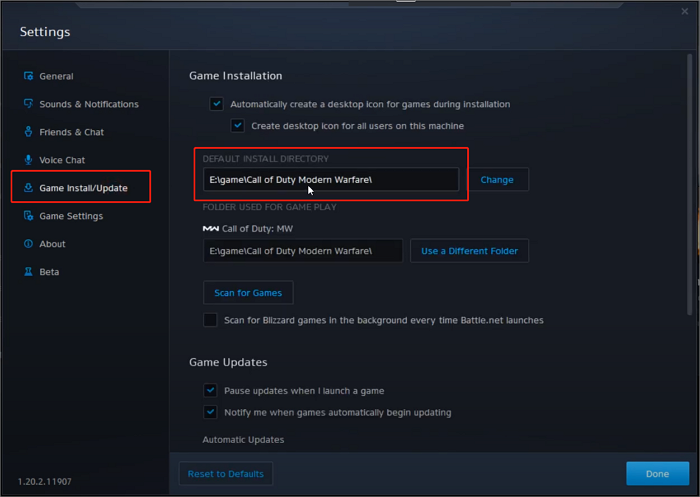
Step 3. Choose the "Game Install/Update" button
Step 4. Now you can see the default download address.
How to Change COD: Warzone File Location
Call of Duty: Warzone needs to occupy at least 175 GB of disk space, which may be a great burden for users who have not done a good job of hard disk partitioning. With the game update, many users will find that the disk space where the original file is located is insufficient to hold more data. At this time, you need to move the COD file to a larger hard disk.
Here is a detailed tutorial on how to change the file location of Call of Duty: Warzone.
Step 1. Find the COD file location by following the method the post shows
Step 2. Copy the file using the command prompt to another hard disk you prepared and delete the original one
Step 3. Open the Game Settings of COD on the Blizzard platform(Battle.net app)
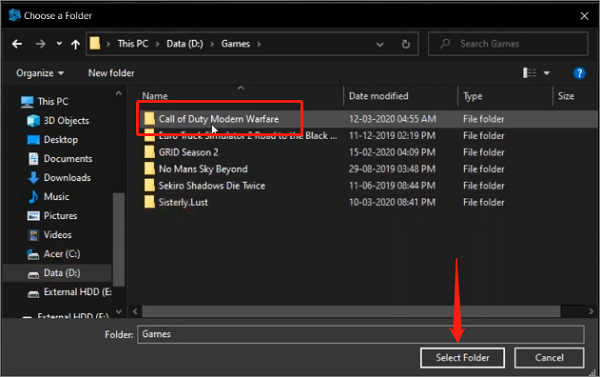
Step 4. Choose the "Game Install/Update" button and click "Use a Different Folder"

Step 5. Now find the new file location you just changed and hit "Select"
Now you've changed the Call of Duty: Warzone file location without affecting the normal operation of the game.
How to Backup COD: Warzone File
The importance of COD files is self-evident. It is the key to the normal operation of the game. To maintain the game's stability and ensure that the data in the game is not affected, it is necessary to back up the COD file. Among much backup software, EaseUS Todo Backup Home is the best choice for you to backup COD.
Secure Download
Conclusion
Call of Duty: Warzone is still one of the hottest games on PC. As a novice player, we hope that after reading this article, you can master the method to find and change the Call of Duty: Warzone file location. At the same time, we recommend you use EaseUS Todo Backup Home to back up file data to maintain the game's stability further.
FAQs
What is the storage of Warzone on PC?
Warzone requires at least 175GB of hard disk storage space.
How to install Cod Warzone on PC?
You should install COD: Warzone on your PC through the Blizzard platform. Here are the simple steps for you to follow:
Step 1. Open Blizzard platform(Battle.net app)
Step 2. Find Call of Duty: Warzone and open its showing page
Step 3. Hit the install button to get it on your PC
Was This Page Helpful?
Jean is recognized as one of the most professional writers in EaseUS. She has kept improving her writing skills over the past 10 years and helped millions of her readers solve their tech problems on PC, Mac, and iOS devices.
Written by Rel
Rel has always maintained a strong curiosity about the computer field and is committed to the research of the most efficient and practical computer problem solutions.
Related Articles
-
How to Fix SSD Slow Write Speed on Windows 10/11 [Full Guide]
![author icon]() Sherly/2026-06-29
Sherly/2026-06-29 -
How to Fix One of Your Disks Needs to Be Checked for Consistency in Windows 7/8/10/11
![author icon]() Jaden/2026-05-21
Jaden/2026-05-21 -
Star Wars Outlaws Save Location - Where to Find & How to Backup?
![author icon]() Jerry/2025-07-04
Jerry/2025-07-04 -
Why Is My SD Card So Slow [All Reasons Explained 2025]
![author icon]() Sherly/2025-07-04
Sherly/2025-07-04
EaseUS Data Recovery Services
EaseUS data recovery experts have uneaqualed expertise to repair disks/systems and salvage data from all devices like RAID, HDD, SSD, USB, etc.