
EXE files are executable files designed to run only on Windows operating system. These files are used to either open or install applications on your computer. On Mac computers, the operating system does not support EXE files, it relies on DMG extension. If you are wondering if you can run an .exe file on Mac, then here is something you need to know. The key point is to create or install a Windows system on the Mac. Both macOS built-in application and third-party software can make it possible.
How to Run EXE Files on Mac
To install a Windows system on Mac, there are various ways you can apply. Here we choose three of the most popular ways - using the Boot Camp, installing Windows on a virtual machine, and creating a portable Windows system drive. Now follow the guide below to see how to run exe files on Mac.
Method 1. Install Windows OS with Boot Camp
Boot Camp is a utility equipped with your Mac and allows you to switch between Windows and macOS. Download a copy of Windows 10 and let the Boot Camp Assistant walk you through the steps to install the software on your Mac computer. Before you start, notice that Boot Camp requires at least 64 GB of free disk space for installation. Here are the steps you can follow otherwise.
Step 1. Download the installation file
Download the Windows ISO file. Remember that now Boot Camp only supports Windows 8/8.1/10. Choose the proper version to download.
Step 2. Partition Mac Drives
Open Boot Camp Assistant, which is in the Utilities folder of your Applications folder. When asked to insert a USB drive, choose a USB drive that is at least 8GB. It is used for creating a bootable USB drive for Windows installation. You need also set the partition size, remember it should be at least 64GB.
Step 3. Format the Windows Partition
The next step is to format the partition for the Windows system. When Boot Camp Assistant finishes, your Mac restarts to the Windows installer. Select the BOOTCAMP partition as the install destination, and click Format. In most cases, the installer selects and formats the BOOTCAMP partition automatically.
Step 4. Install Windows with Boot Camp
Then your Mac will start to install Windows. When the process is finished, you could see a "Welcome to the Boot Camp installer" window. Follow the on-screen wizard to install Boot Camp and Windows support software.
Method 2. Install Windows OS using Virtual Machine
Another way to install Windows is to use the VM (virtual machine) software. With this method, you need a valid Windows license. You can download it and install it in a virtual machine program if you already have a product key.
Parallel desktop helps you run Windows on Mac without rebooting. Seamlessly move and share content between Mac and Windows. The software is simplistic and easy to set up. Here are the steps you can follow if you wish to learn how to run exe on Mac.
Step 1. Windows installation
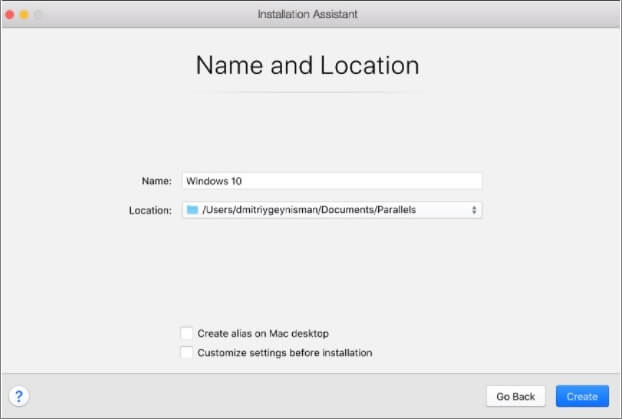
Install and open Parallels on your Mac. Go to File > New > Install Windows or another OS from DVD or image file. Select the Continue option to install windows either from a bootable USB drive or from a DVD. Then enter the Windows product key.
Enter the details and continue and type in a name for the virtual machine. This will initiate the installation process. Once installed, open Windows by clicking on the Power button and choosing from the list of the Parallels Virtual Machine.

Step 2. Use the Parallels desktop
Open the Parallels Desktop form Spotlight option. Click on Virtual Machine and then select the option to Configure from the drop-down menu. Click on Options and then click on Shared Folders. Click on Add and then select the Choose option. These steps will include a path from your Mac's desktop to the virtual machine.
Method 3. Creating a Portable Windows USB Drive for Mac
Besides installing a Windows system on your Mac, there is a better and easier method you can try, which is to create a portable Windows USB drive. This method requires zero free disk space on your Mac computer, so you don't need to worry about installing dual OS would lower your Mac disk space.
Third-party software is necessary for this method, EaseUS OS2Go is what we recommend. It requires no complicated operation steps or advanced computer knowledge. With simple steps and clear instructions, you can create a portable Windows USB drive. Here are how you can use the EaseUS OS2Go.
Step 1. Install EaseUS OS2Go on your Windows computer, it will display your system drive's used space. Plug in a USB drive that is larger than the system drive used space. Choose the target USB drive and click Next to continue.

Step 2. EaseUS OS2Go will notify you that the following operation would delete all data on your drive. Make sure that you have backed up all the important data. Click the Continue button to proceed.

Step 3. Adjust disk layout. The default disk layout on the target drive will be exactly the same as the resource drive. You could also edit the layout according to your needs. Tick the option there if you're using a Solid State Drive as the Windows bootable drive. Next, click Proceed.

Step 4. Then EaseUS OS2Go will start to create the portable USB drive. It usually takes a while depending on your OS and Network condition. When the progress reaches 100%, the USB drive should be bootable now.

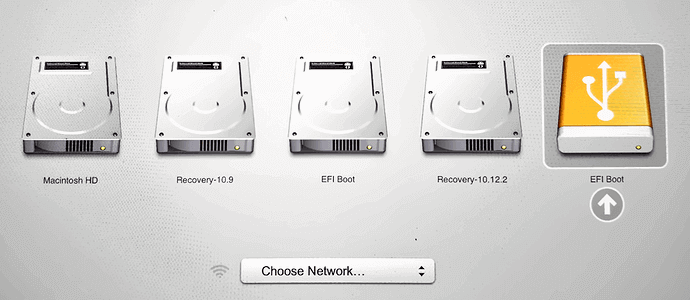
Step 5. Insert the portable Windows USB and start your Mac. Press the Option/Alt key. Choose the yellow EFI Boot icon to boot from the USB drive. Then follow the onscreen instruction to boot your Mac.
A portable Windows USB drive not only works for Mac computers to run Windows-based apps but is also a great choice for businessmen. Once created such a drive of your own computer, you can use it to boot any other's computer with your own system. You don't need to worry about the internet connection or if it will erase other's computer data. We can promise you it doesn't need an internet connection and there is no data loss.
Conclusion
There are different ways to run an EXE file on Mac. Whether you use Boot Camp or a Virtual Machine or EaseUs OS2Go, it will basically involve installing Windows operating system within your Mac computer. You can then launch the EXE file within that Windows operating system installed within the Mac device.
Was This Page Helpful?
Related Articles
-
Windows 11 Download - How to Get the Windows 11 22H2 ISO File
![]() Jean/2023-11-17
Jean/2023-11-17 -
Windows 7 ISO File Download [Ultimate and Professional Edition]
![]() Cedric/2023-11-06
Cedric/2023-11-06 -
How to Play League of Legends (LOL) on Mac with 3 Solutions
![]() Jean/2023-12-12
Jean/2023-12-12 -
Windows 11 Pro Download Full Version Direct Link (Tested and Trusted)
![]() Jean/2023-11-17
Jean/2023-11-17
EaseUS OS2Go
- Create portable Windows to USB
- Copy installed Windows OS to USB
- Clone Winodws OS drive to USB
- Run Windows 11 on any PC
- Run Windows 11 on unsupported PC
- Run Windows 11/10 on a Mac