Tesla Dashcam records video footage of your vehicle's surroundings when you are driving a Tesla car. It is used to record notable events when you are driving. How to view Tesla Dashcam footage? Here are 4 effective ways to view Tesla Dashcam footage:
| This is the most powerful method, as it allows you to view deleted Tesla Dashcam footage clips. | |
| 🚗Fix 2. View Tesla Dashcam Footage on Touchscreen | It's the easiest and fastest way to check Tesla Dashcam footage clips when you're parked. |
| 💻Fix 3. View Tesla Dashcam Footage on Mac | When the USB storage is running low, you can back it up on your Mac and format it for further use. |
| 📱Fix 4. View Tesla Dashcam Footage on iPhone | It allows you to view Tesla Dashcam videos without transferring the USB drive to your computer. |
Add the Dashcam app to the bottom bar of the Tesla Model X, Model 3, or Model Y touchscreen to access Tesla Dashcam footage conveniently. Is Tesla Dashcam footage always recording? The answer is no; it does not record videos when Dashcam is Off. In order to protect your privacy, footage recorded by Tesla Dashcam is saved locally to a formatted USB flash drive and won't be sent to Tesla.
How to View Tesla Dashcam Footage on Touchscreen, Mac, iPhone
Before learning how to view the Tesla Dashcam footage, you should follow three parts to use the Tesla Dashcam: format the USB drive, insert it, and enable the Tesla Dashcam. To make it easier to understand, we added a video tutorial here; check it out:
- 02:36 - What is Dashcam
- 02:55 - Optimize Sentry Mode and Dashcam Settings
- 06:03 - Using Dash Cam
- 07:17 - Removing Sentry Mode/Dashcam Footage from your Tesla
Once the recording is saved, you can access Tesla camera footage clips on the touchscreen or your MacBook. Or you can insert the Tesla USB into your computer to view the footage clips.
🏆How to View Tesla Dashcam Footage with Software
Dashcam footage helps drivers check their driving conditions and, in the unfortunate event of an accident, it helps the judicial authorities figure out the cause and effect of the accident.
To view the Tesla Dashcam footage on your device, you can find numerous ways, but the easiest way must be using EaseUS Data Recovery Wizard for Mac Pro, which can cut out the complicated process and directly view all files on your Tesla Dashcam storage space, including hidden, lost, and deleted footage.
The Tesla Dashcam will not save recordings when it is short of space. In this case, most users may delete the early footage to free up space on the USB drive. As a result, your Tesla Dashcam footage may be lost or deleted.
Even if your dashcam storage device (including SD card, external disk, etc.) has been damaged (partition corruption or RAW format), it can quickly read the recoverable data on it. In addition, the EaseUS software can help you view the deleted Tesla Dashcam footage and, if necessary, recover Tesla Dashcam footage on a Mac quickly.
Camera Photo Recovery: Restore Lost Photos from Any Camera or SD Card
In this page, you will learn about digital camera photo recovery and how to recover lost digital photos, pictures, images, and videos from a memory card.

It supports USB recovery Mac and recovers various video types from the external USB drives, including recovering deleted ring videos, dashcam footage recovery, etc. Besides, if your USB drive is corrupted, the EaseUS Mac data recovery software can fix a corrupted USB on a Mac.
Here are detailed steps to recover your deleted Tesla Dashcam footage on Mac:
Step 1. Connect your USB drive to your Mac
Correctly connect your USB flash drive to your Mac. Launch EaseUS Data Recovery Wizard for Mac. Start selecting the flash drive and click "Search for lost files" to let the software scan for lost files on it.

Step 2. Find lost data on the USB drive
After the scan, all files will be presented in the left panel in the scan results.

Step 3. Recover data from flash drive
Select the files you want to recover and click the "Recover" button. Don't save the recoverable files to the USB drive itself in case of data overwriting.

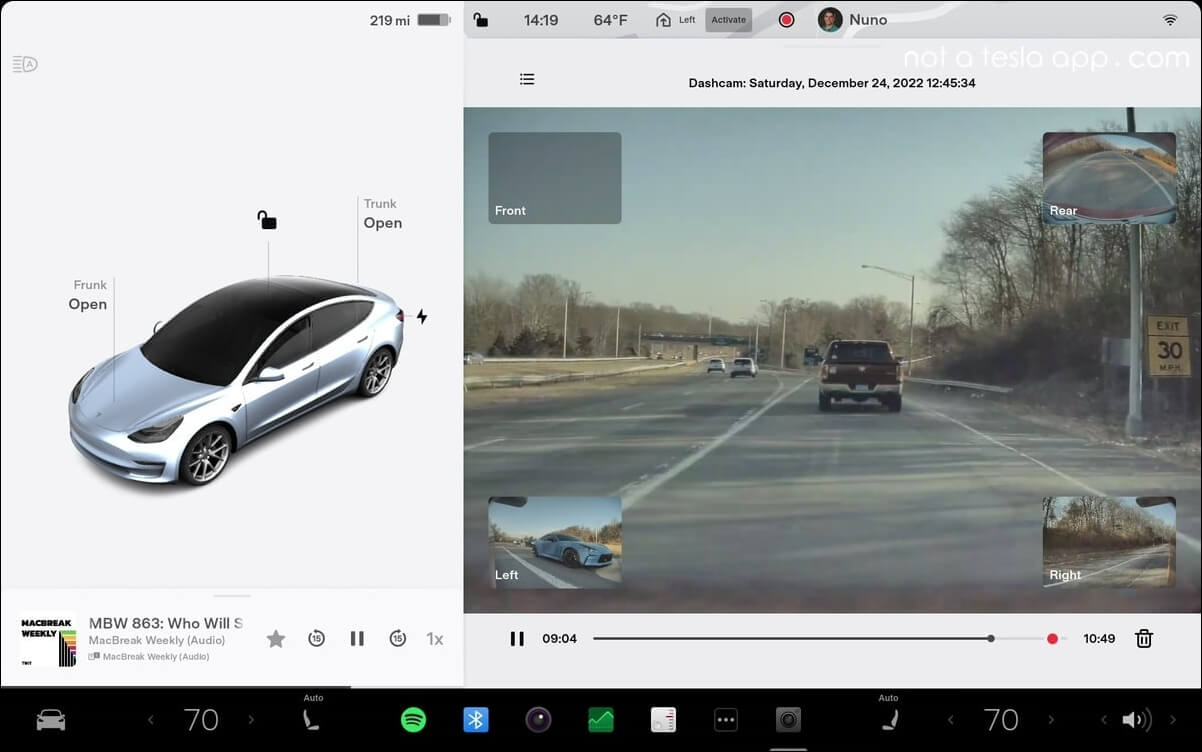
🚗How to View Tesla Dashcam Footage on Touchscreen
When you park your car, you can view the recording from the Tesla Dashcam. Follow the steps below:
Step 1. Touch the Dashcam icon on the touchscreen.

Tesla Dashcam allows you to select different modes to save footage; check out the following three modes and choose the suitable one for you:
🤖Auto: Dashcam automatically saves a recording to the USB drive when Model X detects a safety-critical event, such as a collision or airbag deployment.
👉Manual: You must manually touch the Dashcam icon to save a recording of the most recent ten minutes of footage.
🔊On Honk: When you press the horn, Dashcam saves a recording of the most recent ten minutes of footage. You can enable this along with Auto or Manual. - Tesla Dashcam Official Website
Step 2. Touch the menu icon on the screen, and the tabs display your recording video clips. On this page, you organize videos, including pausing, rewinding, and deleting them.
Note: Videos can't be saved on the USB drive as it runs out of space, so you should remove the early videos after backing them up on other storage devices or format Tesla USB on Mac.
Share this article on social media to help others learn more about how to view Tesla Dashcam footage on the touchscreen, Mac, and iPhone app.
💻How to View Tesla Dashcam Footage on a Mac
To access the footage on your computer, you should follow the steps below:
Step 1. Insert the USB into your Mac, and press "Command + Space" to launch "Disk Utility". Or you can go to "Finder > Applications > Disk Utility".
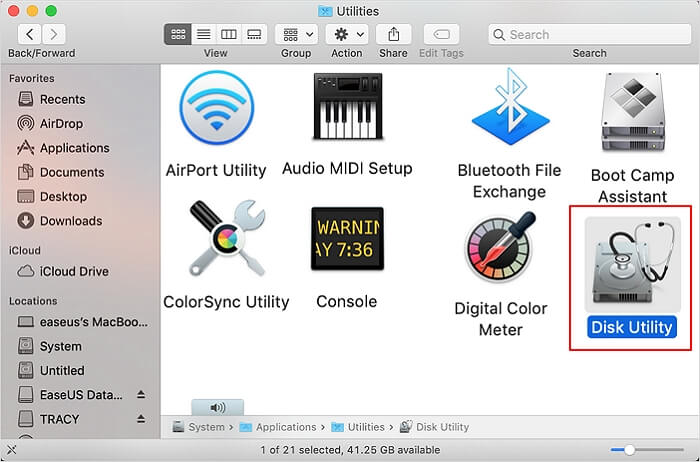
Step 2. Choose the USB drive on the left panel, and open it.
Step 3. And you can see a folder called TeslaCam. Your Dashcam footage clips are saved in the sub-folders of TeslaCam.

However, sometimes the error occurs, and your Mac does not detect the USB drive. In this condition, your Mac may remind you, "Mac First Aid found corruption need repaired", if so, follow the screen instruction to repair the USB drive. Or you can check out the following article to solve the error USB drive not showing.

USB Flash Drive Not Showing Up on Mac, Why and How to Fix
This article will discuss 10 solutions to help you fix the problem of USB flash drive not showing up on Mac. Read more >>
📱How to View Tesla Dashcam Footage on iPhone
Oftentimes, you don't have a computer nearby, but if you want to check out dashcam footage, you may consider using a mobile app to do so. To view Tesla Dashcam footage on your iPhone, check out the steps here:
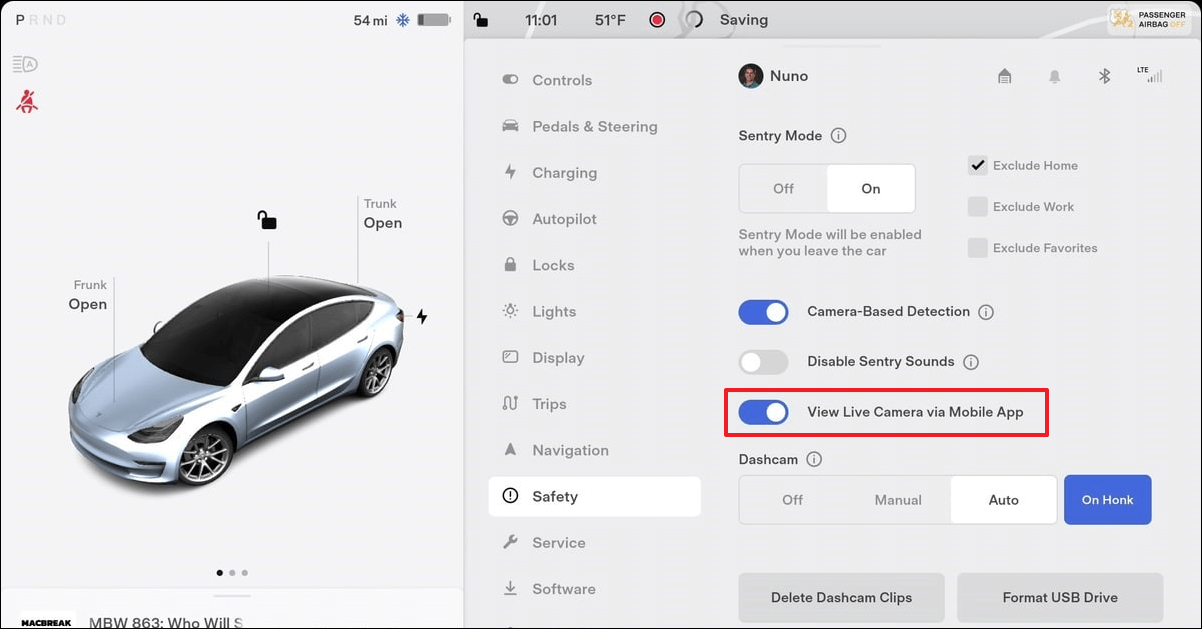
Step 1. Install the Tesla mobile app in the App Store.
Step 2. Turn on the "View Live Camera via Mobile App" option, which allows you to view Sentry videos and Dashcam videos generated without transferring the USB drive to your computer.
Extra Tips to Avoid Data Loss from Tesla Dashcam Footage
The main reason for the loss of dashcam footage data is USB damage and insufficient storage space. In order to better protect your footage clips, you can refer to Tesla's official USB basic requirements. Besides, you can frequently back up the Tesla Dashcam footage clips to avoid data loss.
Here are the USB drive requirements for recording videos with Tesla Dashcam:
- Minimum storage capacity of 64 GB
- At least 4 MB/s sustained write speed
- USB 2.0 compatible
In addition, you should format the USB to the correct format, such as exFAT. You can insert the Tesla USB into your computer and use Disk Utility to format it. Follow the steps here to correctly format the USB:
Step 1. Click the "Erase" option on the top menu, and you can see a confirmation window showing up. Be careful selecting the Tesla USB drive but don't accidentally erase external hard drive Disk Utility.
Step 2. Type the name of the USB drive, and choose "ExFAT" in the Format box.
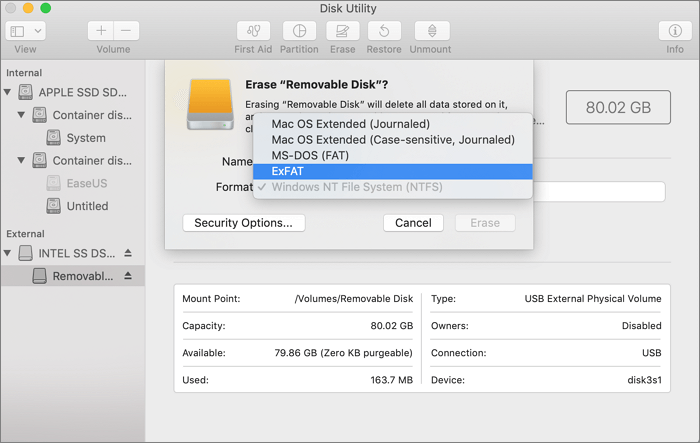
Step 3. Click "Erase" again to format USB to exFAT on Mac.
Note: If your USB stores data before, you should back up the USB to avoid data loss. If you forget to do this before formatting, don't worry. Here's a video guide on how to recover Tesla dashcam footage on a Mac. Take a look at this video to learn the details about recovering your Tesla videos!

After correctly formatting the Tesla USB, you should insert the USB drive into a front USB port in your Tesla vehicle, and it will be recognized soon. Make sure when you touch "Controls" on the touchscreen, the Dashcam icon is available, which means it's ready to record footage.
Conclusion
You should format a USB drive and insert it into the front port of your Tesla vehicle, and then ensure the Dashcam is turned on. To view the Tesla Dashcam footage quickly, you can add the Dashcam icon to the bottom bar of the touchscreen, or you can insert the USB drive into your MacBook can use Finder to locate the folder TeslarCam.
Pay attention that the footage won't be saved when the USB lacks storage space, so you should keep frequently deleting the older footage to free up space on the USB drive. If you accidentally deleted essential footage clips, use EaseUS Data Recovery Wizard for Mac Pro to recover the deleted video clips.
How to View Tesla Dashcam Footage FAQs
Here are questions people frequently ask when they search for how to view Tesla Dashcam footage:
1. How do I watch a Tesla Dashcam recording on a Mac?
Follow the steps below to watch a Tesla Dashcam recording on Mac:
Step 1. Insert the USB drive into your Mac.
Step 2. Go to "Finder > Applications > Disk Utility".
Step 3. Find the folder called TeslaCam on the USB drive. Open it to find your Tesla Dashcam.
2. Can you view the Tesla Dashcam on your iPhone?
Yes, you can install the Tesla mobile app in the App Store, which allows you to view Sentry videos and Dashcam videos generated by your Tesla on your iPhone without needing a computer.
3. Can I recover deleted Dashcam video clips from Tesla?
It's possible to recover deleted Tesla Dashcam video clips with professional video recovery software: EaseUS Data Recovery Wizard for Mac. Note that you should stop using the USB once you delete the clips on it; they can be recovered if the deleted clips are not overwritten.
Was This Page Helpful?
Jaden is one of the editors of EaseUS, who focuses on topics concerning PCs and Mac data recovery. Jaden is committed to enhancing professional IT knowledge and writing abilities. She is always keen on new and intelligent products.
Brithny is a technology enthusiast, aiming to make readers' tech lives easy and enjoyable. She loves exploring new technologies and writing technical how-to tips. In her spare time, she loves sharing things about her game experience on Facebook or Twitter.
-
EaseUS Data Recovery Wizard is a powerful system recovery software, designed to enable you to recover files you’ve deleted accidentally, potentially lost to malware or an entire hard drive partition.
Read More -
EaseUS Data Recovery Wizard is the best we have seen. It's far from perfect, partly because today's advanced disk technology makes data-recovery more difficult than it was with the simpler technology of the past.
Read More -
EaseUS Data Recovery Wizard Pro has a reputation as one of the best data recovery software programs on the market. It comes with a selection of advanced features, including partition recovery, formatted drive restoration, and corrupted file repair.
Read More
Related Articles
-
Recover Deleted Photos from Canon Camera [2 Solutions for Mac Users]
![author icon]() Dany/Jun 03, 2026
Dany/Jun 03, 2026 -
How to Fix Time Machine Backup Error 19 With Nas
![author icon]() Jaden/Jun 30, 2026
Jaden/Jun 30, 2026 -
Safari Bookmarks Disappeared? Recover with 3 Easy Methods
![author icon]() Dany/Jun 17, 2026
Dany/Jun 17, 2026 -
APFS vs Mac OS Extended [Beginner's Guide]
![author icon]() Jean/Jun 30, 2026
Jean/Jun 30, 2026