No disk appears when reinstalling OS X is one of the most concerning issues Mac users can face. It can be highly frustrating to see a blank Disk Utility window with no indication of your primary drive, whether you're upgrading your operating system, debugging a significant software issue, or preparing to sell your device. It often results from misconfigured disk structures, formatting errors, or logical errors.
The problem can be resolved with the right approach. If your disk doesn't appear during a macOS reinstall, this thorough guide will walk you through everything you need to know. It provides simple, step-by-step guidance and insights on when to seek professional assistance.
Causes of No Disk Appears When Reinstalling OS
When a Mac fails to detect its internal disk during reinstallation, several factors may be at play. The most common cause is file system corruption. This can occur due to sudden power loss, improper shutdowns, failed software updates, or disk errors that prevent the system from recognizing the drive. In other cases, the disk may still be physically intact but is no longer properly formatted or partitioned for macOS to read.
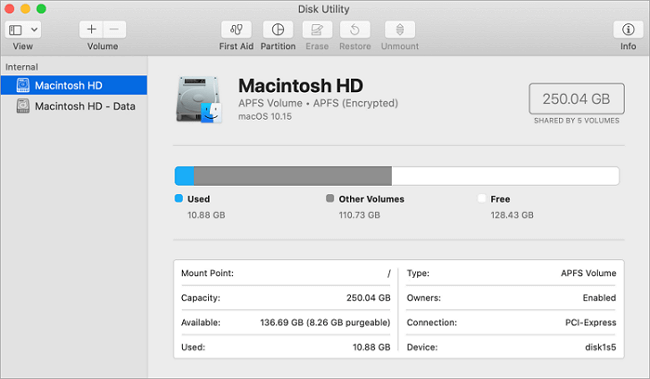
Another common issue is that users can't see files on an external hard drive on a Mac because the drive is hidden. macOS organizes storage in a hierarchy: physical drives contain containers (on APFS systems) or partitions, which in turn host volumes such as "Macintosh HD." If only the volume is visible and the underlying physical drive is corrupted or unmounted, Disk Utility may not display it unless you explicitly choose to view all devices. This is why many users mistakenly believe their disk has disappeared when it's simply not visible in the default view.
How to Recover a Missing Disk When Reinstalling macOS
Before diving into troubleshooting, it's essential to prepare your environment to maximize the chances of a successful recovery.
1. Boot Mac into Recovery Mode
macOS Recovery often requires downloading the operating system installer from Apple's servers. If you're using a MacBook, ensure it has at least 50% battery life, or better yet, keep it plugged in throughout the entire process. Unexpected power loss during disk erasure or OS reinstallation can result in permanent data loss or a bricked system.
Step 1. Shut down your Mac, press the power button, and immediately hold Command + R.
Step 2. Continue holding the keys until you see the Apple logo, a spinning globe, or the macOS Utilities window. This boots your Mac into local Recovery Mode, which uses a built-in recovery partition.
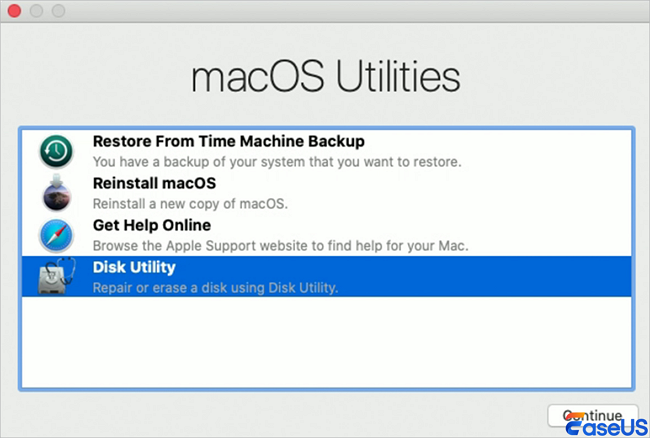
Step 3. From the macOS Utilities screen, select "Disk Utility" and click "Continue". In Disk Utility, go to the "View" menu at the top of the screen and select "Show All Devices".
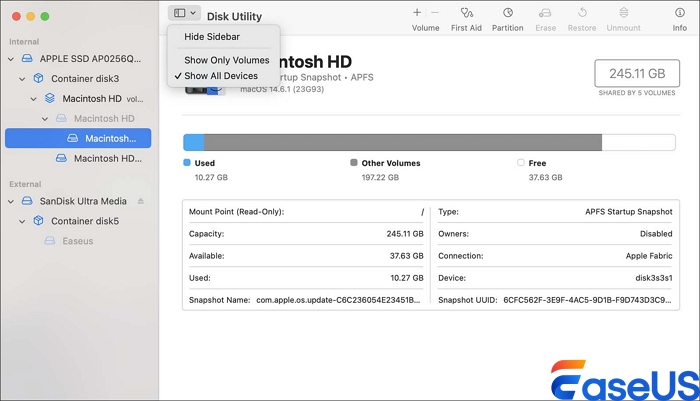
In the left-hand sidebar, look for the top-level device. It's usually labeled with the manufacturer's name, such as "APPLE SSD" or "Samsung NVMe."
Do not select indented volumes, such as "Macintosh HD," which are logical volumes within a container or partition. You need to select the drive itself to perform a full erase and reformat.
With the physical drive selected, click the Erase button in the toolbar. A dialog box will appear with three key settings:
- Name: Enter a name for the drive, typically "Macintosh HD."
- Format: Choose APFS for Macs from 2017 or later, or those using SSDs. For older Macs with traditional hard drives, select Mac OS Extended.
- Scheme: Set the partition scheme to GUID Partition Map, which is required for Intel-based Macs and Apple Silicon Macs to boot correctly.
Click "Erase", then confirm the action. This process will completely wipe the drive, removing all data and file system structures.
Data-Aid: Recovery Data from Mac Disk
A virus assault or damage to the hard drive's file system could be the cause if your Macintosh HD has a lot of vital files that you need, but they aren't visible in the Finder or Recovery Mode right now. In this situation, it is recommended to resolve the issue no disk appears during OS X reinstallation.
Finding a competent data recovery program is, therefore, the only thing you need to perform before fixing the problem of not showing. A reliable and effective program, EaseUS Data Recovery Wizard for Mac, can recover data from a variety of file types on various devices.
Step 1. Select the location
Select the disk where you lost data after updating to macOS Sonoma/Ventura/Monterey/Big Sur. Then, click "Search for lost files".

Step 2. Find lost data after the scan
EaseUS Data Recovery Wizard for Mac will immediately scan your selected disk volume and display the scanning results on the left pane. Use the file type and file path to find wanted data on Mac.

Step 3. Recover data after macOS update
Select the target files that were unknowingly lost during or after the update and click the "Recover" button to get them all back.

If software solutions fail, contact Apple Support or visit an Apple Authorized Service Provider. In some cases, the SSD may need to be replaced, especially if the system firmware no longer recognizes it.
Final Thoughts
While the "no disk showing up" error can be alarming, it's often fixable with the proper knowledge and tools. By understanding macOS storage architecture, using Disk Utility correctly, and following a methodical approach, most users can resolve the issue and reinstall the operating system. However, it's equally important to recognize when a problem extends beyond software troubleshooting—persistent detection issues often indicate hardware degradation.
Was This Page Helpful?
Jaden is one of the editors of EaseUS, who focuses on topics concerning PCs and Mac data recovery. Jaden is committed to enhancing professional IT knowledge and writing abilities. She is always keen on new and intelligent products.
-
EaseUS Data Recovery Wizard is a powerful system recovery software, designed to enable you to recover files you’ve deleted accidentally, potentially lost to malware or an entire hard drive partition.
Read More -
EaseUS Data Recovery Wizard is the best we have seen. It's far from perfect, partly because today's advanced disk technology makes data-recovery more difficult than it was with the simpler technology of the past.
Read More -
EaseUS Data Recovery Wizard Pro has a reputation as one of the best data recovery software programs on the market. It comes with a selection of advanced features, including partition recovery, formatted drive restoration, and corrupted file repair.
Read More
Related Articles
-
6 Best Ways to Restore Disappeared Desktop on Mac [Step-by-Step Tutorial]
![author icon]() Brithny/Jun 30, 2026
Brithny/Jun 30, 2026 -
How to Recover Deleted Videos on Mac in 4 Ways
![author icon]() Daisy/Jun 30, 2026
Daisy/Jun 30, 2026 -
Fix macOS Tahoe Update Not Showing on Mac [5 Solutions]
![author icon]() Finley/May 19, 2026
Finley/May 19, 2026 -
How to Fix Mac White Screen of Death? [macOS Ventura, Monterey, Big Sur]
![author icon]() Jaden/Jun 30, 2026
Jaden/Jun 30, 2026