The Surface is a new hardware brand launched by Microsoft, with a novel appearance design and especially its unique method of selecting USB boot. You, sometimes, may not be available to Windows and cannot access your files. Or you are likely to create a bootable drive and use it to boot and repair your device, which could lead many users to look up the official tutorial to operate. Consequently, it is necessary to walk users through this guide for booting Surface from USB. Let us start!
Before Booting Surface from USB
Before we start to boot our Surface from USB, we should learn the following dominating points:
- 1. What is Surface?
- 2. Why do you require booting from USB?
- 3. What kind of preparatory work should you do?
These three questions show you the prerequisites and the importance of booting Surface from USB. Let us explore them one by one.
1. What is Surface?
The Surface was released by Microsoft on June 19, 2012. With a 10.6-inch display, it is equipped with a USB 2.0 or 3.0 interface and uses the Windows 8 operating system. Everybody may know the Surface but not be familiar with other products under the same series. We provide you with three main products listed below:
Surface Go 3: The most portable 2-in-1 laptop
Surface Laptop Studio: Known as a mighty transformer
Surface Laptop Go 2: 4 colors could be chosen by users, its appearance is much more brilliant.
2. Why do you require booting from USB?
As a practical tool, USB can not only be used to reinstall or repair the system (it could help reinstall windows10 without losing data), but also perform hardware detection and repair, such as hard disk, and memory. This is why it can become the mainstream system reloading method now.
If your daily work equipment is Surface, I believe that you could need to learn more to make your laptop bootable in case emergencies are approaching. For example, you want to recover, upgrade or reset the Surface using a USB recovery drive.
3. What kind of preparatory work should you do?
As we all know, ordinary USB drives cannot boot a PC. Before you make Surface boot from USB, you should make some preparatory works in advance (quick navigation provided below if it is necessary for you):
1. Make a bootable USB driver (suitable for the method1)
The easiest way of acquiring a bootable USB driver is to download Windows Media Creation Tool from Microsoft.
If the bootable USB is not detected in the Bios, you're suggested to read this article below:
Bootable USB Drive Not Showing Up or Recognized in Windows 11/10/8/7
To deal with bootable USB drive not showing up or recognized issue in BIOS boot menu in Windows 10/8.1/8/7, first of all, figure out what causes the real problem, and pick up the perfect solutions to repair bootable USB flash drive that is not showing up, detected, read or recognized!

2. Make sure you turn off Fast Startup
3. Prepare wired mouse and keyboard
Sometimes the process of booting could be disrupted or even devastated if you use a tablet because of the lack of operation conditions. Therefore, a Wired Mouse and matched Keyboard should be prepared in advance to ensure the process goes successfully.
How to Boot Surface From USB
After finishing these works above, we can start to boot Surface from USB. We will provide you with two efficient methods to guide you:
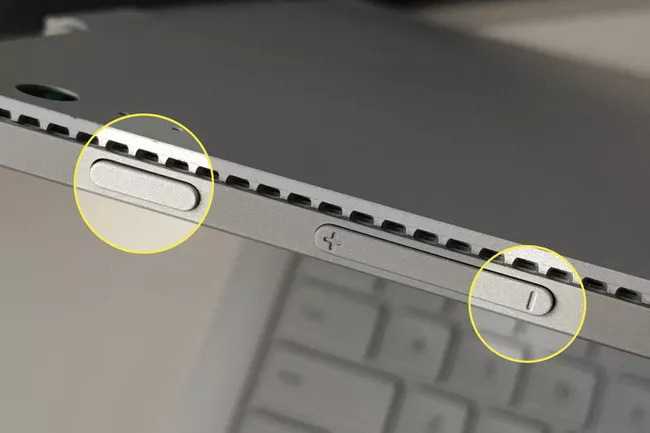
Method 1: Use the Volume-Down button
Step 1: Shut down your Surface first and wait about ten seconds to ensure the laptop is closed completely.
Step 2: Plug the bootable USB drive into a USB port on the Surface.
Step 3: Press and hold the volume-down (Volume-) button on the side of your laptop, and then press and release the power button to start.
And then, you will see the Microsoft or Surface logo.
![]()
Step 4: Continue to hold the volume-down button, and release it once spinning dots appear beneath the logo.
Step 5: Follow the instructions on the screen and boot from your USB.
Method 2: Use the Volume-Up button.
This one is more complex than the previous one because you need to enter UEFI. So let us move on.
Step 1: Turn off your Surface, then wait about 10 seconds to ensure it has been turned off.
Step 2: Press and hold the volume-up button (Volume+) on your Surface while pressing and releasing the power button.
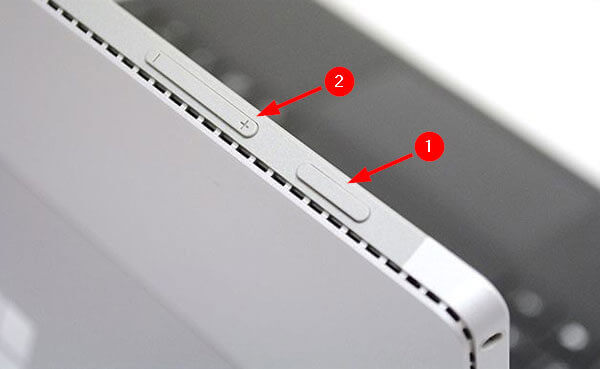
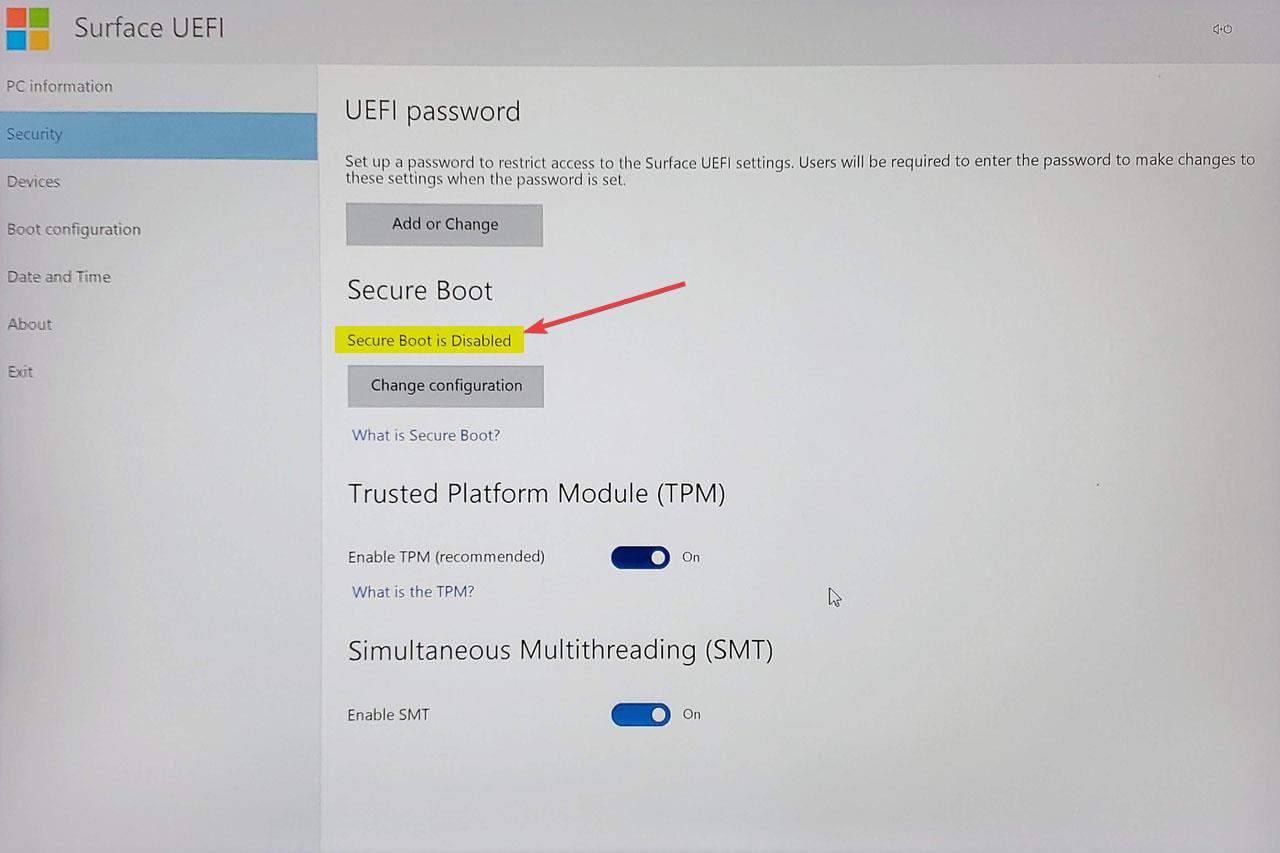
Step 3: The Microsoft or Surface logo will be displayed on the screen. Continue to press and hold the volume-up button. After the UEFI screen is displayed, release the control (press F6 to enter the Surface Laptop), and enter the Surface UEFI interface. If you plan to install the win10 system, look directly at it in Step 4. Rather, if you install a non-Microsoft system, you need to disable Secure Boot under the Security interface.
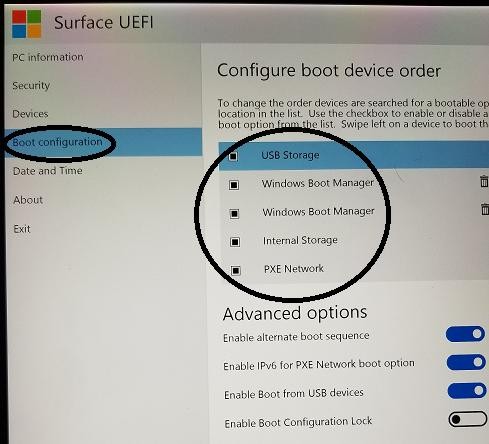
Step 4: Under Boot Configuration, you can see the USB Storage item, drag it to the first position
Step 5: Under Exit, click “Restart now” to restart from the USB.
Bottom Line
Now that you get full and explicit information on how to boot your Surface from USB, which could greatly help you to fresh install or upgrade Windows, run a bootable antivirus program, and something like that. Don’t forget to follow these steps above to reset your USB boot disk if they work for you.
FAQs
We provide you with other relative questions to learn more about booting Surface from USB:
1. What to do if the USB drive doesn’t work?
Try to set up the USB drive again, but you need to transfer any vital data on your USB drive in advance. You could ask the Microsoft official for help if it didn't work.
2. What is UEFI boot mode?
UEFI boot mode refers to the boot process used by UEFI firmware. UEFI boot mode refers to the boot process used by UEFI firmware. UEFI stores all the information about initialization and startup in an. EFI file that is saved on a certain partition called EFI System Partition (ESP).
Was This Page Helpful?
Daisy is the Senior editor of the writing team for EaseUS. She has been working at EaseUS for over ten years, starting as a technical writer and moving on to being a team leader of the content group. As a professional author for over ten years, she writes a lot to help people overcome their tech troubles.
Written by Tracy King
Tracy became a member of the EaseUS content team in 2013. Being a technical writer for over 10 years, she is enthusiastic about sharing tips to assist readers in resolving complex issues in disk management, file transfer, PC & Mac performance optimization, etc., like an expert.
Related Articles
-
Complete Guide to Windows Internet Name Service (WINS)
 Daisy/2024-01-11
 -
What Is Tracert/Traceroute Command? How to Run It on Windows, Mac, and Linux?
Daisy/2024-01-11 -
7 Days to Die Save File Location [Every Detail You Want to Know]
 Larissa/2024-07-01
 -
What Is MSI Boot Menu [Detailed Info]🔥🔥
 Jerry/2024-10-25
