Does your Windows 11 keep crashing? Then you might be wondering how you can fix it. Ever since Windows 11 was released, it has been plagued by issues. Some people struggle to find compatible drivers, while others cannot run Windows 11 on their PCs.
And while most of those early-day problems are gone, some still cause Windows 11 to keep crashing. So, many people have their heads in their hands, wondering how to fix this issue.
Therefore, let's dive in and find out what you can do to fix if your Windows 11 keeps crashing.
Why Does My Windows 11 Keep Crashing
Before we talk about the fixes, let us diagnose the issue. Here are possible reasons your Windows 11 keeps crashing:
- An outdated or bad driver installation
- A system update that might have caused issues
- An outdated Windows version or build
- Broken or corrupted system files
- Virus or malware attack
- Your computer is overheating
- Your graphics driver is outdated
- Your RAM is causing issues
These are the most common problems if your Windows 11 keeps crashing. Therefore, trying a few fixes is imperative to ensure this problem goes away. So, let's keep digging to fix these crash issues.
How to Fix Windows 11 Keeps Crashing
Now that you know what might be causing your Windows 11 to keep crashing, let's talk about fixes. It's important to understand that each issue has hundreds of fixes. However, we have narrowed it down to eight of the best and most probably fixes for this problem. So, let's talk about each of them.
- Fix 1: Check for Updates
- Fix 2: Check for Malware
- Fix 3: Run DISM and SFC Scan
- Fix 4: Perform a Clean Boot
- Fix 5: Fix Overheating Issue
- Fix 6: Update Graphics Driver
- Fix 7: Check Crash Log
- Fix 8: Reset PC to Factory Settings
Fix 1: Check for Updates
One of the best things you can do is check for updates in your Windows. As mentioned before, an outdated Windows build version can sometimes cause many issues. So, to avoid that sort of incompatibility, here's what you'll do:
Step 1: Open Settings on your PC.
Step 2: Head into the Update & Security option.

Step 3: Tap on the Windows Update tab in the sidebar.
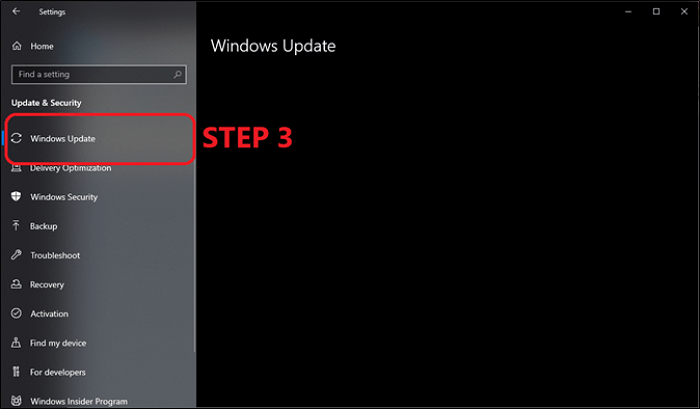
Step 4: Let it check for updates.
Step 5: Download and install updates, if any are available.
This might also cause your Windows to restart now and check for updates. However, once you check for updates and none are available, then it's unlikely that the problem is with your outdated Windows. So, try the next method to fix this problem.
Fix 2: Check for Malware
The next step is to check for malware. There isn't a lot of trusted software, so the best thing you can do is use Windows Defender - Windows' own tool to check for any computer viruses or malware in your PC.
So, here's what you'll do to check for malware:
Step 1: Open the System Tray.
Step 2: Right-click on the Windows Defender icon.

Step 3: Tap Run a quick scan from the menu.
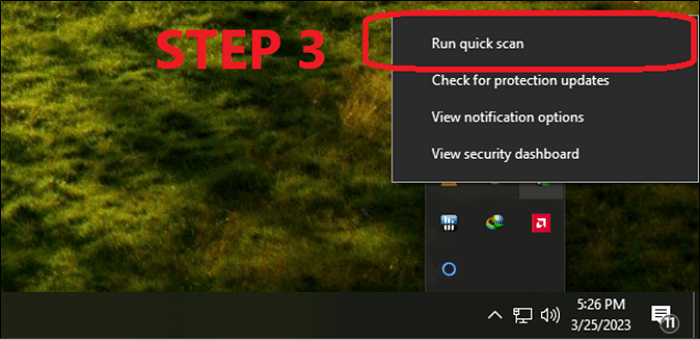
Step 4: Let it scan your PC.
Once the scan is over, restart your computer to ensure the quick scan is complete. If the restart is prevented, then it's likely that Windows Defender is still scanning. Once done, your Windows will be free of malware. So you can check if the problem still persists. If it does, try the next fix.
Fix 3: Run DISM and SFC Scan
DISM and SFC scans are two different types of system scans that check your PC for corrupted or missing files. So, trying one or both of these scans can help you fix those missing files and possibly stop the issue of Windows 11 keeps crashing. Here's what you'll do for an SFC Scan:
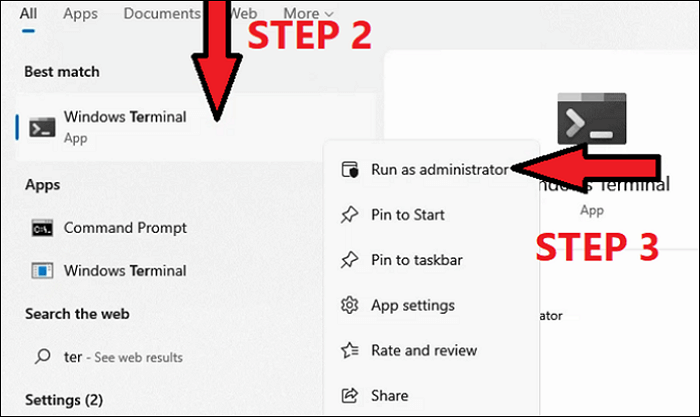
Step 1: Head into Start Menu.
Step 2: Type CMD/Windows Terminal.
Step 3: Launch Windows Terminal as administrator.
Step 4: Once CMD launches, enter the following command:
"SFC /Scannow"
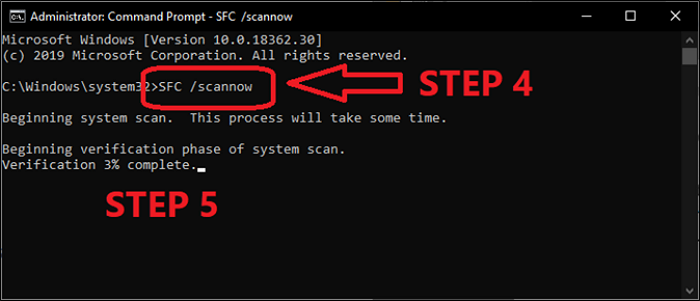
Step 5: Then hit enter and wait for the scan to finish.
This SFC scan will check your PC for any missing files. If you find no files missing, then try the DISM method, and follow these steps:
Step 1: Run CMD/Windows Terminal as administrator.
Step 2: Then type the following command:
"DISM /Online /Cleanup-Image /CheckHealth"
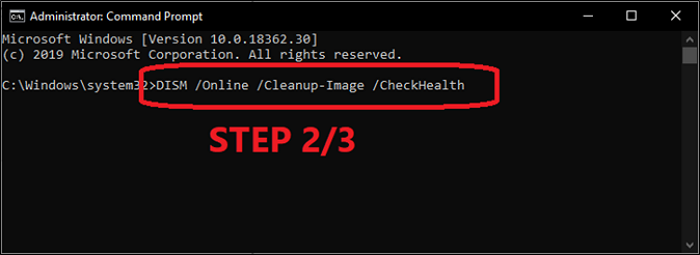
Step 3: Press Enter and wait for it to finish.
Step 4: Close CMD if no violations are found.
Step 5: Type the following commands if violations are found:
"DISM/Online/Cleanup-Image/RestoreHealth"
Step 6: Wait for it to restore your files.
Once you have checked these files, you can also click the run dialogue and type MDSched.exe to scan for any memory-related errors. This will restart your computer as soon as you hit enter. Therefore, make sure you try the memory diagnostic tool after using the DISM and SFC scannow commands.
Fix 4: Perform a Clean Boot
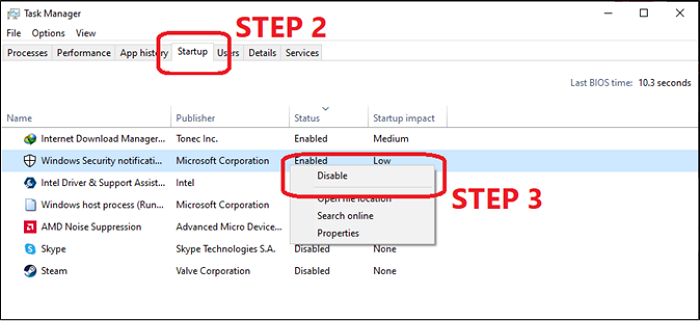
A clean boot is where you turn off all the apps and services you do not need. Therefore, the system only starts with the bare minimum. In order to do that, you're going to change settings in System Configuration and Task Manager. Here's how:
Step 1: Open Task Manager.
Step 2: Head into the Startup tab.
Step 3: Turn off/Disable all the apps one after the other.
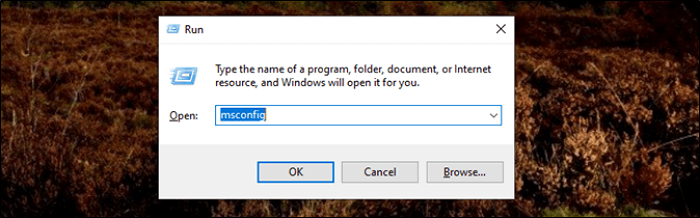
Step 4: Now head into the Run command by pressing Windows + R on your keyboard.
Step 5: Type MSConfig and hit enter.
Step 6: In MSConfig, switch to Services Tab.
Step 7: Tap Hide all Microsoft services.
Step 8: Tap the Disable All button.

Step 9: Press Apply, then OK.
Step 10: Restart your PC.
This will most likely resolve the issue if it was caused by a newly installed software, driver, or service. Once you fix the issue, you can return to these options to enable each service or software one after the other - until you find the service or software causing the issue.
Fix 5: Fix Overheating Issue
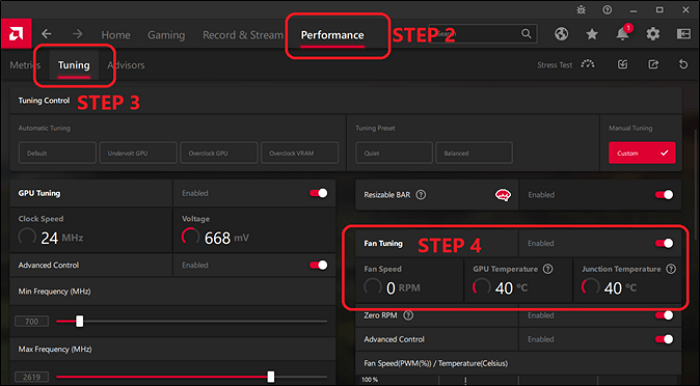
If your PC is overheating, then it's likely that your Windows 11 keeps crashing. Therefore, you need to monitor the temperature and usage of your PC. In order to do that, you can try various tools. For instance, if you are using an AMD GPU, then here's how you'll check it:
Step 1: Right-click on your Desktop and head into AMD Software.
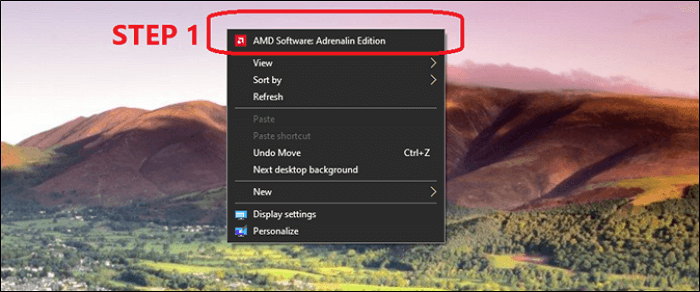
Step 2: Inside AMD software, head into Performance.
Step 3: Then switch to Tuning.
Step 4: Finally, check the GPU temperatures under the Fan Tuning option.
There are similar tools for NVIDIA GPUs and Intel and AMD CPUs. Therefore, you can try a few software such as:
- HWiNFO64
- Hardware Monitor
- GPU-Z
- NVIDIA Control Panel
Once you try these tools and if your system temps are above the charts, then you can try a few things, such as:
- Clean the dust off your PC with an air blower;
- Remove the carbon from RAM/CPU/GPU connectors with a rubber eraser;
- Replace the thermal paste on your CPU/GPU;
- Replace the thermal pads on your NVME heatsinks
- And replace the thermal pads on your heatsinks, i.e., GPU, chipset, etc.
Therefore, once you try all these, check the temperatures of your CPU, GPU, and VRMs again. If all is good, then it's unlikely that there is any hardware issue.
Fix 6: Update Graphics Driver
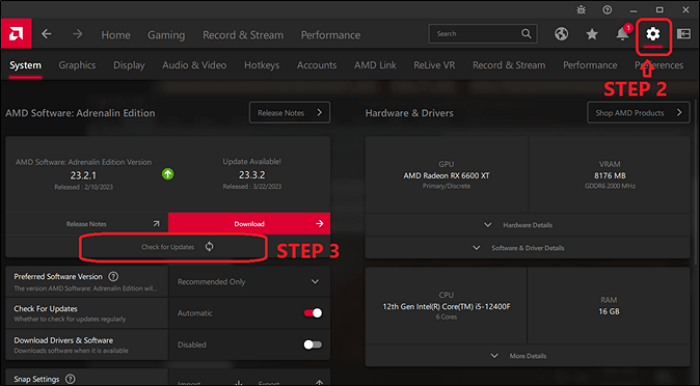
The next thing you can do is check for drivers update. Since we're using an AMD GPU, we'll show you how you can try to update your driver through the AMD Adrenalin software. You must visit their websites to install the latest drivers if you use NVIDIA or Intel.
But here's how AMD users can update their graphics driver:
Step 1: Right-click on your Desktop or open AMD software through the system tray.
Step 2: Inside AMD Software, tap on the Settings cogwheel.
Step 3: Then find and click on the Check for Updates option.
Step 4: Then click on Download once the driver update pops up.
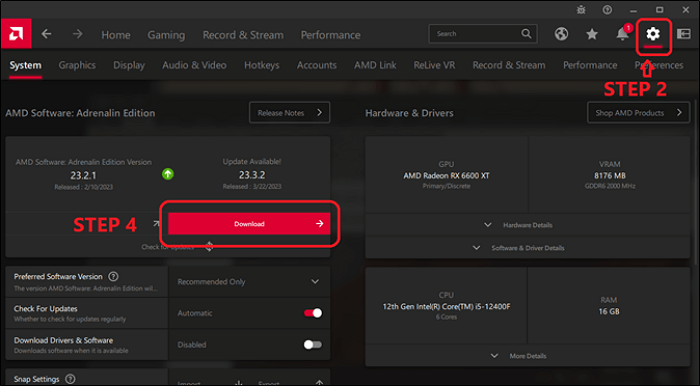
Step 5: Wait for it to download and install.
Step 6: Restart your computer.
This will update your AMD graphics device driver in a few minutes. Therefore, you can check the updated driver version in the same settings. For Intel and NVIDIA users, download drivers from their website and update them through the executable file or the device manager on Windows 11 PC.
Fix 7: Check Crash Log
The next step is to check the System Crash Log. This requires you to check the crash log to pinpoint what is causing your Windows 11 PC to crash. Whether it's an installed ram or an outdated driver, this method will help you know the issue. Here's how:
Step 1: Head into Control Panel.
Step 2: Find the System and Security.
Step 3: Click on Security and Maintenance.
Step 4: Check the Reliability Monitor.
Step 5: Check Critical Events.

Step 6: Analyze what's causing the issue.
As you can see in this image, DTLite.exe is one of the culprit tools. Therefore, uninstalling it might fix the issue for you - or any other software/program that's crashing.
Fix 8: Reset PC to Factory Settings
In this method, we're going to reset your PC to factory settings. Therefore, make sure you back up all of your data on C drive to avoid losing it in the process. This process will also reset any drivers and software, so make sure you back them up too. A backup can ensure factory resetting PC without losing data. Once done, follow these steps:
Step 1: Head into System Settings.
Step 2: Find the Recovery tab in the sidebar and click on it.
Step 3: Tap on Get Started under Reset this PC.
Step 4: Select the Keep my files.
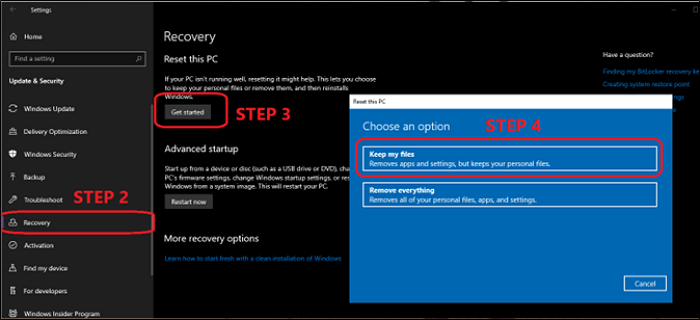
Step 5: Wait for your PC to restart and reset.
This will reset your entire PC, which might take around 30 minutes. Therefore, once it's done, it's more than likely that the problem will be resolved, and your Windows 11 will stop crashing.
Bonus Tip: How to Backup Windows 11 PC to Prevent Data Loss
All the methods we have discussed so far put your data at risk. Therefore, it's imperative that you focus on using a method that allows you to prevent data loss. For that, we're going to use EaseUS Todo Backup.
Secure Download
EaseUS Todo Backup Home allows you to back up your entire computer to avoid data loss. It allows you to create diverse backup types, including full, incremental, and differential backups. In addition, it enables you to compress your backups to save storage space.
Here are further reasons to use EaseUS Todo Backup as your primary data backup software:
- It has a one-click backup option and easy recovery
- It lets you install Windows on a hard disk for another computer
- It provides 250G free cloud storage and a Security Zone to safeguard data
- It allows you to clone a hard drive
- It can help you create an iso image of your operating system
Therefore, once you download and install this tool, here's how you can create a backup of your Windows 11 with it:
Step 1. On the main page, click "Select backup contents".

Step 2. Among the four available categories, click OS.

Step 3. EaseUS Todo Backup will automatically select your system partition, you only need to select the backup destination.

Step 4. Both Local Drive and NAS are available for you to save the backup file.

Step 5. After finishing the backup process, you can check the backup status, recover, open, or delete the backup by right-clicking the backup task on the left.

To Wrap Things Up
That is all about how to fix Windows 11 keeps crashing. These eight fixes will surely help you prevent your Windows 11 from crashing. Therefore, it's important that you try each fix one after the other to ensure smooth and thorough backup recovery because it's likely that one fix helps you eliminate the issue, so you don't have to try them all.
However, before you go through any of the fixes, make sure you back up your data. Once again, use EaseUS Todo Backup to create a thorough and proper backup of your important data so that you don't lose it while the computer keeps crashing. Just download and try it. More features are here for you to explore.
Secure Download
FAQs on Windows 11 Keeps Crashing
1: Is it bad if your PC keeps crashing?
The prolonged crashing of your PC has the potential to damage your hardware. Constantly powering up and powering off your PC can cause irreparable damage to your components, and that's why it's bad if your PC keeps crashing.
2: Why does Windows 11 have a blue screen error?
Blue screen or BSOD errors are usually associated with hardware such as RAM, HDD, or bad graphics drivers. However, in recent cases, it could also be a simple cause of unsupported apps, drivers, or services.
3: How do I know if my CPU needs replacing?
If your CPU is heating up and not taking the burden of newer games, software, etc., it's likely outdated. However, if you have been using a CPU for the last 2-3 generations, then it's likely that you don't need to replace your CPU just yet.
Was This Page Helpful?
Updated by Jerry
"I hope my articles can help solve your technical problems. If you are interested in other articles, you can check the articles at the bottom of this page, and you can also check my Facebook to get additional help."
Related Articles
-
Use CHKDSK to Fix the Selected Volume Corruption Problem in Windows 10
![author icon]() Jean/2026-02-12
Jean/2026-02-12 -
ASUS Rog Ally Z1 vs. Z1 Extreme: What's the Difference?
![author icon]() Larissa/2026-06-18
Larissa/2026-06-18 -
What Format Works on Both Mac and PC [Best Choice]
![author icon]() Cici/2026-06-29
Cici/2026-06-29 -
How to Reset Windows 7 Password Using CMD - 2025 Tutorial
![author icon]() Cici/2026-04-15
Cici/2026-04-15
EaseUS Data Recovery Services
EaseUS data recovery experts have uneaqualed expertise to repair disks/systems and salvage data from all devices like RAID, HDD, SSD, USB, etc.