Overview of 'Screen Flickering on Windows'
Screen flickering issues can detract from the user experience. Flickering occurs like rapid and repetitive changes in brightness or color on the screen. It can disrupt normal viewing and cause eye strain. Screen flickering issues can cause obstacles in productivity and gaming. It is important to find reasons behind the issue to solve it. This article offers solutions for all possible screen flickering on Windows 11/10 issues. We'll explore software and hardware factors that contribute to this problem. Additionally, the solutions and troubleshooting steps will help you effectively resolve screen flickering issues.
6 Easy Fixes to Screen Flickering Issue on Windows 11/10
Screen Flickering while playing games, watching video, or other scenarios issues on Windows 11 can disrupt the overall user experience. Here are the effective ways to solve the issue:
Fix 1. Check the Monitor Connection
Flickering issues with monitors can be frustrating. However, it's essential to perform a systematic check of potential causes. One of the primary areas to investigate is the monitor connection. Whether you're using a traditional monitor or a laptop, ensure a secure and stable connection.
Step 1. Verify that the cable is securely plugged into the computer and the monitor.
Step 2. Check for any signs of looseness or disconnection.
Step 3. If any cable connections appear loose, gently tighten them.
Step 4. Ensure that each cable is properly inserted into its port.
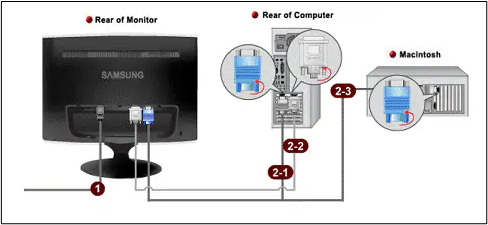
Step 5. Replace Faulty Cables. Use a high-quality replacement cable of the same type to eliminate potential connectivity problems.
If your laptop is experiencing flickering screens, power on the device and observe the flickering behavior.
Fix 2. Reconnect GPU
Fixing screen flickering issues on Windows is possible by reconnecting the GPU. It ensures that the graphics processing unit is properly connected to the computer system. Follow these steps to reconnect the GPU:
Step 1. Shut down the computer completely to prevent any electrical damage or data loss during the process.
Step 2. Disconnect Power supply.
Step 3. Open the computer case. Remove the side panel or access panel to gain access to the internal components.
Step 4. Identify the graphics card installed on the computer. It is located in the PCIe slot on the motherboard.
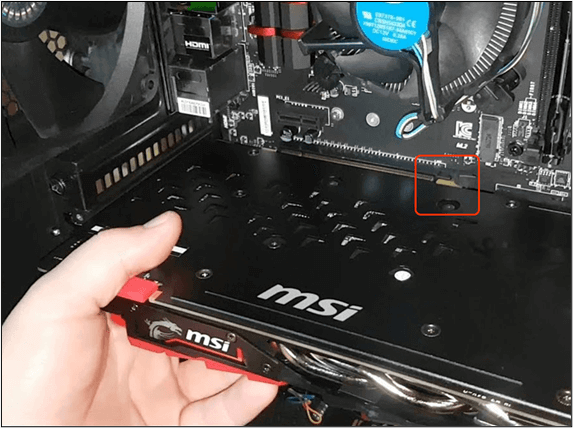
Step 5. Carefully unscrew or release any retaining mechanisms securing the GPU in place.
Step 6. Check the GPU for any visible signs of damage, dust, or debris. Clean the GPU and PCIe slot using compressed air if necessary.
Step 7. Align the graphics card with the PCIe slot on the motherboard. Insert the GPU firmly into the slot.
Step 8. Fasten the graphics card in place.
Step 9. Complete the setup and turn on the computer.
EaseUS Todo Backup
It is always a good idea to back up Windows before any Windows update or change.
Secure Download
Fix 3. Switch to a New User Profile
Screen flickering on Windows can be frustrating. It disrupts productivity and causes visual discomfort. However, resolving this problem can be straightforward with the right approach. One effective solution is to switch to a new user profile. It can help eliminate screen flickering caused by corrupted user settings or conflicts within the current profile.
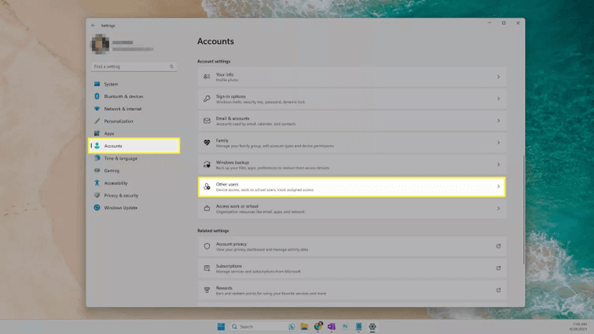
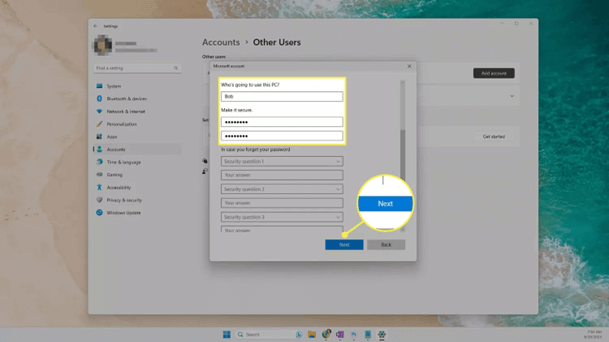
Step 1. Open Windows "Settings" and go to "Accounts".
Step 2. Choose "Other Users" and "Create a new account." Then, Set up a new user profile.
Step 3. Enter your details and select "Next".
Step 4. After creating a new profile, log out of your current user account.
Step 5. Select the newly created user profile from the login screen. Observe the screen for any signs of flickering.
Is the post helpful? Share it with your fans and friends to help them solve the issue effectively.
Fix 4. Disable Third-Party Antivirus Software
Antivirus programs are essential for system security. They can occasionally conflict with other software or drivers. Disabling third-party antivirus software can also solve the screen flickering on Windows 11 issues. Follow these steps to disable antivirus software:
Step 1. Open the Antivirus Program, and go to "Settings."
Step 2. Select Real-time protection or an active scanning option.
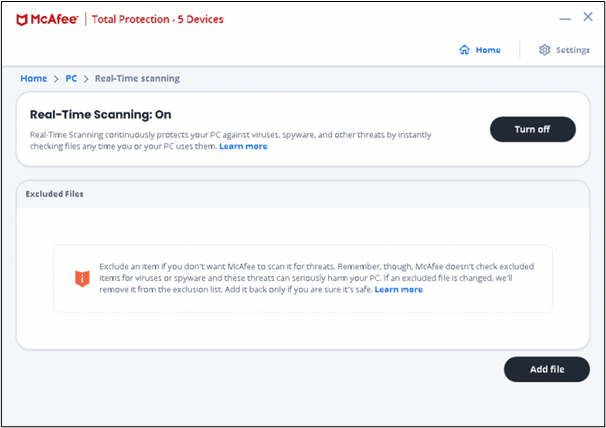
Step 3. Turn off real-time protection.
Step 5. Restart your computer.
Fix 5. Update Display Driver
EaseUS Todo Backup
It is always a good idea to back up Windows before any Windows update or change.
Secure Download
Outdated or corrupt drivers can cause display issues. It is essential to update the display driver for resolving screen flickering issues on Windows systems. Follow these steps to update your display driver:
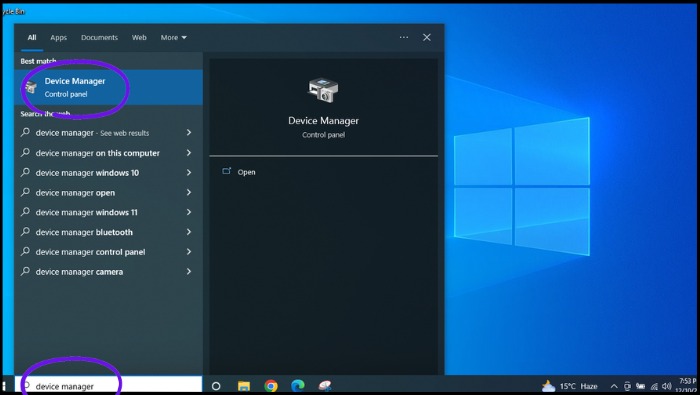
Step 1. Search "Device Manager" in the Windows search bar.
Step 2. Expand the "Display adapters" category to reveal your system's installed display adapter(s).
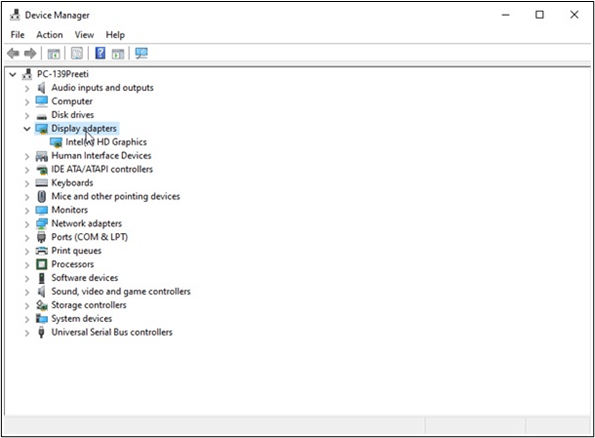
Step 3. It will show your GPU model. Select "Update driver" from the context menu.
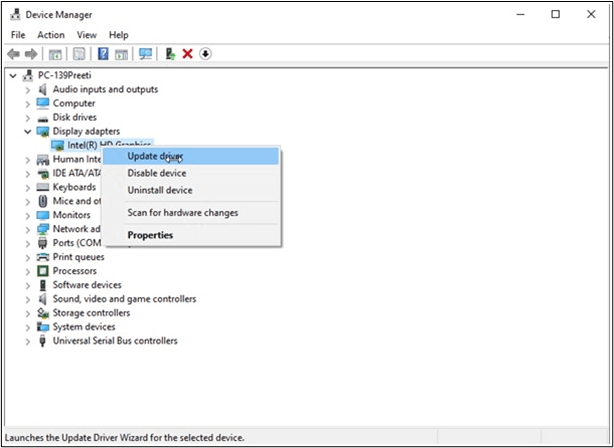
Step 4. Choose the option that allows you to search automatically for updated driver software.
Fix 6. Perform System Restore
Sometimes, the problem arises after recent system changes or updates. To address screen flickering issues on Windows systems, perform a system restore from boot. This allows you to restore your computer to a previous point when it was functioning correctly. It will also restore any system settings and installed applications.
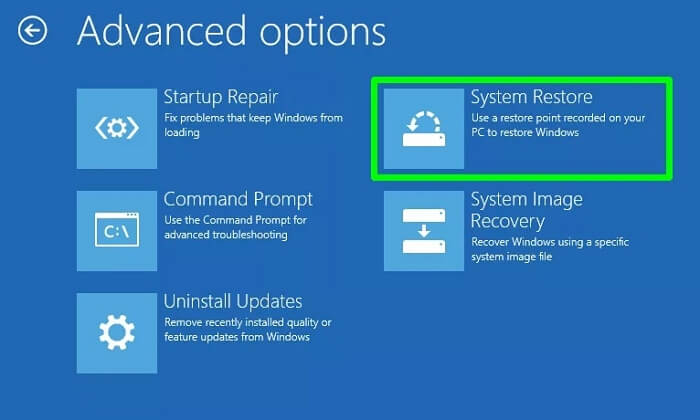
Step 1. Restart your computer. Press the F11 key as soon as it powers. This will open the "Advanced Startup" options.
Step 2. On the Advanced Options screen, select "System Restore". The computer will reboot.
Step 3. Select an administrator account (and confirm using a password) > Click "continue" > "Next."
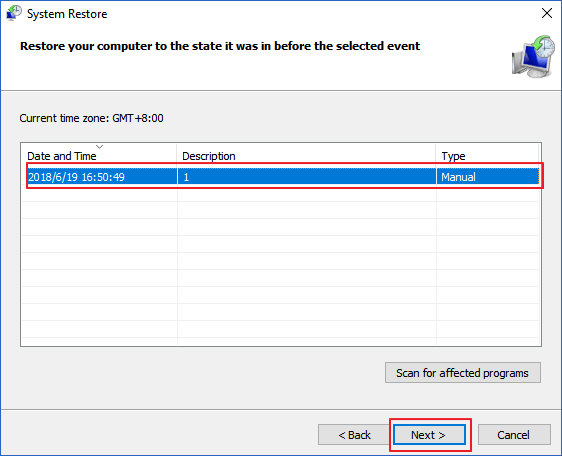
Step 4. Ensure the "Choose a different restore point" option is selected, and then click "Next." You can also select the descriptive restore point you created on your PC. If you encounter the System Restore points missing issue, link to the article for solutions.
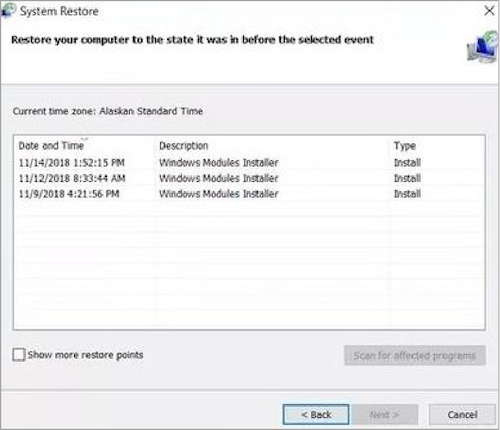
Step 5. Select a particular restore point from the available list on your PC. Then Click "Next" at the Confirm your restore point screen.
Step 6. Click "Scan for affected programs." This will confirm the apps/programs that will be removed since they were installed after creating the system restore point.
Step 7. Click "Yes" if a warning message appears.
Step 8. Click "Next", then click "Finish" and wait for the restore tool to continue.
Step 9. Your computer will restart, meaning the restore is complete.
Step 10. On the next boot, log in to your PC and go to your Desktop to see a confirmation message saying: "System Restore completed successfully."
Is the post helpful? Share it with your fans and friends to help them solve the issue effectively.
Why Windows Screen Display Flickering?
Windows screen display flickering is a common issue that many Windows users encounter while using, it can be due to various reasons:
- #️⃣Outdated or Faulty Graphics Drivers: Incompatible graphics drivers can cause screen flickering problems. It happens after a Windows update or hardware change.
- #️⃣Incompatible Software or Applications: Software programs or applications conflict with your system's display settings. It can be due to compatibility issues or conflicting settings.
- #️⃣Faulty Hardware Components: A damaged GPU or loose cable can cause screen flickering issues. Look for physical damage or wear and tear over time.
- #️⃣Electrical Interference: External factors such as electromagnetic interference from nearby electronic devices or power fluctuations can cause screen flickering.
- #️⃣System Settings or Configuration: Incorrect display or resolution settings can contribute to screen flickering problems. Moreover, refresh rate or power management settings can also contribute to the issue.
- #️⃣Malware or Virus Infections: Malicious software infections can interfere with system processes, including display drivers.
- #️⃣System Updates: Windows updates or driver updates can introduce bugs or compatibility issues. This may occur after installing a new update or patch.
- #️⃣Hardware Compatibility Issues: Using hardware components or peripherals that are not fully compatible with your system can lead to screen flickering problems.
The Final Words
Screen flickering on Windows 11/10 systems can disrupt your computing experience. The sudden changes in brightness or color cause frustration and strain your eyes. This article explored the various causes of screen flickering. We've also provided detailed solutions and troubleshooting steps to help you address and resolve these issues effectively.
Before conducting any update or change to your computer, it is recommended to back up your device to prevent data loos with EaseUS Todo Backup. By following the steps outlined here, you can restore stability and clarity to your display. it ensures a smoother and more enjoyable Windows experience overall.
Secure Download
FAQs on Screen Flicker on Windows 11
Screen Flickering issues can be due to multiple reasons. If you have any confusion about the process, here are some insights.
Is screen flickering a software problem?
Screen flickering can be due to software. problems such as outdated or incompatible graphics drivers and conflicts between applications can cause the problem. Moreover, malware infections or incorrect system settings can all contribute to screen flickering. Additionally, software updates or patch issues can introduce bugs or compatibility issues. Therefore, troubleshooting software-related factors is an essential step in resolving screen flickering problems on Windows systems.
Can hardware cause screen flickering?
Yes, hardware issues can also cause screen flickering. Problems with hardware components such as a damaged GPU or loose cables can be a common cause. Other reasons may include malfunctioning monitors or electrical interference. Physical damage or compatibility issues between hardware components can contribute to the issue.
Was This Page Helpful?
Updated by Larissa
Larissa has rich experience in writing technical articles and is now a professional editor at EaseUS. She is good at writing articles about data recovery, disk cloning, disk partitioning, data backup, and other related knowledge. Her detailed and ultimate guides help users find effective solutions to their problems. She is fond of traveling, reading, and riding in her spare time.
Related Articles
-
[Fixed] How to Resolve Error Code 43 on Mac with 4 Workable Plans
![author icon]() Dany/2024-01-11
Dany/2024-01-11 -
Microsoft Word Not Opening on Mac | 4 Effective Fixes
![author icon]() Jean/2024-07-01
Jean/2024-07-01 -
REFS Volume Showing as RAW: How to Fix Without Lossing Data
![author icon]() Jaden/2024-05-20
Jaden/2024-05-20 -
[NEW] Fix USB Accessories Disabled on macOS 13 Ventura Effectively in Seven Ways
![author icon]() Dany/2024-01-11
Dany/2024-01-11

EaseUS Data Recovery Services
EaseUS data recovery experts have uneaqualed expertise to repair disks/systems and salvage data from all devices like RAID, HDD, SSD, USB, etc.