Don't worry if you received this error message while restoring a system image to a computer: "Windows cannot restore a system image to a computer that has different firmware. The system image was created on a computer using EFI/BIOS and this computer is using BIOS/EFI."

On this page, we'll explain why system image restore failed and how to fix this error to restore the system image to a target computer successfully. Check out how to fix this issue on your own:
Applies to: Fix "System image restore failed. Windows cannot restore a system image to a computer that has different firmware" error in Windows 10/8.1/8/7.
Overview of System Image Restore Failed Error
In this part, you'll learn:
- 1. What is system image recovery
- 2. Why did system image restore fail, causes of Windows cannot restore a system image error
- 3. What to do when system cannot restore a system image to a different computer
System Image Recovery, briefly, is a process of restoring a Windows computer back to a previous healthy state with a previously created system backup image (also known as restore points sometimes). So can you use a system image on a different PC, for example, to restore a Windows 7 system image to a different computer? Yes, you can.
But why did system restore fail? Here are two basic reasons that can explain why did the error occur to your new PC:
- #1. System Restore did not complete successfully.
- #2. System Image Restore failed because of EFI/BIOS error.
Basically, the 1st issue is related to the computer's system files and settings. As for the 2nd issue, it's more complex and mainly caused by the listed issue:
- The system image was created on a computer using BIOS and the target computer is using EFI.
- The system image was created on a computer using EFI, while the current PC is using BIOS.
- The source system disk is MBR, the target disk is GPT, or the source disk is GPT, while the target disk is MBR.
Fix 'System Image Restore Failed. Windows Can't Restore System Image' Error
If you search on google, you may find that many users have an experience of getting system image restore failed because of EFI/BIOS error. If you are one of the victims, try the following troubleshooting methods to fix the issue with ease:
- #1. Use System Restore Alternative Tool - Easiest
- #2. Perform System Restore via Windows Installation Media
- #2. Configure Boot Mode in New PC
- #3. Convert Target Disk to the Same Partition Style as Source Disk: MBR - MBR; GPT - GPT
Note that if you are a Windows beginner and prefer an efficient way to create and restore system image to a different computer, Method 1 is the best. If you're familiar with Windows operation and need a free method, Method 2, 3, and Method 4 are good for you to try.
Method 1. Use System Restore Alternative to Restore System Image to A Different Drive/PC
Best for: All levels of Windows users.
Difficulty Level: The easiest way to fix system image restore fails because of EFI/BIOS error.
Applies to: Fix "System Restore failed", "Windows cannot restore a system image to a different computer" error on Windows 10/8/7 with ease.
To most Windows beginners, it's merely impossible to restore the system image to dissimilar hardware regardless of the computer firmware with Windows Restore feature. Fortunately, professional Windows backup software can easily fix the issue.
Here, EaseUS Todo Backup enables all levels of Windows users to easily restore system image to a dissimilar hard drive or computer with ease.
Secure Download
With it, you can restore the system image created on a BIOS-based computer (MBR disk) to a UEFI computer (GPT disk) and vice verses.
- Notice:
- To restore the system image from a GPT disk to an MBR disk without boot issue, make sure the system supports UEFI boot mode.
Tutorial: Restore a System Image to a Computer with Different Firmware
Step 1. Create an Emergency Disk to USB
1. Connect an empty USB flash drive or external hard drive (with over than 100GB space) to your PC.
Note: Initialize the USB or external hard drive as MBR, and create two partitions: set the first partition as FAT32 and the second partition as NTFS.
2. Run EaseUS Todo Backup and click "Tools" > "Create Emergency Disk".

3. Choose USB as the disk location to create the emergency disk and click "Create".
The bootable disk will help you boot computer and transfer system image to the new PC.

Step 2. Create System Backup Image on Source Computer
1. Click "OS" on the main page and Windows OS will be selected by default.
2. Choose the second partition of the USB drive which contains the emergency disk to save system image.
You may also save system backup image to another empty external disk (which must be equal or bigger than the system C drive).

3. Click "Backup Now" to start creating a system backup image to the target device.
Step 3. Boot Target Computer from EaseUS Todo Backup Emergency Disk
1. Eject EaseUS emergency disk and system backup image USB and connect it to the new computer.
2. Restart PC and press "DEL/F2/F10/F12" to boot into BIOS.
3. Go to the boot menu and set the computer to boot from the EaseUS Todo Backup emergency disk.
If you want to restore the system image to a GPT disk, you need to change the boot mode to EUFI in BIOS. Then your computer will enter EaseUS Todo Backup main interface.
Step 4. Transfer System to the New Computer
Note: Restoring system image to the new computer will erase the data on the target disk. Remember to back up the files in advance or use an empty disk to restore the system image to avoid data loss.
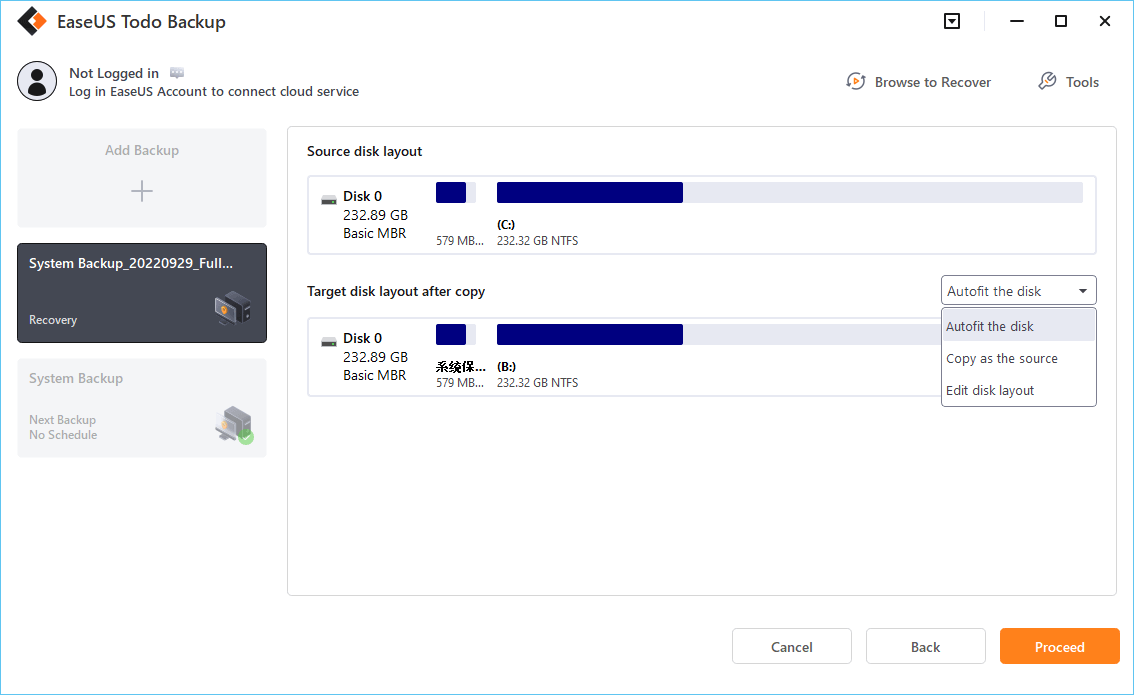
1. On EaseUS Todo Backup main interface, click "Tools" > "System Transfer".
2. Select the system image on your USB external drive and click "OK" to continue.
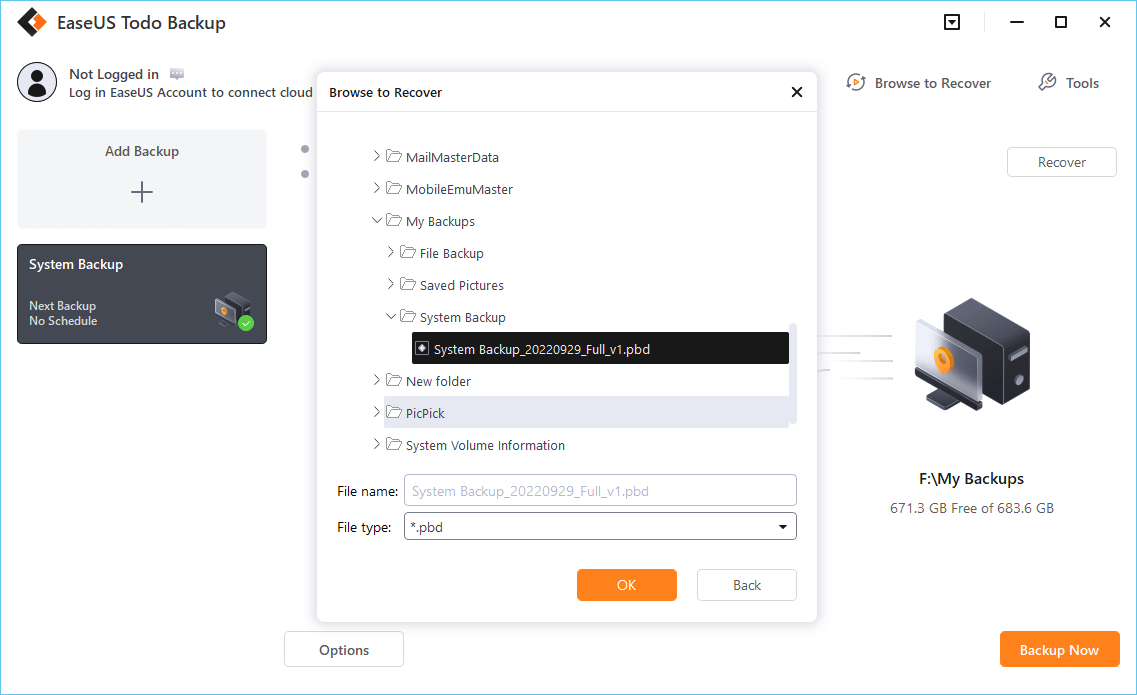
3. Then click "Proceed" to start transferring the system to a new computer.
Step 5. Restart PC with transferred system
1. Enter BIOS and set computer to boot up from the drive with the transferred system.
2. Save all changes and restart your computer.
3. Update all drive drivers and programs to ensure all things will work just fine on the new computer.
After following the above steps, you should be able to boot up your new computer with the transferred OS by then.
Method 2. Perform System Restore on New Computer via Windows Installation Media (By Microsoft Forum)
Best for: Experienced Windows users, Windows 7 users recommended.
Difficulty Level: Medium, complex for Windows beginners.
Applies to: Fix "Windows cannot restore a system image to a different computer" error with Windows installation media.
Important: As the process may cause file loss on the new PC, make sure you'll create a backup of important data on the target disk in advance.
If you are a Windows 10 or Windows 8 user, the steps to restore a system image to a new computer via Windows installation media may be a bit different. This method is highly praised by many Windows 7 users in the Microsoft forum, follow to have a try:
Remember to insert the external hard drive or USB drive that contains your system backup image to the target PC.
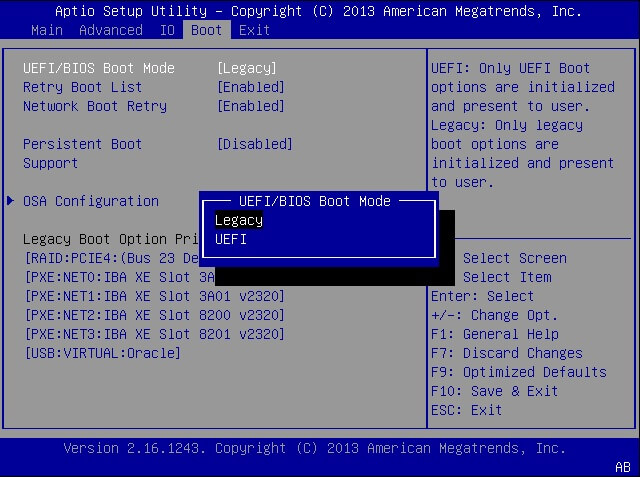
Step 1. On the target PC, restart the PC and press F2/F11/Del to enter BIOS.
Step 2. Go to the boot menu, enable UEFI as the Boot mode.
Step 3. Insert Windows installation media to the target PC and set to restart from the media.
Step 4. Enter the "Install Now" window, select "I don't have a product key", select OS and click "Next".
Step 5. Check "I accept the license terms" and click "Next".
Step 6. Select "Custom", then select the original disk and click "Delete".
Step 7. Select the target disk again and click "New" and "Apply".
Step 8. Then click "X" to close the window.
Step 9. Re-enter the Install Windows window, click "Repair your computer", select "Troubleshoot" and click "System Image Recovery".
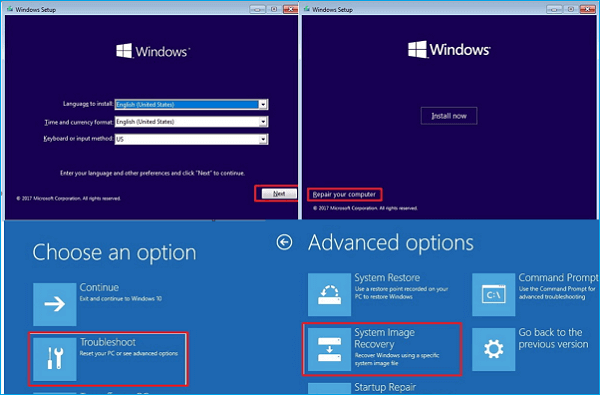
Step 10. Check "Select a system image" and click "Next".
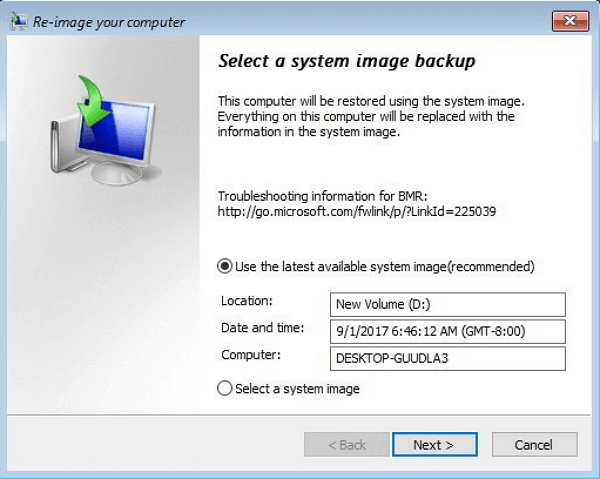
Step 11. Check "Format and repartition disks", click "Next" and "Finish", then click "Yes".
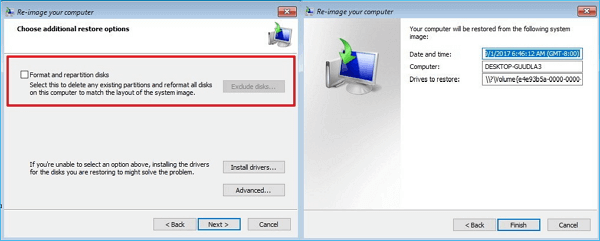
Wait for Windows to complete restoring a system image to a computer that has different firmware. After this, just reboot your computer, there, you are good to use your OS on the new computer again.
Note that if the process doesn't work on your computer, you're having some issues with the BIOS boot mode or the target disk partition style. Check and follow the next two methods for help.
Method 3. Configure Boot Mode in New PC
Best for: Advanced Windows users.
Difficulty Level: Hard, not easy for ordinary Windows users to configure the computer boot mode.
Applies to: Fix "System Restore failed because of EIF/BIOS" error on Windows 10/8/7.
When the source and destination computer are using different boot modes in BIOS, Windows won't allow you to restore the system from UEFI based computer to a BIOS Legacy computer, and vice versa.
Therefore, to fix this issue, you'll need to make sure that the source and destination computer are using the same mode:
- If the backup was created on a computer using BIOS, change the boot mode to Legacy.
- If the backup was created on a UEFI computer, enable UEFI boot mode.
To configure the firmware boot mode, follow the steps below as a guide:
Step 1. Check boot mode on the source computer:
Restart the source computer > Press F2/F11/F12/Del to enter BIOS > Go to Boot Mode and Check which mode is enabled: Legacy or UEFI.
Step 2. On the target computer, restart it and enter BIOS with the above guidelines in Step 1.
Step 3. Go to the Boot Menu, select the Bood Mode as the same as it was on the source PC: Legacy - Legacy, UEFI - UEFI.
Step 4. Save the changes and restart the PC.
After this, you may continue to perform system image recovery and restore a system image created on your old PC to the new computer.
Method 4. Convert Target Disk to the Same Partition Style as Source Disk
Best for: Advanced Windows users.
Difficulty Level: Hard, ordinary Windows users should be very careful while following this tutorial or consulting the manufacturer for help.
Applies to: Fix "Windows cannot restore a system image to a computer that has different firmware" on Windows 10/8/7.
If Windows system restores still doesn't work after configuring the boot mode on your target PC, you should also check the disk partition styles on both computers.
Normally, BIOS Legacy mode requires the system to be installed on a master boot record (MBR) disk, and UEFI mode the GUID partition table (GPT) disk. Therefore, to fix the system image restore failure error, make sure that the source and destination disk partition are the same types:
- MBR - MBR
- GPT - GPT
To save your time, we'd like to suggest you try a reliable partition manager software - EaseUS Partition Master to convert GPT to MBR or MBR to GPT. Here are the steps for you to follow:
Step 1. Download and launch EaseUS Partition Master on your computer.
Step 2. Go to Disk Converter, select "MBR => GPT" and click "Next" to continue.

Step 3. Select the target MBR disk that you tend to convert to GPT, and click "Convert" to start the conversion.

If the source disk is GPT, while the target disk is MBR. Use the same steps as shown, right-click target disk and select "Convert to GPT" to complete the conversion task.
After this, you can restart the PC and continue restoring the system image to your new disk or new computer again.
The Bottom Line
On this page, we discussed why the system restores failed on your new computer, what caused the failure, and how to fix 'Windows cannot restore a system image to a computer that has different firmware' successfully.
It's important that you create a backup of important files on your target disk in the new PC. This will save you from data loss caused by system image restore.
For most Windows beginners and average users, we suggest you try the system image backup and restore feature provided by EaseUS Todo Backup as shown in Method 1. It's easy and efficient in restoring a system image to a dissimilar hard drive or computer.
Secure Download
Was This Page Helpful?
Daisy is the Senior editor of the writing team for EaseUS. She has been working at EaseUS for over ten years, starting as a technical writer and moving on to being a team leader of the content group. As a professional author for over ten years, she writes a lot to help people overcome their tech troubles.
Written by Tracy King
Tracy became a member of the EaseUS content team in 2013. Being a technical writer for over 10 years, she is enthusiastic about sharing tips to assist readers in resolving complex issues in disk management, file transfer, PC & Mac performance optimization, etc., like an expert.
Related Articles
-
How to Transfer Stardew Valley Saves Between Different Devices
![author icon]() Rel/2025-07-07
Rel/2025-07-07 -
Mac Software Update Not Working | 6 Proven Ways to Fix It [macOS Sonoma Included]
![author icon]() Brithny/2026-06-17
Brithny/2026-06-17 -
[8 Solutions] Fix Shift Key not Working on Mac, MacBook
![author icon]() Dany/2025-09-17
Dany/2025-09-17 -
File System Verify or Repair Failed. : (-69845) | How to Fix
![author icon]() Dany/2026-06-17
Dany/2026-06-17
EaseUS Data Recovery Services
EaseUS data recovery experts have uneaqualed expertise to repair disks/systems and salvage data from all devices like RAID, HDD, SSD, USB, etc.