Problem with PC Startup: Checking File System on C
Have you encountered the issue of checking the file system on C at startup? Many users often face this issue, which leads to system crashes. So, you must carefully shut down the PC by pressing the power button or unplugging the power cable. After restarting your Windows PC, the interface shows this error: "checking file system on C." This error on Windows computers will jeopardize its hard drives when you power on or off directly.
What's more? This error message damages PC's the data and disables usual booting. However, it would be natural when checking the file system on C operates one time. But if you find out the issue happens every time you boot your PC, you must stop checking the C file system. This problem is scary! But you can fix checking file system on C with these methods.
Causes of Checking File System on C on Windows 7/8/10/11
You should know the causes of the Checking File System on C error to understand how to fix them. So, when you encounter this issue, fixing the checking file system on C is an absolute thing to do!
Here are the 3 reasons below why the users see the onscreen error message:
Reason 1. Power outage causes the error message
If your Windows PC turns off due to an interruption in the electricity supply, the "checking file system on C" error can appear after restarting it. However, as a power outage is planned, it could stem from an equipment failure, natural weather conditions, and others.
Reason 2. File system damage
Another probable reason for checking the file system on C on Windows is the file system damage. This is how you can contain the file system errors:
Step 1. Double-click the "Computer" icon and search for C drive on the desktop. Once done, "Properties" need to be selected after right-clicking C drive.
Step 2. Click the "tools" option and the "check now" button.
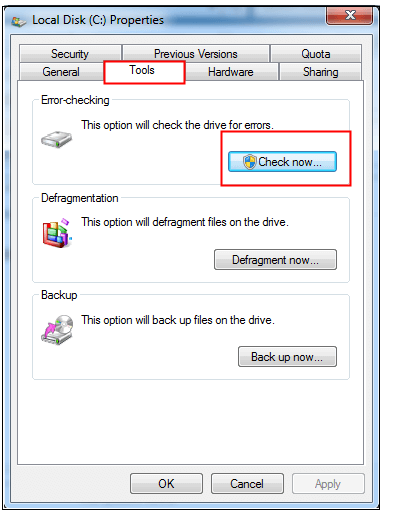
Step 3. A pop-up window will open, where you need to tick before "Fix the system errors automatically" and opt for the "start" button.
Reason 3. Bad sectors
A bad sector is a hard disc on a computer that has been corrupted and can no longer store or retrieve data. Check for faulty sectors if the C disc has no file system issues. The ideal option is to perform the task in a convenient, all-inclusive, complex disc management program, and it only takes a few clicks to use it to check for faulty sectors quickly. An outstanding program will provide capabilities like partition alignment and partition cleaning in addition to erroneous sector checks.
4 Solutions to Fix Checking File System on C on Windows 7/8/10/11
If you want to fix the checking file system on C, follow the top 4 solutions mentioned below:
Do you want to eliminate the checking file system on the C issue on Windows PC? If yes, you can disable Autochk.exe software from the scheduled tasks list. These are the steps below:
Method 1. Using Control Panel
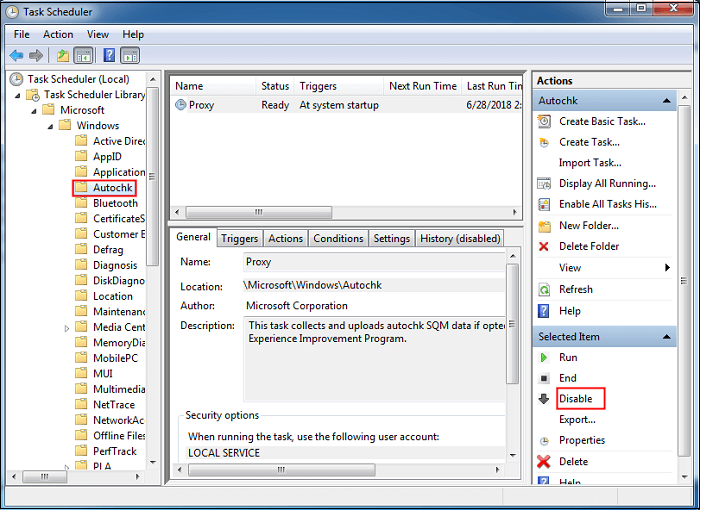
Step 1. Hit the start button and then Control Panel. Under Control Panel, you need to click "system and security" and "Administrative Tools."
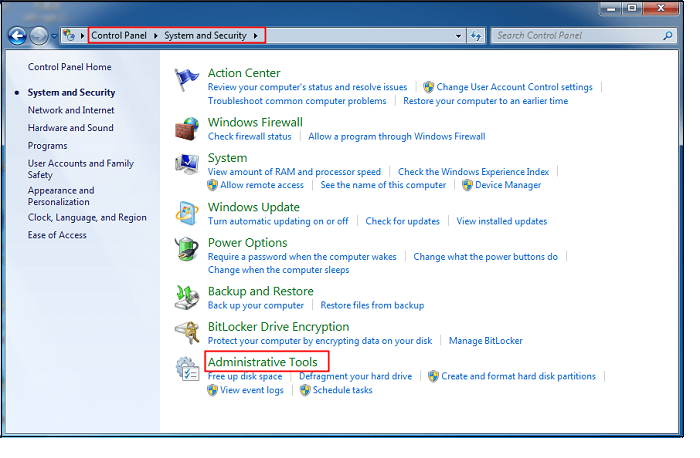
Step 2. "Task Scheduler" needs to be double-clicked at this step. Afterward, you need to search for Autochk in the pop-up window and click it. Opt for "Disable" from the right-side panel.
Method 2. Check the Session Manager Registry Entry
You can fix Checking File System on C on Windows 7/8/10/11 after disabling the automatic checking file system on C through the registry editor. The steps are the following:
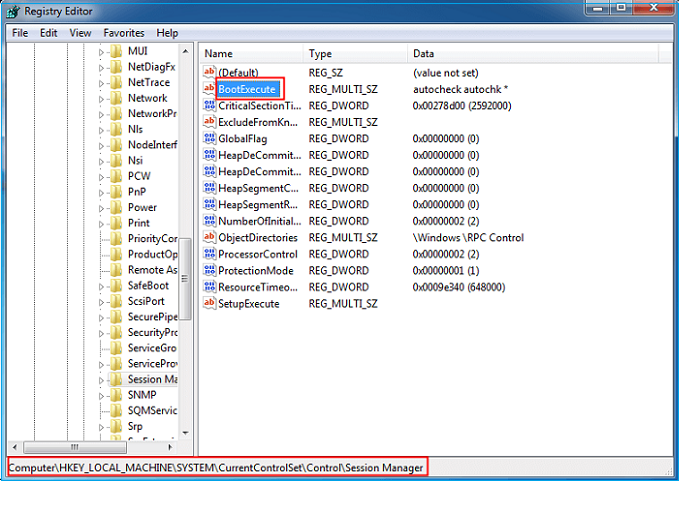
Step 1. You need to open the Run dialogue by pressing Windows Key + R. After that; you need to type Regedit and hit Enter button or click "OK" to open the Registry editor.
Step 2. To move to the following path, expand the entries in the left-hand pane:
HKEY_LOCAL_MACHINE\SYSTEM\CurrentControlSet\Control\Session Manager
Step 3. Double-click on BootExecute, located in the right-hand pane.
Step 4: You can change the key's default value in the pop-up window by incorporating /K:C at the end before. Once done, click "OK" to confirm your changes.
Step 5: You should shut down the "Registry Editor."
Method 3. Disable the automatic checking file system on C through the registry.
Follow the steps below to disable the automatic checking file system on C through the registry:
Step 1: Hit the start button, and in the search box, type "Regedit."
Step 2: You must rummage for this registry key:
HKEY_LOCAL_MACHINE\SYSTEM\CurrentControlSet\Control\Session Manager
Step 3: Double-click on BootExecute in the right-hand pane.
Here, autochk or autocheck is the key's default value, which means every drive is verified for consistency. Simply put /K:C before * to turn off autocheck on the C: disc when Windows starts. Thus, the final value should seem as follows: autocheck autochk /k:C *
If you would love to incorporate more drives, the key must look like this: autocheck autochk /k:C /k:D * after disabling C and D drives.
Lastly, replace the key with the default key to return everything to its default state, which is autochk autocheck*
Method 4. Run CHKDSK to file Windows file errors
You may check where this "checking file system on C" error is located on the disk to get them fixed. However, you can run the CHKDSK check to fix Windows file errors. The steps are shown below:
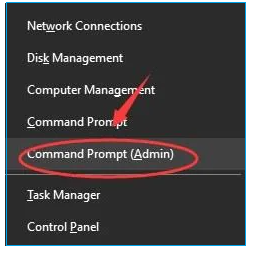
Step 1. Windows + X and Command Prompt (Admin) must be pressed together.
Step 2. Press "Enter" right after typing "chkdsk /f c:".

Step 3. Don't forget to type in "chkdsk C: /r".
Following these, you can check to see if the problem has been resolved. Don't give up if it doesn't work; there are other options.
Further Solution: Recover Data When the File System Corrupts
Sometimes, especially after inspecting the faulty file system, files may disappear after executing SFC and CHKDSK. Additionally, there is a significant chance of data loss. Therefore, users should prioritize data security. A specialist data recovery program can be helpful for Windows users.
You can download the effective data recovery program EaseUS Data Recovery Wizard. It was created to aid in the recovery of data lost as a result of a file system malfunction, system crashes, and accidental file deletion.
EaseUS Data Recovery Wizard
- Formatted recovery: You can retrieve all your data, whether it's an SSD, flash drive, HDD, or USB drive, with EaseUS.
- Damaged HDD recovery: With the support of the EaseUS Data Recovery Wizard, you can recover data from dead hard drive.
- Deleted file recovery: Don't worry if you accidentally delete a file. The lost files are retrievable with the professional recovery tool.
Final Thoughts
With the help of the solutions above, you can quickly stop checking the file system on C error on your Windows 7/8/10/11 PC. But despite all your answers, there's a risk of data loss! To save your files from getting permanently deleted from your PC, it's essential to have premium data recovery software to retrieve files. EaseUS Data Recovery Wizard is the best option since it helps you reduce disk space with several features.
Fix Checking File System on C FAQs
Consider the FAQs mentioned below to obtain a profound understanding of the topic:
1. How do I know if FAT32 or NTFS?
To determine if the file system is FAT32, exFAT or NTFS, you need to open "My Computer or PC," right-click the drive you want to see, and opt for "Properties." The file system format will be listed in the Disk Properties window.
2. How to stop checking the file systems on c Windows XP?
Select Run from the Start menu, enter regedit and select OK. Find the following key in the registry, and then click it:
HKEY_LOCAL_MACHINE\System\CurrentControlSet\Control\Session Manager\BootExecute. Click Modify on the Edit menu. After entering autocheck autochk, hit ENTER.
3. How to disable disk check Windows 7 startup?
One of the easiest ways to disable disk check on Windows 7 startup is to utilize the chkntfs command. You must hit the "Start" button and type "command prompt." Once right-clicking on the command prompt, you need to opt for "Run as Administrator."
4. How to fix checking the file system on C Windows 7 every boot?
Follow the steps below:
- Step 1. On the Windows 7 desktop, you must double-click the "Computer" icon and search for C drive. After that, "Properties" need to be chosen after right-clicking the C drive.
- Step 2. Hit the "Tools" tab and, after that "check now" button.
- Step 3. Select "Automatically resolve file system faults" and click "Start" in the pop-up window.
5. How long does checking the file system on C take?
Checking the file system on C usually takes over 2 hours based on your drive's size and the errors discovered.
Was This Page Helpful?
Daisy is the Senior editor of the writing team for EaseUS. She has been working at EaseUS for over ten years, starting as a technical writer and moving on to being a team leader of the content group. As a professional author for over ten years, she writes a lot to help people overcome their tech troubles.
Jaden is one of the editors of EaseUS, who focuses on topics concerning PCs and Mac data recovery. Jaden is committed to enhancing professional IT knowledge and writing abilities. She is always keen on new and intelligent products.
Related Articles
-
Learn How to Install on ReFS Partition Today | Windows 11 Installation Made Simple
![author icon]() Roxanne/2024-01-11
Roxanne/2024-01-11 -
SanDisk Extreme Pro Portable SSD Not Detected: Troubleshooting and Data Recovery
![author icon]() Dany/2024-10-25
Dany/2024-10-25 -
How to Check Hard Disk Health Using CMD [Full Guide]
![author icon]() Cici/2024-06-21
Cici/2024-06-21 -
Top 2 Ways | How to Create Bootable USB from ISO Windows 10
![author icon]() Jerry/2024-06-06
Jerry/2024-06-06

EaseUS Data Recovery Services
EaseUS data recovery experts have uneaqualed expertise to repair disks/systems and salvage data from all devices like RAID, HDD, SSD, USB, etc.