Suppose you get the "There was an error connecting to the Apple ID server" prompt on your screen and don't know how to fix it; this article will introduce 9 practical fixes to you! Check out:
| Workable Solutions | Step-by-step Troubleshooting |
|---|---|
| Fix 1. Check Network Connection | Hit the Apple menu > System Settings. After that, click Network in the sidebar...Full steps |
| Fix 2. Check Apple Servers Status | Visit Apple's official website to confirm if your required services are out of the server yet...Full steps |
| Fix 3. Reset Network Settings | Select System Preferences > Network. Eliminate your Wi-Fi connection...Full steps |
| Fix 4. Change Time & Date Settings | Click System Preferences > Date & Time, and check Set date and time automatically...Full steps |
| Other Practical Fixes | Sign out and sign in with Apple ID, reset the Apple ID password, get a verification code, etc...Full steps |
Before fixing the "There was an error connecting to the Apple ID server" error, you should first figure out why this problem happens. Read on to find the possible reasons.
Why There Was an Error Connecting to the Apple ID Server
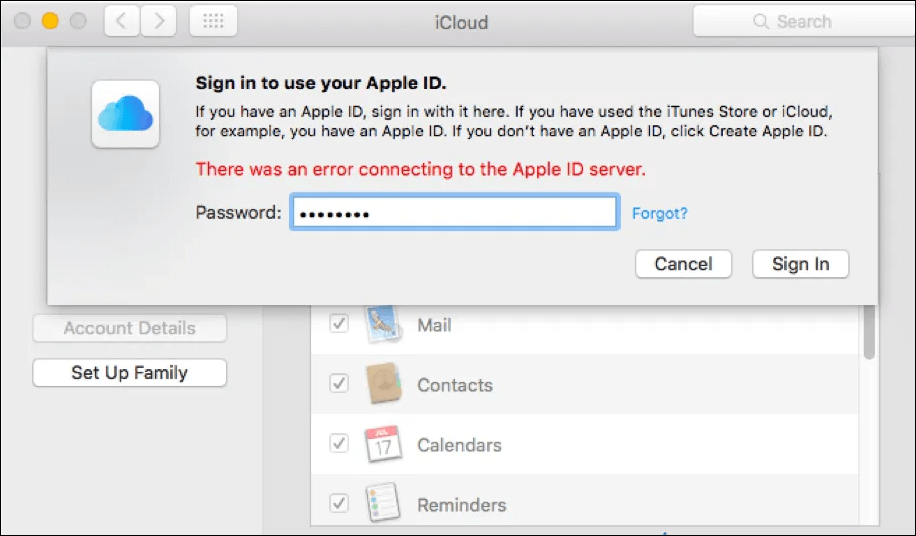
Does your MacBook demonstrate a "Verification breakdown" notification stating, "There was an error connecting to the Apple ID server"? The primary reason for this error is your MacBook can't get linked to iCloud services. iTunes, backups, or App Store.
Although the issue pertains to your Apple ID, sometimes it may not have anything to do with it. It means this error begins to sprout in date & time settings, Wi-Fi connection, a bug in the OS, and VPN interference.
Several reasons exist which can directly or indirectly engender this error. The common causes are the following:
- Unstable Wi-Fi connection
- Missed verification code
- Incorrect settings for Date & Time
- Imprecise Apple ID password
- Third-party app interference, such as anti-virus or VPN
- iTunes authentication token glitch
- System flaws
- Utilizing mobile data while retrieving an iCloud backup
As you have understood the potential reasons for this error, it's time to look into the probable fixes to resolve the "There was an error connecting to the Apple ID server" issue.
How Do I Fix the Error Connecting to Apple ID Server
If you're getting the "Error Connecting to Apple ID Server" pop-up notification while trying to log in to your App Store or iCloud, you must not panic! It's a common issue every MacBook user has gone through once or more. Let's get started with the nine tips to fix the error:
Fix 1. Check Network Connection
Are you unable to log into the Apple ID server? It's because the issue pertains to the internet connection! Apple tries to log you in with two reliable ways: Wi-Fi and a cellular connection. You need to ensure having a top-notch connection by verifying the wireless status. Go through the steps below to check the status of the network on Mac:
Step 1. Hit the Apple menu > System Settings (or System Preferences). After that, click "Network", which is located in the sidebar.
Step 2. You can see the network connection status on the right side of the screen:
- 🟢Green: the network is connected;
- 🟡Yellow: the web isn't connected but is active.
- 🔴Red: the service is not operational.
Fix 2. Check Apple Servers Status
To solve the "There was an error connecting to the Apple ID server" error, you need to verify the Apple server's status. You can visit Apple's official website to confirm if your required services are out of the server yet. For instance, if you intend to utilize the App Store and sign in with an Apple ID, ensure the Apple Store service is indicated by green, which denotes availability.
Fix 3. Reset Network Settings on macOS
In case the above-mentioned two fixes didn't work, resetting network settings on macOS is high time. You can do it by deleting and re-adding your Wi-Fi connection. Follow the steps below to reset network settings on macOS:
Step 1. Opt for the Apple menu, and select "System Preferences > Network".
Step 2. Eliminate your Wi-Fi connection by picking and then pressing "-".
Step 3. Re-include by hitting "+" and opting for Wi-Fi from the drop-down menu.
Step 4. Hit the "Create" button, and then "Apply".

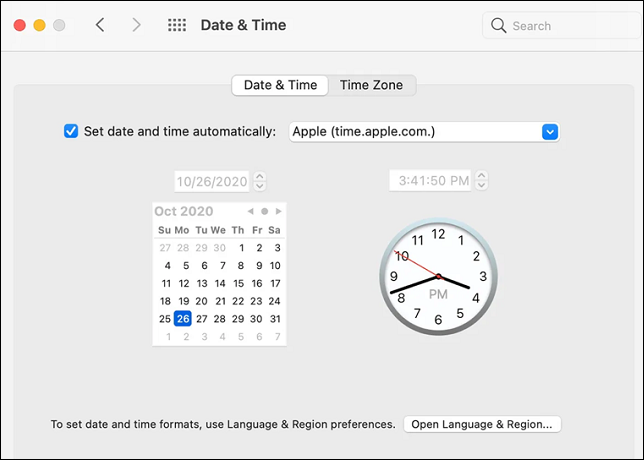
Fix 4. Change Time and Date Settings
While trying to log in to the Apple service, such as iTunes or iCloud, your device will notice whether the time & date matches the time & date of the Apple servers. You will notice issues, such as "Verification failed", in case they don't sync.
To get rid of these Apple ID errors, you have to set the time & date on your MacBook to automatic. The steps are as follows:
Step 1. Go to the Apple menu, and click "System Preferences > Date & Time".
Step 2. Check the box adjacent to "Set date and time automatically".
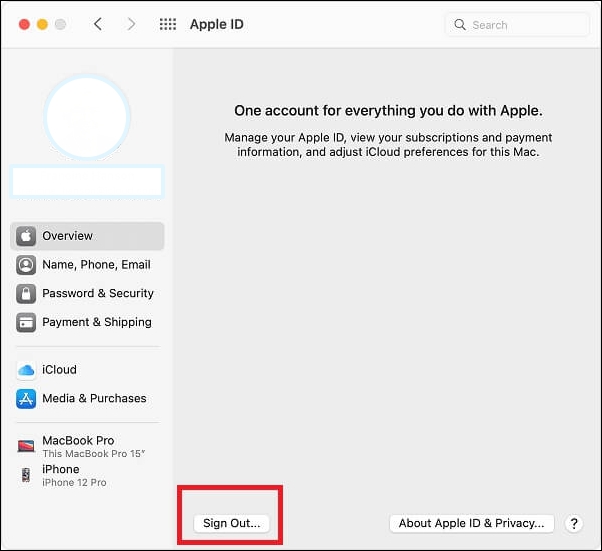
Fix 5. Sign out and Sign in with Apple ID
As you get the error linking with the Apple ID server, and everybody knows that Apple servers are working, you may try to sign out of your Apple ID and then sign in again to fix any glitches. Go through the steps below to sign out and sign back in Apple ID:
Step 1. In order to sign out of Apple ID, Select "System Preferences > Apple ID".
Step 2. The overview tab needs to be opened.
Step 3. Hit the "Sign Out" option.
Step 4. Hit the "Keep a copy" in case there are any applications to save data.
Step 5. Now, select the "Sign In" button right away.
Share this article on social media to help others learn more about how to fix the issue "There was an error connecting to the Apple ID server".
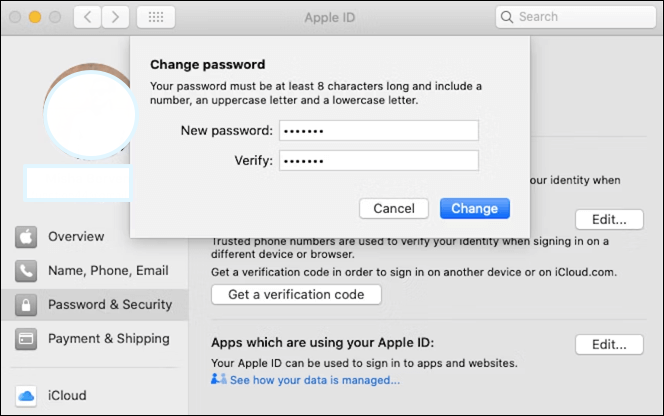
Fix 6. Reset Apple ID Password
If the issue "There was an error connecting to the Apple ID server" persists, you must reset your Apple ID password. Another possibility of this persisting error could be attributed to authentication and understanding how to reset the Apple ID password, which would compel the system to start over. The steps to reset your Apple ID password are the following:
Step 1. You need to select "System Preferences > Apple ID".
Step 2. Head to "Password & Security".
Step 3. Opt for "Change password".
Step 4. Type the password of your MacBook.
Step 5. Double-enter the new Apple ID password and select "Change".
Fix 7. Get a Verification Code for Apple ID
While trying to log into iCloud on one Apple device, it often transmits the verification code to your other Apple gadget. In case you don't have another Apple device or you can't get the 2FA code, you can go through the steps below to obtain a verification code for Apple ID:
Step 1. Go to "System Preferences > Apple ID".
Step 2. Opt for "Password & Security".
Step 3. Hit the option "Get a Verification Code".
Step 4. Copy and paste this code when logging into a different device or icloud.com.
Fix 8. Restart Mac
Restarting MacBook Pro or Air might help eliminate this "Error connecting to the Apple ID Server". The detailed steps to restart MacBook are the following:
Step 1. Hit the Apple menu on the screen.
Step 2. Click on "Restart".

Step 3. Tick the box adjacent to "Reopen Windows when logging back in".
Step 4. Hit the "Restart" button again to finish the restart.

If the "Restart" potion doesn't work, you can hard restart MacBook by pressing the "Command + Control + Power" keys.
Fix 9. Update Software on Mac
If none of the fixes work, you can try the most apparent yet drastic option by getting a new macOS. You can start the process by verifying if there’s any update available. Follow the steps below to perform a software update on your Mac:
Step 1. Open "System Preferences > Software Update".
Step 2. Hit the "Download & Install".
Once you're entirely updated, you may reinstall your macOS with these steps below:
Step 1. Restart your MacBook Air or Pro.
Step 2. Until you notice a spinning globe, hold down the "Command + R" keys, and then let go. Or you can start Mac in Recovery Mode.
Step 3. Hit the "Reinstall macOS" button and, after that, the "Continue" button.
Step 4. Go through the on-screen installation instructions.
Does reinstalling macOS delete data? Technically, reinstalling macOS does not erase your data. However, many Mac users have reported unexplained data loss after reinstalling the system. If the worst happens and your essential data disappears after reinstalling your system, don't worry; keep reading; there will be very effective solutions below.

3 Ways to Recover Files After Factory Reset Mac or Reinstalling macOS in 2023
This article will show you 3 effective ways to recover lost files after reinstalling macOS. Read more >>
✨Bonus Tip: Recover Lost Files After Updating
Have you updated your macOS recently and lost valuable data? For example, missing photos after macOS Sonoma updating. Updating your macOS often leads to data loss, so you must back up your data before updating. If you have lost data and don't know how to recover those files, EaseUS Data Recovery Wizard for Mac is your best choice!
The Mac version of EaseUS Data Recovery Wizard assists in recovering information stored on various Mac-based gadgets, including SD card recovery on Mac, USB drives, cameras, HDDs, SSDs, Fusion drives, etc. It was installed by 79% of Apple users to restore lost documents on Macs, even more, recover deleted files on Mac without Time Machine.
Common data loss scenarios include system crashes, unforeseen shutdowns, macOS updates, virus attacks, and hardware failures. EaseUS Data Recovery Wizard for Mac has a wide range of sophisticated features supporting Mac data recovery. Check out 3 steps to recover you lost data quickly:
Step 1. Select the location
Select the disk where you lost data after updating to macOS Sonoma/Ventura/Monterey/Big Sur. Then, click "Search for lost files".

Step 2. Find lost data after the scan
EaseUS Data Recovery Wizard for Mac will immediately scan your selected disk volume and display the scanning results on the left pane. Use the file type and file path to find wanted data on Mac.

Step 3. Recover data after macOS update
Select the target files that were unknowingly lost during or after the update and click the "Recover" button to get them all back.

Conclusion
These are the top 9 fixes to eliminate the "There was an error connecting to the Apple ID server" error entirely from your MacBook. If one doesn't work, don't be disheartened; try another to resolve this error. While attempting these fixes above, you may encounter data loss. But with the help of professional data recovery software, EaseUS, you can recover every type of file without any hassles. So, download this professional tool now!
There Was an Error Connecting to the Apple ID Server FAQs
Consider these FAQs below to get information about this error:
1. Why is my MacBook saying there is an error connecting to the Apple ID Server?
Poor internet connection is one of the most significant reasons MacBook faces errors while connecting to the Apple ID server. To fix this, you need to switch to a stable Wi-Fi connection in case you're using mobile data.
2. Why does it say verification failed: "There was an error connecting to the Apple ID Server"?
The unsteady internet connection could cause this unsuccessful Apple ID authentication. Even after entering the correct login information, you may encounter this problem if you try to link Apple devices and services, but your internet connection needs consistency.
3. Why can't I access my Apple ID?
The Apple ID or password you use to access your MacBook might need to be corrected. Incorrect information will prevent your Apple ID from logging in. You may try changing your Apple account's password.
4. What does server error mean on Apple?
Ensure your MacBook's date and time are correct while dealing with network- and server-related difficulties. This server error means a non-credible server.
Was This Page Helpful?
Brithny is a technology enthusiast, aiming to make readers' tech lives easy and enjoyable. She loves exploring new technologies and writing technical how-to tips. In her spare time, she loves sharing things about her game experience on Facebook or Twitter.
Related Articles
-
Factory Reset Mac Without Password [for macOS Ventura/Monterey]
![author icon]() Dany/2026-06-22
Dany/2026-06-22 -
How to Solve Kindle not showing up on PC
![author icon]() Daisy/2025-07-04
Daisy/2025-07-04 -
How to Fix Raw SD Card Won't Format Error [3 Efficient Solutions]
![author icon]() Sherly/2025-08-19
Sherly/2025-08-19 -
How to Fix Slow USB Transfer Speed and Speed Up USB in Windows 10/8/7
![author icon]() Tracy King/2026-06-29
Tracy King/2026-06-29
EaseUS Data Recovery Services
EaseUS data recovery experts have uneaqualed expertise to repair disks/systems and salvage data from all devices like RAID, HDD, SSD, USB, etc.