| Workable Solutions | Step-by-step Troubleshooting |
|---|---|
| 1. Create Windows 10 Bootable USB on Mac with Boot Camp | Go to Finder. Choose Applications. Select Utilities. Open Boot Camp Assistant. Click on Continue...Full steps |
| 2. Create Windows 10 Bootable USB on Mac with UUByte ISO Editor | Install UUByte ISO Editor on your Mac. Connect the USB drive to the system. The software will detect the...Full steps |
| 3. Create Bootable USB on Mac for Windows with Disk Utility | Plug the USB drive into the system. Open Disk Utility. Format the USB flash drive via MS-DOS (FAT)...Full steps |
| 4. Using Terminal to Create Windows 10 Bootable USB on Mac | Plug the USB drive into your Mac. Open Terminal. To do so, choose Terminal from Utilities folder. Type...Full steps |
Create Windows 10 Bootable USB on Mac Overview
Do you want to create Windows 10 bootable USB on macOS Ventura/Monterey/Big Sur? Multiple reasons may prompt a user to do so. Firstly, a new operating system aids in clearing out existing malware. Secondly, it cleans up the system and improves efficiency. Moreover, you can easily create a bootable USB on Mac for Windows.
Creating a Windows 10 Bootable USB on a Windows computer is no big deal. But is it possible to create Windows 10 bootable USB on Mac without Bootcamp? Yes, you can! You can also create Mac bootable USB from Windows.
The latest silicon chips on Mac do not have Bootcamp installed. The new ARM chip architecture doesn't allow it, so conventional Windows installation is impossible. However, multiple solutions can aid Mac users. It is hassle-free to create Windows 10 bootable USB on Mac with Terminal.
Here's a video tutorial on how to create Windows bootable USB on a Mac, including Windows 11, 10, 8, 7, and older versions. Take a look!

How to Download Windows 10 ISO File for Bootable USB
⚠️ Important Note
macOS-based tools for creating Windows bootable USBs are primarily designed for Mac hardware. Their partitioning scheme, bootloader setup, and file handling may not fully align with what a standard Windows PC firmware expects.
To ensure maximum compatibility, it is strongly recommended to create the bootable USB using a Windows PC and Microsoft's official Media Creation Tool. This method guarantees the best chance of success across all Windows hardware, especially for UEFI systems.
The best option to attain the Windows 10 ISO File is to visit Microsoft's official website. Here are the steps you need to follow:
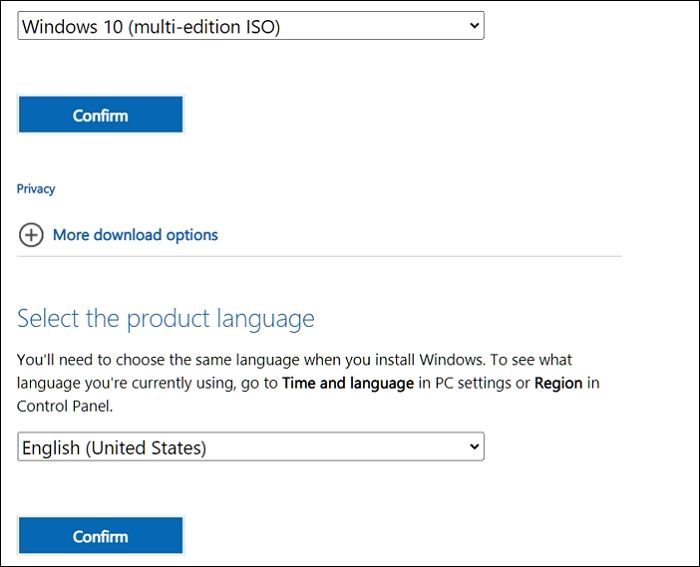
Step 1. Visit the Microsoft Windows 10 download page.

Step 2. Click on the dropdown under Windows 10 version, and then click on confirm.
Step 3. Next, select the language and edition. Click Confirm.
Step 4. Another page will open, giving you a download link. You can choose between Windows 10 32-bit ISO or 64-Bit ISO.
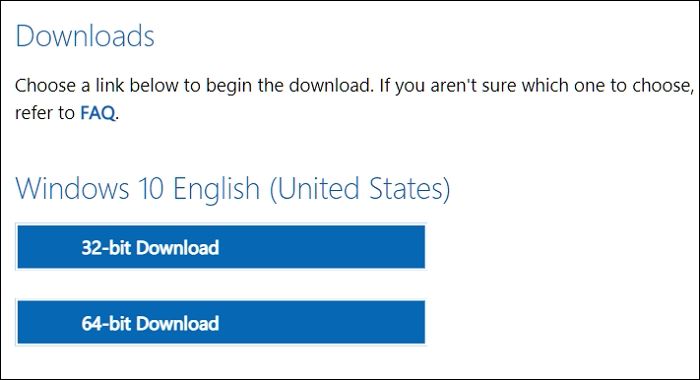
Step 5. Select where you want to save the ISO file. Wait for the download to complete.
How to Format a USB Correctly to Create Windows 10 Bootable USB
Before you go ahead with creating Windows 10 Bootable USB on Mac, it is vital to format the USB. Most users have no idea how to do this or why this is even important. Formatting the USB will erase all existing data and make the space free for the download. Moreover, you also need to ensure that the formatting is compatible with the system you will use it with.
Take a look at the steps you can follow to format drives on Macs:
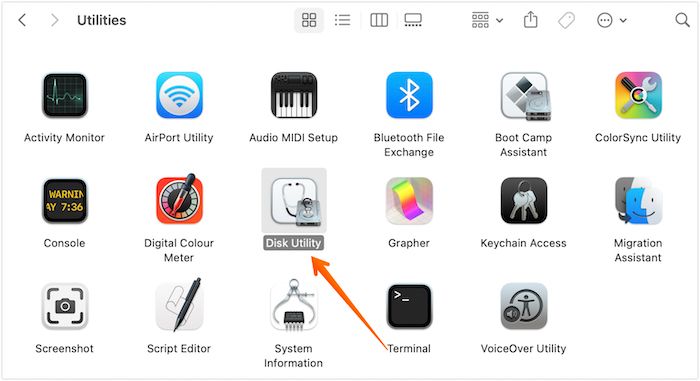
Step 1. Plug in the USB drive. Open Disk Utility. To do so, you need to open the Applications folder. Under that, open the Utilities folder, where you will find Disk Utility app.
Step 2. Choose the USB drive from the list. You will find it on the left-hand sidebar.
Step 3. Choose Erase. Now, type the name you want for the drive.

Step 4. Choose the Format you want. Select Erase.
Step 5. After some time, choose Done. Allow some time for the process to complete.
Download Recovery Software to Avoid Data Loss [Important]
Did you know you may lose data while using Mac to create a bootable USB? Yes! That's a real possibility. If you want to create a Windows bootable USB on Mac, your Windows PC cannot boot and needs to recover data. Moreover, you can also face data loss after formatting the USB drive. In that case, taking the assistance of professional data recovery software is a great idea.
The EaseUS Data Recovery Wizard for Mac is a highly efficient and user-friendly data recovery tool for Mac. With this tool, you can recover lost data due to various causes, such as malware attacks, USB formatting, accidental deletion, etc. Moreover, you can also retrieve data from Mac-based devices like SSD, HDD, fusion drive, and more!
EaseUS Data Recovery Wizard
- Recover unsaved Word documents on Mac. And it can recover deleted files, documents, photos, audio, music, etc.
- Support data recovery on multiple devices, including USB drives, memory cards, internal hard drives, and digital cameras.
- Recover data from unbootable Mac. If your Mac cannot boot, you can create bootable media with this recovery tool.
Other exciting features include file filters, data protection, iCloud recovery, etc. You can also seek remote IT support if you encounter any issues. Are you eager to use EaseUS Data Recovery Wizard for Mac? In that case, follow these simple steps listed here:
Step 1. Search for lost files
Select the disk location to search for lost files (it can be an internal HDD/SSD or a removable storage device) on macOS Sierra, High Sierra, Mojave, Catalina, Big Sur, Monterey, Ventura, and the latest Sonoma. Click the "Search for lost files" button.

Step 2. Go through the scanning results
EaseUS Data Recovery Wizard for Mac will immediately scan your selected disk volume and display the scanning results.

Step 3. Select the file(s) and recover
In the scan results, select the file(s) to preview and click the "Recover" button to have them back.

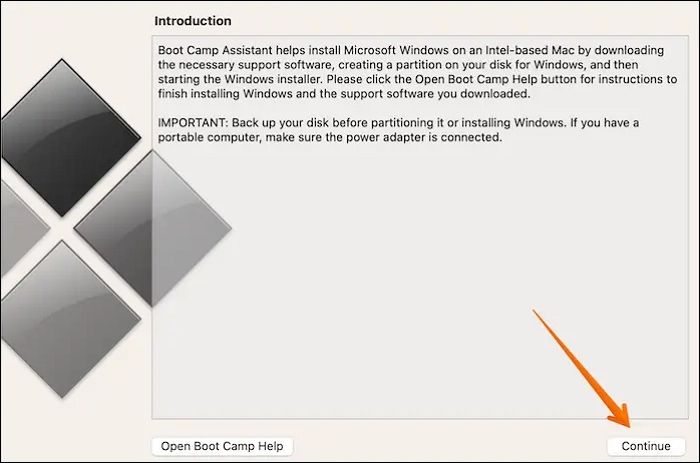
Method 1. Create Windows 10 Bootable USB on Mac with Boot Camp
One of the most straightforward solutions to create a Windows 10 Bootable USB on Mac is to use Mac Boot Camp Assistant. It is a multi-faceted boot program that requires an installed Windows ISO file and a USB drive.
Take a look at the steps you need to follow:
Step 1. Go to Finder.
Step 2. Choose Applications.
Step 3. Select Utilities.
Step 4. Open Boot Camp Assistant.
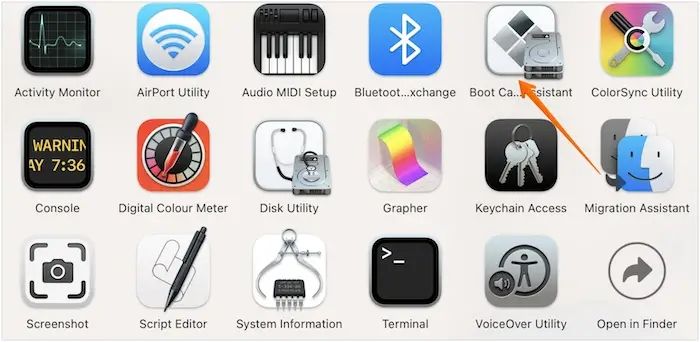
Step 5. Click on Continue.
Step 6. Select the "Create a Windows 10 or later version installs disk" option. Click on Continue. Select Choose.
Step 7. Import the ISO file. Go ahead with Continue. Wait for the process to complete.
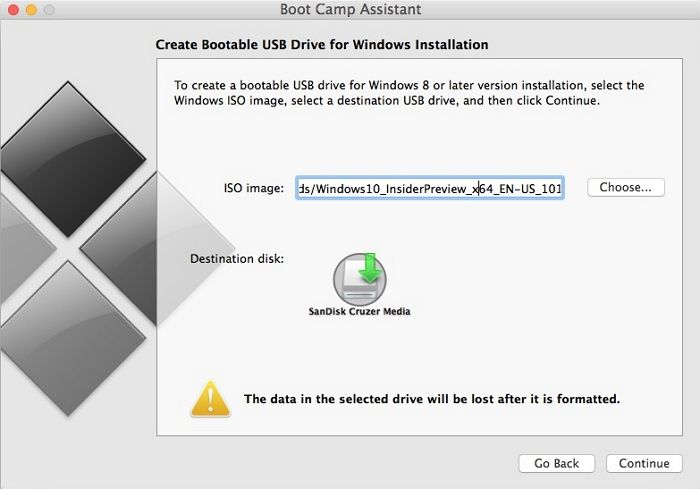
Step 8. Check if the bootable USB is named WININSTALL.
Step 9. If it appears so, you can remove the USB.
Note: This solution is only applicable to Intel-based Macs. You can opt for the following methods if you have Macs with an M1 chip.
Method 2. Create Windows 10 Bootable USB on Mac with UU Byte ISO Editor
Another excellent method to create Windows 10 Bootable USB on Mac is with UUByte ISO Editor. The UUByte ISO Editor is a robust tool that enables users to complete the process easily. Most importantly, this app is fully compatible with Apple M1 and M2 Mac. In addition, you can run this app perfectly on the latest macOS Ventura. Here are the steps to follow:
Step 1. Download UUByte ISO Editor app from this link and Install it on your Mac.
Step 2. Connect the USB drive to the system.
Step 3. Click the Burn tab on the welcome screen and you can see the software detect the USB.
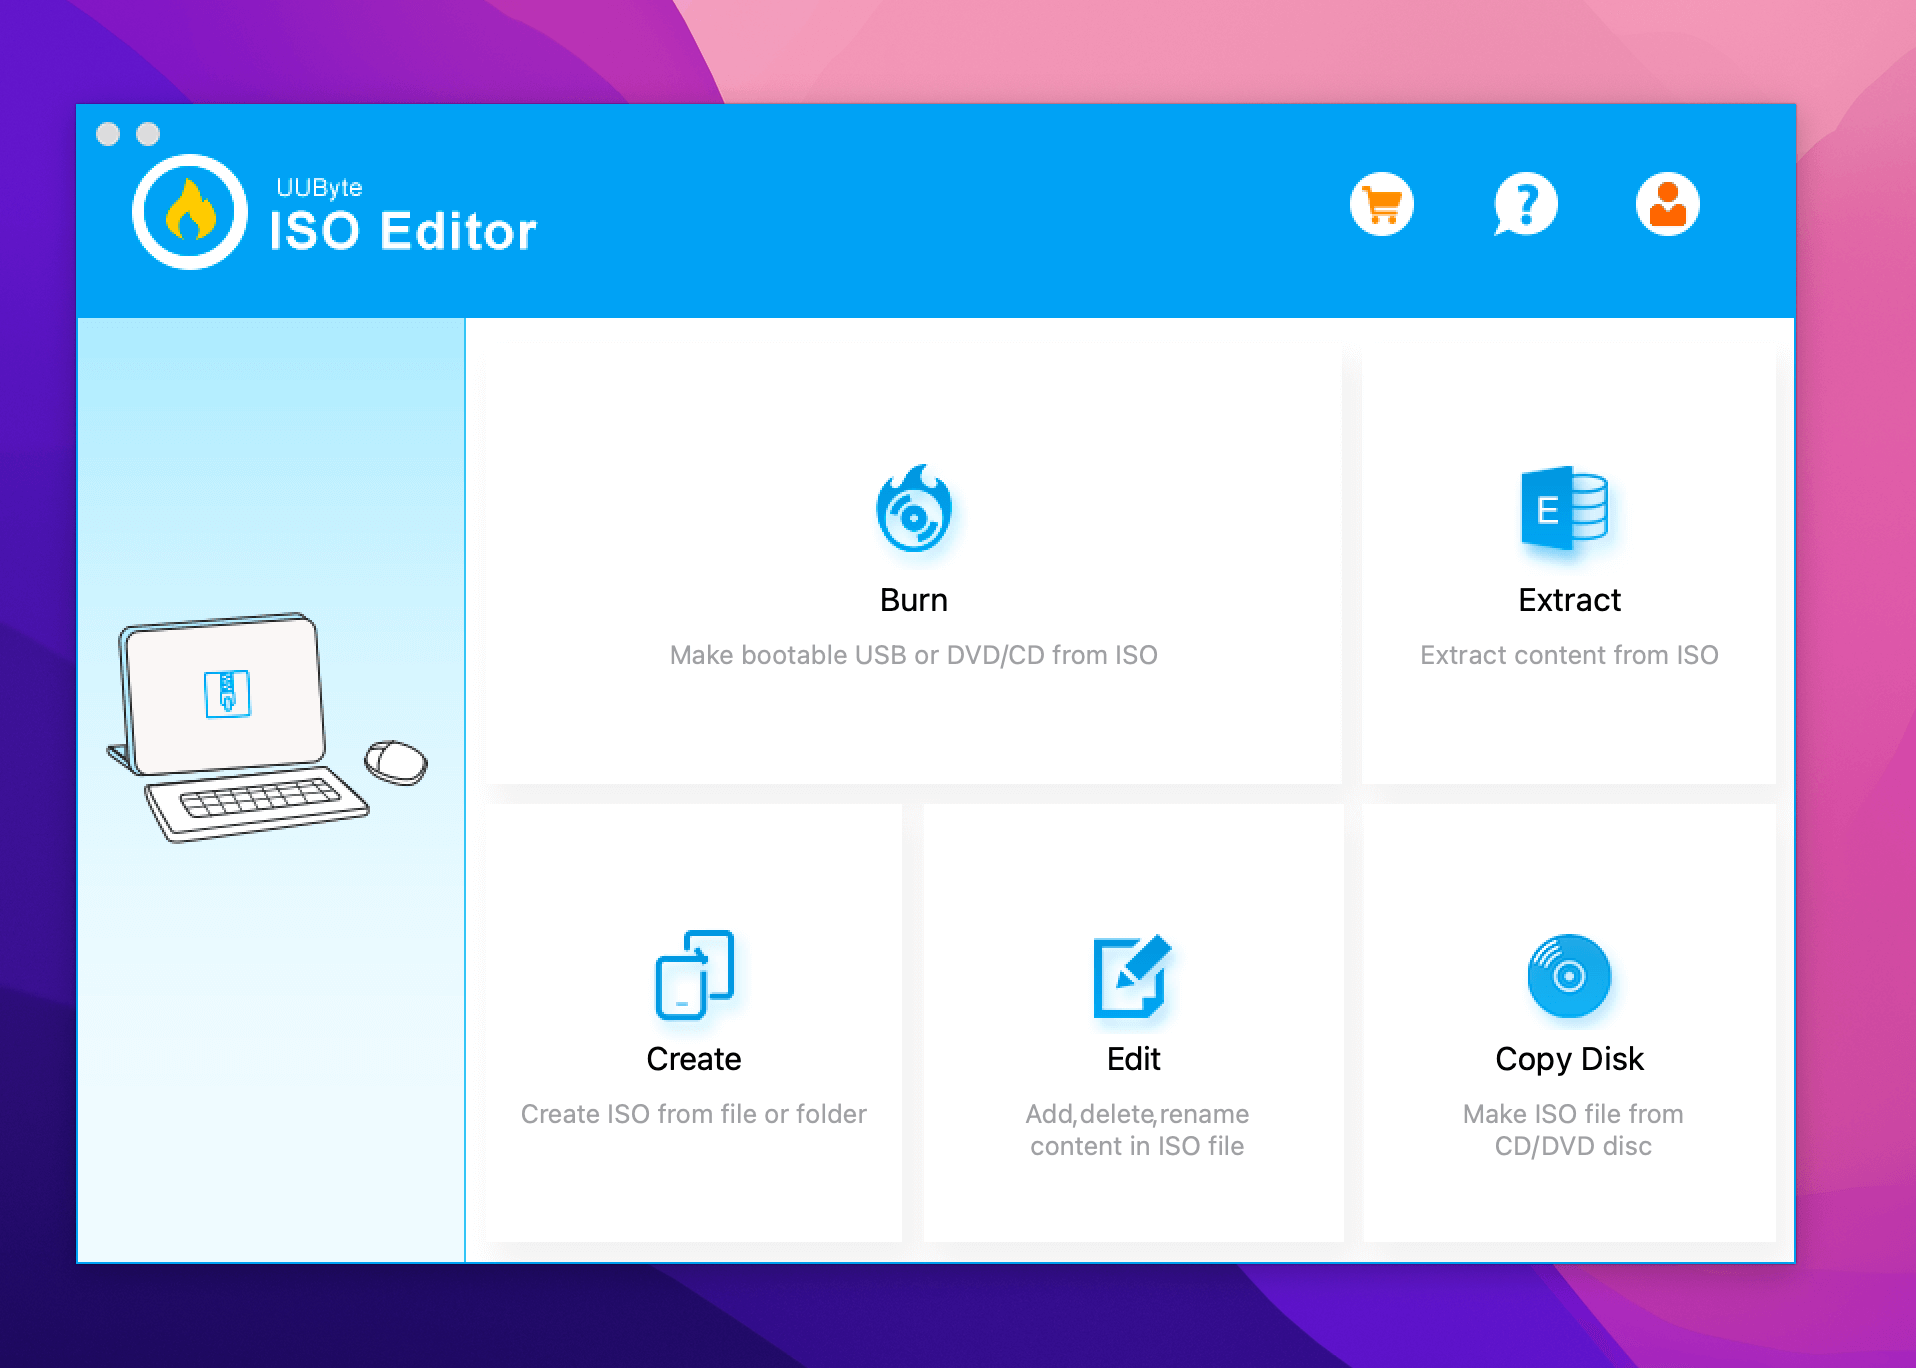
Step 4. Import Windows 10 ISO into the app and choose the right USB drive.

Step 5. Now, click the Burn button at the bottom to start the process. Wait for some time for the completion of the process. It takes approximately 7 minutes to create a bootable USB on Mac. During this step, you can see ISO Editor splits the install.wim file automatically at the end.
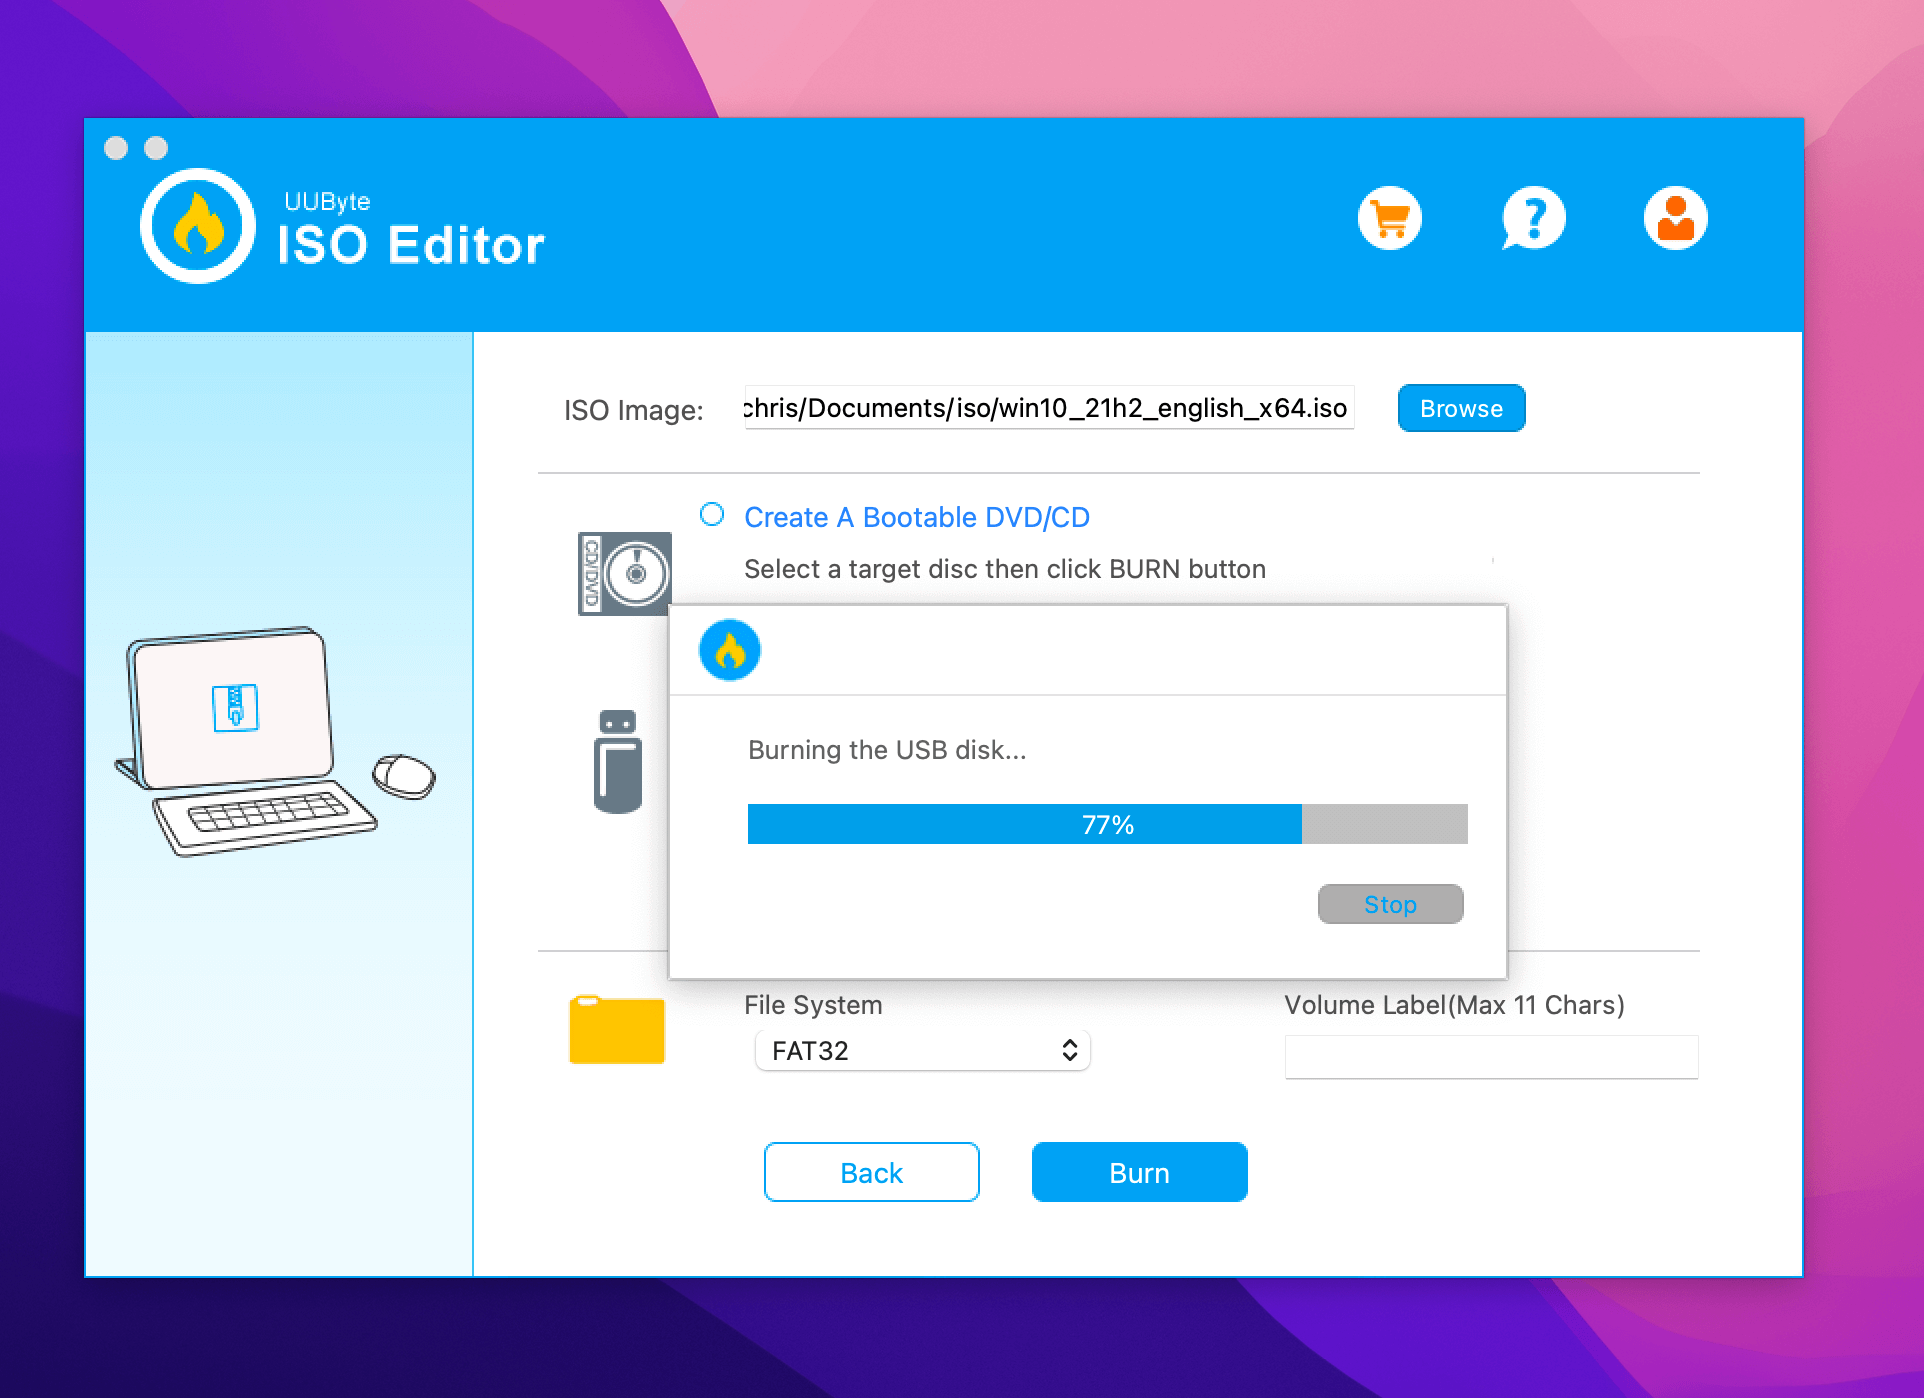
Note: While the process is simple, you should be very careful with it, especially don’t touch the USB device. If you have created Windows 10 bootable USB successfully, remember to share this post with more users!
Method 3. Create Bootable USB on Mac for Windows with Disk Utility
Did you know you can create Bootable USB on Mac for Windows with Disk Utility? For that, you need to follow some simple steps –
Step 1. Plug the USB drive into the system.
Step 2. Open Disk Utility.
Step 3. Format the USB flash drive via MS-DOS (FAT).
Step 4. Send the Windows ISO file to the USB.
Step 5. Wait for the ISO file writing process to complete.
Now, you can use the USB to install Windows on Mac. However, it is essential to understand that this method favors older Mac models. If you have the latest version, use other solutions.
Method 4. Use Terminal to Create Windows 10 Bootable USB on Mac
You can use Mac Terminal to create Windows 10 Bootable USB on Mac. We have also included a video to help out users. Take a look:
- 00:48 Download the Windows 10 ISO file.
- 03:00 Copy the ISO file to the USB drive.
- 04:24 Use the Homebrew package manager.
- 07:32 Create a new folder on the USB drive and copy the downloaded contents.
Check out the written steps to follow:
Step 1. Plug the USB drive into your Mac.
Step 2. Open Terminal. To do so, choose Terminal from Utilities folder.
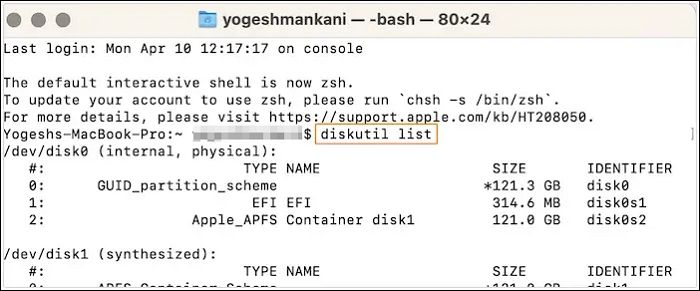
Step 3. Type diskutil list to find the USB name and press the Enter key.
Step 4. Type diskutil eraseDisk MS-DOS "WINDOWS10" GPT drive name@. Here, the drive name is the name of your USB drive.
Step 5. Download the Windows 10 ISO file.
Step 6. Type hdiutil mount ~/Downloads/WINDOWS10IMAGE.iso. Here, it would be best if you used the ISO file name instead of WINDOWS10IMAG.
Step 7. Next, type cp -rp /Volumes/MOUNTED-ISO/* /Volumes/WINDOWS10/. Here, MOUNTED will be replaced by the name of the ISO mounted.
Step 8. Lastly, type hdiutil unmount/Volumes/MOUNTED-ISO. The Terminal will close, and you will get a bootable USB.
If you are also interested in creating macOS Sonoma bootable USB on Mac, check the following passage:

Create macOS Sonoma Bootable USB Installer
If you have macOS Sonoma installed, then it's essential to create a bootable USB in case of an issue with the OS. Read more >>
Summary
Isn't creating Windows 10 Bootable USB on Mac easy? This article lists four methods you can use to create Bootable USB on Mac for Windows. You can follow these hassle-free steps and get it done.
However, data loss is always possible while creating Windows 10 Bootable USB on Mac. For that, you need help from reliable data recovery software. You can check out EaseUS Data Recovery Wizard for Mac in that case. It is a practical yet easy-to-use tool that aids in recovering lost data.
Haven't you installed EaseUS Data Recovery Wizard for Mac yet? Download it today!
Create Windows 10 Bootable USB on Mac FAQs
You can create Windows 10 Bootable USB on Mac in these different ways. To know more, read the questions and answers listed below -
1. How to create macOS Ventura bootable USB on Mac?
To create macOS Ventura bootable USB on Mac, follow these steps:
- 1. Go to the Apple Store and download macOS Ventura.
- 2. Run Terminal on the system.
- 3. Connect the USB to the Mac.
- 4. Type in sudo /Applications/Install\ macOS\ Ventura. app/Contents/Resources/createinstallmedia --volume /Volumes/MyVolume in the Terminal.
- 5. Hit the Return key.
- 6. Enter the password when prompted.
2. How to rescue data from an unbootable Windows computer?
There are multiple ways to rescue data from an unbootable Windows computer. For instance, you can unplug various cables and reset the connection. You can also use the BIOS feature or eject RAM. However, if nothing works, you can opt for professional data recovery software, EaseUS Data Recovery Wizard for Mac.
3. Can I create Windows 10 bootable USB on a Mac with Terminal?
Yes, you can create Windows 10 bootable USB on a Mac with Terminal. But for that, you must use the diskutil, hdiutil commands with mount and unmount. You will also need to copy the ISO to the USB.
- 1. Download the ISO file from Windows.
- 2. Plug the USB drive into your system.
- 3. Enter "diskutil list" on Terminal to see where the USB is.
- 4. Enter "diskutil eraseDisk MS-DOS "WINDOWS10" GPT@"
- 5. Now, enter "hdiutil mount ~/Downloads/WINDOWS10IMAGE.iso"
- 6. After that, type "cp -rp /Volumes/MOUNTED-ISO/* /Volumes/WINDOWS10/"
- 7. At last, enter "hdiutil unmount /Volumes/MOUNTED-ISO".
4. How to install macOS Ventura on a Windows PC?
To install macOS Ventura on a Windows PC, follow these steps:
- 1. Create a Bootable USB installer for macOS Ventura.
- 2. Go ahead with the EFI partitions configuration.
- 3. Adjust BIOS settings.
- 4. Install macOS Ventura on the system.
Was This Page Helpful?
Dany is an editor of EaseUS who lives and works in Chengdu, China. She focuses on writing articles about data recovery on Mac devices and PCs. She is devoted to improving her writing skills and enriching her professional knowledge. Dany also enjoys reading detective novels in her spare time.
Related Articles
-
Upgrade from Monterey to Ventura | Detailed Information
![author icon]() Dany/2025-09-17
Dany/2025-09-17 -
How to Fix An Error Occurred While Installing the Selected Updates
![author icon]() Jaden/2026-06-17
Jaden/2026-06-17 -
How to Solve 'Can't Delete Partition on SD Card' [100% Working Solutions]
![author icon]() Cici/2025-07-06
Cici/2025-07-06 -
How to fix the error DNS PROBE FINISHED NO INTERNET? [A Complete Guide]
![author icon]() Daisy/2025-07-04
Daisy/2025-07-04
EaseUS Data Recovery Services
EaseUS data recovery experts have uneaqualed expertise to repair disks/systems and salvage data from all devices like RAID, HDD, SSD, USB, etc.