Have you recently updated your MacBook to an upgraded macOS version? Or are you running a beta version of macOS on your Mac? Whatever the scenario is, it doesn't have to be an all-or-nothing affair! Mac users can install two separate OS and dual boot Mac, which implies you will have dual versions of macOS and opt for the one that suits you on a daily basis. Now, the question may arise: "Why do you need to dual-boot macOS?" There are a couple of reasons why you might be willing to operate two OS versions, which is mainly what dual-booting implies:
- If you would like to update your Mac to the latest version, like macOS 15, but possess legacy applications that might not function on it, creating a dual boot is the best strategy if you must run those applications.
- If you would like to try out a beta version of the macOS without devoting to it or jeopardizing it, causing issues with the data & applications on your Mac.
- Suppose you would like to update your Mac to the newest software but have legacy applications that might not run on it. Generating a dual boot is a top-notch solution if you have to run those applications.
Now, the question is: "How to dual boot Mac?" Once the reasons are clear, it's time to go through the step-by-step process. Let's get started!
How to Dual Boot Mac with macOS Installer Creator
We will introduce the simplest way to run two macOS versions on a Mac. For most Mac users, it's a little bit difficult to create or prepare a new volume and install another macOS version. If you need to dual boot the latest macOS Sequoia and older versions, it's easier to apply a free tool to create a macOS Sequoia USB installer.
EaseUS Data Recovery Wizard for Mac can help you do that, and you just need to prepare a USB drive or external hard drive. It can install macOS Sequoia or other versions on the USB and make it a bootable drive; when you need to switch to the other version, just choose this USB as a startup disk.
With the help of this free feature of EaseUS Data Recovery Wizard for Mac, you can easily dual-boot Ventura and Monterey, Sequoia and Sonoma, etc. Check the following guide to learn how to create a macOS installer with the EaseUS macOS installer creator feature:
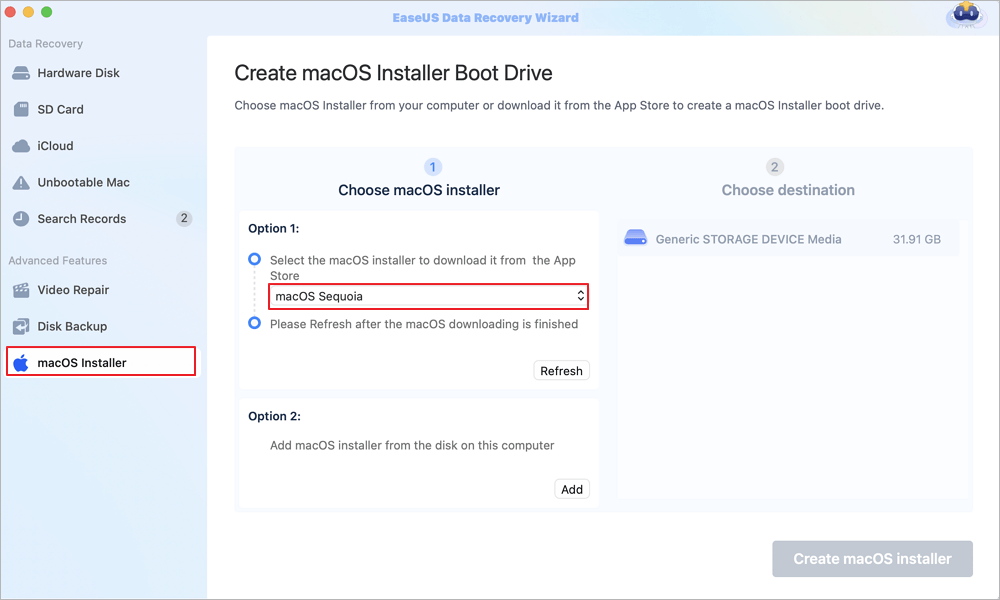
Step 1. Select macOS installer
Launch EaseUS Data Recovery Wizard for Mac and click "macOS Installer" on the left side. In tab 1, unfold the macOS version list by clicking "Select macOS intaller". You can also select "Refresh" button after downloading the macOS installer from App Store.
You can download macOS installer to upgrade or downgrade macOS, and you can find all the available versions, no matter the latest or older versions. Morever, you can apply macOS installer to dual boot Mac and run two macOS together.
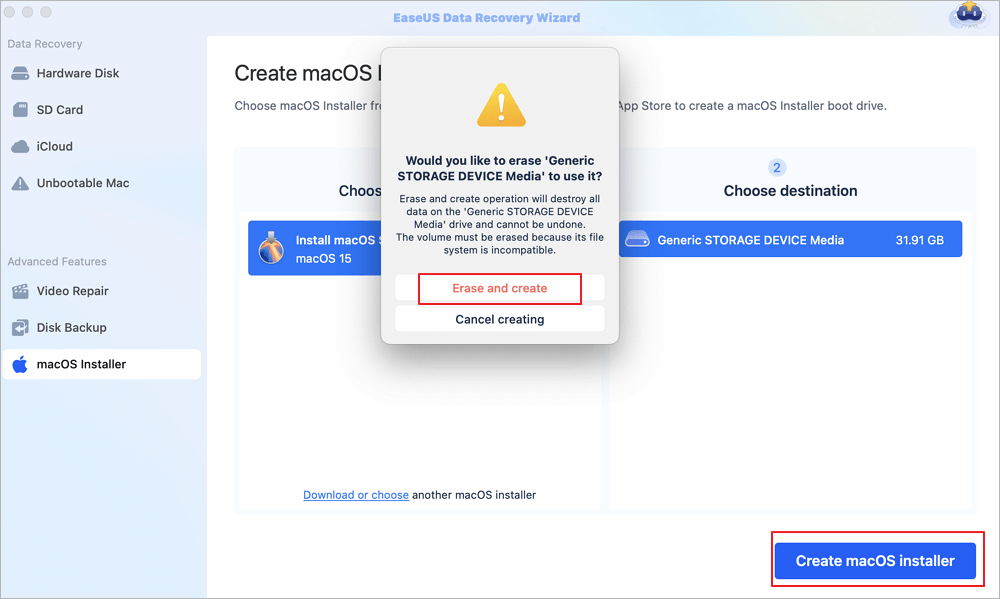
Step 2. Format the USB flash drive
Connect a USB flash drive (larger than 16 GB) to the Mac as your macOS boot drive. Choose the USB drive you prepared in tab 2 and click the "Erase and create" option in the pop-up window to format your USB flash drive. Then click the "Create macOS installer" button to start the creating.
- Important: This progress will delete all data on your USB flash drive, please back up the data before, or use EaseUS data recovery software to recover your data.
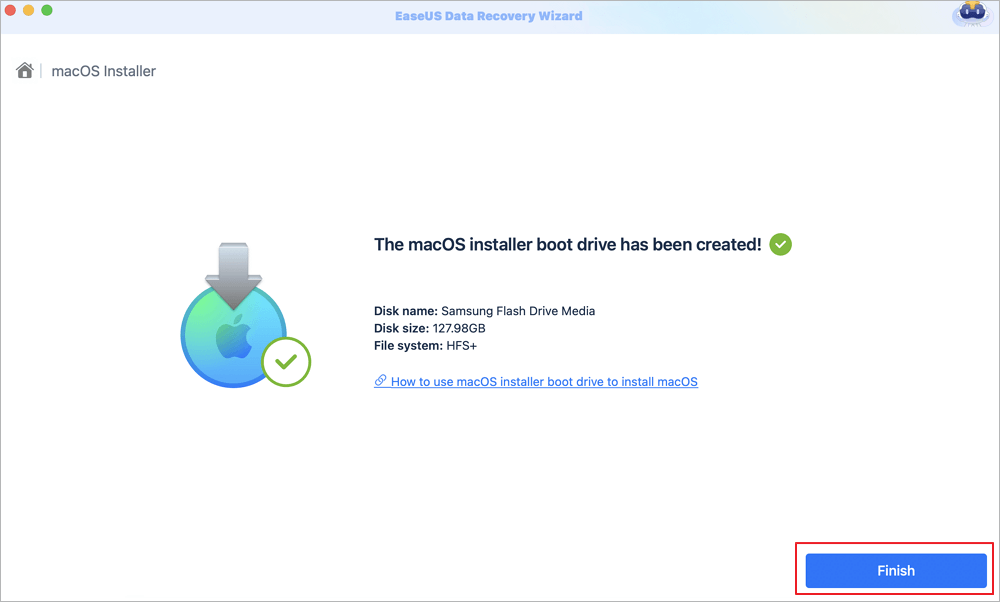
Step 3. Create the macOS installer boot drive
Click the "Finish" button after the macOS installer creating is finished. Follow the prompts on the interface to perform subsequent installation operations.
Please share this handy tool on social media to help more users who want to boot two macOS versions on a Mac!
How to Multi-Boot macOS Versions Manually
Now, you can learn another way to multi-boot macOS versions on a Mac. We'll guide you on how to back up your Mac, add a new volume, and install a new macOS on this volume. Keep reading to find out detailed information!
Step 1. Back-Up Mac Before Dual Boot
Backup is one of the most crucial steps to dual boot your Mac. It's always prudent to ensure you back up your MacBook before doing anything like this, as files may get eliminated unknowingly. MacBook can be backed up with Time Machine. If you own a USB drive or any external storage device, using Time Machine can back up your data automatically, including photos, audio, apps, emails, and others. However, using Time Machine to back up files may not be the most feasible option for dual-booting a Mac.
How do you back up a Mac without the Time Machine? If your MacBook is running on two OSs, you may consider using powerful software, EaseUS Data Recovery Wizard for Mac, which has an in-built disk image creation feature.
The EaseUS recovery tool can also help you recover a formatted hard drive on a Mac. Most importantly, this software provides a free feature that can help you create a macOS installer with a USB or external hard drive. Now, check the following guide to learn how to back up a Mac:
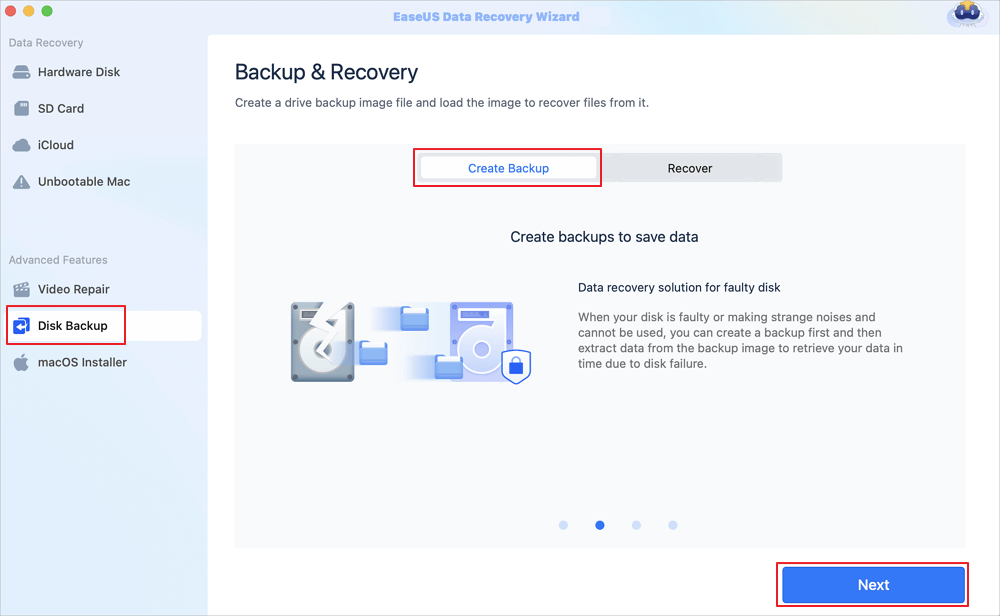
Step 1. Click "Disk Backup" > "Create Backup" > "Next" in EaseUS Data Recovery Wizard for Mac's main interface. You can create a drive backup image file in case the data is overwritten.
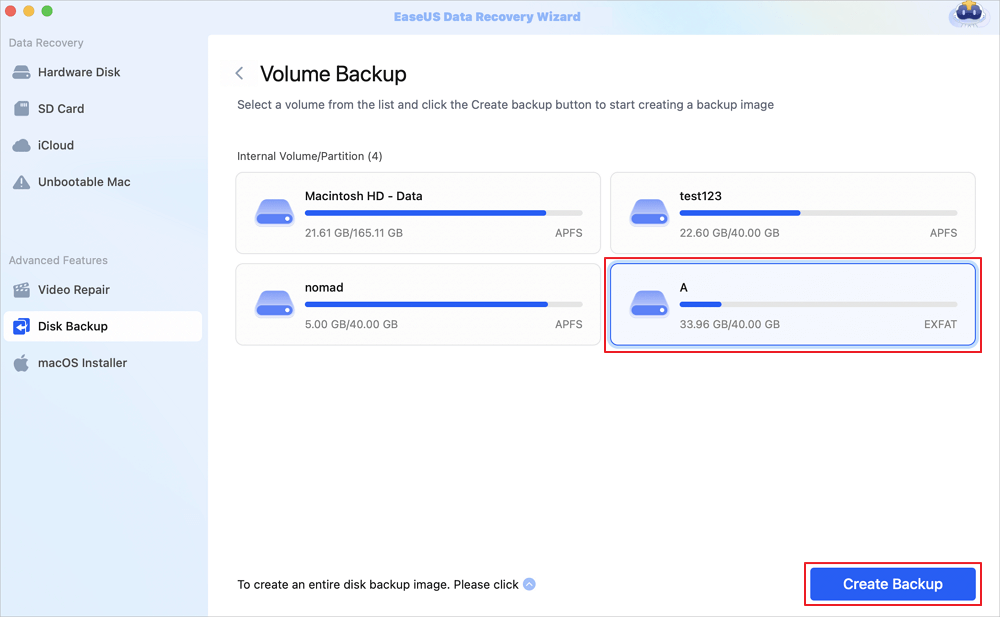
Step 2. Select an internal volume to back up, and click "Create Backup". If you want to create backups and recover data from an external hard drive, USB flash drive, or SD card, remember to connect the storage device to your Mac in advance.
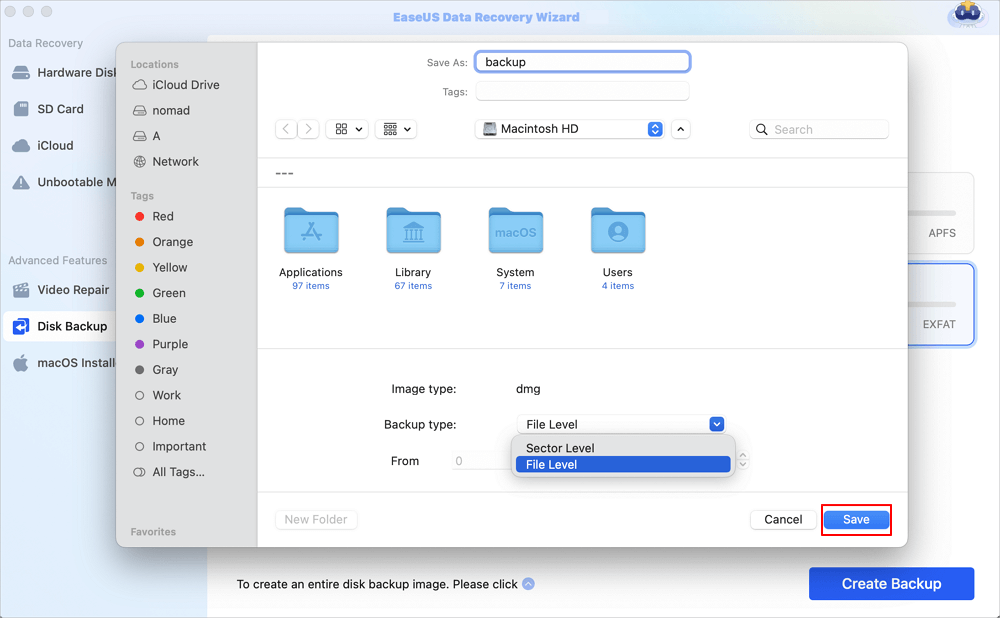
Step 3. Choose a place to save your backup files, and change the name of your backup file, then click "Save". It is not wise to save backups in the same storage device that you want to recover data from.
So, download this professional data recovery & backup software now! Also, if you find this tool helpful, kindly share the information with your friends on social media.
Step 2. Add New Volume to Dual Boot Mac
As you intend to run two macOS versions on your Mac, this method will depend on your current macOS version. If you own a modern Mac, the process is hassle-free! This procedure is straightforward because your Mac will be employing the Apple File System APFS, which is compatible with more ancient Macs operating High Sierra on an SSD or with every release deployed since macOS Big Sur.
Therefore, if you're using APFS, you may generate an APFS volume and then just install the latest version of the OS on that volume. You won't have to reformat anything.
If you own an outdated MacBook and are using an older version of macOS as well, the process will be challenging as it needs a partition. The steps to create an APFS volume are the following:
Step 1. Back up your MacBook first.
Step 2. Launch "Disk Utility" or just hit "Command + Space" and start typing "Disk Utility."
Step 3. Hit the "Drop-down menu" next to the "View" button in the toolbar, and opt for "Show all devices." It will ensure you can check the volumes within your disk. Your Macintosh HD or Home model undoubtedly has one.
Step 4. Opt for the "Home volume" and hit the "+" button to generate a new volume.

Step 5. Name your volume; you may consider naming it "Beta."
Step 6. You may set the storage limit by clicking on the "Size" options and filling in the "Reserve" and "Quota" options.
Step 7. Hit "Add" to add your New Volume to the Mac.

Step 3. Install Another macOS on the New Volume
With a new partition or volume prepared, you may now install the second macOS on the new volume. Hence, you must know which macOS your MacBook can operate. Installing MacOS Big Sur and its updates is restricted to users of Apple Silicon Mac systems. The steps are the following:
Step 1. Click on the "Apple" menu > "About this Mac" to find your Mac model.
Step 2. Visit Apple's official website to verify whether the macOS you would like to install is compatible with your current macOS.
Step 3. Install macOS earlier on your Mac. Once you've done this, it will automatically open, and you must quit there and install it later.
If you would like to install the macOS Beta, go to beta.apple.com, go through the onscreen prompts to install the macOS Public Beta Access Utility, and obtain the beta installer on your MacBook. Below are the steps to install macOS with the macOS installer prepared:
Step 1. Launch the compatible macOS installer on your MacBook.
Step 2. Go through the guides on the wizard that emerges to install the software.
Step 3. Hit "Show all disks" when it asks to select where to install.

Step 4. Opt for the new volume to install macOS.
Step 5. Hit "Continue" and enter the "Admin account password."
Step 6. Wait once the installation is over, and turn off your Mac.
How to Switch Between Two macOS Versions
As you have installed two of the latest macOS versions on your Mac, you may easily boot your MacBook from the one you require. Anytime you would like to switch to macOS, you may reboot your Mac to alter the startup disk. The steps to boot Mac from the second macOS are following:
Step 1. Turn off your Intel Mac or Apple Silicon Mac.
Step 2. Press & hold the "Option" key while starting up an Intel Mac, or hit and hold the "Power" button until you check the "Loading startup options" screen of Apple Silicon Mac.
Step 3. Opt for the new volume or partition with macOS installed from the available ones.
Step 4. Hit the "Up" arrow or "Continue" button.
Step 5. It will boot your Mac from the chosen disk.
The next time you reboot your Mac, it will load the startup disk you selected in System Preferences. If you would like to use another macOS more often, you may alter the startup disk with a few extra steps:
Step 1. Navigate to the "Apple" menu > "System Settings" > Click "General" >Hit "Startup Disk."

Step 2. Hit the lock at the bottom left to unlock the preference panel.
Step 3. Opt for the "Volume/partition" you prefer as the "Startup disk," and hit "Restart."
Please share it with your friends on social media if you can dual-boot two macOS versions with your guidance.
Summary
This article shows the best ways and bonus tips to dual boot two macOS versions on a similar MacBook. It is possible to use both a public and beta edition of macOS simultaneously. Before going through the steps above, you need to have a backup of your MacBook first. Hence, installing the EaseUS Data Recovery Wizard for Mac is important!
Mac Dual Boot FAQs
Below are the best FAQs to consider:
1. Can I dual boot macOS Sequoia and Sonoma?
Yes, it's possible to dual-boot macOS Sonoma and Sequoia on a Mac. But before doing this, you need to remember that dual boot is a temporary solution, which is a convenient method to try out a new version of macOS while keeping the recent version for outdated software.
2. How do I dual boot macOS and Windows 11?
To dual-boot Windows 11 and macOS on an Intel-based Mac, you may utilize Apple's Boot camp assistant by backing up your files and downloading all the macOS updates.
3. Can I dual boot Mac without Boot Camp?
You may consider Bootcamp assistance if it's available on your MacBook for dual-boot. If not, you must make a Windows bootable USB on your Mac and install Windows from the USB drive. Once done, you must back up your MacBook and eliminate the disk to MS-DOS FAT32.
Was This Page Helpful?
Dany is an editor of EaseUS who lives and works in Chengdu, China. She focuses on writing articles about data recovery on Mac devices and PCs. She is devoted to improving her writing skills and enriching her professional knowledge. Dany also enjoys reading detective novels in her spare time.
-
EaseUS Data Recovery Wizard is a powerful system recovery software, designed to enable you to recover files you’ve deleted accidentally, potentially lost to malware or an entire hard drive partition.
Read More -
EaseUS Data Recovery Wizard is the best we have seen. It's far from perfect, partly because today's advanced disk technology makes data-recovery more difficult than it was with the simpler technology of the past.
Read More -
EaseUS Data Recovery Wizard Pro has a reputation as one of the best data recovery software programs on the market. It comes with a selection of advanced features, including partition recovery, formatted drive restoration, and corrupted file repair.
Read More
Related Articles
-
How to Recover Deleted TIFF Photos on Mac
![author icon]() Jaden/Jan 19, 2026
Jaden/Jan 19, 2026 -
How to Recover Deleted System Files Mac [New Updated]
![author icon]() Jaden/Jan 19, 2026
Jaden/Jan 19, 2026 -
How to Open Chat.db Files on Mac [Read&Recover]
![author icon]() Jaden/Sep 17, 2025
Jaden/Sep 17, 2025 -
Fix Zoom Won't Update on Mac | Error Code 10004
![author icon]() Jaden/Dec 12, 2025
Jaden/Dec 12, 2025