You are browsing a familiar website on your Chrome, and suddenly it displays ERR_CACHE_MISS. This error is usually inclusive of Chrome and happens for various reasons. This article will enlighten us on what ERR_CACHE_MISS means, why it occurs, and how to fix this error.
| Workable Solutions | Step-by-step Troubleshooting |
|---|---|
| Fix 1. Reload the Page | Next, you can reload the page to fix most of the cache errors. You can use Ctrl + R to reload...Full steps |
| Fix 2. Relaunch Google Chrome | If reloading does not work, you can close the browsing window or Chrome altogether, relaunch the...Full steps |
| Fix 3. Disable Browser Extensions | Web extension apps are pretty famous, and people use a lot of different browser extensions to customize...Full steps |
| Fix 4. Update Chrome | In some cases, an outdated version of Chrome may be the source of the issue. So it is recommended...Full steps |
| Other Workable Solutions |
Clear Browsing Data; Reset Chrome Settings to Default; Turn Off the Cache System on Chrome...Full steps |
Google Chrome is the top web browser in the world and is the most downloaded browser, even on its competitor's devices. Well, not everything is perfect, and so is Google Chrome. There can be some issues with it, and one is ERR_CACHE_MISS. If you face this error even after browsing multiple times, it could be confusing and irritating, but it is easily fixable.
The blog discusses the potential reasons for this error and a handful of easy fixes to get back to browsing as usual.
What Does ERR_CACHE_MISS Mean
Just as the name suggests, the error is related to caching, and the error means a mismatch between the actual website and the version in your cache, and a variety of reasons can also cause this, including:
- When the browser is unable to obtain the cache files of the site you are visiting
- If there are bugs, corrupt files, or issues with the browser, browser settings, and extensions.
- Incorrect coding and PHP issues with your visiting website.
The error message displays "Confirm for Resubmission," asking you to browse again with ERR_CACHE_MISS at the bottom of the page. This happens while submitting or completing a form, surfing a website like Facebook, and using the back/ forward buttons too fast.
How to Fix ERR_CACHE_MISS
You need to try to restart the browser to see if it works. As the cache updates, the browser may load the requested site properly. If it did not help, try these fixes below to see if it works. However, each computer is different, and solutions may differ, so try one after the other.
- Fix 1. Reload the Page
- Fix 2. Relaunch Google Chrome
- Fix 3. Disable Unwanted or Suspicious Browser Extensions
- Fix 4. Update Chrome to the Latest Version
- Fix 5. Clear Browsing Data
- Fix 6. Reset Chrome Settings to Default
- Fix 7. Turn Off the Cache System on Chrome
Fix 1. Reload the Page
Next, you can reload the page to fix most of the cache errors.
You can use Ctrl + R to reload on Windows and Command + Shift + R on macOS or use the reload icon to do it manually.
If you still see the error, the network connection is good, and move to the next one.
Fix 2. Relaunch Google Chrome
If reloading does not work, you can close the browsing window or Chrome altogether, relaunch the application, and try surfing again.
Fix 3. Disable Unwanted or Suspicious Browser Extensions
Web extension apps are pretty famous, and people use a lot of different browser extensions to customize Internet surfing, like ad blockers, etc. If you have any such Potentially Unwanted Program (PUP), interfering with your cache can cause this error.hao
To manage the browser extensions on Google Chrome:
Step 1. Open Google Chrome and enter chrome://extensions, or you can click on "More" ( three vertical dots in the top-right corner next to your profile) options, move the cursor on "More Tools", and select "Extensions".
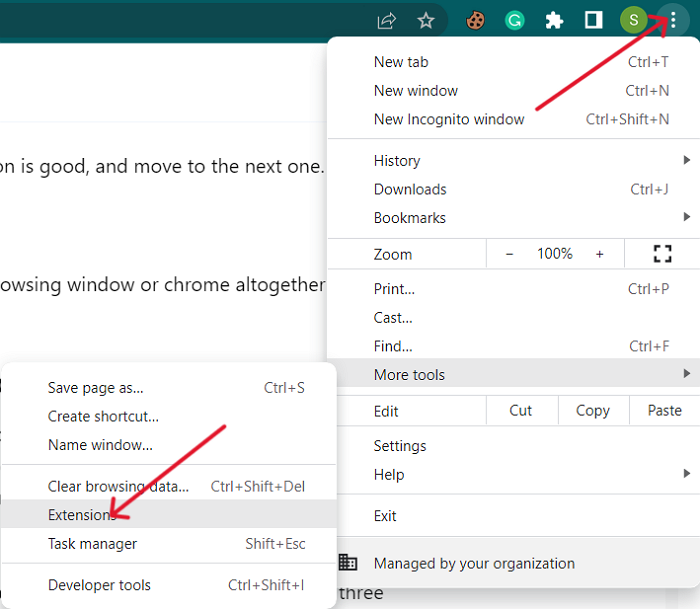
Step 2. On this page, you can see the extensions downloaded on your browser. Carefully observe and remove the corrupt and unnecessary ones.
Reload the page or relaunch the browser to see the changes.
Fix 4. Update Chrome to the Latest Version
In some cases, an outdated version of Chrome may be the source of the issue. So it is recommended to update it to the latest version to rectify any caching errors.
You can update it directly if you see the Update button on the top-right corner of the screen beside your profile. Or go to "Settings" and click "About Chrome" to automatically update to the latest version.
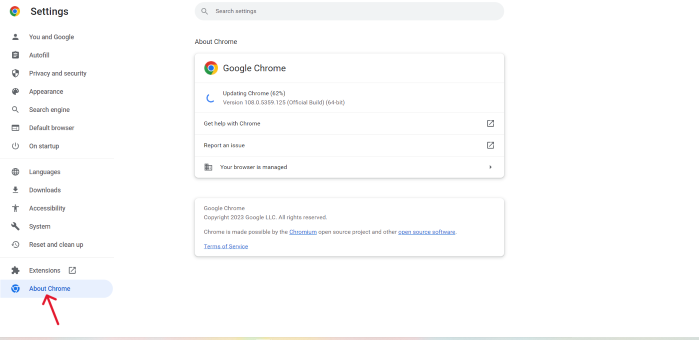
Restart the browser after updating and try reaccessing the error page to see if the fix works.
If you find these fixes helpful, please share it with your friends and colleagues and leave a comment about it. If you have any questions regarding the topic, feel free to ask them in the comment box, and do let me know of the future issues you wish to see articles from EaseUS.
Fix 5. Clear Browsing Data
If you have not cleared your cache for a long time, it accumulates on the browser, and some corrupt files in that cache can also cause this error. We need to clear browsing data in such cases.
Step 1. Open Google Chrome and click on "More" ( three vertical dots in the top-right corner next to your profile) options.
Step 2. Navigate to "Settings" and Open them.
Step 3. In the "Privacy and Security" section, click "Clear Browsing Data".
Step 4. You can see two clear browsing data options, Basic and Advanced. If you do not want to lose your passwords and personalized data, opt for basic and clear total cache and go for the advanced option.
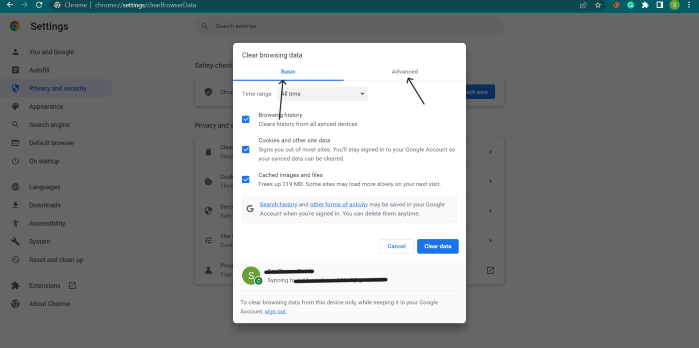
You can see the details under them if you want more clarity on what sort of cache you want to clear on your browser. Restart your browser after completion and see if the error resolves.
Fix 6. Reset Chrome Settings to Default
You can reset your browser settings using "Reset and Clean" options. This action will reset Chrome settings and Chrome shortcuts, disable extensions, and delete cookies and other temporary saved data on Chrome like configurations, autofill forms, bookmarks, passwords, etc.
Step 1. Open Google Chrome and click on "More" ( three vertical dots in the top-right corner next to your profile) options.
Step 2. Navigate to "Settings" and open them.
Step 3. Open the "Reset and Clean" section and click on "Reset settings to their Original Defaults".
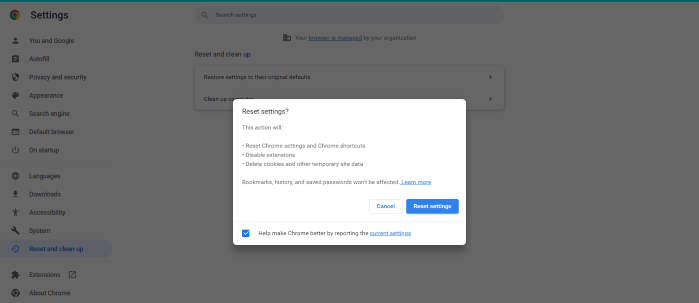
Step 4. Click on "Reset Settings" to confirm the action.
Fix 7. Turn Off the Cache System on Chrome
You can do this only when you are in developer mode, and the cache system will be automatically enabled once you are out of developer mode. This solution is to check if the entire cache system is at fault or not for the ERR_CACHE_MISS error.
Step 1. Press Ctrl + Shift + I and Press F1. This action will invoke Settings in "Developer Mode."
Step 2. Find the Network option and check the "Disable cache (While DevTools is Open)" check box.

Step 3. Refresh the website after this to see if the error persists.
Other Potential Causes of Err_Cache_Miss
If none of the above fixes could solve the issue, there could be a problem with your device's network or DNS settings. Let us know fixes to solve these potential causes.
Reason 1. Reset Network Settings
The ERR_CACHE_MISS may also occur due to improper or incorrect network settings on your device. You can set the network settings to default to see if the issue resolves. The easiest way is to launch the Command Prompt in Administrator mode and run the commands to reset the settings.
Step 1. Search for Command Prompt and "Run it as Administrator" mode.
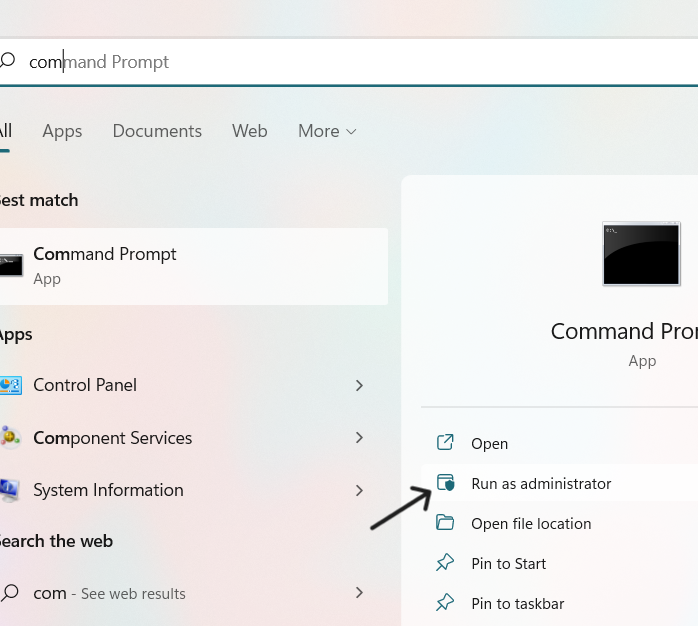
Step 2. Run the below commands one after the other and press "Enter" after every command to reset the network settings.
- ipconfig/release
- ipconfig/all
- ipconfig/flushdns
- ipconfig/renew
- netsh int ip set dns
- netsh winsock reset
- ipconfig renew
- ipconfig renew
For macOS users
For macOS users, You can use the Terminal app to run the commands.
Step 1. Open "Finder" and navigate to Applications > Utilities.

Step 2. Locate the Terminal app in the utilities folder and open it.
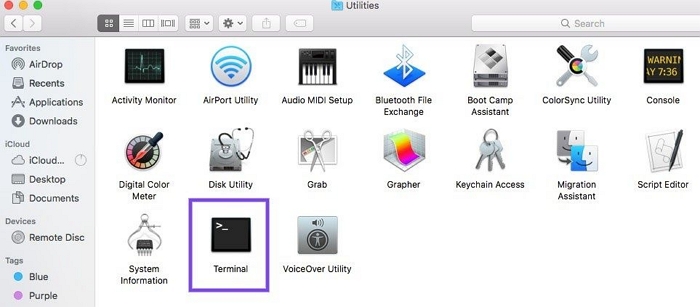
In Terminal Window, type the commands below and click "enter" after each command:
dscacheutil -flushcache
sudo killall -HUP mDNSResponder
Restart your computer after running the commands to see the changes.
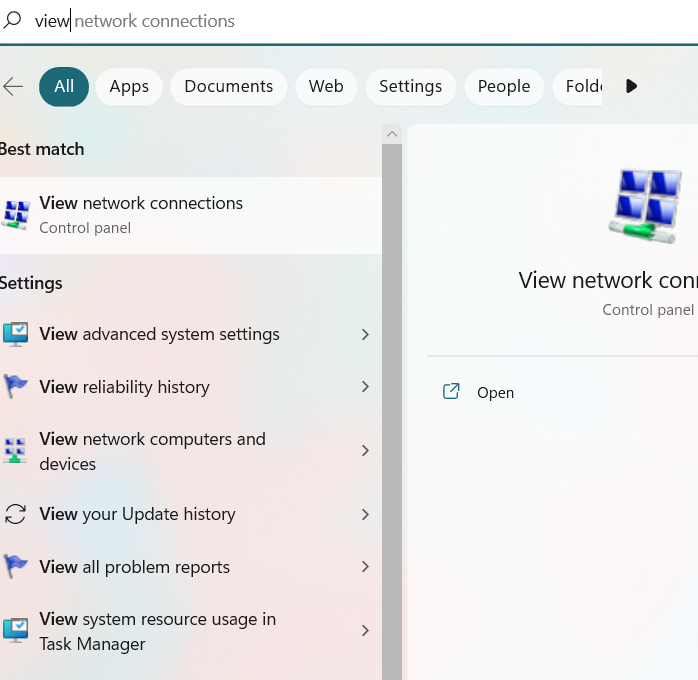
Reason 2. Modify Your DNS Settings
DNS handles all the Domain Name Requests on your device, and it matches the IP address with the requested website and loads the page on your device. Sometimes, some DNS providers will restrict some content on their services. Additionally, some unwanted programs, potentially by hackers, will alter the DNS settings and causes errors like ERR_CACHE_MISS.
Steps to change DNS settings to Google's DNS:
Step 1. Search for "View Network Connections" on your PC.
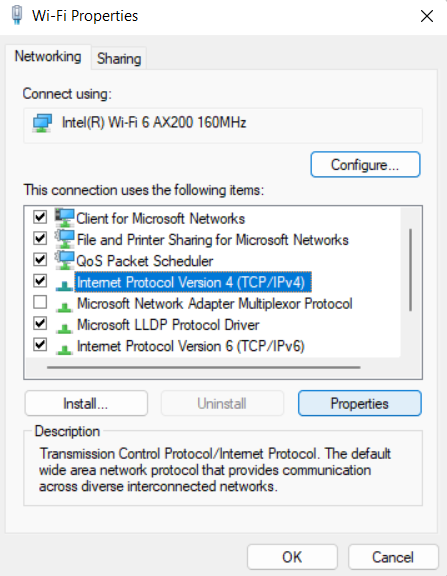
Step 2. Go to your Internet Connection, right-click on it, and select "Properties".
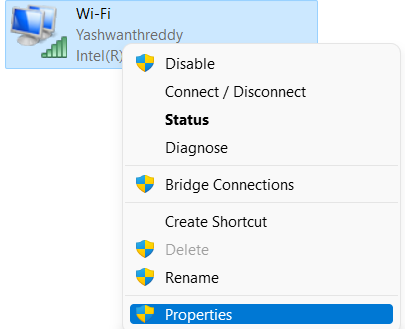
Step 3. Choose "Internet Protocol Version 4 (TCP/IPv4)" from the options and Select the "Properties" button.
Step 4. Select "Use the following DNS server addresses" and enter the below server addresses.
Preferred DNS Server: 8.8.8.8
Alternate DNS Server: 8.8.4.4
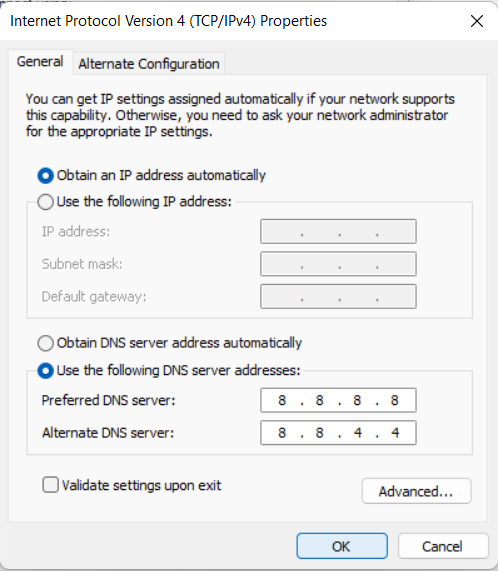
Step 5. Click "OK" and save the changes. Restart the PC to check if the error occurs or not.
The Bottom Line
The ERR_CACHE_MISS is a caching error, just as the name suggests, and is easily fixable. It happens due to a corrupt cache, browser, and network settings. There are multiple easy fixes discussed above to solve the error, and follow the guide to get back to browsing in no time. You can also try uninstalling and reinstalling Chrome once if the issue is not resolved.
To avoid facing such errors in the future, ensure you are accessing authentic websites only and follow internet protocols to prevent falling into the traps of hackers.
Was This Page Helpful?
Daisy is the Senior editor of the writing team for EaseUS. She has been working at EaseUS for over ten years, starting as a technical writer and moving on to being a team leader of the content group. As a professional author for over ten years, she writes a lot to help people overcome their tech troubles.
Related Articles
-
macOS Ventura: Preview, Features and Downloading
 Brithny/2024-02-19
 -
Windows 11 Games Crash or Freeze? Don't Miss Quick Fixes Here!
 Tracy King/2024-01-11
 -
EaseUS Disk Drives Stats 2 (Disk Number/Disk Types/C Drive Size) for 2024
 Cici/2024-01-15
 -
What Is CD-RW? Compact Disc Re-Writable Explained
 Daisy/2024-01-11
