-
![]()
-
![]()
-
![]() Is It Safe to Delete Temp Files? How to Recover Temp Files
Is It Safe to Delete Temp Files? How to Recover Temp Files February 12,2026
 6 min read
 -
![]()
-
![]()
-
![]()
-
![]() How to Recover Deleted Game Files/Steam Data/Game Saves on PC
How to Recover Deleted Game Files/Steam Data/Game Saves on PC February 12,2026
 6 min read
 -
![]() How to Recover Deleted VHD and VHDX Files in Windows 10/11 [Easy]
How to Recover Deleted VHD and VHDX Files in Windows 10/11 [Easy] February 12,2026
 6 min read
 -
![]()
-
![]()
Page Table of Contents
PAGE CONTENT:
When you use the Shift + Delete keys to delete files, the files will be directly deleted without moving into the recycle bin. "Can I recover shift deleted files Windows 11?" these files are not gone forever, and you still have opportunities to recover shift deleted files on Windows 11 before overwritten.
You can recover deleted files Windows 11 with three proven methods. Recovering shift deleted files with the Windows deleted file recovery tool and from File History are both available, and the fastest way to recover shift deleted files is by applying data recovery software.
Recover Shift Delete Files Windows 11 with File Recovery Software
"Can I recover permanently deleted files Windows 11?" When you delete files with the Shift + Delete keys, you think the files are permanently deleted because you cannot find and recover them in the recycle bin. As we said at this article's beginning, you still get a chance to recover them before overwriting them.
With EaseUS Data Recovery Wizard, you can recover shift deleted files efficiently with high quality. This file recovery software can recover unlimited data with a high success rate. EaseUS Data Recovery Wizard can recover different types of files from various storage media, even a dead hard disk.
- Recover data from external hard drives, SD cards, USB flash drives, and cameras. It also supports NAS data recovery.
- It is not only a PDF recovery tool but also can recover shift deleted JEPG, RAW, GIF, PST, DOC, MOV, and MPG files. It supports more than 1000 file types.
- It is also bootable data recovery software. When your PC cannot boot, you can use this recovery tool to recover shift deleted files from your PC.
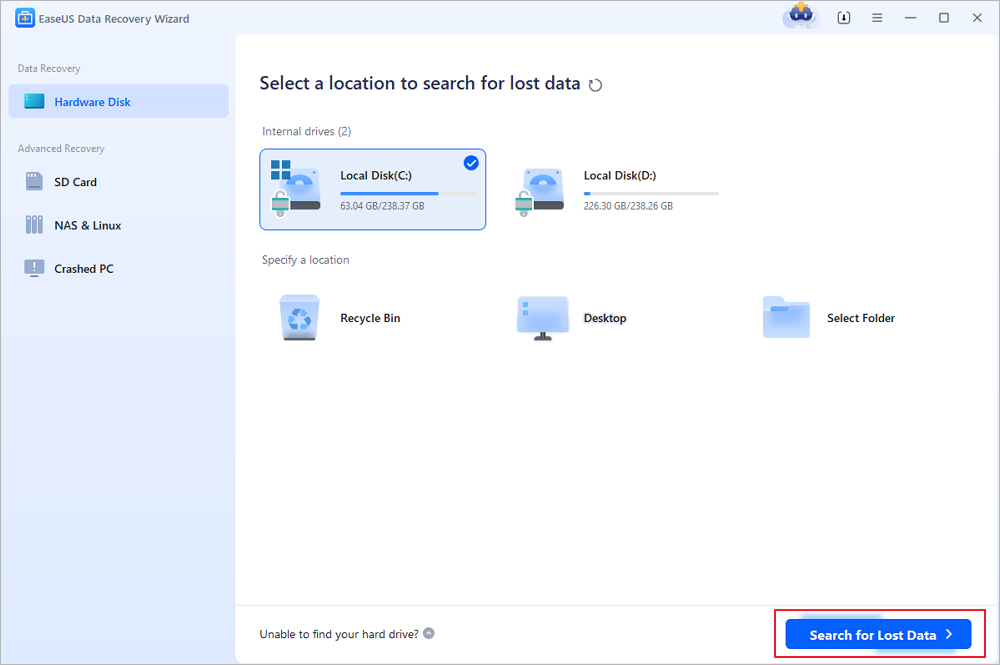
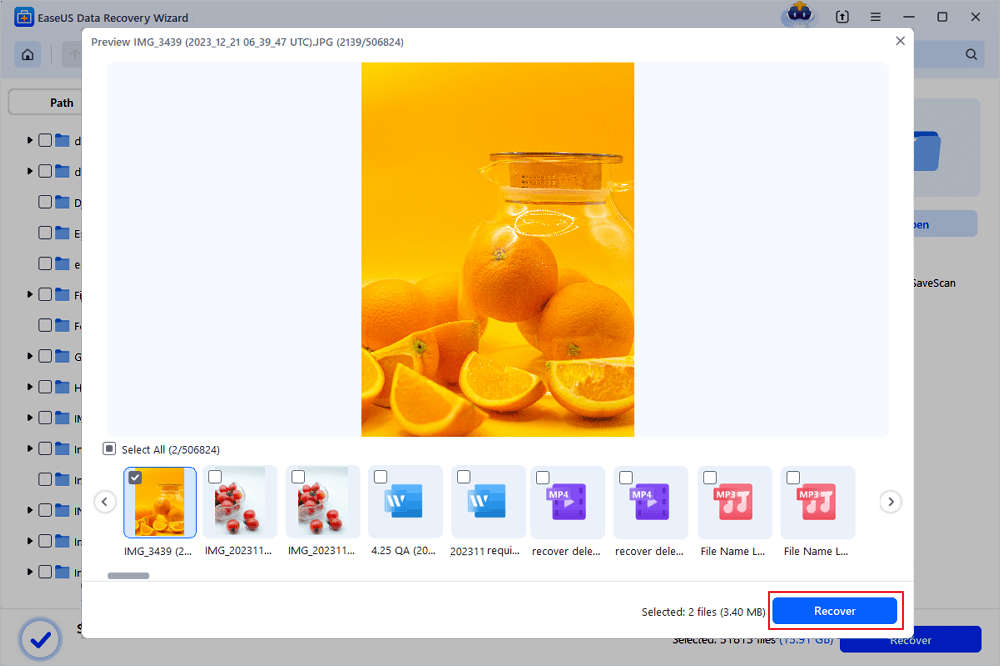
Step 1. Select the location to scan
Choose the specific device and drive where you have permanently deleted files using Shift delete or emptying recycle bin. Then, click the "Search for Lost Data" button to find lost files.
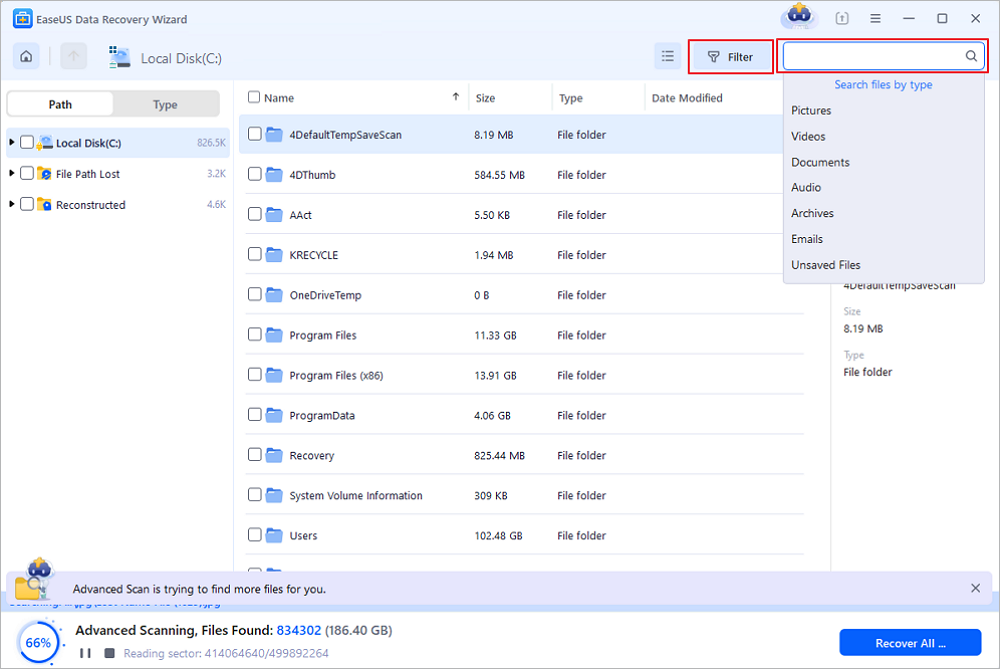
Step 2. Check the results
The software will automatically start scanning all over the selected drive. When the scan completes, select the deleted or lost folders in the left panel using the "Path" feature. Then, apply the "Filter" feature or use the search box to quickly find the deleted files.
Step 3. Recover deleted files
Select the deleted files and click "Preview". Next, click "Recover" to save them to another secure location or device. You can choose a cloud storage, such as OneDrive, Google Drive, etc., and click "Save" to save your recovered files.
Recover Shift Deleted Files Windows 11 Without Recovery Software
There are many workable solutions to recover deleted files without software. We will introduce two tested ways to recover shift deleted files on Windows 11.
Fix 1. Recover Shift Delete Files Windows 11 from File History
File History is also a built-in feature on Windows 11, and it can help you recover accidentally deleted files easily. It will be a wise choice to enable this option, and the File History will back up your files, including documents, graphics, videos, music, etc.
How to Enable File History on Windows 11
If you find this option is disabled, we will help you turn it on first.
Step 1. Click the Windows icon and search for File History.
Step 2. You will see some options in a Window, and select the "Restore your files with File History" option.

Step 3. Click "Configure File History settings".

Step 4. Now you should choose the drive to enable the File History option.
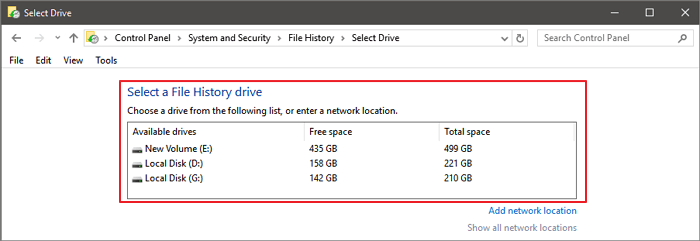
Step 5. Click "Turn on", and the File History is enabled.
How to Recover Shift Deleted Files Windows 11 from File History
Have you enabled the File History successfully? Now we will introduce how to recover shift deleted files on Windows 11 from the File History.
Step 1. Click the Windows icon and search for File History.
Step 2. You will see some options in a Window, and click "Restore your files with File History".

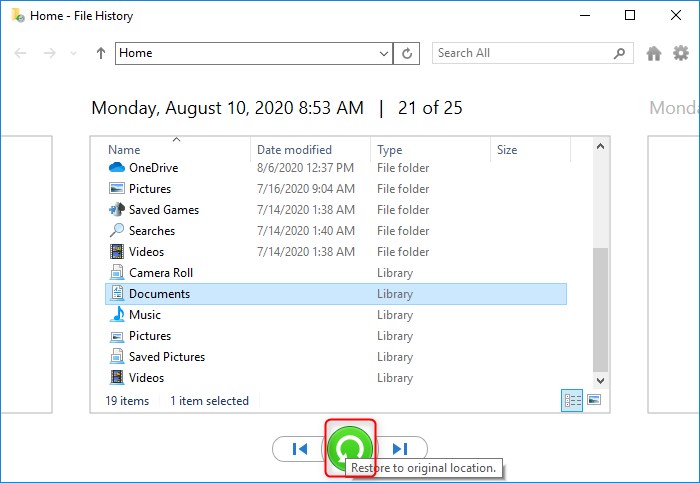
Step 3. You will see all files that are available to recover, then select the files you want and click the green button.
Fix 2. How to Recover Shift Deleted Files with Windows File Recovery
You should download Windows File Recovery from Microsoft Store, and it is a Windows command-line tool that can help you recover deleted files in Windows 10 and Windows 11. We do not recommend a computer novice use Windows File Recovery, it is a little hard to use. If you are going to recover deleted files with the Windows File Recovery tool, you need a secondary drive to recover deleted files, and you should know the location of your files.
Step 1. Click the Windows icon and search for Windows File Recovery. Download this recovery tool.
Step 2. Run Windows File Recovery on Windows 11.
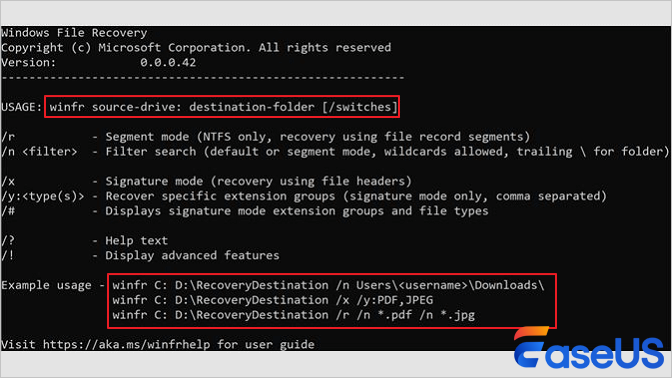
Step 3. Type in winfr source-drive: destination-drive: [/switches]. You should replace the "source-drive" and "destination-drive" with correct drive letters, for example, winfr C: D: /n \Users\Documents\test.docx.
Step 4. Then you can follow the prompts to restore the files.
Bottom Line
If you are recovering shift deleted files with the Windows File Recovery tool, you should pay attention to your command lines and ensure you are typing in the right commands. If you choose to recover shift deleted files from File History, ensure your File History option is enabled already, or your files will not show up in File History.
Don't worry if you fail to recover shift deleted files with the Windows File Recovery tool or from File History. EaseUS Data Recovery Wizard can scan the whole disk and list all the lost or deleted files for you, and you can preview the files to make sure they are the exact ones you want. Don't hesitate to download this tool and get back your shift deleted files with one click.
Recover Shift Deleted Files Windows 11 FAQs
You will get more information about recovering shift deleted files on Windows 11 in this part by reading four Q&As.
Does Windows 11 have File History?
Yes, you can find the File History option on Windows 11 and recover files from the File History.
- 1. Click the Windows icon and search for File History.
- 2. You will see some options in a Window, and click "Restore your files with File History".
- 3. Click "Configure File History settings".
- 4. Now, you should choose the drive to enable the File History option.
- 5. Click "Turn on", and the File History is enabled.
- 6. If your File History is enabled already, then you will see all files that are available to recover, then select the deleted files you want and click the green button.
Can shift deleted files be recovered on Windows 11?
The easiest way to recover shift deleted files on Windows is by applying EaseUS Data Recovery Wizard.
- 1. Download and install EaseUS Data Recovery Wizard, then run it.
- 2. Scan the shift deleted files.
- 3. You are allowed to preview the deleted files.
- 4. Select all the deleted files and recover them.
Can we recover permanently deleted files on Windows 11?
Yes, you can recover the files on Windows 11 before the files are overwritten. You can recover deleted files with the Windows File Recovery tool or from the File History. You can also download a professional deleted file recovery tool – EaseUS Data Recovery Wizard.
- 1. Download and install EaseUS Data Recovery Wizard, then run it.
- 2. Scan the deleted files.
- 3. You are allowed to preview the deleted files.
- 4. Select all the deleted files and recover them.
How can I recover permanently deleted files with CMD?
You can not recover permanently deleted files with Command Prompt, but you can recover hidden files with CMD by following the tutorial below:
- 1. Click the Windows icon and type in cmd, and you can see Command Prompt.
- 2. You should run Command Prompt as an administrator.
- 3. Then it is time to type in chkdsk drive letter: /f. (Replace the "drive letter" with your actual drive letter.)
- 4. Type in Y and press the Enter key to confirm your operation.
- 5. Type in your actual drive letter and press the Enter key.
- 6. The last is typing in attrib -h -r -s drive letter:\*.* /s /d. (Replace the "drive letter" with your actual drive letter.)
Was this page helpful?
-
Brithny is a technology enthusiast, aiming to make readers' tech lives easy and enjoyable. She loves exploring new technologies and writing technical how-to tips. In her spare time, she loves sharing things about her game experience on Facebook or Twitter.…
-
Dany is an editor of EaseUS who lives and works in Chengdu, China. She focuses on writing articles about data recovery on Mac devices and PCs. She is devoted to improving her writing skills and enriching her professional knowledge. Dany also enjoys reading detective novels in her spare time. …

20+
Years of experience

160+
Countries and regions

72 Million+
Downloads

4.9 +
Trustpilot Score


Free Data
Recovery Software
Recover data up to 2GB for free!


