Have you recently witnessed "Your computer is low on memory" on your Mac? If you have, you need to pause before taking any further action. You might not know, but this deceptive pop-up can wreak havoc on your system. But what is this "Your computer is low on memory" pop-up?
The pop-up is a fake warning issued by malicious apps with the intent to trick users. Clicking on it causes the user to give various permissions like browser control, access to data, and more unwillingness. Here is a quick navigation for you to fix the computer that is low on memory.
| Workable Solutions | Step-by-step Troubleshooting |
|---|---|
| Fix 1. Force quit malicious apps | One of the simplest solutions to get rid of the tricky popup is to force quit the application responsibly...Full steps |
| Fix 2. Remove harmful Profiles | In some cases, malicious code present within the Mac Profiles can lead to the occurrence of the pop-up...Full steps |
| Fix 3. Remove rogue extensions | Have you clicked on any buttons on the pop-ups? In that case, the web browser you use is most likely...Full steps |
| Fix 4. Uninstall programs | While eliminating malware you can spot is relatively easy, the same cannot be said for the ones with...Full steps |
Rogue apps take multiple permissions using this pop-up trick to infiltrate the system. That leads to severe privacy concerns, identity theft, and financial losses. You need to remove the application causing this pop-up right away. Remember not to click the Close button when your computer is low on memory Mac pop-up.
Reasons: Why You See Your Computer Is Low on Memory Mac
Are you wondering why you are seeing your computer is low on memory Mac? The primary reason for this pop-up is the installation of freeware or other dubious apps. Moreover, the same issue can arise with PUA or potentially unwanted applications, which are grouped with unauthorized ones.
It is vital to understand that deleting the apps on Mac is of utmost importance. However, removing them can be a real challenge. The presence of helper components aids them in reinstallation even after their removal. That is why you need to be diligent and cautious while fixing this particular popup problem.
Solutions: How to Fix Your Computer Is Low on Memory Mac
The Computer Is Low on Memory Mac pop-up is a severe issue. However, there are various solutions you can adopt to fix this problem –
- Fix 1. Force quit the malicious applications in Activity Monitor
- Fix 2. Get rid of harmful Profiles on your Mac
- Fix 3. Remove rogue search engine extensions
- Fix 4. Uninstall any questionable apps from Launch Agent
Fix 1. Force quit the malicious applications in Activity Monitor
One of the simplest solutions to get rid of the tricky popup is to force quit the application responsibly. You can do that via Activity Monitor. That way, you can remove the display of the error message with ease.
Here are the steps you need to follow –
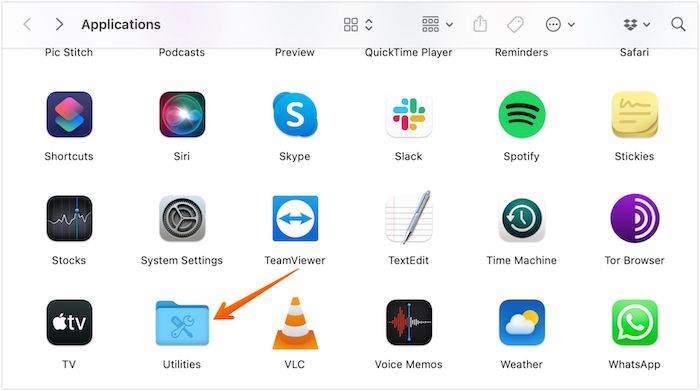
Step 1. Open Finder. Click on Go on the Apple menu. A drop-down will appear, click on Applications.

Step 2. Click on Utilities.
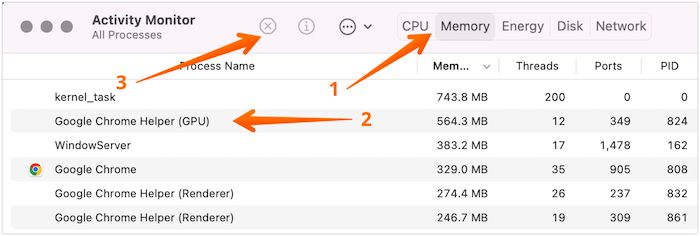
Step 3. Launch Activity Monitor. Select the Memory tab. Here, you need to locate the malicious application. For that, you can see if any processes appear unfamiliar or using too many resources. After locating it, select the app.
Step 4. Now, select the cross-sign present at the upper-left part of the screen.
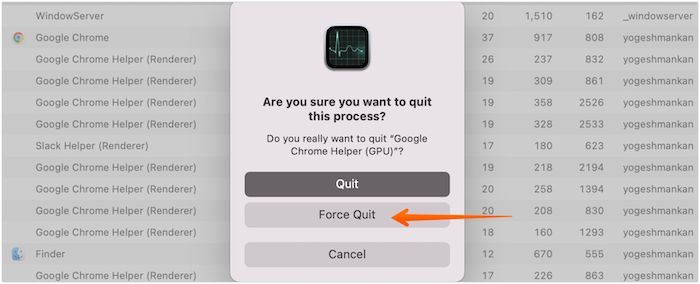
Step 5. You will come across a dialog box that asks for confirmation to Force Quit the app. Click on the Force Quit button to get rid of the application.
Fix 2. Get rid of harmful Profiles on your Mac
In some cases, malicious code present within the Mac Profiles can lead to the occurrence of the pop-up. You need to remove the configuration file within Profiles to handle the scenario. That way, you can delete these applications with ease.
Check out the steps you need to follow –
Step 1. Click the Apple logo. Go to System Settings.

Step 2. Scroll through the User & Groups icon on the left-hand sidebar.
Step 3. Check if there are any dubious profiles on the right-hand sidebar. You will see this section only if there are profiles connected.
Step 4. Select and then click on the – sign to get rid of it.
Step 5. Go to the Trash can present on the screen.
Step 6. Right-click on it and then select Empty Trash.
Fix 3. Remove rogue search engine extensions
Have you clicked on any buttons on the pop-ups? In that case, the web browser you use is most likely infected with malware.
Here, we will discuss how to remove such rogue search engine extensions from different web browsers.
>Safari:
Step 1. Launch Safari.
Step 2. Click on Safari from the menu and select Settings options.

Step 3. A new window will open, click on the Extensions tab.

Step 4. You need to check out the various extensions installed here.
Step 5. Look for the ones that appear suspicious.
Step 6. When you find that extension, click Uninstall to get rid of it.
>Firefox:
Step 1. Open Firefox. Go to the main menu button. Select Help.
Step 2. Click on Troubleshooting Information present in the drop-down menu. Select Refresh Firefox.

Step 3. You need to confirm again by clicking on Refresh Firefox.
Step 4. Now, select Finish.
>Google Chrome
Step 1. Launch Chrome. Go to the top-right corner and click on the three dots.
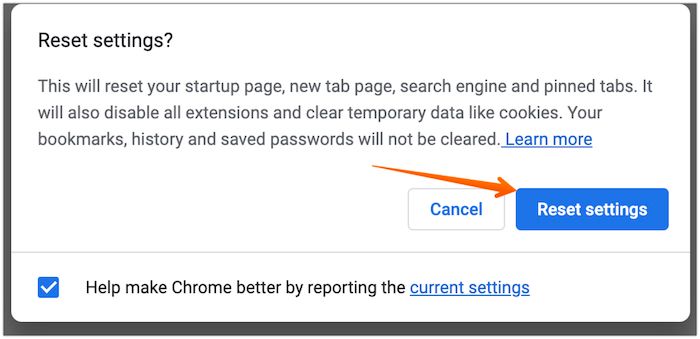
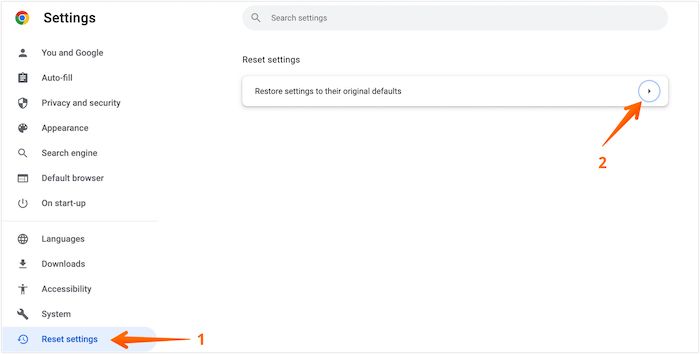
Step 2. Select Settings and click on Reset Settings from the left-hand sidebar.
Step 3. Click on Restore settings to their original defaults to reset the web browser.
Step 4. A dialog box will open. Click on Reset Settings to confirm.
Note: Both Google and Firefox offer users the chance to get back the default settings. It will eliminate undesirable changes without affecting the saved history or bookmarks. Moreover, you won't lose the passwords too.
Fix 4. Uninstall any questionable apps from Launch Agent
While eliminating malware you can spot is relatively easy, the same cannot be said for the ones with hidden codes. It is crucial to understand that malware requires the Launch Agent scripts to attack the system. So, going directly to the root of the issue is a better approach.
Take a look at the steps you must adopt –
Step 1. Go to Finder.
Step 2. Navigate to the top menu bar and click on Go.
Step 3. Now select the Go to Folder option from the drop-down menu.
Step 4. Here, you need to type - /Library/LaunchAgents. Press Enter.
Step 5. Now, look for applications or files you don't recognize or are aware of their presence. Select these files.
Step 6. Click on the Move to Trash option.
Note: You can also follow the same procedure to check out - /Library/Application Support and /Library/LaunchDaemons. And you can clear Recents on Mac with Finder
Extra Tip: Recover Lost Data While Fixing the Mac Error
Low memory sometimes leads to Mac black screen issues, forcing users to reboot the system. Now, rebooting your Mac can lead to data loss in some cases. It is especially true when you have already encountered the low memory warning. In that scenario, the best solution is to opt for a reliable data recovery tool.
Using a data recovery tool is a good idea to retrieve precious data. For that, you can choose EaseUS Data Recovery Wizard for Mac. It is a highly efficient, powerful, and easy-to-use program. The tool was specifically created to aid users in recovering lost data.
- Data loss is frustrating, no matter the reason. You can experience this situation due to macOS update format, system crash, virus attack, manual error, unexpected shutdown, and hardware failure.
- You can recover different data formats, such as documents, videos, photos, music, emails, archives, and more.
- The software aids in Mac file recovery from the camera, USB drive, memory card, and hard drive.
- Moreover, the tool is easy to use and allows even amateurs to implement it without a fuss.
- You can even retrieve data when the system becomes unbootable.
- Bootable data recovery is one of the main USPs of the tool.
- You can always contact the support team if you face data restoration issues.
To recover data on Mac, here are the steps:
Step 1. Select the drive to be scanned
In the main EaseUS Data Recovery Wizard window, there will be a list of the drives connected to your Mac. Select the drive you need to recover lost/deleted files from, and click the "Search for lost files" button.

Step 2. Select your lost data/files
EaseUS Data Recovery Wizard for Mac will immediately scan your selected disk volume and display the scanning results on the left pane. You can sort the results to find the wanted files if you are looking for certain files.

Step 3. Recover lost/deleted data
Once you have found the desired files, preview the files and then click "Recover" to begin the recovery of your deleted/lost Mac files.

Final Words
Don't take immediate action if you encounter "Your computer is low on memory" on your Mac. Instead of clicking anywhere on the pop-up, try to remove the application that caused this in the first place. The pop-up is a deceptive method of malicious apps tracking users to give control over different permissions.
Luckily, there are multiple solutions you can apply to resolve the problem. For starters, you can eliminate rogue search engine extensions. You can also get rid of dubious apps on your Mac. However, data loss can still occur. In that case, you need to opt for a reliable data recovery tool.
To restore data, you can use EaseUS Data Recovery Wizard for Mac. It is efficient, user-friendly, and gives satisfactory results. Haven't you used it yet? Try this excellent data recovery software solution now!
Your Computer Is Low on Memory Mac FAQs
Applying these solutions will aid in resolving the “Your Computer Is Low on Memory Mac” issue. However, you need to gather more knowledge. For that, take a look at these questions and answers -
1. Why is my available RAM so low?
Understanding that every file or program you use takes up a specific amount of RAM is vital. The more apps you have, the lower the RAM will get. Eventually, it slows down the system.
2. How to prevent the pop-up virus from happening again?
To prevent the pop-up virus from happening again, you can block them. You can go to Safari settings and block pop-ups.
3. Why is my Mac saying memory is full?
Your Mac says the memory is full because no free space is available. It mainly occurs when too many applications and files are running on the hard drive. You must clear some free space immediately to ensure low memory doesn't interfere with the system's efficient functioning.
4. How to increase memory on Mac?
Firstly, you need to know if your Mac memory can be upgraded. Not all Mac devices support RAM upgradation. But if it does, you must purchase RAM modules of the size you want. After that, you need to take out the old ones and insert the ones you have bought to increase memory on Mac.
Was This Page Helpful?
Jaden is one of the editors of EaseUS, who focuses on topics concerning PCs and Mac data recovery. Jaden is committed to enhancing professional IT knowledge and writing abilities. She is always keen on new and intelligent products.
Related Articles
-
How to Install macOS Monterey | macOS 12 Clean Install
![author icon]() Jaden/2024-10-10
Jaden/2024-10-10 -
How to Set Up Windows 11 Without Microsoft Account
![author icon]() Brithny/2024-07-12
Brithny/2024-07-12 -
[2024 Updated] How to System Restore Mac in 2 Ways
![author icon]() Dany/2024-11-12
Dany/2024-11-12 -
How to Fix 'An Error Occurred While Preparing the Installation' Error [macOS Upgrade Issue]
![author icon]() Dany/2024-10-10
Dany/2024-10-10

EaseUS Data Recovery Services
EaseUS data recovery experts have uneaqualed expertise to repair disks/systems and salvage data from all devices like RAID, HDD, SSD, USB, etc.