Backups always help us provide rescue from misfortunate events like the deletion of a file by mistake, the loss of an important document, etc. To complete the Windows environment, Microsoft provides Shadow copy that you can create on external or local volumes that assist with backup copies.
So here, you will learn about all aspects of volume shadow copy and how it works. You can enable it easily and restore any folders or files deleted by it.
Read on in detail about it to better cater to its issues.
What Is Volume Shadow Copy
Introduced by Windows in 2003, the Volume Shadow Copy service provides a facility for establishing conversation or communication between various components that help them coordinate. Once all the VSS components come together, it assists in creating a backup of your app-related data without taking it offline. It also maintains coordination of actions essential for creating a consistent VSS/ snapshot/ point-in-time copy.
How Does Volume Shadow Copy Work?
For a functioning VSS, you require some essential parts such as;
- VSS Service ensures better communication of other components not only with each other but work as well.
- VSS Requester is software that helps create requests related to the actual creation of VSS.
- VSS Writer is a component that ensures consistency in the data set for backing up.
- VSS Provider is another component that helps create and maintain shadow copies. It uses a copy-on-write function.
Functions
You can use Volume Shadow Copy not only for creating backups of data related to an app, but it has some other functions too. These are;
- Restoration of LUNs, including their swapping and resynchronization.
- Mining of data by making use of shadow copies that are transportable.
- Restoration of individual files that contain shadow copies related to shared folders.
Advantages:
- It helps create access and copies of files while not in use, locked, or open.
- You can make amendments in your shadow copies even when accessing/copying them without creating a hindrance to your work.
Disadvantages:
- To create a Volume shadow Copy, you must have some spare time before starting the file copying process.
Although as a default feature, Microsoft already enabled Volume shadow copy. However, if you feel that it is disabled due to some reason or you are looking for a confirmation for the same, then stay glued for the next part. Herein we will be guiding you about using VSS correctly in Windows 10.
How to Use Volume Shadow Copy in Windows 10 Correctly
You can enable Volume Shadow Copy by using the following methods.
- Method 1. Enable Volume Shadow Copy Using System Restore Points
- Method 2. Turn on Volume Shadow Copy Using Task Scheduler
Method 1. Enable Volume Shadow Copy Using System Restore Points
You can set Restore points for enabling volume shadow copy. For example, you can select daily, weekly, or monthly points per your preference.
Steps to Use:
Step 1. Locate the search box and go ahead by typing Create a restore point and make its selection. After that, choose "Choose a drive" from the System Properties and tap on the "Configure" option.
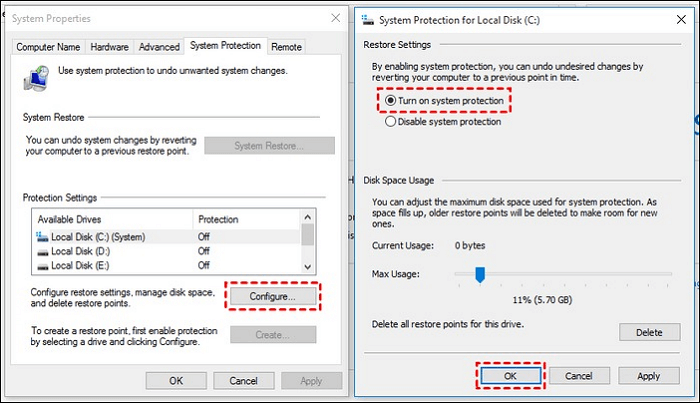
Step 2. Now check the option of "Turn on system protection." Then tap on the "Apply" button to enable the option.
Step 3. Tap the "Create" option to enable the volume shadow copy using Windows 10.
If the System Restore Points is not working, you can read the article below to solve the problem.
Windows 10/8/7 System Restore Points Not Working
When Windows System Restore is not working, it usually happens after users update the system, install an application, or their computer becomes infected with malware or a virus.
Method 2. Turn on Volume Shadow Copy Using Task Scheduler
If you wish to customize Windows 10 volume shadow copy by using a specific time, you can utilize Task Scheduler. You can start by enabling the shadow copy by following the given steps.
Steps to Use:
Step 1. Start by opening the Task scheduler. Then tap on "Start" and go ahead with typing Task Scheduler, and after that, make its selection from the list.
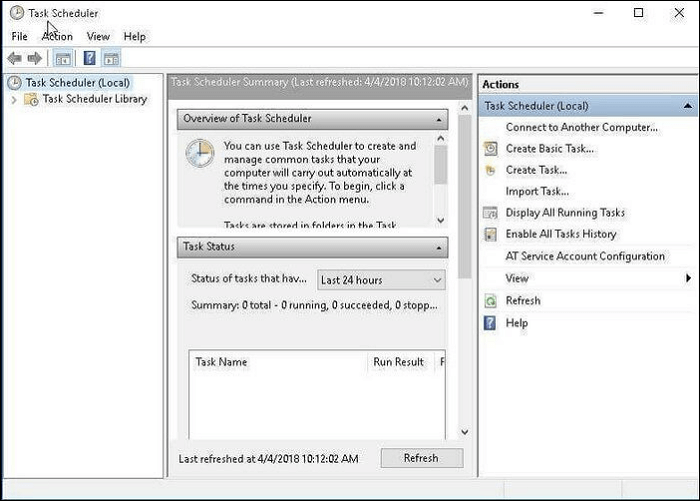
Step 2. Tap on "Create Task," then go for the specification of a name for the task.

Step 3. Now do the creation of a new trigger. You can opt to click on the tab for "Triggers." Then from the lower location, tap on the option for "New." Afterward, select one-time, daily, weekly, or monthly settings.
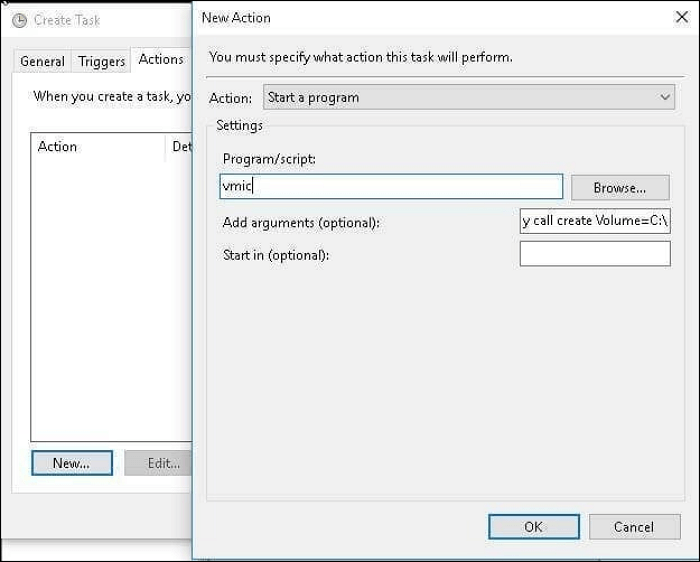
Step 4. Now opt for enabling Shadow copy. You can also tap on the tab for "Actions" and then the option for "New." After that, under the option for Script or Program, type out wmic and then write the argument as "shadow copy call create Volume=C:\" in the blank box given on the right side.
How to Backup Files Using Volume Shadow Copy
After enabling VSS, you can use it to back up volumes or files. Although it is done by default, you still have a chance to check if you need more clarification on it.
Steps to Use:
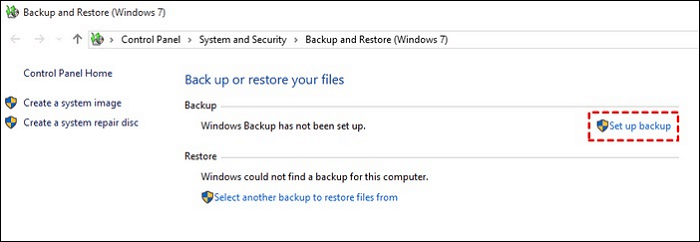
Step 1. Start by opening the option of "Backup and Restore" on Windows 10 by tapping on the "Start" button. Then tap on "Control Panel," then on "System and maintenance," and then on "Backup and Restore."
Step 2. Then tap on the "Set up backup" option.
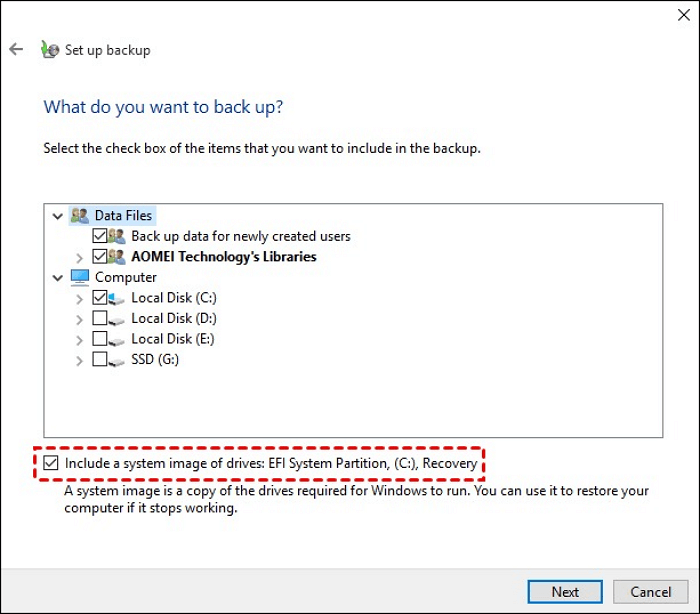
Step 3. Now select where you wish to have your backup saved and tap on the "Next" option.
Step 4. Then select "Let Windows choose," or you can opt for "Let me choose." Then tap on the "Next" option. Finally, you will find a system image as a default feature if you still need to uncheck the checkbox.
Step 5. You can also review your backup settings and confirm the same. Then tap on the option of "Save settings and run backup."
Sometimes you may note that VSS responds slowly. It only assists with baking up files in the NTFS partition. It also lacks certain advanced features, including backing up on multiple Windows PCs.
A Better Way of Backup: EaseUS Todo Backup
EaseUS Todo Backup helps you meet your needs by creating a centralized backup option if you do not wish to go for manual backups. The app offers various functionalities that also work as its advantages.
- It provides saving of effort and time by creating a flawless system backup.
- It provides a reduction in downtime for the protection of business data.
- It initiates an automated backup opportunity.
- It helps in providing configuration and deployment of Windows systems in a quick manner on your PC.
- It serves as a backup and restore software for Windows 10.
- It is apt for home users, enterprises, Mac users, and service providers.
Secure Download
Here are the steps to use this wonderful program.
Step 1. Launch EaseUS Todo Backup and choose "Create Backup" on the home page, click "Select backup contents".

Step 2. Among the four available categories, click "OS" to start back up.

Step 3. The system partition will be automatically selected, you only need to select the location.

Step 4. Local Drive, Cloud, and NAS are available for you to save the backup file. You can also connect an external hard drive to preserve the system backup files.

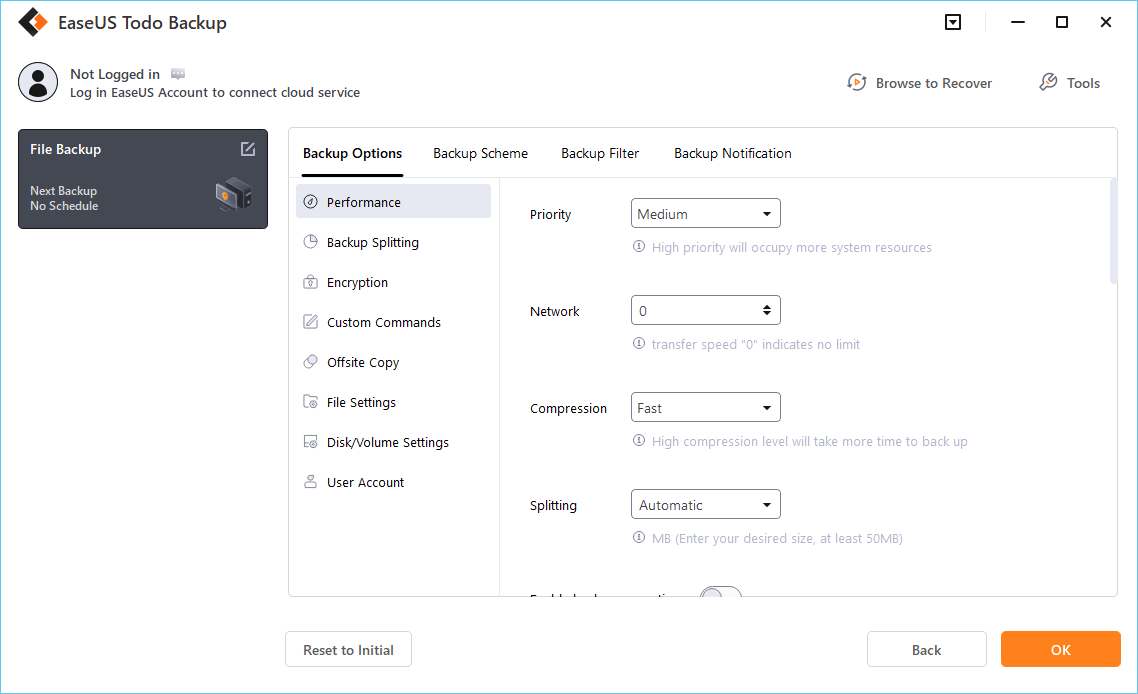
Step 5. You can customize the settings in "Options" at the left bottom. After that, click "Backup Now", and the process will begin.
*After finishing the backup process, you can check the backup status, recover, open, or delete the backup by right-clicking the backup task on the left.
Final Verdict
In this write-up, we have helped you out by enabling Volume Shadow Copy using various manual methods. We have also provided you with an alternate reliable solution for backing up your files with VSS in the form of EaseUS Todo Backup. It helps overcome a few difficulties that VSS poses in terms of high usage of disks leading to their deletion. Additionally, EaseUS provides an opportunity for home users, businesses, and professionals to use it accordingly on their devices.
Secure Download
Volume Shadow Copy FAQs
After reading the article, you may have some queries. Let's find them here!
1. Can I delete Volume Shadow Copies?
Yes, if Volume Shadow copies take up much space on your PC, you can delete them using system properties or the command prompt.
2. Where is the volume shadow copy stored?
You can find shadow copies stored beside the data of your file system. The file system backups also have your shadow copies stored, consuming a large part of the storage capacity of your system.
3. Is VSS enabled by default?
Yes, VSS is enabled by Microsoft by default.
Was This Page Helpful?
Daisy is the Senior editor of the writing team for EaseUS. She has been working at EaseUS for over ten years, starting as a technical writer and moving on to being a team leader of the content group. As a professional author for over ten years, she writes a lot to help people overcome their tech troubles.
Written by Tracy King
Tracy became a member of the EaseUS content team in 2013. Being a technical writer for over 10 years, she is enthusiastic about sharing tips to assist readers in resolving complex issues in disk management, file transfer, PC & Mac performance optimization, etc., like an expert.
Related Articles
-
How to Fix iMessage Waiting for Activation Error on Mac [8 Proven Methods]
![author icon]() Brithny/2024-10-30
Brithny/2024-10-30 -
How to Get Live Wallpapers on Windows 10 [Full Guide]
![author icon]() Daisy/2024-10-25
Daisy/2024-10-25 -
Mac Error Code 8072 Occurs? Check Here to Get Rid of It
![author icon]() Jaden/2024-10-25
Jaden/2024-10-25 -
How to Get BitLocker Recovery Key Using CMD ✨
![author icon]() Sherly/2024-10-30
Sherly/2024-10-30

EaseUS Data Recovery Services
EaseUS data recovery experts have uneaqualed expertise to repair disks/systems and salvage data from all devices like RAID, HDD, SSD, USB, etc.