Many individuals add passwords to their Excel files to prevent unauthorized access or modification. But sometimes, the user may forget the password, making the files inaccessible or uneditable. It can be annoying because many users risk important file missing. Not to worry, as in this post, we will offer several helpful techniques you may use to unlock the Excel file if you have forgotten the password. So, given below are the three most straightforward and most successful ways to unprotect Excel.
Method 1: Entering a Script or Code
Excel allows you to create multiple files, but what happens if you forget the password to one of those files and then want to change it? Let us see how:
Step 1. Open Excel, and switch to the password-protected spreadsheet. Press the Alt + F11 keys to open Microsoft Visual Basic for Applications window.
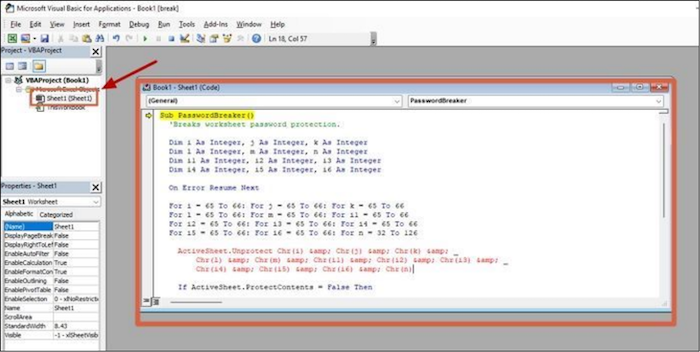
Step 2. Select the workbook on the left pane, and right-click on it. Select Insert > Module from the context menu. Next, copy and paste the code below into the code window of the protected spreadsheet, which you can choose from the window's left pane.
Sub PasswordBreaker()
Dim i As Integer, j As Integer, k As Integer
Dim l As Integer, m As Integer, n As Integer
Dim i1 As Integer, i2 As Integer, i3 As Integer
Dim i4 As Integer, i5 As Integer, i6 As Integer
On Error Resume Next
For i = 65 To 66: For j = 65 To 66: For k = 65 To 66
For l = 65 To 66: For m = 65 To 66: For i1 = 65 To 66
For i2 = 65 To 66: For i3 = 65 To 66: For i4 = 65 To 66
For i5 = 65 To 66: For i6 = 65 To 66: For n = 32 To 126
ActiveSheet.Unprotect Chr(i) & Chr(j) & Chr(k) & _
Chr(l) & Chr(m) & Chr(i1) & Chr(i2) & Chr(i3) & _
Chr(i4) & Chr(i5) & Chr(i6) & Chr(n)
If ActiveSheet.ProtectContents = False Then
MsgBox "One usable password is" & Chr(i) & Chr(j) & _
Chr(k) & Chr(l) & Chr(m) & Chr(i1) & Chr(i2) & _
Chr(i3) & Chr(i4) & Chr(i5) & Chr(i6) & Chr(n)
Exit Sub
End If
Next: Next: Next: Next: Next: Next
Next: Next: Next: Next: Next: Next
End Sub
Step 3. Press the F5 key to run the code. You can also click on the Run > Run Macro menu to execute the script.
It will take a while to complete. A pop-up containing a password will appear after the process. Press OK, and your spreadsheet will become unprotected.
Method 2: Using WinRAR
With this technique, you may quickly remove the password protection from an excel file and alter the extension. Although a little complex, you can use WinRAR by just following the instructions below:
Note: Before you begin, make a copy of your protected Excel file, as there are chances that it may go corrupt.
Step 1. Right-click on the copied Excel file and rename your folder from .xlsx to .zip. Press "Yes" on the Rename prompt window.
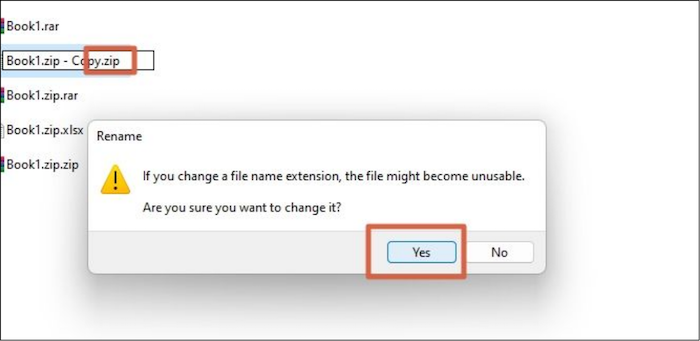
Note: Go to File Explorer and click on the View tab > Show > File name extensions to view your file extension.
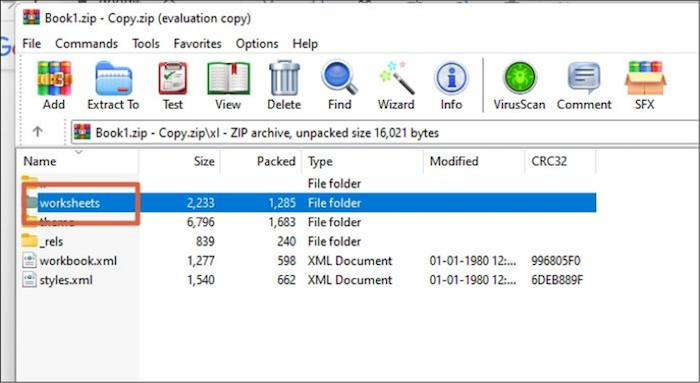
Step 2. Next, double-click on your ZIP file, and a window with the components of your spreadsheet will open. Choose the xl folder.
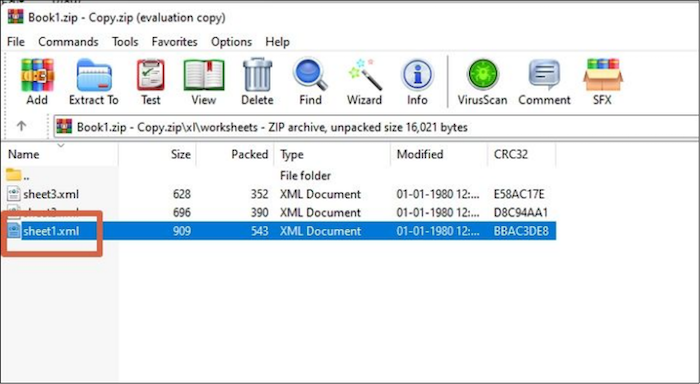
Step 3. Next, go to the worksheets folder, and you will find separate .xml files for each worksheet. Copy and paste the protected sheet from the list to your desktop.
Step 4. Next, right-click on your protected sheet, and go to Open with > Notepad or any other editor.
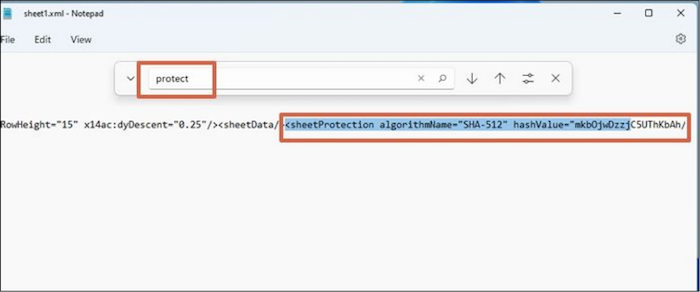
Step 5. Press "Ctrl + F" and type protect into the search bar.
Step 6. So, start selecting the code, including the opening angle bracket from where the word sheetProtection starts till all the way it closes (< …. >) (select the closing bracket as well) and press the delete button.
Step 7. Close the window, and save the changes.
Step 8. Delete the old version of the XML-protected sheet from the worksheets folder.
Step 9. Copy and paste the .xml sheet, where the changes were made, back into the worksheets folder.
Step 10. Press "OK" in the Archive name and parameters window.
Step 11. Next, close the window and go back to the Excel file where you changed the file name from .xlsx to .zip and rename it back to .xlsx. Press OK in the prompt window.
Now open your Excel file and check whether you can make changes to the Excel sheet, which is now unprotected.
Method 3: Open With Spreadsheet
This method only applies to Excel files locked only in the sheet section. If the main file is protected, then the spreadsheet cannot open.
Step 1. Open your Excel spreadsheet and go to the Review tab.
Step 2. Click on the "Unprotect Sheet" option. A pop-window asking for a password will appear.
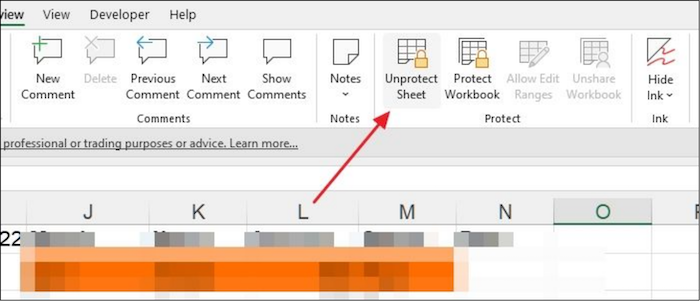
Step 3. Type the password and press OK.
Your Excel spreadsheet is free of protection.
Conclusion
Most big and small businesses use Excel files to keep track of their finances, growth, output, etc. When everything is included in Excel files, safeguarding them becomes essential. So, it is not easy to remember passwords as there may be so many files.
Thus, the three simple methods in this post will help if you are stuck with an Excel spreadsheet as you have set a password and cannot remember it.
Was This Page Helpful?
Daisy is the Senior editor of the writing team for EaseUS. She has been working at EaseUS for over ten years, starting as a technical writer and moving on to being a team leader of the content group. As a professional author for over ten years, she writes a lot to help people overcome their tech troubles.
Related Articles
-
How to Encrypt Hard Drive on a Mac with 2 Reliable Methods
![author icon]() Dany/2024-01-11
Dany/2024-01-11 -
Copy Partition to Another Drive Using CMD: Quick & Efficient Ways
![author icon]() Cici/2024-01-11
Cici/2024-01-11 -
How to Solve Mouse Not Working Windows 10? [Step by Step]
![author icon]() Tracy King/2024-01-11
Tracy King/2024-01-11 -
How to Fix WindowServer High CPU on Mac [macOS Ventura/Monterey/Big Sur]
![author icon]() Jaden/2024-01-11
Jaden/2024-01-11

EaseUS Data Recovery Services
EaseUS data recovery experts have uneaqualed expertise to repair disks/systems and salvage data from all devices like RAID, HDD, SSD, USB, etc.