| 4 Workable Solutions | Step-by-step Troubleshooting |
|---|---|
| Fix 1. Use the Option Key | Shut down the system. Then Press the Option key and hold it. After that...Full steps |
| Fix 2. Check the Security Settings | Press and hold the Command and R keys to restart the system...Full steps |
| Fix 3. Reset SMC | Shut down the Mac. Press the Option (Alt) key, Control key, and Shift keys...Full steps |
| Fix 4. Reboot to Safe Mode | Press Command, Option, Control, and Power buttons simultaneously...Full steps |
What Is Safe Mode on Mac
Safe mode is a highly controlled environment where only the essential apps and files are run on Mac. Other apps and extensions that are not precisely necessary will not run. Apart from that, the safe mode also continues a basic assessment of the system disk. It also eliminates system caches, removing primary reasons for issues.
The main reason safe mode on Mac doesn't allow non-native or third-party apps to run is to optimize its performance. Various reasons lead users to opt for the safe mode. For instance, it can be due to the system freezing up or the inability of the OS to boot normally. Another reason is the system crashing and restarting itself.
However, many users have reported problems while starting the safe mode. Starting the safe mode is relatively easy. If you can't do it, some issues must be resolved immediately.
Why Is My Mac Not Starting in Safe Mode
Are you wondering why your Mac won't start in safe mode? Well, various reasons could lead to this error. These are:
- The Mac might not be powered off entirely before restarting it into safe mode.
- Releasing the Shift shortcut key immediately instead of pressing it down for some seconds.
- Ensure the keyboard is working perfectly fine, so you can use the Shift key properly.
- Bugs present in the mac OS.
- Issues in the security settings of the system prevent booting in safe mode. Check out the Mac firmware password and FileVault.
- Problems with SMC or System Management Controller.
- NVRAM/PRAM-related issues.
- File system errors are present on the startup disk.
4 Ways to Fix Mac Won't Start in Safe Mode
Numerous reasons explain why your Mac won't start in safe mode. Fortunately, there are solutions too. This section will list the top four ways you can resolve this error - Mac won't start in safe mode. Before the solutions, you can check the video to get help first.
- 0:10 Check the charge, keyboard, and more
- 2:25 Turn off Firmware Password
- 4:04 Reset SMC
Fix 1. Use the Option Key to Fix Mac Won't Start in Safe Mode
One of the best ways to fix the Mac won't start in safe mode is to opt for the Option key. Here are the steps you need to follow:
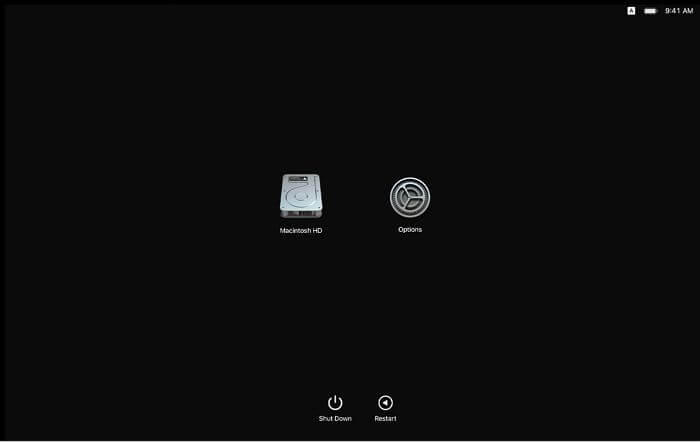
Step 1. Shut down the system.
Step 2. Then Press the Option key and hold it. After that, press the Power button.
Step 3. Here, you will get a list of the different drives on the Mac. Choose Mac's startup Drive and press the Enter key.

Now, check if the system can start in safe mode.
Fix 2. Check the Security Settings to Fix Mac Won't Start in Safe Mode
Another excellent way to fix the Mac won't start in safe mode problem is assessing the security settings. Sometimes, issues with the security settings, such as Firmware password or FileVault, can lead to this error.
It would help if you disabled the Firmware password. For that, take a look at these steps:
Step 1. Press and hold the Command and R keys to restart the system. Type the Firmware password.
Step 2. Select the language you want. Click on the "Utility" option and go to Startup Security Utility.
Step 3. You need to press the "Turn Off Firmware Password". Now, you need to enter the Firmware password again.
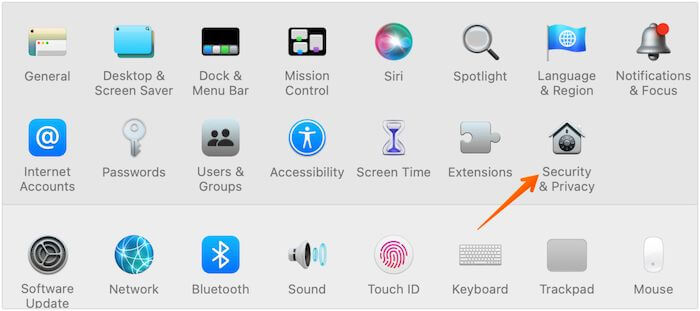
Step 4. Apart from this, you also need to disable FileVault. To do that, go to System Preferences, click "Security & Privacy", and press the "FileVault" option.
Step 5. Press the lock icon present on the bottom-left part of the screen. Now, you need to type the authentication credentials. It will unlock System Preferences.
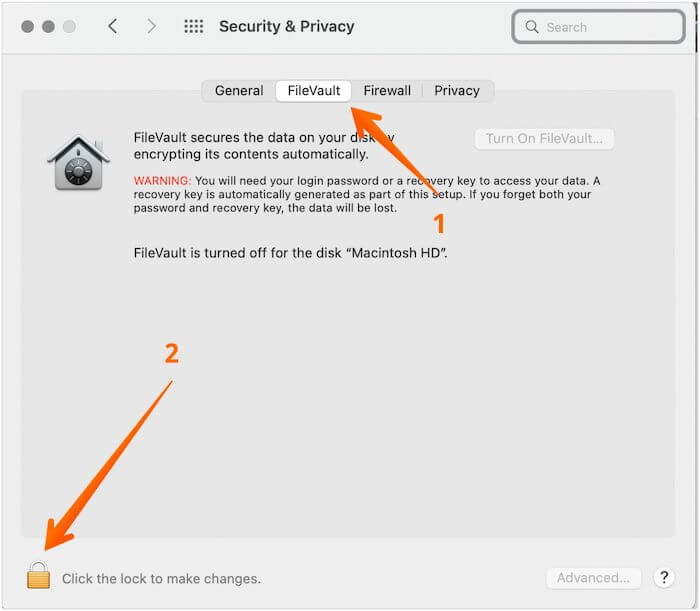
Step 6. Click the "Turn Off FileVault" option. After that, press the lock icon again. It will save the changes made. Restart the Mac and see if it enters safe mode.

Fix 3. Reset the System Management Controller (SMC)
In some cases, resetting the SMC can resolve the Mac won't start in safe mode problem. For Macs that have the T2, M2, or Apple M1 chip, you need to follow these steps:
Step 1. Shut down the Mac
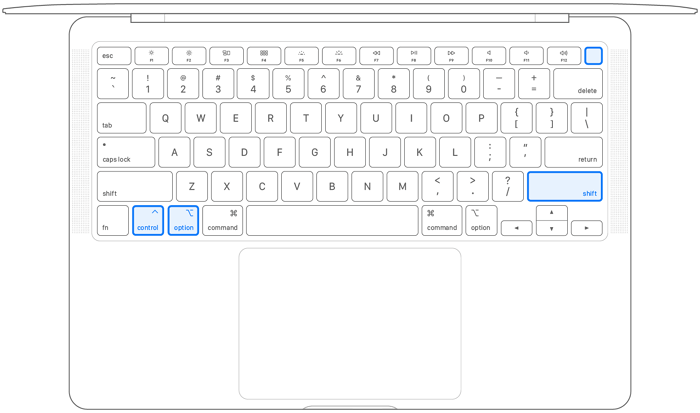
Step 2. Press the Option (Alt) key, Control key, and Shift keys simultaneously and hold them for a few seconds.
Step 3. After that, press the Power button and hold it. It will turn off the system.
- Notice:
- You must press and hold the four keys for at least 7-8 seconds before releasing them. After that, wait for half a minute. Then, press the Power button, and the system will be turned on. However, if you have Macs with M1 chips, you don't have to do anything extra. You need to shut down the system and leave it for 30 seconds to reset SMC.
Fix 4. Shut Down your Mac and Reboot to Safe Mode
Sometimes, the Mac might freeze while trying to go to safe mode. In that case, the only option is to force the system shutdown. There are different ways you can shut down your Mac. Take a look:
Option 1. Press Command, Option, Control, and Power buttons simultaneously. It will close the running apps and shut down. Remember that holding the Power button for a long time will enter the system into Force Shutdown.
Option 2. However, if the method described above doesn't work, you need to shut it down forcefully. For that, press the Command, Power, and Control keys and hold them for some time. That will lead to a Force shutdown.
Option 3. Another way you can force the system shut down is by pressing the power button and holding it. It would help if you held the button until you saw the screen returns. After that, you can start the Mac in safe mode.
Recover Data on macOS Ventura/Big Sur/Mojave (Extra Tip)
In some cases, you might need to retrieve data loss due to issues with the macOS. In that case, you can opt for EaseUS Data Recovery Wizard Mac to recover data. It is the best way to restore lost files.
The EaseUS Data Recovery Wizard Mac is a professional data recovery software. One can retrieve the lost data in three easy steps. With this software, you can recover different types of data. These include videos, photos, emails, music files, pdfs, documents, etc. This highly efficient software can recover data without Time Machine backup.
You can recover the data from various Mac-based devices. These include a fusion drive, SSD and HDD, sd card, Time Machine backup drive, USB drive, etc. If you cannot retrieve the data, you can also contact the data experts for data recovery services.
Follow the steps below to recover data from macOS Ventura/Big Sur/Mojave/Catalina
Step 1. Select the drive to be scanned
In the main EaseUS Data Recovery Wizard window, there will be a list of the drives connected to your Mac. Select the drive you need to recover lost/deleted files from, and click the "Search for lost files" button.

Step 2. Select your lost data/files
EaseUS Data Recovery Wizard for Mac will immediately scan your selected disk volume and display the scanning results on the left pane. You can sort the results to find the wanted files if you are looking for certain files.

Step 3. Recover lost/deleted data
Once you have found the desired files, preview the files and then click "Recover" to begin the recovery of your deleted/lost Mac files.

Conclusion
Safe mode in Mac runs essential apps and features that are necessary. However, various reasons lead to the Mac not starting in safe mode. Luckily, there are different solutions to fix the issue. You can adapt the methods mentioned above to resolve the problem.
It is vital to choose the solution based on your needs. And if you face data loss during this hassle, you can opt for EaseUS Mac data recovery software. It is an easy-to-use yet reliable professional data recovery software. You can recover data from a camera, USB, memory card, hard drive, etc., with ease.
Mac Won't Start in Safe Mode FAQs
Now you know the different solutions to apply if your Mac won't start in safe mode. However, it would help if you learned more. For that, check out these questions and answers.
1. How to enter safe mode in Windows 10?
To enter safe mode Windows 10:
- Select Power and then restart at the sign-in screen.
- After that, press and hold the Shift key.
- When the PC restarts, you must go to the Choose an option screen.
- After that, press Troubleshoot, followed by Advanced options and Startup Settings.
- Now, press the Restart option. When restarting occurs, you need to press F4 or 4 to enter the computer in safe mode.
2. How do I force my Mac to start in Safe Mode?
To force your Mac to start in Safe Mode:
- Press the power button and hold it. It would be best if you did this till you see the Loading startup options.
- After that, press the Shift key and hold it.
- Then, press Continue in Safe Mode. The system will restart automatically.
3. How do I restart my Mac in Safe Mode?
To restart your Mac in safe mode, power up the system. As the Mac starts, press the Shift key and gold it. When you come across the login window, release it. Log into your system.
4. How to upgrade to macOS 13 Ventura?
Firstly, you will need to download the macOS 13 Ventura from the website and run the installer. After that, you need to go to System Preferences. There, you will see Software Update and press Upgrade Now. That will upgrade your system.
Was This Page Helpful?
Daisy is the Senior editor of the writing team for EaseUS. She has been working at EaseUS for over ten years, starting as a technical writer and moving on to being a team leader of the content group. As a professional author for over ten years, she writes a lot to help people overcome their tech troubles.
Brithny is a technology enthusiast, aiming to make readers' tech lives easy and enjoyable. She loves exploring new technologies and writing technical how-to tips. In her spare time, she loves sharing things about her game experience on Facebook or Twitter.
Related Articles
-
How to Fix Mac Stuck on Loading Screen [6 Straightforward Methods]
![author icon]() Dany/2026-06-30
Dany/2026-06-30 -
Can't Install macOS Ventura? Here Are the 9 Best Solutions
![author icon]() Brithny/2026-06-17
Brithny/2026-06-17 -
SSD Not Detected in BIOS | Top 8 Ways to Fix🔥
![author icon]() Jerry/2026-06-30
Jerry/2026-06-30 -
How to Increase Transfer Speed of External Hard Drive
![author icon]() Jean/2026-04-30
Jean/2026-04-30
EaseUS Data Recovery Services
EaseUS data recovery experts have uneaqualed expertise to repair disks/systems and salvage data from all devices like RAID, HDD, SSD, USB, etc.