Mac Won't Start/Boot After macOS High Sierra Update, Help!
"I upgraded my iMac into latest macOS High Sierra last night. And when I completed the update process, tried to start the computer. It won't boot.
I tried to hard reboot Mac computer, but nothing showed up. What else can I do to wake up the computer and make it work again with macOS High Sierra?"
Although Mac hard drive boot failure issue is not a new problem anymore. But it's still a tough case for ordinary users to fix when their Mac computers fail to boot after macOS High Sierra update or installation.
In addition, to prevent the inconvenience of losing important data, it is recommended that you back up your important files via EaseUS Data Recovery Wizard for Mac Pro before installing or updating macOS.
Back Up Your Mac and Never Lose Data
Back up and restore your MacBook/iMac without Time Machine, iCloud, or external hard drives.
If you are having such a problem, relax! This tutorial article will show you how to quickly fix and resolve Mac hard drive won't boot issue after macOS High Sierra update. Just follow any one of offered methods to get your Mac computer back to work again now:
Quick Fix 1. Reset SMC to fix Mac won't boot after High Sierra update
Sometimes, if the Mac computer cables are not connected properly, you may not be able to boot it normally. So if Mac cannot boot after system update, you can reset SMC to fix Mac won't boot issue after macOS High Sierra update:
1. Shut down Mac computer and unplug all cables;
2. Wait for a few minutes and then plug the cables back;
3. Restart Mac computer to see if you can enter the system or not.
Quick Fix 2. Force to reboot Mac and reset NVRAM to fix Mac won't boot issue
1. Press and hold Power button for a few minutes till Mac turns off;
2. Wait a few seconds and press Power button to turn on Mac;
3. Hold Command + Option + P + R keys while booting Mac to reset NVRAM;
4. Reboot computer again to see if the problem gets solved or not.
Note: If these two quick fixes didn't help, continue with below complete solutions to get your problem resolved now.
Fix Mac Won't Boot/Fails to Boot Error After macOS High Sierra Update
If you have important data saved in Mac computer hard drive, do remember to restore data before taking actions to fix Mac won't boot error.
1. Recover data when Mac hard drive won't boot from High Sierra
Professional Mac data recovery software with a bootable disk can help you effectively restore your data out of Mac hard drive when the computer fails to boot. You can directly purchase EaseUS Data Recovery Wizard for Mac with Bootable Media to create a bootable media for Mac and apply it to restore data from fail to boot Mac computer now:
When EaseUS Data Recovery Wizard for Mac launches, follow this tutorial to restore lost files on Mac.
Step 1. Install and run EaseUS Data Recovery Wizard for Mac on another Mac computer, and select "Unbootable Mac > Start".
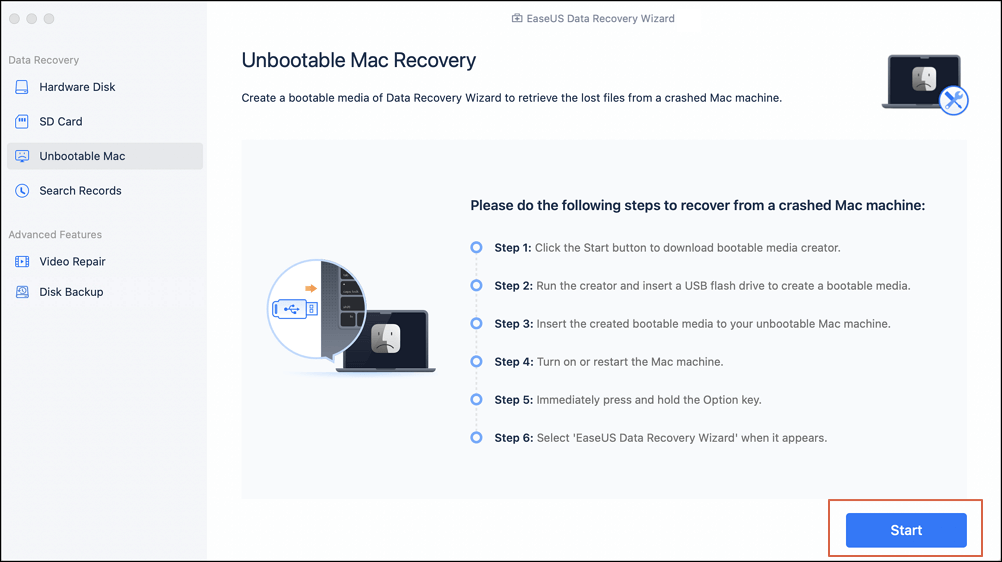
Step 2. Then, choose a prepared USB drive to create the bootable disc. Select "Next" to start creating the bootable disk.

- Warning
- The creator will prompt to erase the drive to reallocate the space; then it can write the bootable files to this drive. Please back up all USB files before processing "Eraser".
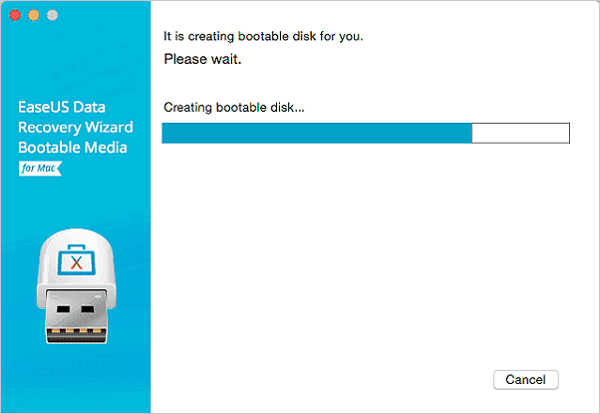
Step 3. The program starts to create a 2GB space and save the boot files. The rest space on the USB can be still used for storage.
Step 4. Once it completes, please follow the guide to boot the corrupted Mac from the bootable disc and start the recovery. We suggest you restore the data to an external hard drive.
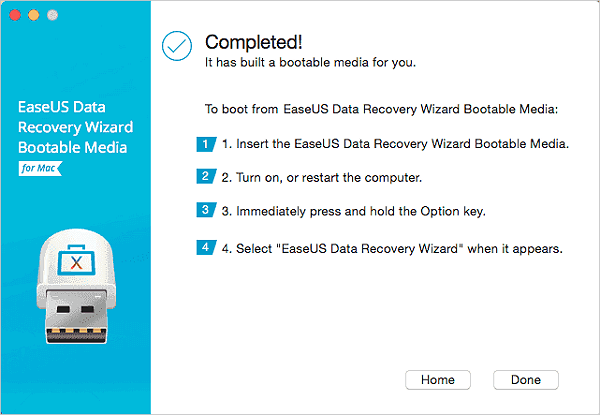
Step 5. After booting the Mac, launch EaseUS Data Recovery Wizard for Mac. Select the disk location (an internal HDD/SSD or a removable storage device) where you lost data and files. Then, this recovery tool will scan for lost files automatically.
Note: Before data recovery, you'd better create a backup of your Mac to avoid further data loss. After backing up, the software can recover data from the Mac backup, and your computer can wirte new data again.

2. Fix Mac won't boot error after macOS High Sierra update
Follow the methods to fix macOS High Sierra won't boot issue
Method 1. Boot Mac from Safe Mode to fix Mac won't boot issue
1. Turn on Mac, press Shift when you hear the startup sound and release it till you see Apple logo;
2. After Mac fully starts, restart the computer normally without holding any keys/buttons.
3. Wait patiently till Mac computer finish the reboot process.
Method 2. Use Disk Utility to restore Mac from Recovery Mode when macOS High Sierra won't boot
1. Boot Mac up, press Command + R during the boot-up process;
2. Click Disk Utility option > Click First Aid and try repairing Mac's disk;
3. Disk Utility will automatically run a fsck (file system check) operation to help you repair macOS High Sierra fail to boot error;
4. If this fails, try restore from Recovery mode.
5. Reinstall OS X in Recovery Mode will automatically download and install the latest macOS High Sierra for your Mac device.
Method 3. Run Terminal to repair Mac hard drive won't boot error due to High Sierra update
1. Open Terminal > Applications > Utilities;
Enter: system_profile SPExtensionsDataType > ~/Desktop/kextList.txt and hit return;
2. Open the kextList.txt file on desktop > Press Apple(Command) + F to bring up find;
3. In the find field insert "Obtained from: Not Signed" and copy the destination to the .kext file to a list for use later;
4. Click Next to cycle through all of them, for example: /System/Library/Extensions/JMicronATA.kext
5. Browse your drive to /System/Library/Extensions and remove all unsigned kext files;
6. Reboot and your Mac boot problem shall be all set.
Method 4. Reinstall macOS High Sierra to resolve Mac won't boot issue
The last method that you can try is to download macOS High Sierra and create a new bootable drive to clean install macOS High Sierra on Mac computer so to make it boot up normally and work smoothly again.
1. Connect USB bootable drive on Mac and restart Mac by holding Option till you hear the reboot tone;
2. Select disk called Install macOS High Sierra in the drive list that appears on screen;
3. Once USB drive is booted, select Disk Utility > Choose Mac's startup from the list > Click Erase;
4. Once Mac's startup disk is formatted, return to Utilities window and select Install macOS > Choose just erase startup drive to install macOS > Follow onscreen prompts to complete the installation.
This may take you a few hours to complete the task. And of course, if you have important data, follow Step 1 to get all saved data out firstly.
Was This Page Helpful?
Daisy is the Senior editor of the writing team for EaseUS. She has been working at EaseUS for over ten years, starting as a technical writer and moving on to being a team leader of the content group. As a professional author for over ten years, she writes a lot to help people overcome their tech troubles.
Written by Tracy King
Tracy became a member of the EaseUS content team in 2013. Being a technical writer for over 10 years, she is enthusiastic about sharing tips to assist readers in resolving complex issues in disk management, file transfer, PC & Mac performance optimization, etc., like an expert.
Related Articles
-
How Do I Format USB Drive on Linux? Linux Beginners in 2025
![author icon]() Tracy King/2025-01-24
Tracy King/2025-01-24 -
How to Change the Read/Write Permission on a Flash Disk/Memory Card
![author icon]() Jean/2025-01-24
Jean/2025-01-24 -
How to Force Mount External Hard Drive on a Mac with Step-Step Tutorial
![author icon]() Brithny/2025-01-24
Brithny/2025-01-24 -
How to Factory Reset ASUS Laptop from BIOS🔥
![author icon]() Jerry/2025-01-24
Jerry/2025-01-24
EaseUS Data Recovery Services
EaseUS data recovery experts have uneaqualed expertise to repair disks/systems and salvage data from all devices like RAID, HDD, SSD, USB, etc.