100% disk usage in task manager in Windows 10
"I use Dell laptop with 8GB RAM, and it is running Windows 10. Lately, the device seemingly stalls a lot, and the task manager shows highlighted 100% disk usage. That's really annoying, so I ended many tasks at once. However, a few minutes later, the disk usage becomes 100% again! This situation lasts for a couple of weeks, and deleting files in the hard drive does not work either. How can I fix 100% disk usage error in Windows 10?If I had to upgrade hard disk, also how?"
Many reasons cause 100% disk usage in Windows 10. These are the typical ones you may refer to your own case.
1. ill service from Superfetch and Prefetch
Windows 10 includes Superfetch and Prefetch services, which are supposed to improve performance by predicting tasks that a user is likely to perform and preloading required applications into memory. Likewise, these services are also responsible for the occurrences of high disk usage on Windows 10 computers.
2. Viruses and malware
We hate disgusting viruses and malicious software, but they are anywhere beyond our notice. They take up excessive resource usage, causing your programs running on insufficient space.
3. The common combination of programs like Skype and Google Chrome
As investigated, a common major of the 100% disk usage issue in Windows 10 is the combination of running Skype and Google Chrome. It might be some other programs combination as well.
4. Hardware issue
The existence of corrupted files on your computer hard drive sends your computer into a loop with a high disk usage.
Your computer hard drive might be too old to work properly, even there is plenty of unused space available, still, your computer functions like a turtle.
Read Also:
7 Ways to Fix 99% Disk Usage on Windows
Discover effective solutions to resolve 99% disk usage issues on Windows. Follow seven methods to optimize your system's performance efficiently.
How to Fix 100% disk usage on Windows 10 computer?
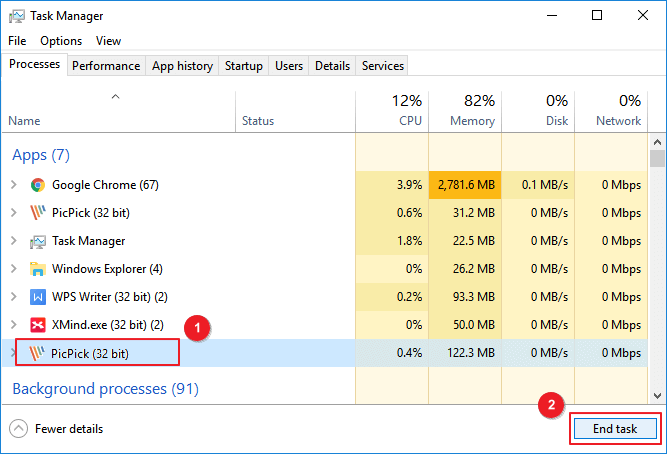
Now you need to confirm the high disk usage error by pressing CTRL+ALT+DEL and selecting task manager. In the processes tab, you'll find the highlighted disk volume with red. on the left displayed all the tasks that are going on. To fix the problem of your case, you may have a try with following solutions.
1. Eliminate viruses and malware
Use antivirus software to scan the virus infected files. Clear them off.
2. Disable Superfetch service
Type services.msc in Windows 10 search box, find Superfetch, right-click on it and go to Properties. Locate Startup Type and choose Disabled, click OK to save the settings.
3. Disable Prefetch
Type regedit in Windows 10 search box to open registry editor. Go to \HKEY_LOCAL_MACHINE\SYSTEM. By clicking on successive folders, navigate to HKEY_LOCAL_MACHINE\SYSTEM\CurrentControlSet\Control\Session Manager\Memory Management\PerfetchParameters. Double click on EnablePrefetcher, then completely disable Prefetcher by changing the Value data to 0 on DWORD window.
4. Replace hard drive
You should figure out whether this error is caused by failing hard drive in an easy way. Do you notice some hard drive problems like making a loud clicking sound? Is it because the computer's hard drive too old-fashioned in capacity? In this case, you'd better upgrade hard disk as soon as possible.
Use EaseUS Windows backup software to upgrade the hard disk to a bigger one or a new one without reinstalling Windows 10 operating system and applications. It's a very fast and convenient way to replace your failing hard drive and solve 100% disk usage error in Windows 10 computer.
Steps to upgrade hard disk with EaseUS Todo Backup:
Step 1. On the main page, find and click "Tools". You can see clone and other utilities.

Step 2. Choose the source disk or partition, click "Next".
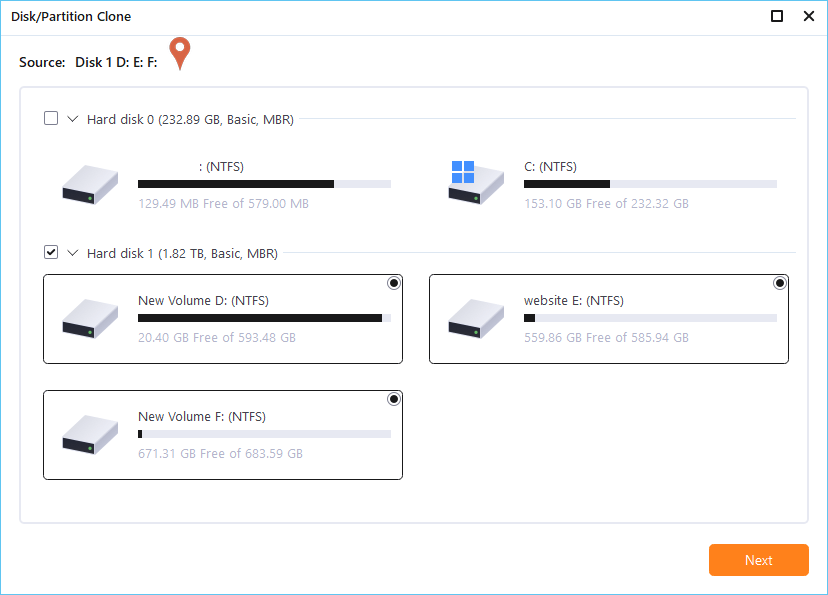
Step 3. Then you need to choose the target disk. Make sure the target disk is larger than the source disk or partition.
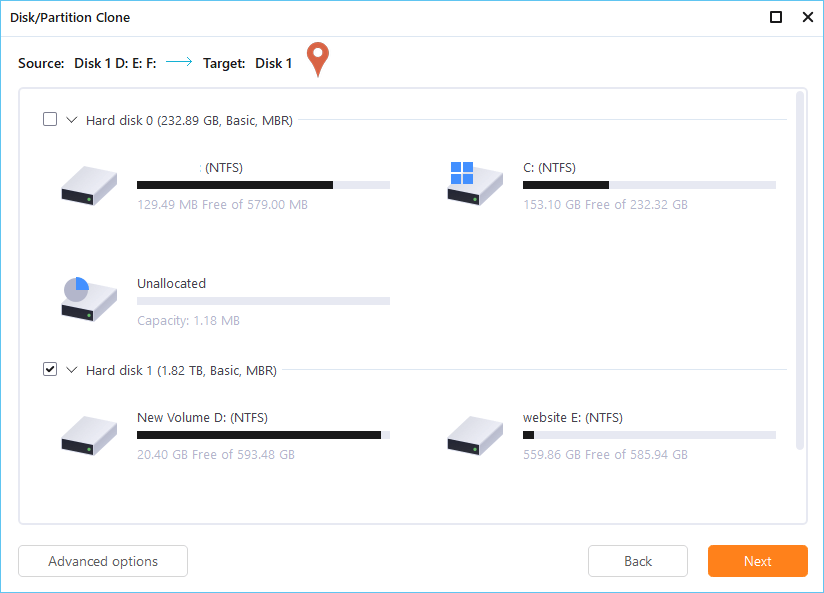
Step 4. A warning window will inform you that clone would permanently wipe out all data on the target disk/partition, if you want to start clone, click "Continue."

Was This Page Helpful?
Cici is the junior editor of the writing team of EaseUS. She accepted the systematic training on computers at EaseUS for over one year. Now, she wrote a lot of professional articles to help people resolve the issues of hard drive corruption, computer boot errors, and disk partition problems.
Jean is recognized as one of the most professional writers in EaseUS. She has kept improving her writing skills over the past 10 years and helped millions of her readers solve their tech problems on PC, Mac, and iOS devices.
Related Articles
-
What's The Best SSD Allocation Unit Size in Windows 11/10
![author icon]() Cici/2024-02-14
Cici/2024-02-14 -
5 Simple Ways to Zoom Out on Mac
![author icon]() Daisy/2024-01-11
Daisy/2024-01-11 -
Fixed: Chrome Browser Not Open/Working in Windows 10 Creator
![author icon]() Tracy King/2024-05-23
Tracy King/2024-05-23 -
How to Erase and Reinstall Mac | Sonoma Available
![author icon]() Dany/2024-01-11
Dany/2024-01-11

EaseUS Data Recovery Services
EaseUS data recovery experts have uneaqualed expertise to repair disks/systems and salvage data from all devices like RAID, HDD, SSD, USB, etc.