AutoSave switch greyed out, how to fix
"The Office AutoSave feature seems greyed out and is not available to work in my Office 2016 applications. I tried to turn on the AutoSave feature in the Excel and the Word so that I can automatically save important files while editing them.
However, I tried on both Word and Excel applications, the AutoSave was not available to work. I have to save and backup Word and Excel document files in a manual way. So does anyone know how to resolve the AutoSave not working issue and enable Word/Excel to autosave files again?"
According to Microsoft community, AutoSave not working or not available issue has been continuously bringing ordinary users problems on saving and backing up useful Office Excel or Word files. So how to fix the AutoSave switch greyed out error? And is it possible to automatically backup Word or Excel etc. Office files when the AutoSave feature is not working? Fortunately, reliable methods for solving this issue have been found, and they are available here to help you out now.
Fix AutoSave Is Not Working, Greyed Out or Not available Error Now
If your Office Word, Excel is not working to automatically save files or fail to create temp files for the under-editing document, just follow provided solutions to resolve this issue now you own now.
Method 1. Use AutoSave alternative to back up Office, Word, Excel files
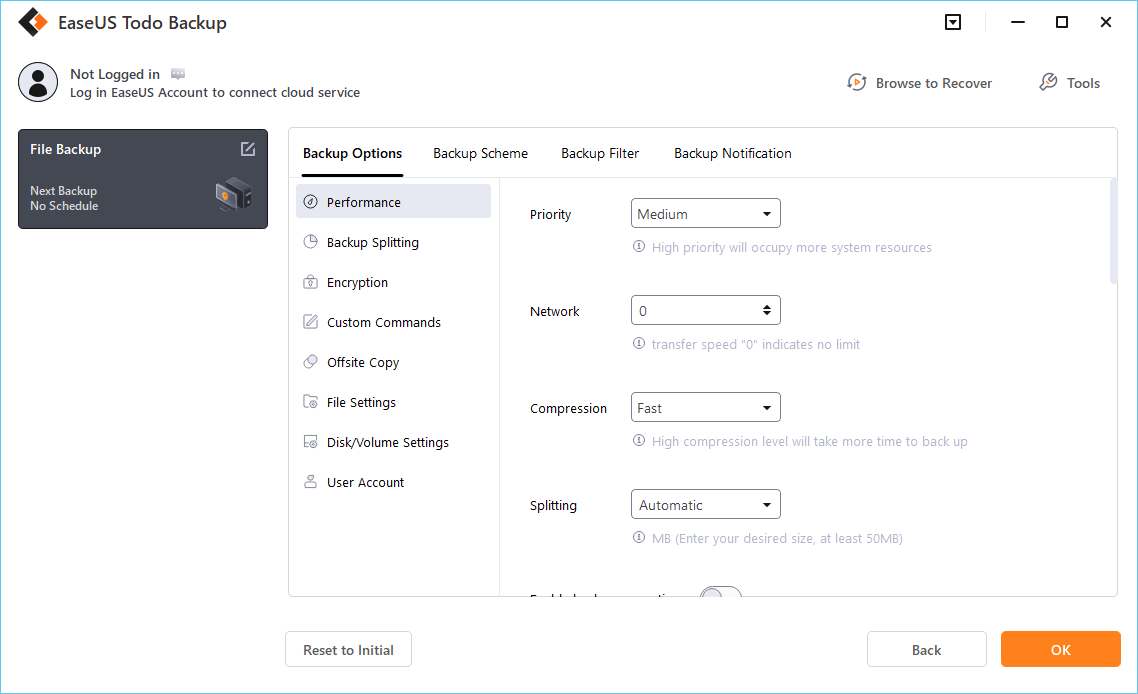
When the AutoSave feature is not working on your computer for saving or backup Word, Excel files, you can turn to an alternative tool - EaseUS Todo Backup to automatically backup your files with simple clicks.
EaseUS Todo Backup can only help you backup saved Word or Excel document files automatically. If you want to auto-save files that are under editing, you’ll have to do the saving job on your own.
If you want to backup target Office files such as Word or Excel document automatically with 100% free tool, EaseUS Todo Backup free can help. And you may install and apply this free alternative software to backup your Word or Excel files with ease now:
Secure Download
Step 1. Launch EaseUS Todo Backup and choose "Create Backup" on the home page, click "Select backup contents".

Step 2. Among the four available categories, click "OS" to start back up.

Step 3. The system partition will be automatically selected, you only need to select the location.

Step 4. Local Drive, Cloud, and NAS are available for you to save the backup file. You can also connect an external hard drive to preserve the system backup files.

Step 5. You can customize the settings in "Options" at the left bottom. After that, click "Backup Now", and the process will begin.

*After finishing the backup process, you can check the backup status, recover, open, or delete the backup by right-clicking the backup task on the left.
After the first time full backup, your Excel, Word or even PPT, etc. Office files will be backup automatically without any further operation.
Method 2. Try to enable AutoSave feature in Office, Excel, Word
When the AutoSave feature is not working to save your files automatically in Word or Excel, you can try to enable AutoSave feature in Office application to see if it helps or not.
Here we’ll take Excel as an example to show you how to enable AutoSave feature in Excel/Word etc Office applications:
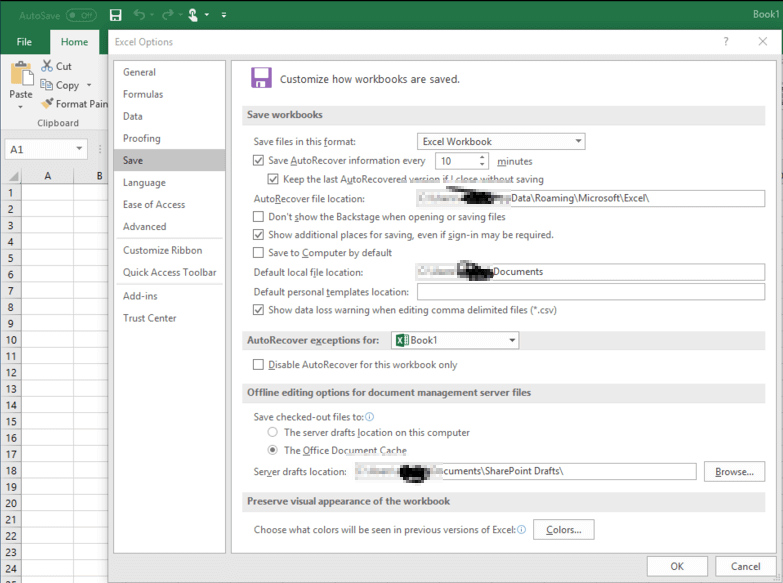
Step 1. Open an Excel or Word file, to go "File", and click "Options".
Step 2. Go to "Save" and check "Save AutoRecover information every ** minute" to enable the AutoRecover feature in Word/Excel application.

With this, you’ll be able to save your Excel or Word document every ** minute as you wish.
As we all know that AutoSave will be turned on when you save your file in a cloud service such as OneDrive, OneDrive or Business or SharePoint. You can you continue below tips to enable AutoSave feature now:
Step 3. Open a Word or Excel file, choose "File" > "Account" > "Update Options" > "Update Now".
Step 4. Open Office app, click "File" > "Open" and navigate to the server location (OneDrive or SharePoint).
Step 5. Use a web browser, open the file directly from OneDrive or SharePoint where the file is stored.
After this, you should be able to autosave Word or Excel file on your own now.
Method 3. Uninstall and reinstall Office application to repair not working AutoSave feature
The last way that you can try to repair the not working AutoSave feature in Office application is to uninstall and reinstall Office on your PC.
You can directly uninstall it from your computer and then redownload it from the Windows Store, and install on your PC.
After this, you can sign in your Office account if you have one and then check whether the AutoSave feature is available now.
Was This Page Helpful?
Daisy is the Senior editor of the writing team for EaseUS. She has been working at EaseUS for over ten years, starting as a technical writer and moving on to being a team leader of the content group. As a professional author for over ten years, she writes a lot to help people overcome their tech troubles.
Written by Tracy King
Tracy became a member of the EaseUS content team in 2013. Being a technical writer for over 10 years, she is enthusiastic about sharing tips to assist readers in resolving complex issues in disk management, file transfer, PC & Mac performance optimization, etc., like an expert.
Related Articles
-
Fix A Device Which Does Not Exist Was Specified [100% Working Solutions]
![author icon]() Cici/2024-01-11
Cici/2024-01-11 -
How to Upload Video to Google Drive [Step-by-Step Tutorial]
![author icon]() Brithny/2024-05-28
Brithny/2024-05-28 -
How to Get Windows 10 for Free [Full Guide in 2024]
![author icon]() Jean/2024-05-13
Jean/2024-05-13 -
How to Connect HP Printer to WiFi? Follow A Full Guide
![author icon]() Daisy/2024-01-11
Daisy/2024-01-11
EaseUS Data Recovery Services
EaseUS data recovery experts have uneaqualed expertise to repair disks/systems and salvage data from all devices like RAID, HDD, SSD, USB, etc.
