The disk space usage bar provides users with an intuitive overview of the current disk utilization. However, some users have reported that they cannot see one of the space bars, and some said that they can't view all disk space bars in the default view (Tiles view mode).

Encountering this crucial disk space usage bar missing can be disconcerting and hinder effective storage management. If you are looking for a way to recover the disk space bar, keep reading this article from EaseUS to learn how.
Why the Disk Space Usage Bar Is Missing
Normally, you can see the drive storage usage bar and detailed text information about the usage in tiling mode. But when the bar goes missing, you may wonder why. Here are some possible causes of the issue.
- RAW file system: When the file system of a drive is corrupted or missing, the drive will be shown as RAW, and the space bar will be missing.
- Incorrect settings: It is possible that you can't view the disk space usage bar if you set File Explorer inappropriately.
- Broken registry: If the related registry items are broken, the drive usage bar can be invisible.
- Limited permission: Some users may encounter the disk space usage bar missing if there's no full permission.
Fix 1. Reset Folders View
When the disk space usage bar is missing, the first try is resetting the folders view in File Explorer Options. Here are the steps:
Step 1. Open This PC on the desktop or press "Windows" + "E" to open File Explorer and go to This PC from the left pane.
Step 2. Follow the step here to open the File Explorer Options:
- For Windows 10: Click "File" in the left upper corner and select "Change folder and search options."
- For Windows 11: Click the three-dot icon in the upper bar and select "Options."
Step 3. A new window will pop up. Go to the "View" tab and click "Reset Folders."
Now, the folders view will be reset to the default settings. Go back to This PC and see if the disk space usage bar has been recovered.
Fix 2. Modify TileInfo Registry Value
If the first method doesn't resolve the issue, editing the registry value data can be another workable solution. Check below to modify the value of TileInfo:
Step 1. Press "Windows" + "R" to open the Run box.
Step 2. Enter regedit to open the Registry Editor.
Step 3. Go to Computer\HKEY_CLASSES_ROOT\Drive and find "TileInfo."
- Tip
- If your system doesn't have TileInfo string, right-click on the Drive folder, select "New" > "String Value," and name it as TileInfo.
Step 4. Right-click on "TileInfo" and select "Modify." Then, change its Value data to prop:*System.PercentFull;System.Computer.DecoratedFreeSpace;System.Volume.FileSystem

Step 5. Hit "OK" to save the change.
Feel free to share this article on your social media to help others who also lost the storage usage bar on their PC.
Fix 3. Reformat the Drive
If the drive is not formatted correctly and it has no file system, it will be shown as RAW in Disk Management. Thus, you can recover the disk space usage bar by reformatting the drive as NTFS or FAT32.
Step 1. Search for Disk Management in the Windows search box and open it.
Step 2. Right-click on the drive that is shown as RAW and select "Format."

Step 3. Set the File system as "NTFS" and hit "OK" to confirm.
Now, open This PC and check if you can view the drive space usage bar. If you can't format the drive in Disk Management, the following pages can help.
Fix 4. Fix Corrupted File System
A drive doesn't show the space usage bar and is shown as RAW can also be caused by the missing or corrupted file system. You might see an error message saying, "The disk structure is corrupted and unreadable." when opening that drive.

To fix this, you'll need a professional tool to fix such an error. EaseUS Partition Master Free offers users a feature to check the file system. It will automatically fix errors if detected.
Follow the steps below to fix the faulty file system and recover the storage bar:
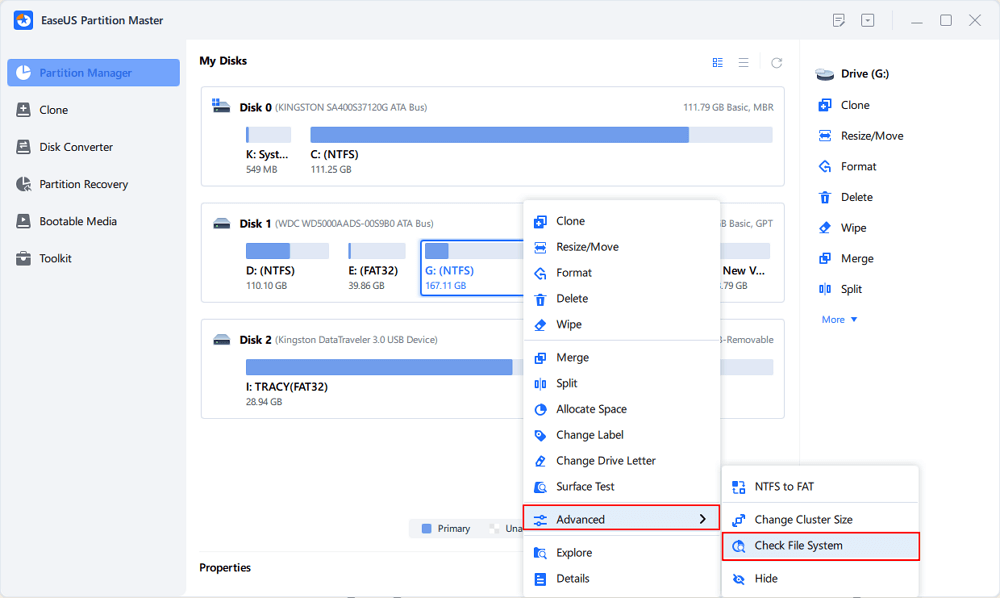
Step 1. Open EaseUS Partition Master on your computer. Then, locate the disk, right-click the partition you want to check, and choose "Advanced" > "Check File System".

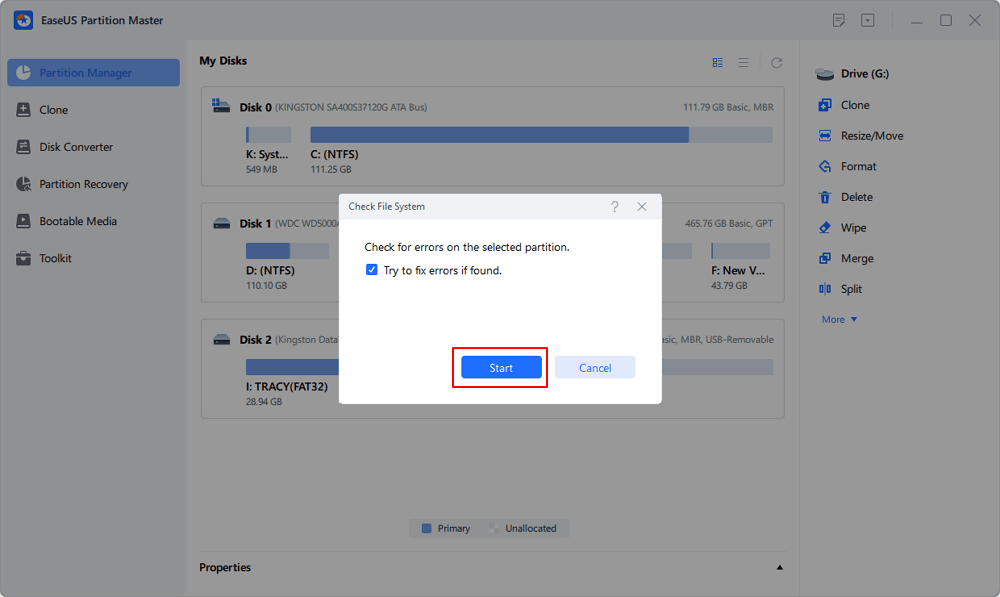
Step 2. In the Check File System window, keep the "Try to fix errors if found" option selected and click "Start".

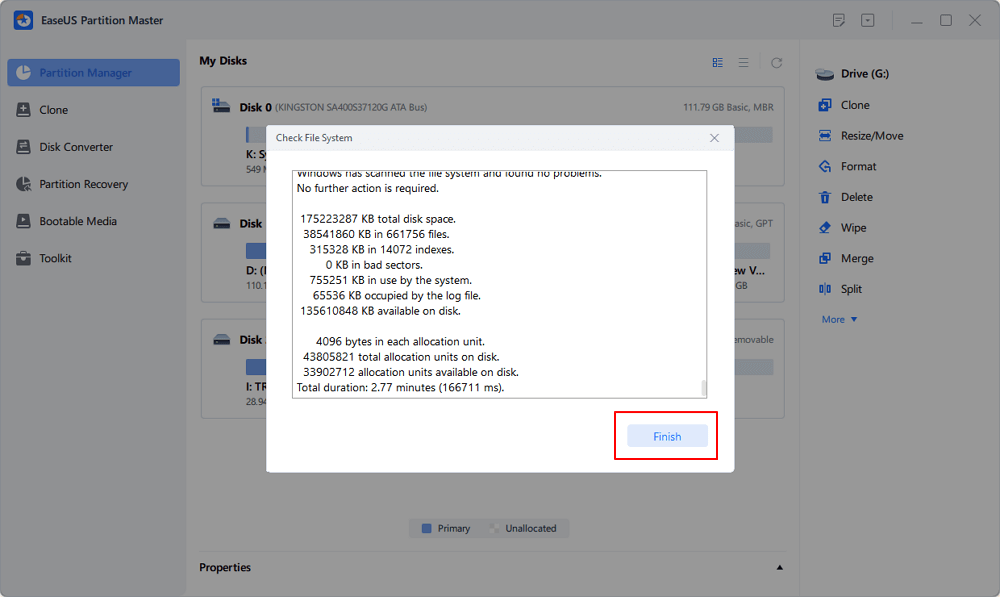
Step 3. The software will begin checking your partition file system on your disk. When it completes, click "Finish".

Fix 5. Set Permission to Full Control
Some users may not be able to view both the disk space usage bar and the drive properties. This is because you don't have full permission on that drive. In this case, change the permission to full control to solve the problem.
Step 1. Right-click on the drive that has no space bar and select "Properties."
Step 2. Go to the "Security" section and hit "Advanced" at the bottom right.
Step 3. In the Advanced Security Settings window, hit the blue "Change" link in the Owner field.
Step 4. In the Select User or Group window, click "Advanced" and hit "Find now" in the next window.

Step 5. Select your user name from the list and click "OK."
Step 6. Click "OK" for each window and go back to the Properties window.
Step 7. In the Security tab, select your user name and click "Edit" under the Group or user names field.
Step 8. Check the Allow box next to Full control in the Permissions field.

Fix 6. Shorten the Volume Label
If it's just the text information is missing, but the space usage bar is visible, you can fix it by simply shortening the volume label. The drive shows three lines of info in the Tiles view mode: volume label with drive letter, disk space usage bar, and text information.
If the volume label is too long, the info will wrap to the second line, leading to insufficient space to display the text info.

You can shorten the volume label of the drive by doing so:
Step 1. Open This PC, right-click on the target drive, and choose "Rename."
Step 2. Type in a shorter label and hit "Enter" to confirm.

Then, you'll be able to see the full information of the drive.
If you are able to see the disk space usage bar successfully after trying one of these methods, don't forget to share this informative article with others.
Conclusion
The disk space usage bar missing issue can be perplexing, but it can also be effectively resolved through diligent troubleshooting in this article. From resetting folders view to shortening the volume label, this page covers almost all the possible solutions to this issue. Try each of them till you can view the disk space usage bar!
FAQs on Disk Space Usage Bar Missing
-
Q1. How do I show the disk space bar in Windows 10?
-
To show the disk space bar in File Explorer, you should:
- Open File Explorer.
- Click the "View" tab in the File Ribbon and select "Tiles" as view mode.
Then the disk space bar will be displayed in your Windows.
-
Q2. Why did all my disk space disappear?
- File system errors caused by corrupted disk integrity or drives may cause all disk space to disappear.
-
Q3. What is a low disk space warning?
- The low disk space warning means that your disk is running out of free space, and soon, it won't be able to store more programs and data. You need to free up some storage space to fix this issue
Was This Page Helpful?
Oliver is an EaseUS professional writer who dares explore new areas. With a passion for solving tech issues with straightforward guides for common users, Oliver keeps honing his writing craft by developing in-depth solutions for disk and partition management, computer boot-up issues, file transfer, etc.
Related Articles
-
Fix 99% or 100% High CPU Usage Issue in Windows 10 Fall Creators
![author icon]() Tracy King/2024-08-22
Tracy King/2024-08-22 -
A Complete Guide to macOS Big Sur Download and Install (Version 11)
![author icon]() Brithny/2024-10-15
Brithny/2024-10-15 -
How to Restore Mac to a Previous Date with Time Machine/Migration Assistant/Recovery Software
![author icon]() Dany/2024-10-25
Dany/2024-10-25 -
(Top 8 Ways) How to Fix Windows 10 Black Screen with Cursor
![author icon]() Jerry/2024-11-25
Jerry/2024-11-25
EaseUS Data Recovery Services
EaseUS data recovery experts have uneaqualed expertise to repair disks/systems and salvage data from all devices like RAID, HDD, SSD, USB, etc.
