
Content
Page Table of Contents
About the Author
Hot Topics

Updated on Nov 06, 2026
Do you connect your SSD to a Windows PC but cannot find it in File Explorer? You open This PC, but the SSD is not listed. You might also find that a new SSD does not appear after installation.
There are several reasons for this problem. The SSD might not have a drive letter, or it could still be uninitialized. Sometimes, Windows detects the disk but does not display its partition. A connection or driver problem is another possibility.
In this guide, I will show you six ways to fix an SSD not showing up in File Explorer in Windows 11/10. You will also learn how to check the SSD connection and identify the problem before making changes.
SSD not showing up in file explorer
by u/GeniusAlpaca in techsupport
Why Is My SSD Not Showing Up in File Explorer?
Not every missing SSD has the same problem. A new drive might simply need to be initialized, while an SSD you've used for months could have lost its drive letter.
Here are several reasons:
- No drive letter: The partition exists, but Windows has not assigned it a letter such as D: or E:.
- Not Initialized: The SSD is new or its partition information is no longer recognized by Windows.
- Unallocated space: The drive has no usable partition.
- Offline status: Disk Management detects the SSD, but the disk is currently offline.
- Driver issue: Windows has trouble communicating with the SSD or its storage controller.
- Bad connection: A loose cable, faulty USB port, or improperly installed M.2 drive prevents detection.
- File system problem: The partition has a damaged or unsupported file system.
How to Fix SSD Not Showing Up in File Explorer
There are several ways to get your SSD working in File Explorer again. The right fix depends on whether Windows detects the drive and how it appears in Disk Management. The following methods cover common SSD issues, from missing drive letters to connection and driver problems.
Before You Start: Check the SSD Connection
Sometimes the problem has nothing to do with Windows. A new internal SSD might not be seated correctly, or an external SSD disconnects because of a damaged cable.
A few quick checks can help narrow it down:
- Unplug the SSD and connect it again.
- Try a different USB port, preferably one directly on the PC rather than through a USB hub.
- Swap the USB or SATA cable if another one is available.
- Connect the external SSD to another computer.
- For a SATA SSD, check both the power and data connections.
- For an M.2 SSD, make sure it is fully inserted into the slot and secured with its screw.
There is another useful check for internal drives: enter BIOS/UEFI and look at the storage device list. If the SSD is not listed there, Windows troubleshooting probably won't help yet. Check the drive installation, motherboard slot, and SSD itself.
- Notice:
- If this SSD contains photos, documents, or other files you need, don't initialize or format it just because Windows asks you to. An existing drive that suddenly becomes Not Initialized or Unallocated could have a partition problem.
Fix 1. Assign a Drive Letter to the SSD
Have you opened Disk Management and found the SSD, but still can't see it in File Explorer? Look at the partition. If it shows Healthy but has no drive letter, Windows has not assigned one to the volume.
You don't need to format the partition. Add a letter instead.
Step 1. Press Win + X and open Disk Management.
Step 2. Find the SSD partition without a drive letter.
Step 3. Right-click it and choose Change Drive Letter and Paths.
- Tip
- If the Change Drive Letter option is unavailable, check the partition's file system and status before trying to force a change.
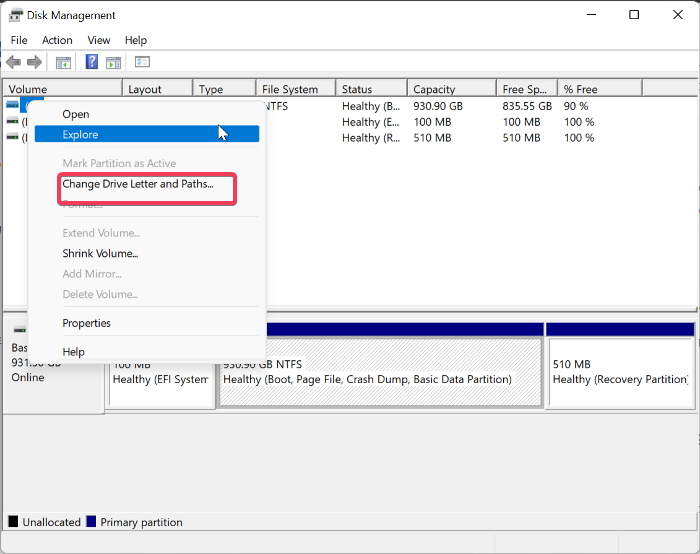
Step 4. Click Add and select an available letter.
Step 5. Click OK.
Now open File Explorer and look under This PC. The SSD should be listed there.
Fix 2. Bring the SSD Online
Take another look at the disk label on the left side of Disk Management. Does it say Offline? This can happen with a secondary SSD connected to a Windows PC. The drive is recognized, but Windows hasn't brought it online. You can change its status from the same window.
Step 1. Open Disk Management.
Step 2. Locate the SSD marked Offline.
Step 3. Right-click the disk label on the left, not the partition area.
Step 4. Select Online.
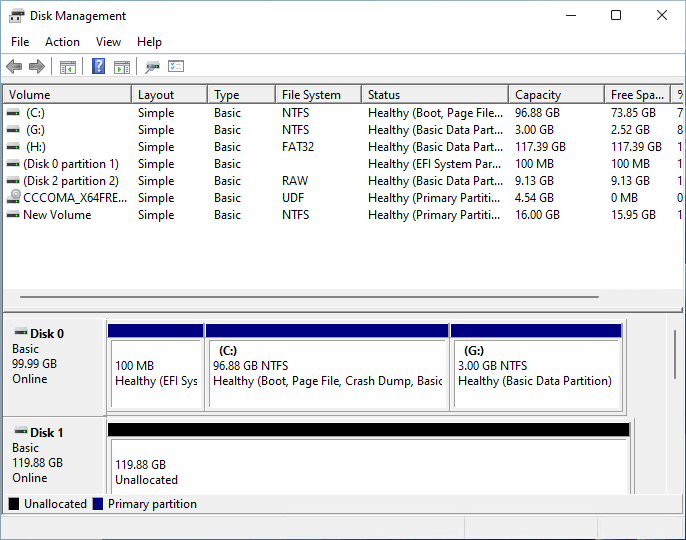
Give Windows a moment to update the disk status, then check File Explorer.
If the disk refuses to go online, read the message Windows displays. A disk signature collision or another disk configuration issue might be involved. Don't delete or change disk signatures without understanding the cause.
Fix 3. Initialize the SSD
Just bought a new SSD and connected it to your computer? It might appear in Disk Management as Unknown and Not Initialized. This is normal for a disk that hasn't been set up yet.
Windows needs a partition style before you can create volumes on the SSD. You will usually see two choices:
- MBR: An older partition style with a maximum disk size of 2 TB.
- GPT: A newer format that supports larger drives and works well with modern Windows systems.
If you want a straightforward way to prepare a new SSD, EaseUS Partition Master offers a simpler graphical interface. You can initialize the disk and select MBR or GPT without navigating through multiple Disk Management menus. The software also lets you create partitions and assign drive letters, so you can complete the basic SSD setup in one place.
Here is how to initialize a disk with EaseUS Partition Master.
Step 1. Open EaseUS Partition Master and got to Partition Manager.
Step 2. Right-click the target disk - HDD or SSD and select "Initialize to MBR" or "Initialize to GPT". Click "Execute Task" and "Apply" to save the changes.
0:00-0:18 Initialize to MBR; 0:19-0:44 Initialize to GPT;
Fix 4. Create a New Partition on the SSD
After initialization, the SSD usually appears with a black bar and the label Unallocated. You won't find it in File Explorer yet because Windows has no volume to display. Use the New Simple Volume wizard to set up the space.
This is also useful if you have an empty SSD that you want to divide into one or more partitions. However, don't use it on unallocated space that previously contained important files. That space could be the result of a lost or damaged partition.
Step 1. In Disk Management, right-click the SSD's Unallocated space.
Step 2. Select New Simple Volume.
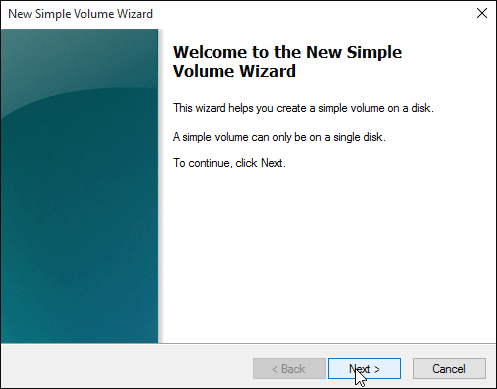
Step 3. Click Next and enter the volume size. Leave the default value if you want to use the entire available space.
Step 4. Choose a drive letter.
Step 5. Select NTFS as the file system and enter a volume label.
Step 6. Click Next, then Finish.
Disk Management works for basic tasks, but it isn't always convenient when you need to do more than create a single volume. EaseUS Partition Master brings common partition operations together in one interface. You can initialize a disk, create or format partitions, assign drive letters, and resize existing volumes. It is another option for preparing a new SSD or organizing its storage space.
Fix 5. Update or Reinstall SSD Drivers
An SSD that worked before but suddenly disappears deserves a driver check, especially if the problem started after a Windows update or hardware change.
Open Device Manager and see whether Windows lists the drive.
Step 1. Press Win + X and select Device Manager.
Step 2. Expand Disk drives.
Step 3. Right-click your SSD and select Update driver.

Step 4. Choose Search automatically for drivers.
Step 5. Follow the on-screen instructions and restart the computer.
If updating the driver doesn't change anything, reinstall the device:
Step 1. Return to Device Manager.
Step 2. Expand Disk drives.
Step 3. Right-click the SSD and select Uninstall device.
Step 4. Confirm the action.
Step 5. Restart Windows.
Windows will try to detect the SSD again and reinstall its device driver.
Fix 6. Rescan Disks and Check BIOS/UEFI
You've checked the connection, but the SSD is still missing from Disk Management. Before going further, ask Windows to scan for connected disks again.
Step 1. Open Disk Management.
Step 2. Click Action in the menu bar.
Step 3. Select Rescan Disks.
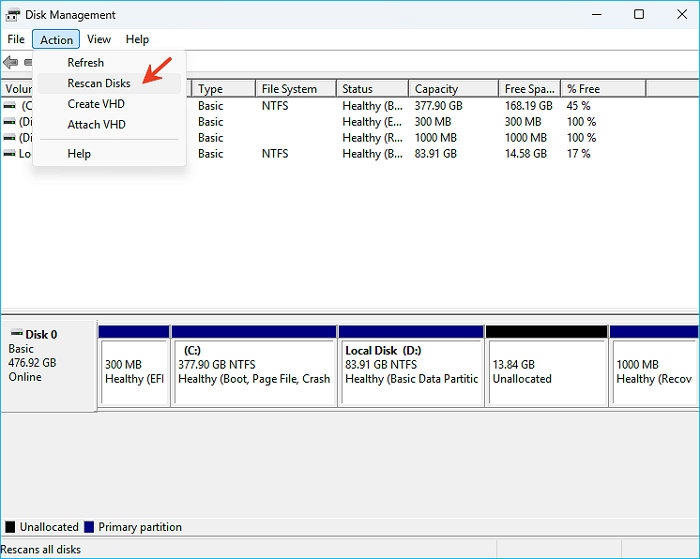
Step 4. Wait for the scan to finish and see whether the SSD appears.
If nothing changes, restart the PC and enter BIOS/UEFI. Check the storage information to see whether the motherboard recognizes the SSD.
For internal drives, there are a few things worth looking at:
- SATA SSD: Check whether the SATA port is enabled and whether the drive's power and data cables are connected.
- M.2 NVMe SSD: Confirm that the motherboard supports NVMe in the slot you're using. Not every M.2 slot supports the same drive types.
- Motherboard slot restrictions: Some boards share lanes between M.2 slots and SATA ports. Installing an M.2 drive can disable certain SATA connections. The motherboard manual explains which ports are affected.
The BIOS/UEFI check gives you a useful clue:
- If the SSD appears in BIOS/UEFI but not Windows, investigate the storage controller driver and Windows disk configuration.
- If the SSD is missing from BIOS/UEFI, focus on the physical connection, SSD, or motherboard slot.
Conclusion
When an SSD doesn't appear in File Explorer, Disk Management is the first place to look. A missing drive letter or an Offline status is usually straightforward to fix. A new SSD might need initialization and a new volume, while a drive that Windows cannot detect at all requires a closer look at its connection and drivers.
Be careful with an SSD that already contains files. Formatting and initialization are not general-purpose fixes for a missing drive. Find out why Windows cannot access it before making changes to its partitions.
FAQs
1. Why is my SSD showing in Device Manager but not File Explorer?
Device Manager can detect the physical SSD even when it has no usable volume in Windows. Open Disk Management and check whether the drive is Unallocated, Offline, or missing a drive letter. If the partition is Healthy but has no letter, assign one through Change Drive Letter and Paths.
2. Why is my SSD not showing up in Disk Management?
Start with the connection. An external SSD might have a faulty cable or USB port, while an internal drive could be improperly installed or connected to an inactive port.
Try another USB port or cable, then check Device Manager and BIOS/UEFI. If neither Windows nor BIOS/UEFI detects the SSD, the drive or its connection might have a hardware problem.
3. How do I make a new SSD appear in File Explorer?
A new SSD needs to be initialized and have a volume with a drive letter. Open Disk Management, initialize the disk using GPT, and right-click its Unallocated space to create a New Simple Volume. Select NTFS and assign a drive letter. The new volume will then appear in File Explorer.
4. Why is my external SSD not showing up in File Explorer?
A loose USB connection, damaged cable, or faulty port can stop an external SSD from appearing. A missing drive letter is another common possibility. Connect the SSD to another USB port or computer. If it appears in Disk Management, check its partition status and whether Windows has assigned a drive letter.
How Can We Help You
About the Author
Updated by Joey Albert
Joey is an enthusiast of science and technology. With a passion for uncovering the latest tech innovations, she creates clear, engaging how-to guides that make technology accessible and enjoyable for all.
Product Reviews
-
I love that the changes you make with EaseUS Partition Master Free aren't immediately applied to the disks. It makes it way easier to play out what will happen after you've made all the changes. I also think the overall look and feel of EaseUS Partition Master Free makes whatever you're doing with your computer's partitions easy.
Read More -
Partition Master Free can Resize, Move, Merge, Migrate, and Copy disks or partitions; convert to local, change label, defragment, check and explore partition; and much more. A premium upgrade adds free tech support and the ability to resize dynamic volumes.
Read More -
It won't hot image your drives or align them, but since it's coupled with a partition manager, it allows you do perform many tasks at once, instead of just cloning drives. You can move partitions around, resize them, defragment, and more, along with the other tools you'd expect from a cloning tool.
Read More
Related Articles
-
[Solved] Can't Resize exFAT Partition with Unallocated Space
![Cici]() Cici/2026/10/30
-
How to Partition Hard Drive without Formatting in Windows
![Jean]() Jean/2026/10/30
-
Valorant Vgk.sys Blue Screen Error | Fix in 9 Ways
![Oliver]() Oliver/2026/10/30
-
USB Partition Tool/Manager: Partition USB or Create Portable USB Drive
![Brithny]() Brithny/2026/10/31
 Cici/2026/10/30
 Jean/2026/10/30
 Oliver/2026/10/30
 Brithny/2026/10/31