





 About the Author
 Reviews and Awards
 Mac SD Card Recovery
You're on a Mac, and you just formatted an external drive that was using NTFS – the native Windows file system. Maybe you wanted to erase it, or perhaps Disk Utility seemed like the right place to fix a problem. The painful truth: macOS cannot properly repair or recover an NTFS partition. By default, Macs are read‑only with NTFS. Disk Utility's First Aid simply doesn't work on it.
But don't panic. Recovering formatted NTFS partitions on Mac is absolutely possible – if you follow the right steps and avoid common mistakes. Our team has handled hundreds of these cases, and we'll show you exactly what works.
Why macOS Native Tools Can't Help with Formatted NTFS
Apple doesn't license the full NTFS write/repair capabilities from Microsoft. So when you try to use Disk Utility to fix or recover a formatted NTFS partition, the system essentially refuses to modify the drive structure. Worse, any attempt to "repair" may create additional confusion without benefiting recovery.
That's why third‑party solutions are required. The good news: because formatting usually just rewrites the file system metadata (not the actual file contents), most of your data remains on the drive – recoverable.
Method 1. Use Professional NTFS Recovery Software on Mac
Our team consistently recommends EaseUS Data Recovery Wizard for Mac for this scenario. It handles formatted NTFS partitions, preserves folder structures, and works without requiring Terminal commands.
Check out the following steps to recover a formatted hard drive on your Mac:
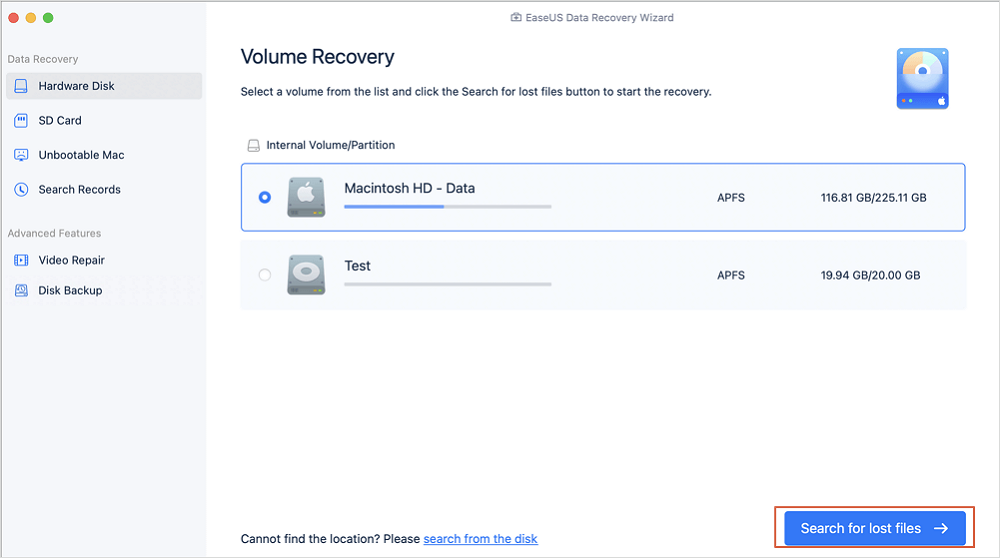
Step 1. Search for lost files
Select the disk location to search for lost files (it can be an internal HDD/SSD or a removable storage device) on macOS Sierra, High Sierra, Mojave, Catalina, Big Sur, Monterey, Ventura, and the latest Sonoma. Click the "Search for lost files" button.
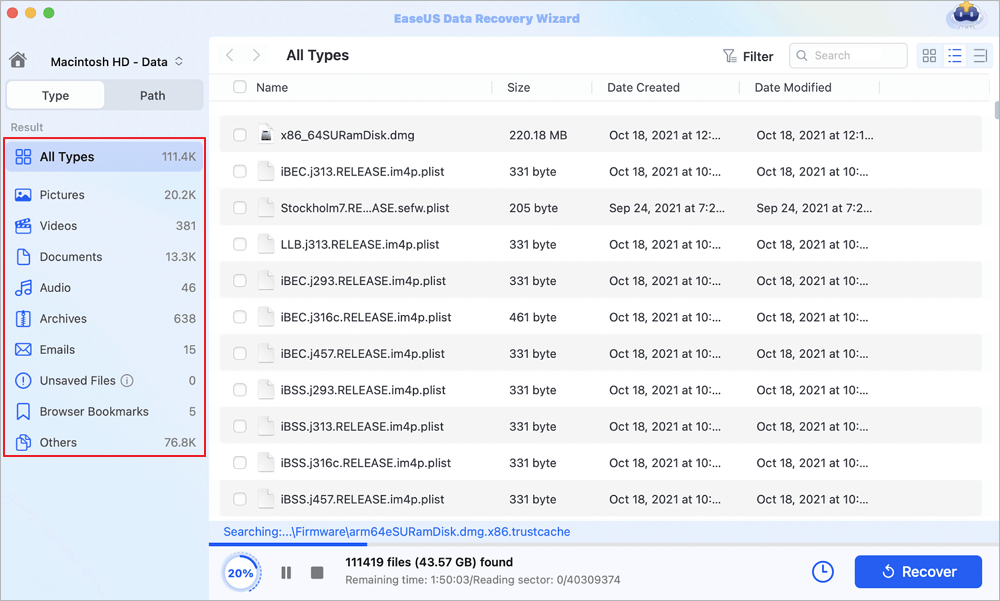
Step 2. Go through the scanning results
EaseUS Data Recovery Wizard for Mac will immediately scan your selected disk volume and display the scanning results.
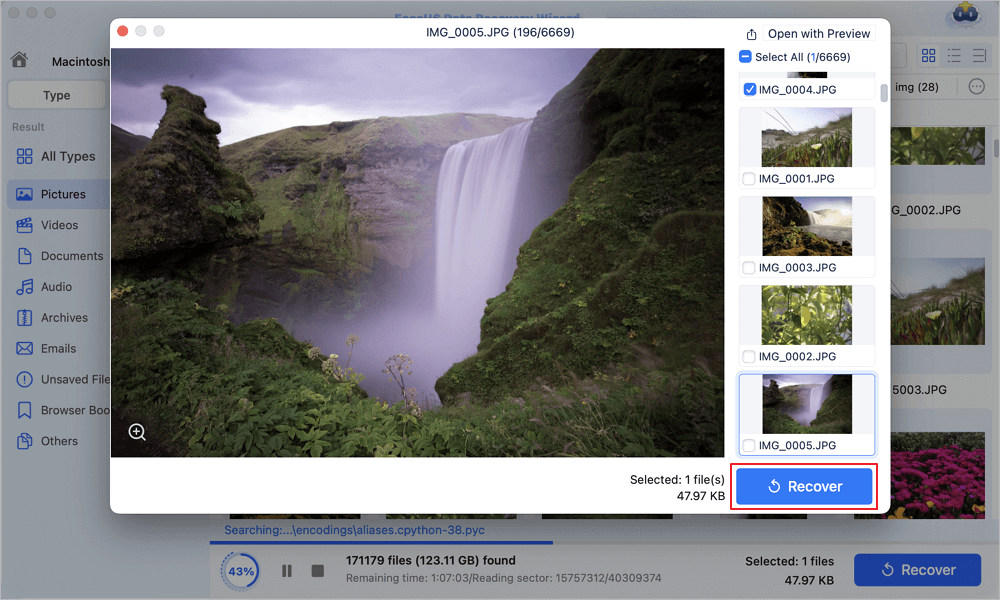
Step 3. Select the file(s) and recover
In the scan results, select the file(s) to preview and click the "Recover" button to have them back.
Method 2. Use TestDisk to Recover Formatted NTFS Partitions
For those who prefer open‑source and don't mind a command‑line interface, TestDisk for Mac can sometimes recover the partition table of a formatted NTFS drive. But be warned: one wrong keystroke can make recovery harder.
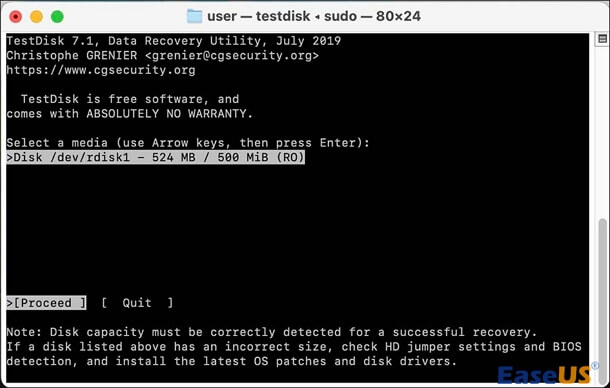
What TestDisk actually does: It tries to rebuild the partition table, not recover individual files. If your NTFS partition was simply "quick formatted" and no new file system was written, TestDisk has a reasonable chance of restoring the original partition structure.
Basic workflow (on Mac):
- Step 1. Download TestDisk from its official source (cgsecurity.org).
- Step 2. Open Terminal and navigate to the TestDisk folder.
- Step 3. Run sudo testdisk (administrator rights required).
- Step 4. Select the affected drive and partition table type (usually "Intel" for NTFS).
- Step 5. Choose "Analyze> Quick Search".
- Step 6. If the lost NTFS partition appears, select it and choose "Write" to restore the partition table.
Limitations our team has observed:
TestDisk struggles when a formatted NTFS partition is converted to a different file system (e.g., exFAT or APFS). It also does not recover individual files – only the partition structure. If the partition table is severely damaged, TestDisk will fail silently.
Share this post on SNS to help more people learn how to recover formatted NTFS partitions on a Mac!

Method 3. Recover NTFS Partitions Using PhotoRec
PhotoRec for Mac is the companion tool to TestDisk. It ignores file systems entirely and performs file carving – scanning raw disk sectors for known file signatures (headers and footers of JPEGs, PDFs, DOCX, etc.).

The trade‑off is significant: You get your data back, but you lose original file names, folder hierarchies, and timestamps. Everything is dumped into numbered directories like recup_dir.1, recup_dir.2 with generic names (e.g., f123456789.jpg).
Use PhotoRec only when professional software and TestDisk cannot recover the desired files, or when the NTFS structure is completely destroyed.

PhotoRec Review: Still Capable of Recovery in 2026
PhotoRec is a file recovery program designed to recover lost files, including video, documents, and archives, from hard disks, CD-ROMs, and other media. Read more >>
Critical Mistakes to Avoid Right Now
❌1. Writing new data to the formatted NTFS drive
This is the #1 reason recovery fails. Every new file saved to that drive reduces the chance of getting old files back. Stop using the drive immediately.
❌2. Running Disk Utility First Aid on NTFS
First Aid was never designed for NTFS. Running it accomplishes nothing and may confuse the drive's metadata.
❌3. Reformatting the drive again
Some online guides suggest reformatting back to NTFS "to help recovery". That's bad advice. Every format writes over existing data structures. Do not do this.
❌4. Recovering files to the same drive
Always save recovered data to a different physical drive or partition. Otherwise, ongoing writes can overwrite other files still waiting to be recovered.
Conclusion
To recover a formatted NTFS partition on a Mac, you can use specialized data recovery software, such as EaseUS Data Recovery Wizard for Mac, TestDisk, and PhotoRec. Because macOS cannot natively format drives to NTFS, you will need to scan the drive with a dedicated application, extract your files, and then safely reformat it to a Mac-compatible format.
Recover Formatted NTFS Partitions on Mac FAQs
1. Can we recover data after formatting an NTFS drive to APFS or HFS+ on a Mac?
Yes. But the process is more complex. The new file system has overwritten part of the NTFS metadata. Professional tools like EaseUS can still perform a raw sector scan and find files by their internal signatures. TestDisk has lower success in cross‑file‑system conversions.
2. How long does a deep scan take on a large NTFS drive?
For a 1TB drive, expect 20–40 minutes. For 4TB or more, up to 2 hours. The scan time also depends on your Mac’s processor and USB connection speed (USB 3.0 is significantly faster than USB 2.0).
3. Is the free version of EaseUS enough for most people?
Yes. 2GB of free recovery covers thousands of documents, hundreds of photos, or several short videos. For large video projects or full drive backups, the paid version removes the size limit.
4. What if the Mac doesn't recognize the NTFS drive at all?
First, check Disk Utility. If the drive appears but is grayed out, the partition table is damaged, but the hardware is fine. If the drive does not appear at all, try a different cable or USB port, or connect it to a Windows PC to rule out hardware failure. Our team has seen many "dead drives" come back with a simple cable swap.
Was This Page Helpful?

Finley is interested in reading and writing articles about technical knowledge. Her articles mainly focus on file repair and data recovery.

Brithny is a technology enthusiast, aiming to make readers' tech lives easy and enjoyable. She loves exploring new technologies and writing technical how-to tips. In her spare time, she loves sharing things about her game experience on Facebook or Twitter.
-
EaseUS Data Recovery Wizard is a powerful system recovery software, designed to enable you to recover files you’ve deleted accidentally, potentially lost to malware or an entire hard drive partition.
Read More -
EaseUS Data Recovery Wizard is the best we have seen. It's far from perfect, partly because today's advanced disk technology makes data-recovery more difficult than it was with the simpler technology of the past.
Read More -
EaseUS Data Recovery Wizard Pro has a reputation as one of the best data recovery software programs on the market. It comes with a selection of advanced features, including partition recovery, formatted drive restoration, and corrupted file repair.
Read More
Related Articles
-
How to Recover ARW Files Mac | Sony RAW Image Recovery
![author icon]() Dany/Sep 29, 2026
Dany/Sep 29, 2026 -
How to Recover Data After macOS Beta Crashes | Ultimate Guide
![author icon]() Jaden/Sep 20, 2026
Jaden/Sep 20, 2026 -
Macintosh HD Download? Restore, Reinstall & Recover Data
![author icon]() Daisy/Sep 24, 2026
Daisy/Sep 24, 2026 -
How to Recover Deleted Messages on Mac | Quick Guide
![author icon]() Tracy King/Sep 27, 2026
Tracy King/Sep 27, 2026
 Dany/Sep 29, 2026
  Jaden/Sep 20, 2026
  Daisy/Sep 24, 2026
  Tracy King/Sep 27, 2026

