When updating or installing macOS, there is a process of starting up your Mac from the startup disk. As the startup continues, you will see a white Apple logo with a progress bar. Usually, when the progress bar finishes, your Mac screen will turn black and then boot normally. But in some rare conditions, you might be stuck at the Apple logo screen forever. In this article, we will discuss what should you do when your iMac or any other Mac computer won't boot past Apple Logo. We have listed several valid methods for you, go ahead and try self-troubleshooting.
Method 1. Quick Solutions to Fix iMac Won't Boot Past Apple Logo
Step 1. Press and hold the iMac power button for at least 10 seconds to shut your Mac down. Restart your Mac and see if you can boot successfully.
Step 2. If Step 1 fails to solve your problem. Press and hold the power button to turn off your Mac again, unplug all accessories including printers, drives, USB hubs, and other nonessential devices from your Mac. Restart now to see if the problem is solved.
Method 2. Repair The Disk with Disk Utility
If quick solutions can't fix the problem, you can try macOS's built-in reparation feature - Disk Utility. This feature can find and repair errors related to the format and directory structure of Mac disks. Here are the detailed steps.
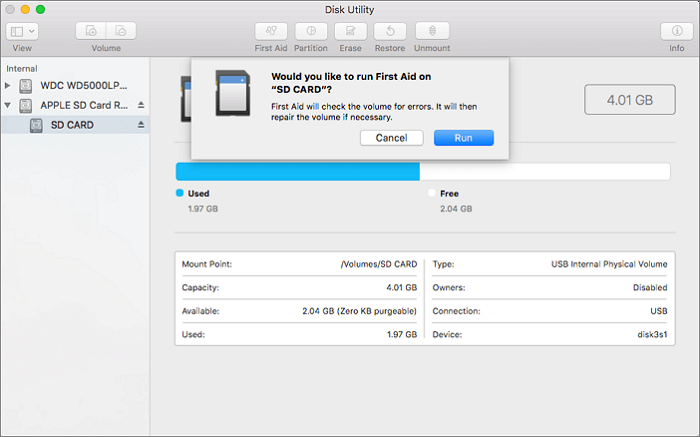
Step 1. Go to Applications > Utilities > Disk Utility.
Step 2. Select the startup disk and click First Aid.
Step 3. Wait until the repairing process is finished.
Step 4. Restart your iMac and see if it can boot properly.
Method 3. Enter Safe Mode to Fix iMac Won't Boot Past Apple Logo
Startup your Mac in Safe Mode can help you determine whether the problem you are experiencing is caused by the software loaded when your Mac starts up.
Step 1. Press and hold the power button to shut down the iMac.
Step 2. Press the power button to start your computer, press and hold the Shift key at the same time.
Step 3. Release the Shift key when you see the login screen. Enter Safe Mode follow the onscreen wizard.

Method 4. Reset NVRAM/PRAM
The last resort you can try is to reset NVRAM or PRAM. This is the method Apple Support will suggest you try when you contact for help. And it mainly works for solving the unexplained problems of your Mac. Follow the steps below to reset NVRAM/PRAM.
Step 1. Shut down your Mac, then turn it on and press and hold these four keys together: Option, Command, P, and R.

Step 2. Hold these keys for about 20 seconds, during which your Mac might appear to restart.
On Mac computers that play a startup sound, you can release the keys after the second startup sound.
On Mac computers that have the Apple T2 Security Chip, you can release the keys after the Apple logo appears and disappears for the second time.
Bonus Tip: What to Do When Mac Lost Data Unexpectedly
One common problem for users is their external hard drives or USB not showing up on Mac. And when they finally made it readable again, they sadly found that all the data on the external hard drive is gone. To save users who have been stuck in this dilemma, we recommend an efficient Mac data recovery tool - EaseUS Data Recovery for Mac. Here are the reasons why we choose this software.
Key Features:
- Recover an unlimited amount of data from external devices (external HDD/SSD, SD cards, USB flash drives, etc.)
- Recover more than 1000 types of files, including photos, documents, emails, archives, etc.
- Create a bootable USB drive and recover data from it when the macOS is unable to boot up.
- Support recovering Time Machine backup and iTunes backup.
If you're interested in this tool, don't hesitate, download it from the button below to have a free trial.
Here is the detailed steps you need to follow and recover data from unbbotable Mac:
Step 1. Launch EaseUS Software in Recovery Mode
Select "Utilities > Terminal" from the top menu, and enter the command sh <(curl https://d3.easeus.com/mac/boot.sh). Hit "Return". Wait for the application to open, and it will take several minutes.
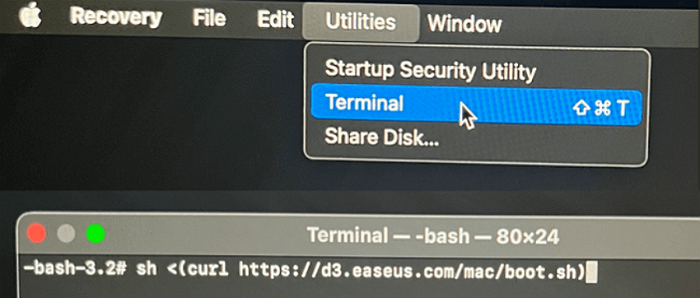
Note: If the Terminal displays either "No such file or directory" or "Could not resolve host," you should verify that the command line you entered is correctly spelled, ensure your Mac has a stable internet connection, and confirm that your macOS version is not lower than macOS 10.15.
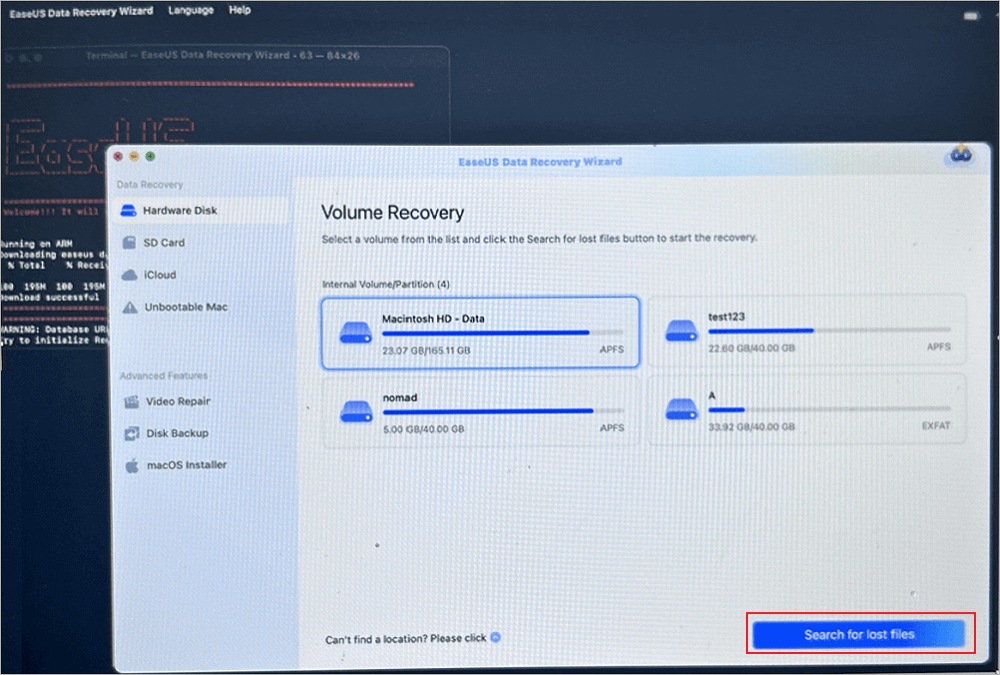
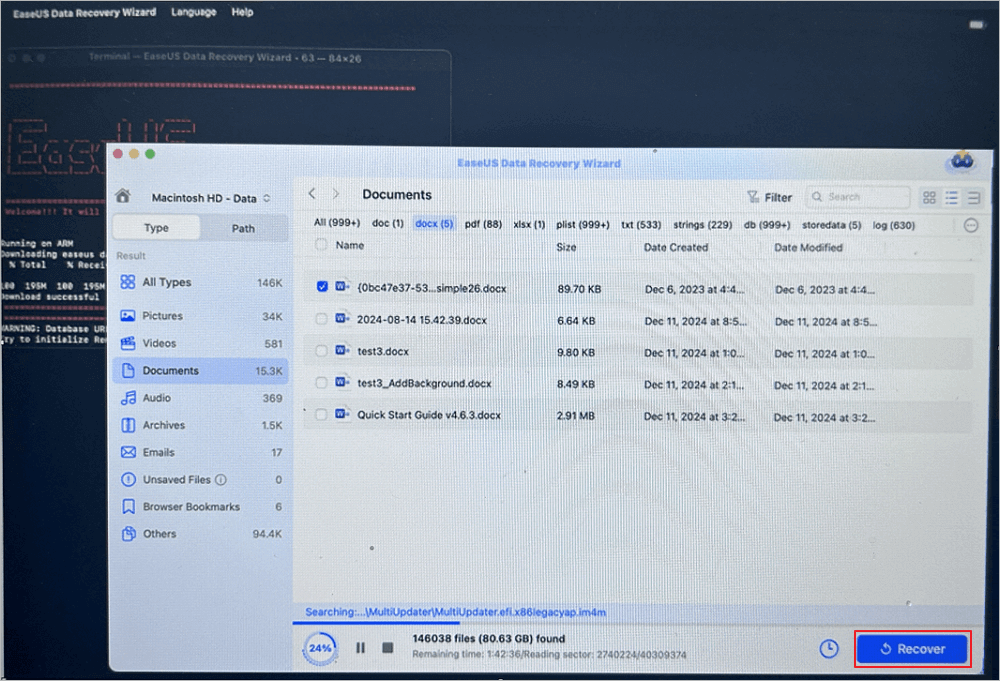
Step 2. Select the Volume on Your Mac Hard Drive
Select the volume where your lost data is stored, and click "Search for lost files". The EaseUS software will quickly locate all the recoverable data on the selected volume.
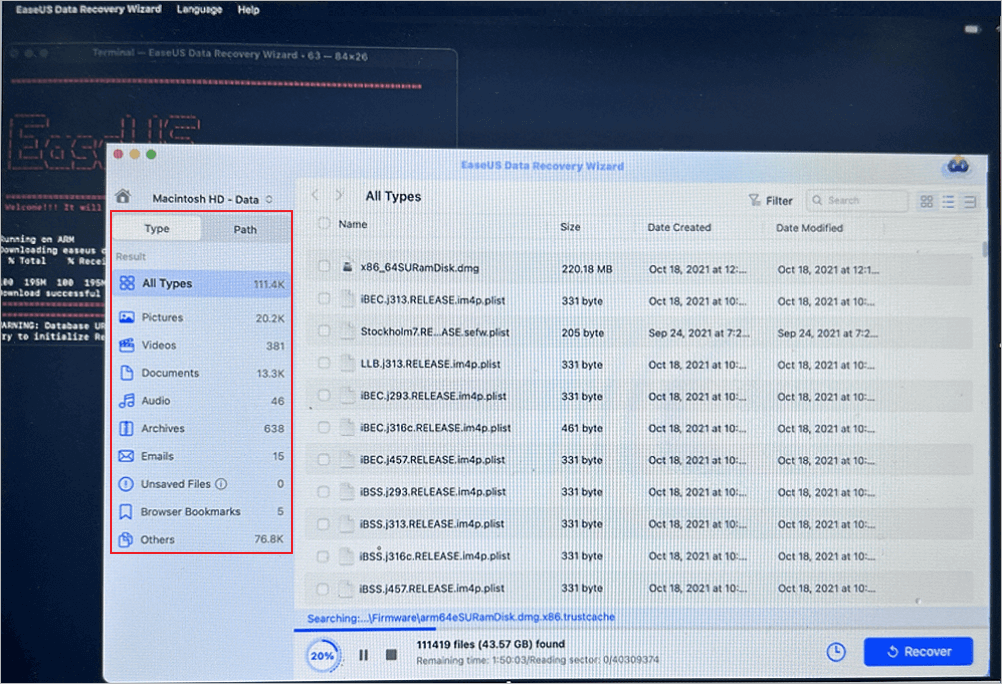
Step 3. Choose the Lost Data You Want
EaseUS software categorizes the scanned recoverable data by file type and storage path. Find the data you want by clicking "Type" or "Path" in the left panel. Then, check the boxes in front of the data you want to recover.
Step 4. Recover and Save Data on an External Disk
Click the "Recover" button, and a pop-up window will show up saying, "Please select a target location to save". Choose the external disk as the new storage location of your recovered data.
The Bottom Line
That's all about how to fix iMac won't boot past the Apple logo. All in all, there is no definite reason for this problem. The self-troubleshooting methods we have provided are worth trying. And they are 100% safe to apply. Even if you have encountered data loss, don't panic. Use EaseUS Data Recovery for Mac immediately, it can scan and recover your lost data.
Was This Page Helpful?
Finley is interested in reading and writing articles about technical knowledge. Her articles mainly focus on file repair and data recovery.
Jean is recognized as one of the most professional writers in EaseUS. She has kept improving her writing skills over the past 10 years and helped millions of her readers solve their tech problems on PC, Mac, and iOS devices.
-
EaseUS Data Recovery Wizard is a powerful system recovery software, designed to enable you to recover files you’ve deleted accidentally, potentially lost to malware or an entire hard drive partition.
Read More -
EaseUS Data Recovery Wizard is the best we have seen. It's far from perfect, partly because today's advanced disk technology makes data-recovery more difficult than it was with the simpler technology of the past.
Read More -
EaseUS Data Recovery Wizard Pro has a reputation as one of the best data recovery software programs on the market. It comes with a selection of advanced features, including partition recovery, formatted drive restoration, and corrupted file repair.
Read More
Related Articles
-
Snow Leopard Recovery Mode | How to Recover Data from Mac OS X
![author icon]() Daisy/Jun 30, 2026
Daisy/Jun 30, 2026 -
Accidentally Clicked Don't Save Excel Mac, How to Recover Unsaved Excel Files
![author icon]() Brithny/Jun 17, 2026
Brithny/Jun 17, 2026 -
How to Find Missing Folder in Outlook Mac: 6 Ways [No File Missing]
![author icon]() Brithny/Jun 14, 2026
Brithny/Jun 14, 2026 -
How to Recover Deleted Partitions on Mac [2026 Updated]
![author icon]() Daisy/Jun 30, 2026
Daisy/Jun 30, 2026