Digitization is a dynamic process with new technological inventions taking place regularly. Hence, businesses need to cope with digital trends to stay high in revenue and market presence. Sadly, a business relying on legacy systems or physical hardware can't achieve the same without powerful Hyper-V P2V conversion.
Hyper-V is the most preferred choice for enterprise-grade virtualization users and was created by Microsoft. As a result, it becomes easy for businesses to run their IT workloads, existing hardware resources, etc., on cloud technology with amazing flexibility and scalability. Let us know all about Hyper- V P2V in detail. We'll also go through the detailed steps to realize this conversion.
What is Hyper-V?
Microsoft Hyper-V or Viridian or Windows Server Virtualization (before its release) can create virtual machines on x86-64 systems running Windows. It is a native hypervisor that has effectively superseded the Windows Virtual PC as the hardware virtualization component of Windows NT client editions. Hyper-V server 2019 is the last version of the free Hyper-V server.
Debuted in 2008, Hyper-V was once thought to be complicated, challenging, and risky to implement and maintain. However, with the advancement of virtualization, cloud providers built their reliability on Hyper-V. The current status of this hypervisor can be estimated that it is a top contender to the VMware ESXi, which is an enterprise virtualization market leader.
Availability of Hyper-V:
Users can get Hyper-V through two different channels offered by Microsoft. These are:
- Hyper-V server: It comes with limited functionality as it is a Windows Server's freeware edition and Hyper-V's component.
- Windows part: It comes with the x64 SKUs of Pro and Enterprise editions of Windows 11, Windows 10, Windows 8.1, and Windows 8. Further, it is an optional component of Windows Server 2008 and later.
Functions of Hyper-V:
After learning a brief about Hyper-V, you must look for its functions. So, let us move to Hyper-V's key functions. These include:
- It can create virtual machines on x86-64 Windows systems.
- Any server computer using Hyper-V can be made to expose the specific virtual machines to different networks.
- It is a command line interface used to configure software, physical hardware, and the host operating system.
- It has menu-driven CLI interface and script files available free of cost for simple configuration.
- It allows smooth configuration and monitoring of its functioning using System Center Virtual Machine Manager or Microsoft Management Consoles for simplified use.
Features of Hyper-V:
After going through the main functions, let us find out the key features of Hyper-V, which are not limited to the following:
- Client-side security protection like HVCI, Credential Guard, etc., and improved physical security benefits with Secured Core Server.
- Offers simplified licensing for Windows Server guests and UEFI mode for guests.
- It allows a high-performing virtualization layer to overcome all guest activities and can be tuned to nullify its impact on virtualized operating systems.
- It can support up to 1,024 virtual machines on a single host and offers an even balancing of resources. It assigns resources dynamically to virtual machines.
- It can move different virtual machines between different Hyper-V hosts.
- It offers high-performing drivers for Linux and Windows guest operating systems.
- It allows live backup of virtual machines and their near real-time replication to remote hosts.
- It supports non-uniform memory architecture (NUMA) at the guest and virtual machine levels.
- It allows off-loaded data transfer (ODX) for file conversions on associated storage systems.
Advantages of Hyper-V:
It is easy to go through the key benefits of Hyper-V after going through the main features. So, the Hyper-V's advantages are:
- Familiar Windows command line: Hyper-V's free version can be locally managed with WMI, PowerShell, etc., and can be remotely managed by free graphical tools. Built on a familiar Windows command line, it can run different Windows forms-based applications.
- Improving capabilities of low-powering devices: It can offer a virtual desktop interface for empowering low-powered handheld devices and laptops with high-powered desktop capabilities.
- Savings on licensing: Hyper-V server offers all features free-of-cost while the guest operating system licensing is required. With overall licensing savings much better than any other setup, it becomes easy for the users to go for a Windows Server Standard license to run two Windows guest operating systems.
- Simplified management: PowerShell and other management tools can be used to monitor different virtual machines over a big data center. Further, it offers a single-pane view of the small setup of virtual machines running on a cluster or host.
- Quick testing with built-in lab environments: Users can quickly design and deploy sandbox and test environments with rapid isolation and provisioning features. Hence, testing driver updates, new applications, and patches are easy before the release.
- Quick server environment deployment: The virtualized environments can be automated with powerful DevOps tools like Ansible, Terraform, PowerShell, etc. The templates can further reduce the time of Linux installation or deployment of Windows Server.
- Improved server applications portability: All the server-based applications can be quickly moved to new hardware with Hyper-V. The VHDX file format used by it can be mounted by any existing Windows operating system for seamless data recovery.
- Low energy footprint: The systems consolidation into a fewer physical system by Hyper-V results in a reduced energy footprint for users. Hence, virtualization remains a "green initiative" affair with Hyper-V.
- Optimized hardware usage: It is easy for businesses to optimize hardware usage by consolidating more computing jobs on reduced hardware. Hyper-V successfully overcomes compatibility issues and helps businesses optimize their hardware usage.
What is Physical-to-Virtual (P2V) Conversion?
The physical-to-virtual conversion (P2V) or hardware visualization is the dedicated process of migrating physical machines to virtual machines. It is widely used for server virtualization, and developers rely on it for transferring physical environments into a digital one. It can be manual, automated, or semi-automated based on business needs.
Functions of P2V:
After a quick definition, let us move to the key functions of P2V, which include:
- It is used by Mac users to run Windows applications.
- It can move operating systems, programs, data, and applications effortlessly.
- The physical machine's state can be saved as an image by the P2V tool.
- It uses migration tools which are specialized programs for migrating physical machines to virtual machines.
- Some of the popular P2V conversion tools are VMware P2V assistant, PlateSpin Migrate, Microsoft System Center Virtual Machine Manager, Microsoft Disk2VHD, etc.
Benefits of P2V:
It is easy to understand the main advantages of P2V after going through its key functions. These are:
- It is easy to abstract the underlying hardware and makes it last longer. The physical hardware is set to wear out in the coming years.
- It is easy for the developers to use virtual machines as a sandbox for testing potentially hazardous or new component changes safely.
- It is easy to place a virtual machine on the working server with minimal downtime. These can be migrated easily.
- Multiple virtual machines can run effortlessly on a single server. In addition, these can run on multiple platforms.
- Migrating to virtual machines reduces operational costs with less physical space, less hardware, fewer repairs, and less power consumption.
How to Realize Hyper-V P2V Conversion?
With a detailed understanding of the P2V and Hyper-V, it all comes down to realizing Hyper-V P2V conversion. We'll go through the two different methods for the same, namely:
1. Using Disk2vhd
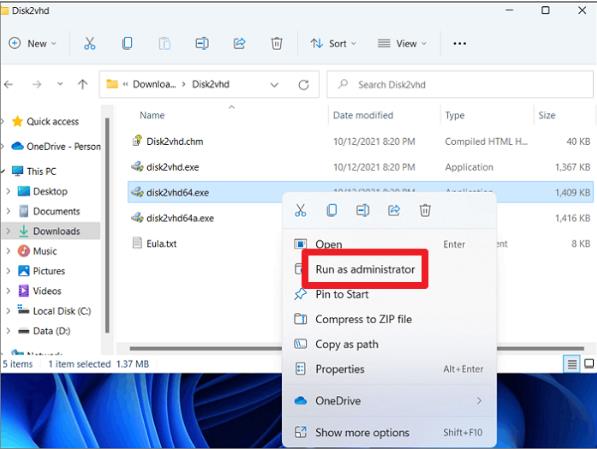
Disk2vhd is an efficient utility that can create VHD versions for Microsoft Hyper-V virtual machines or Microsoft Virtual PC. The quick steps for Hyper-V P2Vconversion using Disk2vhd are:
Step 1. Start by downloading Disk2vhd on a physical server.
Step 2. Right-click on the version and select "Run as Administrator."
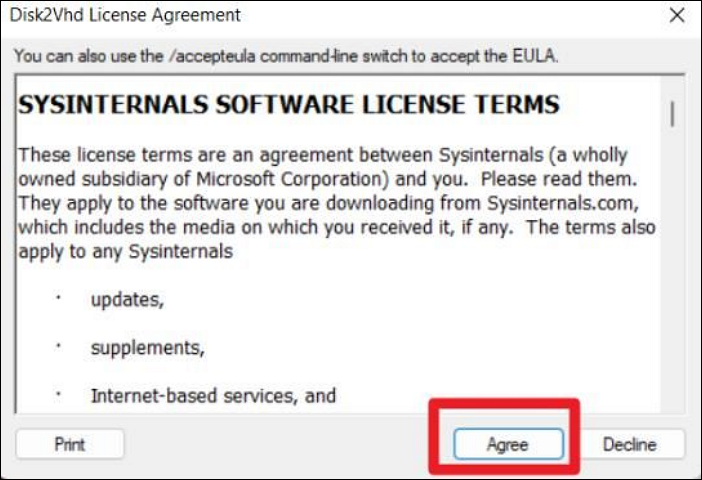
Step 3. Press "Agree" on the Disk2Vhd license agreement page
Step 4. Select the destination for the VHDX file created by pressing "Use Vhdx" and "Use Volume Shadow Copy."
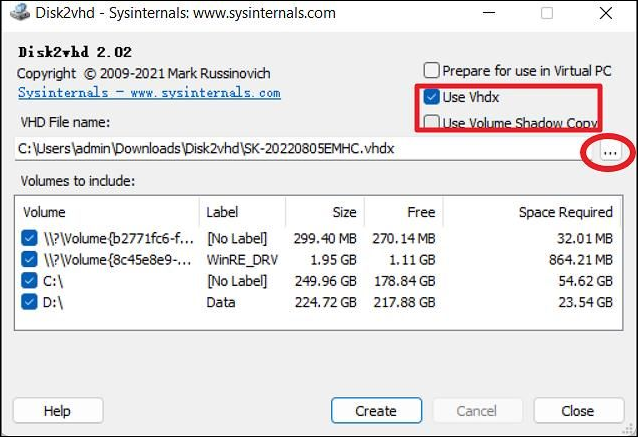
Step 5. Press "Create" and wait for the disk conversion to VHDX format.
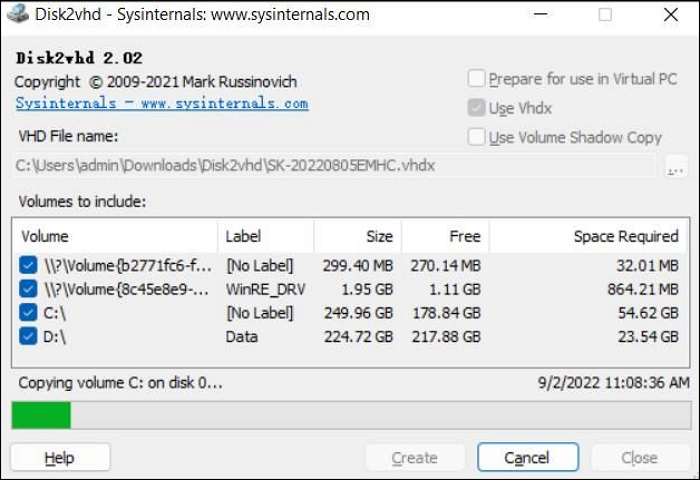
Step 6. Press "Close" to finish the disk to VHD export successfully, and this file is easily used to create virtual machines.
Advice piece: It is advised not to perform P2V casually for the domain controllers, exchange servers, and systems using specialized hardware like licensing dongles, fax boards, etc. In addition, it is recommended to go for the data migration path over the physical-to-virtual conversion path to eliminate the reduced functioning of systems. If required, P2V conversion should be performed by Migrating Active Directory Domain Servers only.
2. Using Backup and Restore
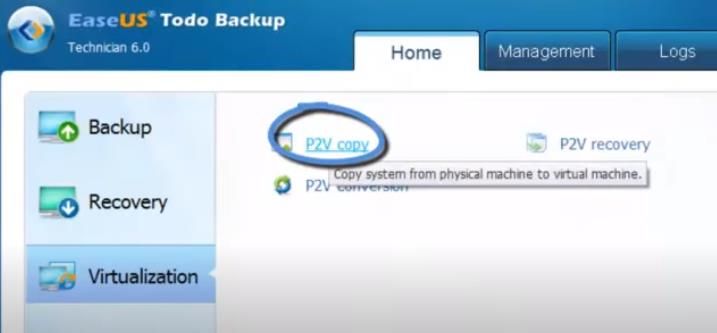
The second method is to use the backup and restore for P2V conversion on the system. We'll use EaseUS Todo Backup to create a new virtual machine effectively and precisely. So, the quick steps for Hyper-V P2Vconversion using Backup and Restore are:
Step 1. Download and install the Ease Todo Backup tool on your system and go to the "Visualization" option.
Step 2. Select the "P2V copy" option.
 s
s
Step 3. Tick on the "Sector by Sector Copy" option in the source menu.
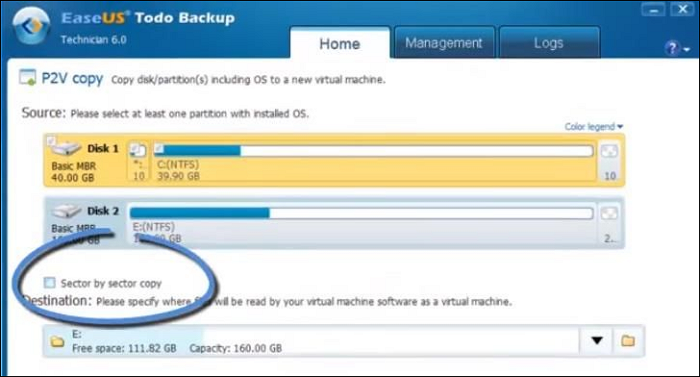
Step 4. Select the virtual machine name and version in the "Destination" section. You can also use "Edit Virtual Machine"for internal settings.
Step 5. Click "Proceed" to start the conversion.
Final Verdict
Hence, it is easy for readers to understand Hyper-V P2V in detail. Starting with all about the Hyper-V, its features, functions, and benefits to the P2V details, it is all about virtualization. Hyper-V is used to create virtual machines which support the physical to virtual (P2V) conversion for many businesses.
After going through the Hyper-V and P2V, readers can quickly understand the dedicated process of realizing Hyper-V P2V conversion. We've defined two different methods, i.e., using Disk2vhd and Backup and Restore for the same. The step-by-step details ensure that readers can select one according to their immediate system needs.
FAQs
After reading about Hyper-V P2V, users may come across some questions. So, below are the few frequently asked questions that users may be interested in:
1. What is V2V, and does it differ from P2V?
In V2V, an existing virtual machine running on one virtualization platform is copied to the other virtual machine running on the other virtualization platform. In P2P, the operating system running on the physical system is copied to the virtual machine. Hence, V2V doesn't involve any physical interaction, while P2V involves physical to-virtual interaction.
2. How do I convert P2V to a VMware converter?
The quick steps to convert P2V to VMware converter are:
- Go to the "Convert machine" option after launching the VMware converter.
- Select the source type as "Powered on" in the "Source System" tab.
- Select the "Remote Windows machine" and press "Next."
- Select the "automatically uninstall the agent when import succeeds" when the popup appears.
- Select the destination type as "VMware Infrastructure virtual machine," fill in VMware server connection details, and press “Ok.”
- Select the VM inventory name on the "Destination Virtual Machine" page and press "Next."
- Select the ESXi host, Datastore, and Virtual Machine version on the "Destination Location" page and press "Next."
- Go to the "Options" page and edit the parameters if required. Press "Next" to continue.
- Go to the "Summary" page, review "Settings," and press "Finish" to start conversion.
Was This Page Helpful?
Daisy is the Senior editor of the writing team for EaseUS. She has been working at EaseUS for over ten years, starting as a technical writer and moving on to being a team leader of the content group. As a professional author for over ten years, she writes a lot to help people overcome their tech troubles.
Written by Tracy King
Tracy became a member of the EaseUS content team in 2013. Being a technical writer for over 10 years, she is enthusiastic about sharing tips to assist readers in resolving complex issues in disk management, file transfer, PC & Mac performance optimization, etc., like an expert.
Related Articles
-
Windows 11 Installation Has Failed? Your Fixes Are Here
 Tracy King/2024-07-01
 -
What Is Disk Utility on Mac? Introduction to the Storage Device Manager on macOS
 Daisy/2024-06-12
 -
Types of Network Switches That You Need to Know
Daisy/2024-01-11 -
How to Fix Physxloader.dll Is Missing or Not Found Errors
Daisy/2024-01-11
