
iOS 12/13 Supported | How to Backup iPhone in Recovery Mode
Summary
If your iPhone is in recovery mode, you can't directly back it up with iTunes, iCloud, or any third-party programs. To make it, you'll need to exit recovery mode first and then back up it with the backup solutions offered in this guide.
There is no direct way to back up your iPhone in recovery mode, but there are ways to exit recovery mode. Once your device gets out of recovery mode, you can back up it with iTunes, iCloud, or any other third-party backup programs.
- Part 1. How to Get iPhone out of Recovery Mode Before Backing up
- Part 2. How to Backup iPhone with 3 Methods
- Part 3. Common Questions Related to iOS Recovery Mode
Part 1. How to Get iPhone out of Recovery Mode
You can get your iPhone out of recovery mode by force restarting your iPhone or restoring it to factory settings with iTunes. For more details, you can read the below instructions.
Solution 1. Exit Recovery Mode by Force Restarting iPhone
Whenever you want to troubleshoot an issue with your iPhone, try performing a force restart. This can fix most of the problems related to the iPhone. Here's how to do it.
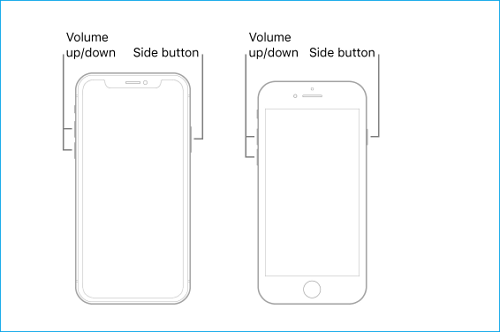
For iPhone X/XS/XR/11/12
- Press the "Volume Up" button and quickly release it. Subsequently, do the same with the "Volume Down" button.
- Press and hold the side button.
- Let go of the button when the Apple logo appears.
For iPhone 8 and iPhone SE (2nd generation)
- Press and quickly release the "Volume Up" button.
- Press and quickly release the "Volume Down" button.
- Press and hold the side button. When you see the Apple logo, release it.
For iPhone 7 and 7 Plus
- Simultaneously press and hold the "Volume Down" and "Sleep/Wake" button.
- When the Apple logo appears on your screen, release both buttons.

Solution 2. Exit Recovery Mode by Resetting it to Factory Settings
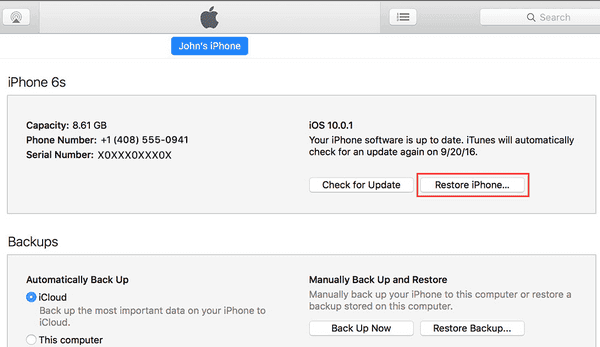
Another way to exit recovery mode is to factory reset your iPhone via iTunes. This will erase everything from your iPhone and replace your existing iPhone data with what in the iTunes backup.
Step 1. Launch the latest version of iTunes on your computer.
Step 2. Connect your iPhone that is stuck in recovery mode to your computer.
Step 3. Then, iTunes will automatically detect that your iPhone is stuck in recovery mode.
Step 4. From its screen, you can manually choose to "Restore iPhone."
Step 5. Once it completes, your iPhone will be taken to its original state and you can set it up.
Part 2. How to Backup iPhone after Getting it out of Recovery Mode
After getting your iPhone out of Recovery mode, you can back it up either using an iPhone backup tool or Apple's recommended backup solution - iTunes and iCloud.
Solution 1. Back up iPhone with EaseUS MobiMover
If you're looking for a quick, easy, and convenient way to back up your iPhone, try this professional and reliable iPhone data transfer tool - EaseUS MobiMover. With it, you can efficiently back up your iPhone data, including photos, videos, music, voice memos, contacts, messages & attachments, and more to the computer without errors.
To back up iPhone with EaseUS MobiMover:
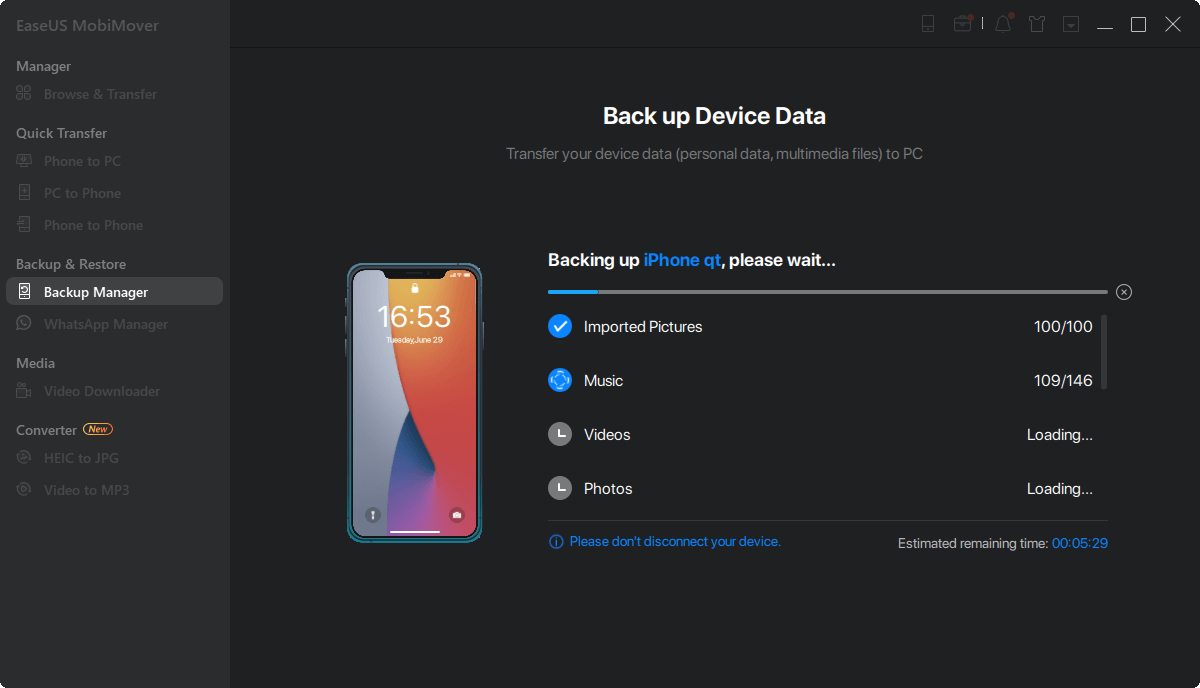
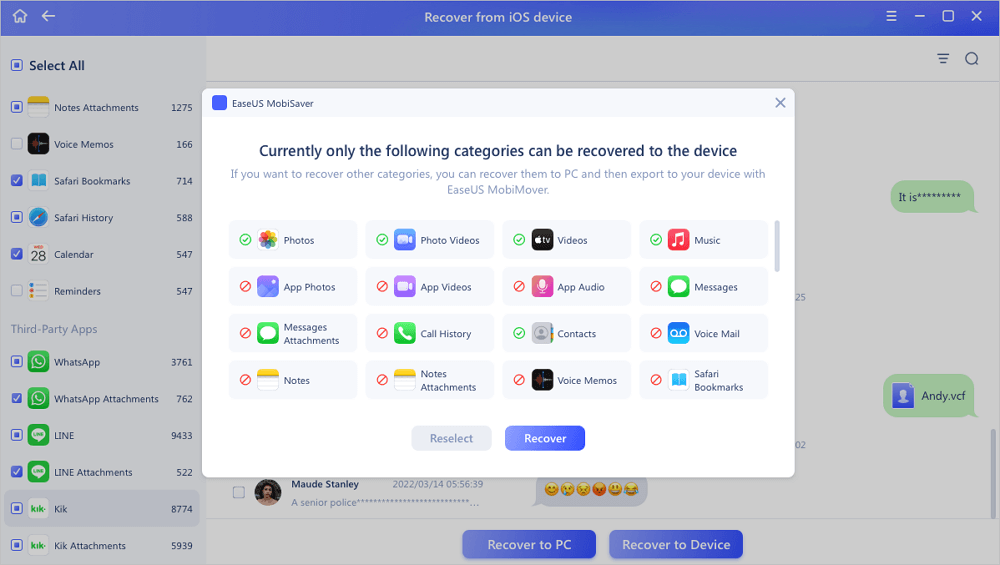
Step 1. Connect your iPhone/iPad to your PC, unlock your device, and trust the computer. Then run EaseUS MobiMover and navigate to "Backup Manager" > "Back up".
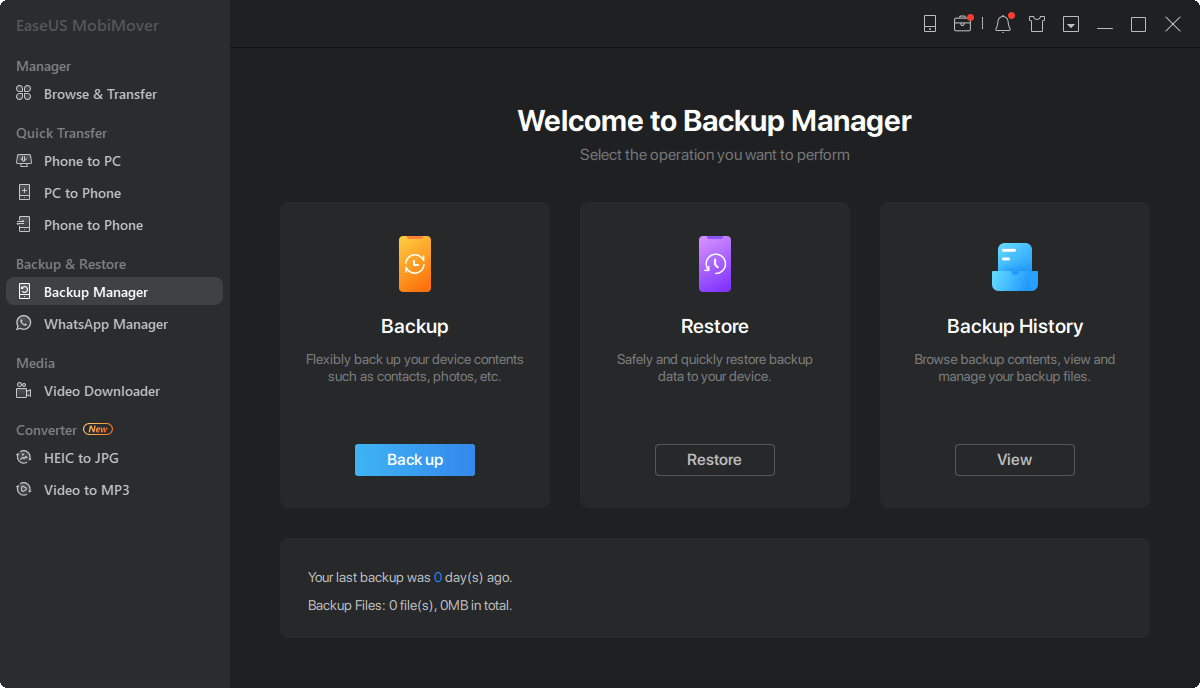
Step 2. Check the categories you want to back up from your iPhone/iPad and then click the backup button to start backing up your device data.

Step 3. Wait for the backup process to complete. If you need to restore the backup to your iPhone/iPad in the furture, go to "Backup Manager" > "Restore" to get it done.
Solution 2. Backing up iPhone with iCloud
iCloud backup allows you to back up your data wirelessly to your iCloud account. While this method is very convenient, it can't back up all of your data. Instead, it only backs up your photos, accounts, documents, and settings. Moreover, Apple only provides 5GB of free cloud storage space, which means you have to buy additional iCloud storage if you have a lot of data to backup.
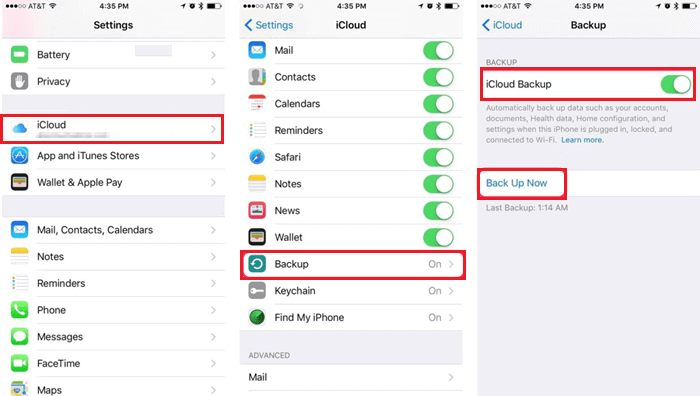
Step 1. Head to the Settings on your iPhone > [your name].
Step 2. Tap "iCloud," then tap "Backup" (or Storage & Backup on iOS 7 or earlier).
Step 3. Make sure that iCloud Backup is turned on and then tap "Back Up Now."
Solution 3. Backing up iPhone with iTunes
If you want to back up large files, iTunes is absolutely the best choice. But note that the data you backed up with iTunes is not accessible and viewable. If you want to view them, you'll need to restore the whole backup to your device.
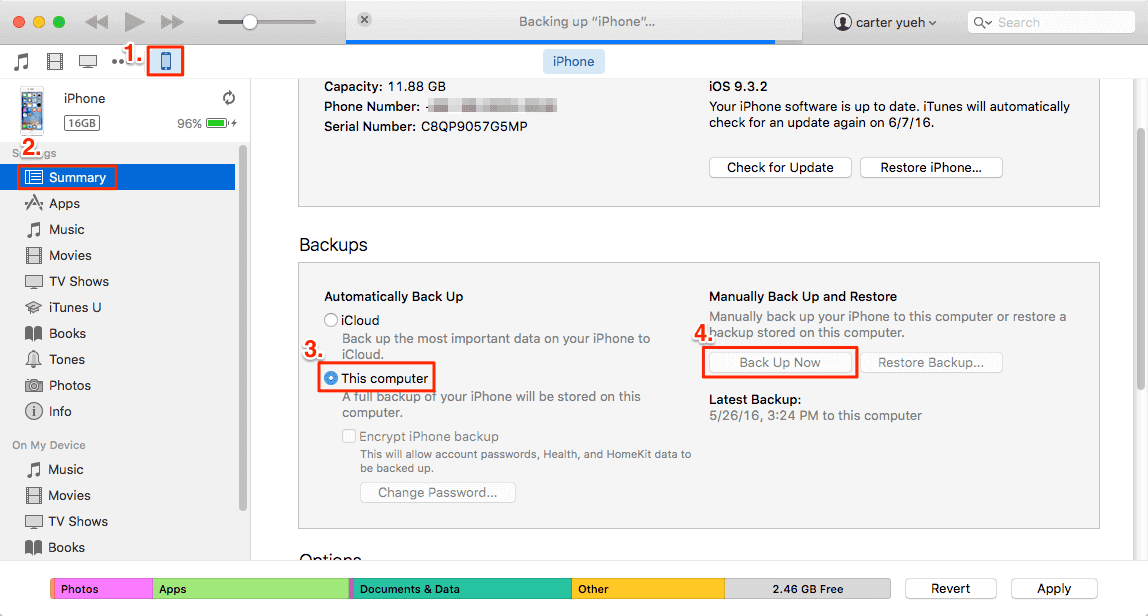
Step 1. Install the latest version of iTunes on your computer and open it.
Step 2. Input your password and select "Trust This Computer" if required.
Step 3. From the iTunes screen, select your iPhone icon.
Step 4. Click on "Back Up Now" to make a copy of your iPhone data.
Bonus Tip: How to Recover iPhone data from iTunes or iCloud Backup
After you have made a backup, you can restore it when data loss happens. In case you don't know how to restore from iTunes or iCloud, here is an iPhone data recovery tool that helps you do it easily.
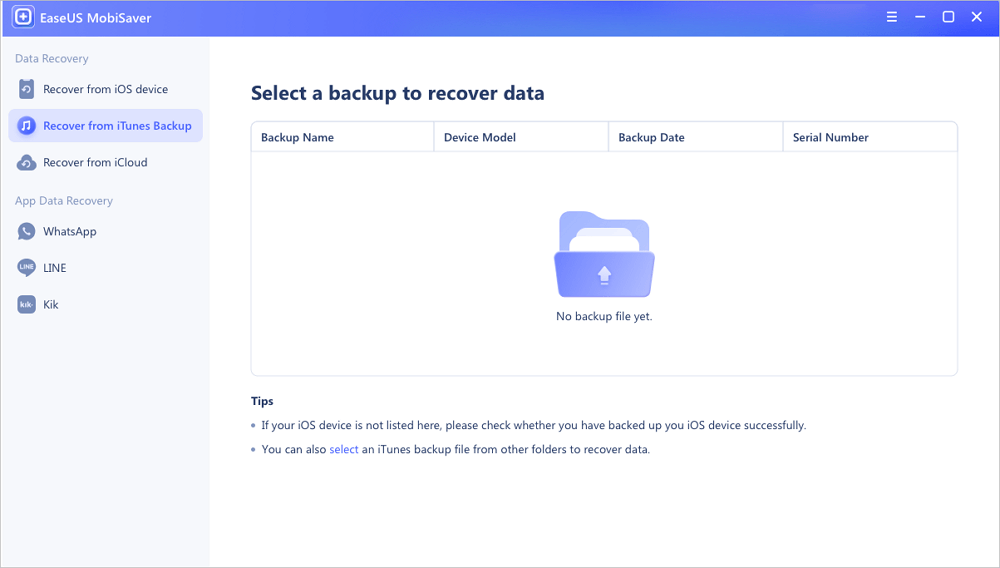
Step 1. Run EaseUS MobiSaver
First, download EaseUS MobiSaver > Connect your iPhone/iPad to your computer > Start EaseUS MobiSaver > Select "Recover from iTunes Backup" > Select an iTunes backup.
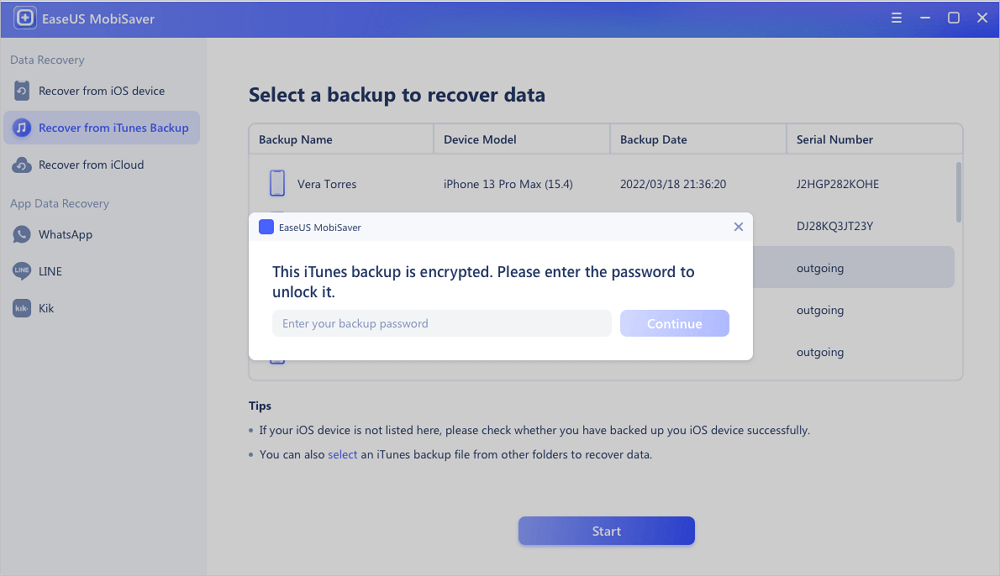
Step 2. Unlock iTunes
If this iTunes backup is encrypted, you need to enter the password to unlock it. After entering the password, click the "Continue" button. EaseUS MobiSaver will automatically scan your backup file to find the lost data.
Step 3. Preview and Recover Data from iTunes
After the scanning, preview the detailed contents of your lost photos/videos, contacts/messages, notes, SNS data. Choose the file and click the "Recover" button to save them on your computer.
Part 3. Common Questions Related to Recovery Mode
In this section, we will outline some answers to some frequently asked questions related to recovery mode.
Question 1. What Does Recovery Mode do on iPhone?
Recovery mode can be used in many situations. The most common situation is where your iPhone, iPad, or iPod touch goes wrong. When that happens, you can take your iPhone back to normal by putting it in recovery mode.
Question 2. Does DFU Mode Delete Everything?
The answer is YES. A recovery mode will factory reset your phone and delete everything from your iPhone. After that, you can restore your iPhone from an iTunes backup if you have made a backup before.
Question 3. How to Put iPhone in Recovery Mode?
It is easy to put your iPhone in recovery mode, but the steps will vary depending on the iPhone models you're using.
For iPhone 8/X/11/11 Pro/11 Pro Max
Step 1. Connect your iPhone 8/ 8 Plus/X/11/11 Pro/11 Pro Max to your computer and launch iTunes.
Step 2. Press and quickly release the Volume Up button, press and quickly release the Volume Down button and then press and hold the Side button (Sleep/Wake button) until you get a black iPhone screen.
Step 3. When your iPhone screen goes black, release the Side button only and then quickly press and hold both Side and Volume Down Buttons for 5 seconds.
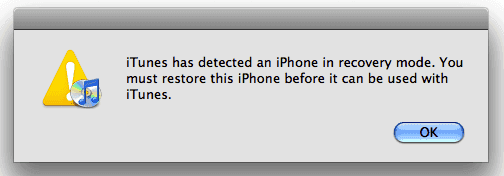
Step 4. Then release the Side button only and hold the Volume Down button for another 5 seconds. During the process, pay close attention to iTunes. When you see a small window in iTunes telling you iTunes has detected an iPhone in recovery mode, release the Volume Down button and check your iPhone screen.
Step 5. If it's black, fortunately, you have put your iPhone 8/8 Plus/X in DFU mode successfully. While if it's not, for example, it's the "connect to iTunes" screen, you have to repeat the steps above to enter DFU mode again.
For iPhone 7/7 Plus
Step 1. Connect your iPhone 7 to your computer and launch iTunes if it doesn't open automatically.
Step 2. Turn off your iPhone 7. Press and hold the Sleep/Wake button until the slider appears. Move the slider to turn off your iPhone.
Step 3. After you have turned off your iPhone 7, hold down both the Sleep/Wake button and Volume Down button for 10 seconds.
Step 4. Keep holding the Volume Down button only for 5 seconds after the 10 seconds. If your iPhone screen remains black, you are now in DFU mode. And iTunes will tell you that it has detected your iPhone. To exit DFU mode, you need to turn off your iPhone.
For iPhone 6S or earlier
Step 1. Connect your iPhone to your computer and run iTunes.
Step 2. Turn off your iPhone. Hold down the Sleep/Wake button until you see a slider on the screen. Move the slider to switch off your iPhone.
Step 3. When you have turned off your iPhone, press and hold both the Sleep/Wake button and Home button for 10 seconds.
Step 4. Then keep holding the Home button only for another 5 seconds. If your iPhone screen stays black, your iPhone is in DFU mode now. A t the same time, a window in iTunes will pop up and tell you iTunes has detected your device.
If your iPhone has entered DFU mode, your device screen will be black, and iTunes will detect it as a device in recovery mode. Then, click OK to start the iPhone restoring.
The Bottom Line
That's all about our guide on how to back up the iPhone in recovery mode. As we mentioned above, there is no direct way to back up your iPhone in recovery mode. The possible way is to get your iPhone out of recovery mode and then back it up with iTunes, iCloud, or third-party tools. If you want to know more about iOS recovery mode, the detailed information listed in Part 3 might be helpful.
Was This Page Helpful?
Related Articles
-
VSCO Recovery | How to Retrieve VSCO Deleted Photos
![]() Jean/2025-07-21
Jean/2025-07-21 -
How to Free Restore Lost or Deleted Notes from iPhone
![]() Daisy/2025-09-01
Daisy/2025-09-01 -
Restore Deleted Contacts/Text Messages on iPhone 7/7 Plus within 3 Steps
![]() Tracy King/2025-07-21
Tracy King/2025-07-21 -
Top 9 Best iPhone Photo Recovery Software
![]() Cedric/2025-07-21
Cedric/2025-07-21