WindowServer draws the graphic elements on your screen every time a new window, app, or anything needs to change on the screen. If there are issues with WindowServer, it consumes a lot of CPU resources to reflect the changes on the screen. Here is the quick navigation of fixes to reduce the usage of CPU resources by WindowServer.
| Workable Solutions | Step-by-step Troubleshooting |
|---|---|
| Fix 1. Accumulate Files and Folders | If you have many folders, files, and applications on your desktop, for WindowServer...Full steps |
| Fix 2. Close Unwanted Apps | If many apps and windows are opened at a time and run in the background...Full steps |
| Fix 3. Turn off the Transparent | Transparent effects consume a lot of CPU resources to give out better visual effects...Full steps |
| Fix 4. Disable Rearranging of Spaces | If Spaces is enabled on your Mac (Virtual Desktop Environment on macOS)...Full steps |
| More Fixes | The other 2 fixes are available here for you to follow and fix WindowServer...Full steps |
With time, the virtue of every electronic device is to slow down since it needs more resources to support the robust applications developed over time that use extensive resources. But if a brand new laptop's performance gets slow, we need to investigate it. This happens when a process called Mac WindowServer uses up most of the CPU resources resulting in the slowdown of the OS. In this article, we will learn what WindowServer is on Mac, why it consumes many resources, and how to fix this issue. Continue reading to know the details.
What is WindowServer on Mac?
The most important part of your Mac is your screen and the apps it displays on it. The Program or Software responsible for maintaining the relationship between the Screen pixels and the apps is WindowServer. The program is a collection of services grouped to manage the application windows on your Mac. You will never bother to learn about this and should know when it slows down the PC.
The function of WindowServer is to reflect the graphics of the applications on your Mac's screen. Whether you are using an app, playing a game, surfing the internet, or doing anything that requires you to open a window, it is managed by the WindowServer.
Though macOS largely support the program, it does not mean the software runs seamlessly at all times. This is where your problem comes in, the WindowServer high CPU on Mac. In the next section, let us understand why the WindowServer uses a lot of CPU cycles on the Mac and why it slows down the whole System.
Why the WindowServer process eats up a high CPU
The graphics on the screen must be regularly refreshed to present the visual changes effectively on the net. Every time you move a window, edit a photo, write something, or even scroll down on your screen, the windows get refreshed, and the WindowServers redraw or present all these using CPU resources.
Along with these, connecting external monitors, improper implementation of transparency effects, clogged up files and folders, unused applications on the desktop, and additional desktops may contribute to this CPU usage.
Why You Should Reduce Mac WindowServer CPU Usage
Now that you know what WindowServer on mac is and why it uses a lot of resources let us understand why and how we can tackle the High CPU resource usage if we get into the details of how windows and desktops consume a lot of CPU cycles. Please take a look at these details to know more about it.
- Faulty or Out of date Apps: Due to inaccurate or out-of-date apps, the WindowServer has to frame the screen every few seconds due to the hogging memory.
- Multiple Displays: Multiple displays use more resources for an app and up the computer's memory.
- Messy Desktop: If you have multiple apps on your desktop, every icon or pixel change must be redrawn to reflect it, resulting in a cluttered desktop.
- Modern Graphics: For games and apps with high graphics, it is generally hard for any computer OS to keep up, so the old systems with new OS struggle with modern pictures.
Checking if the Windowserver Is Using Excessive CPU or Not
We can track the macOS utility of CPU usage on the Activity Monitor. This feature monitors the macOS usage of memory, disk, CPU, network, and energy.
How to Launch the Activity Monitor:
Step 1. Open the "Applications" and Navigate to the "Utilities" section.
Step 2. Launch the "Activity Monitor".
Step 3. Click on "CPU" to know the CPU usage.
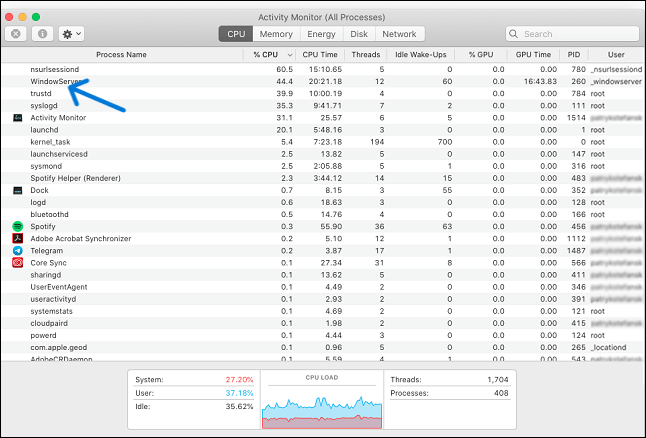
If the WindowServer is on top and uses almost 60% of the CPU cycles, it is a problem you must address.
6 Ways: How to Fix WindowServer High CPU Usage on Mac
Before you are going to check the solutions to the WindowServer Mac high CPU problem, watch this video first. It provides you with more details about the WindowServer on Mac.
- 00:13 - Close unnecessary windows and apps
- 00:33 - Reduce the number of Desktops
- 01:32 - Remove unnecessary login items
- 01:52 - Restart your Mac
- 02:11 - Update Apps & macOS
- 02:25 - Update macOS
- 02:47 - Supported software
We have curated a list of solutions to reduce the high CPU usage on Mac. These are not one-fix-at-a-time solutions, and all the fixes aim to minimize the WindowServer work on your screen to reduce CPU usage. Try to follow as many as possible.
- 1. Accumulate Files and Folders
- 2. Close Unwanted Apps and Windows
- 3. Turn off the Transparent
- 4. Disable Rearranging of Spaces
- 5. Update the Apps and the macOS
- 6. Reboot your Mac
Solution 1. Accumulate Files and Folders on Your Desktop in One Place
If you have many folders, files, and applications on your desktop, for WindowServer to keep up with them takes a lot of memory and CPU cycles. Try accumulating or reducing the number of files and folders on your screen.
For example, if you have 30 files and 10 folders on your desktop, try to put them in one folder. This makes it easy for the WindowServer to visualize one folder instead of 40 on your desktop.
Solution 2. Close Unwanted Apps and Windows
If many apps and windows are opened at a time and run in the background, they will consume more CPU resources. Irrespective of the Mac you are using, the WindowServer has to allocate the CPU cycles for these unnecessary apps and Windows, even for the browser tabs. So, to reduce resource consumption, close the unwanted tabs and windows.
Alternatively, if any applications run in the background longer, especially high-resource applications like games, it is essential to quit them. We can do this by using Force to stop the applications.
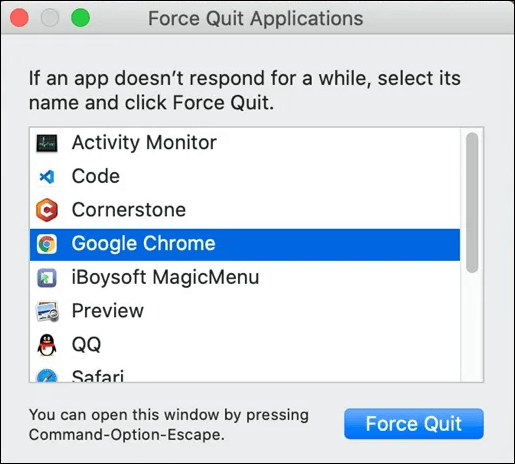
To Force Quit, Press Command + Option + Escape to open the applications list, select the apps you want to quit, and Click "Force Quit" at the bottom of the Window.
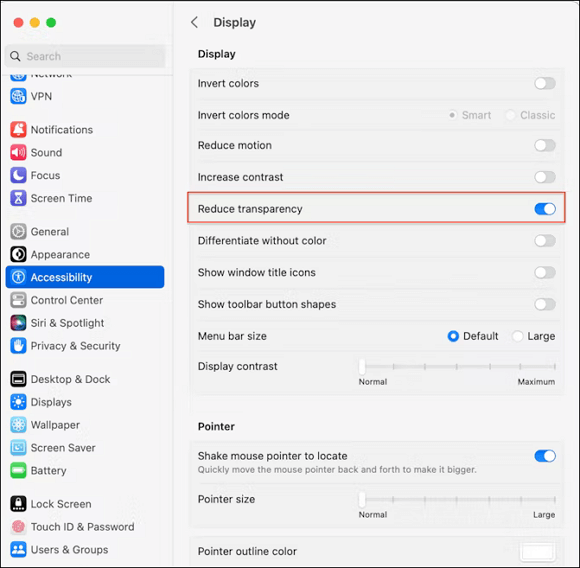
Solution 3. Turn off the Transparent Effects of macOS
Transparent effects consume a lot of CPU resources to give out better visual effects, but in turn, they use more RAM and CPU and slow down the Mac. We can reduce the transparency effects on our Mac to speed up the OS processing to boost our machine.
Steps to reduce transparency on Mac:
Step 1. Open the "Apple Menu" and Select "System Preferences".

Step 2. Navigate to the "Accessibility" section and open the "Display Option".
Step 3. Enable the "Reduce Transparency" box.
This is useful to run your Mac even faster, even if you are not facing any slowdown issues.
Solution 4. Disable Automatically Rearranging of Spaces Based on the Recent Use
If you have Spaces enabled on your Mac (Virtual Desktop Environment on macOS), it will make a massive difference for WindowServer if you disable their automatic rearranging. If this option is disabled, we must manually arrange the Spaces for further use.
Steps to disable Spaces Rearrangement:
Step 1. Open the "Apple Menu" and Select "System Preferences".
Step 2. Navigate to "Mission Control" and Disable the "Automatically rearrange Spaces based on the most recent use" setting.
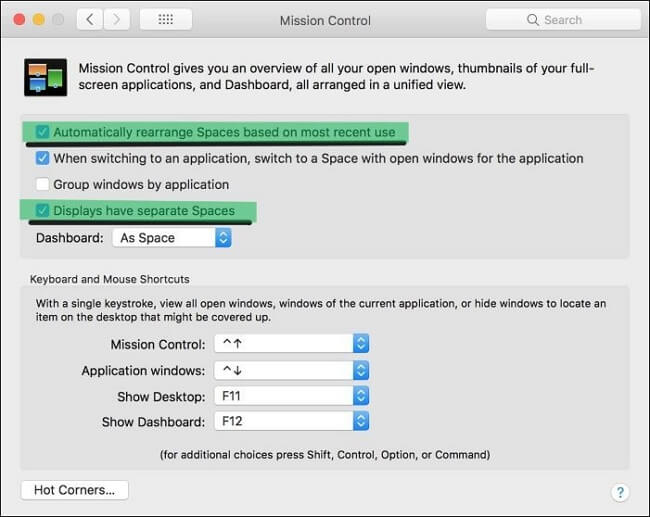
If the spaces are arranging themselves automatically, the WindowServer has to allocate more CPU cycles to present them. However, this might seem small, but it reduces the CPU consumption for WindowServer.
Turn Off Spaces for Multiple Displays:
If you are using multiple display setups on your Mac, you can turn off Spaces for each display to lower the WindowServer CPU usage on your Mac. You will find the option in the Mission Control screen itself. Uncheck the "Displays have Separate Spaces."
Solution 5. Update the Apps and the macOS
Applications that are out of date cause may also use high CPU, so make sure all your applications are up to date, and your macOS is updated.
Launch the "App Store" app, and check for the updates for apps downloaded from it. For other apps, either download updates from the app or go to the website to check for updates and install them.
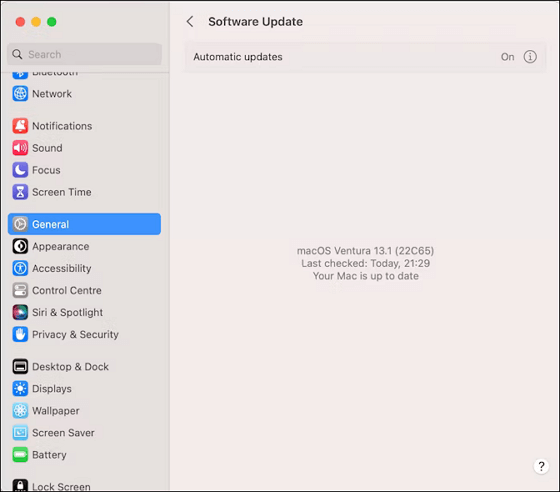
To update the macOS:
Step 1. Go to the "Apple menu" and navigate to the About this Mac section.
Step 2. Click on a software update to see if any updates are available to download.
Step 3. Download the available updates.
Solution 6. Reboot your Mac
We often try to keep our Mac in sleep mode to resume work after some time. But you must restart your Mac once in a while to free up RAM and remove the system cache and temporary files.
A simple reboot will give the OS a fresh start and fix minor glitches in the software. Sometimes, it can improve the high CPU usage by WindowServer issues also.
Extra Tip: Recover Lost Data While Fixing the macOS Issues
There are a lot of instances when repairing the Mac where you may lose the data, and you cannot afford to lose personal or essential data for yourself. In such cases, you need a professional and cost-effective data recovery tool to recover your lost data.
EaseUS Data Recovery Wizard for Mac is a data recovery tool designed especially for macOS to recover deleted files on Mac due to accidents. Select the hard drive from which you want to retrieve files, scan it, and view the recoverable files.
EaseUS Data Recovery Wizard for Mac
- Recover lost or deleted files, documents, photos, audio, music, and emails effectively.
- It can perform Mac hard drive recovery and extract data from Time Machine backup or iTunes backup or even without backup.
- It can recover data from accidents like virus attacks, hardware problems, macOS update errors, and Unexpected power off.
You can read unbiased product reviews and comparisons on trustworthy IT websites and put your trust in a credible, powerful, and efficient Mac data recovery program that guarantees a recovery rate of 99.7%. And you can complete the whole process with three simple steps.
Step 1. Select the drive to be scanned
In the main EaseUS Data Recovery Wizard window, there will be a list of the drives connected to your Mac. Select the drive you need to recover lost/deleted files from, and click the "Search for lost files" button.

Step 2. Select your lost data/files
EaseUS Data Recovery Wizard for Mac will immediately scan your selected disk volume and display the scanning results on the left pane. You can sort the results to find the wanted files if you are looking for certain files.

Step 3. Recover lost/deleted data
Once you have found the desired files, preview the files and then click "Recover" to begin the recovery of your deleted/lost Mac files.

The Final Verdict
Mac WindowServer is a program responsible for the monitor's graphics and window management. The unexpected slowdown of the macOS is due to the High CPU usage of WindowServer on Mac. The solutions mentioned here can combinedly reduce CPU usage, do follow them to boost your Mac speed.
If there is any data loss due to malfunctions on your Mac, use an efficient data recovery tool like EaseUS Data Recovery Wizard for Mac to get the lost data back. A trusted platform for many Apple users with exclusive features to recover data of multiple formats in simple steps.
If you find this article helpful, share it with your friends and leave a comment about it. If you have any queries regarding the topic, feel free to ask them in the comment box, and do let me know of the future issues you wish to see articles from EaseUS.
WindowServer Mac FAQs
Here are some of the most frequent FAQs asked on the topic. If you have similar queries hope this will help you.
1. How to fix WindowServer quit unexpectedly on macOS Ventura?
The WindowServer quitting unexpectedly can happen due to multiple reasons. To fix the issue on macOS, follow the list of solutions below:
- Modify settings in Mission Control
- Adjust Lock Screen settings.
- Change to a different dock.
- Upgrade or Downgrade macOS.
- Create a new account on Mac.
- Force quit the dock.
You can also try to use the default color profile, trashing display preference files, menu bar extensions, etc.
2. How to fix WindowServer prevents it from sleeping?
If the WindowServer is preventing you from putting your macOS to sleep, then follow the methods below to see if the issue gets resolved:
- Restart your Mac
- Check your System's sleeping settings.
- Disable the Wake for Network access.
- Modify System sharing configuration.
- Close processes that prevent your Mac from sleeping.
- Boot your device into safe mode.
3. How to check if the WindowServer uses a high CPU?
You can use the Activity Monitor application to check for CPU usage on macOS. It has all the details of all applications regarding CPU, memory, energy, etc.
Go to Finder -> Applications -> Double click Utilities -> Open Activity monitor -> Click on CPU.
Was This Page Helpful?
Jaden is one of the editors of EaseUS, who focuses on topics concerning PCs and Mac data recovery. Jaden is committed to enhancing professional IT knowledge and writing abilities. She is always keen on new and intelligent products.
Related Articles
-
How to Fix Mac Flashes Folder with Question Mark on Startup? [macOS 13/12/11 Applicable]
![author icon]() Jaden/2024-10-25
Jaden/2024-10-25 -
How to Fix the Recovery Server Could Not Be Contacted on macOS Sonoma/Ventura
![author icon]() Brithny/2024-10-10
Brithny/2024-10-10 -
Is Primary and Active Partition the Same [Beginner's Guide]
![author icon]() Sherly/2024-11-27
Sherly/2024-11-27 -
How to Fix Verifying Microsoft Word Mac Stuck
![author icon]() Dany/2024-11-25
Dany/2024-11-25

EaseUS Data Recovery Services
EaseUS data recovery experts have uneaqualed expertise to repair disks/systems and salvage data from all devices like RAID, HDD, SSD, USB, etc.