If you've installed the macOS Sequoia Beta and are experiencing issues with it or prefer a more stable version. In that case, you should either downgrade to an earlier version or upgrade to the final release. Using a beta version may lead to unexpected bugs or performance problems that cause problems during your daily tasks.
Whether you want to update to the final version of macOS as soon as it becomes available or downgrade to a previous, more reliable version, the process is straightforward but requires attention. With the help of this guide, you can safely uninstall macOS Sequoia Beta and replace it with the most suitable version for your requirements, making the transition more dependable and seamless.
How to Remove the macOS Sequoia Beta from Your Mac
You should uninstall macOS Sequoia Beta if you're facing bugs or performance issues with the beta version. Reverting to a stable macOS version can help avoid Apple beta software problems. The instructions for uninstalling macOS Sequoia Beta from your Mac are as follows.
Step 1. Open the menu bar and go to "System Settings."
Step 2. Click "General" and then "Software Update."
Step 3. Click the "Beta updates" button and select "Off" to stop receiving beta updates.

Remember to share this post with your friends or colleagues in need:
How to Uninstall macOS Sequoia Beta and Upgrade to Final Release
If you're ready to upgrade, you need to uninstall macOS Sequoia Beta. This ensures a smooth transition to the final, stable release. It helps prevent issues that can come from using beta software. Check out how to remove the macOS Sequoia Beta and update to the stable version.
Step 1. Boot Your Mac into Recovery Mode
1. Power off your Mac.
2. For Apple Silicon Macs, press and hold the Power button until "Loading startup options" appears, then select "Options" and click "Continue."

3. Turn on your Mac for Intel Macs and immediately press Command-R until the Apple logo appears.
Step 2. Remove macOS Sequoia Beta
1. In Recovery Mode, you'll see several options: Restore From Time Machine Backup, Reinstall macOS, Safari, and Disk Utility. Choose "Disk Utility" and click "Continue."
2. In Disk Utility, find your drive with macOS Sequoia Beta on the sidebar. Click "Erase," choose APFS format, and confirm the erasure.

Step 3. Install the Final macOS Version
1. Go back to the macOS Recovery window and select "Reinstall macOS."

2. Click "Continue" and follow the instructions to install the macOS Sonoma. Select your drive and wait for the installation to complete.
Step 4. Restore from Time Machine Backup (Optional)
- 1. If you have a Time Machine backup, you can easily restore your system and data. Connect your Time Machine backup drive.
- 2. In Recovery Mode, choose "Restore From Time Machine Backup." Select your backup disk, then choose the backup to restore. Click "Restore" and let the process end.
Step 5. Downgrade to Earlier Version or Upgrade to Final Release
If you don't have a Time Machine backup, install an older macOS version with a bootable installer to downgrade Sequoia.
How to Create a bootable installer:
Luckily, you can create a bootable installer with the help of EaseUS Data Recovery Wizard for Mac, and this feature is totally for free. Download and try it now!
✨Step 1. Connect USB Flash Drive and Choose a macOS Version
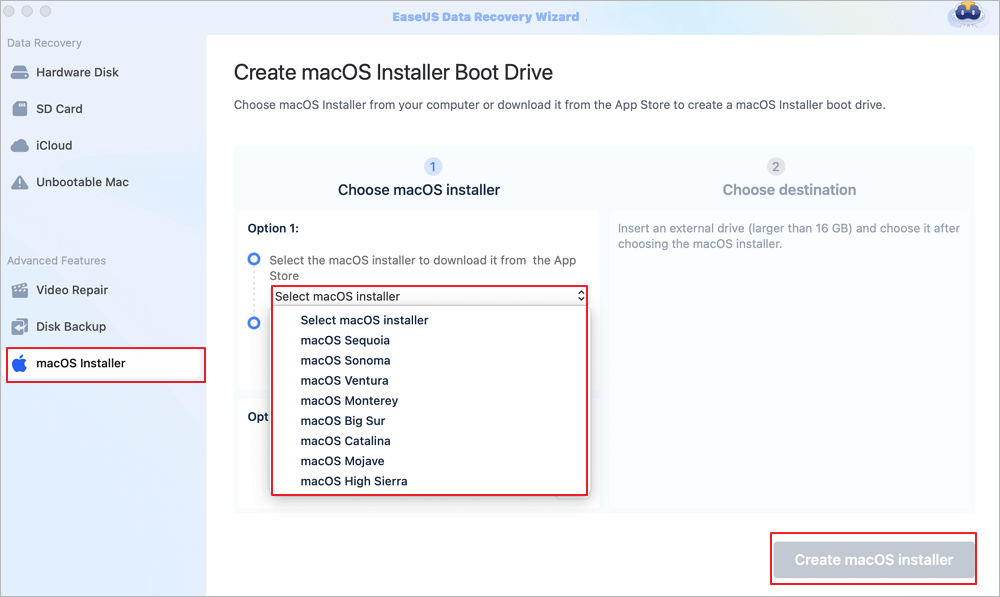
Launch EaseUS recovery software, and choose "macOS Installer" from the Advanced Features. Insert a USB that has more than 16GB of free storage space.
- Option 1: Choose a macOS version you want to install, and a new windows will ask you to download macOS installer from App Store. After downloading the installer, click "Refresh".
- Option 2: If you have already downloaded macOS installer, choose "Add" and select the installer you have downloaded.
Finally, you can choose "Create macOS Installer" to start creating the bootable installer. You can select various macOS versions like macOS Sequoia, Sonoma, Ventura, Monterey, Big Sur, and older versions.

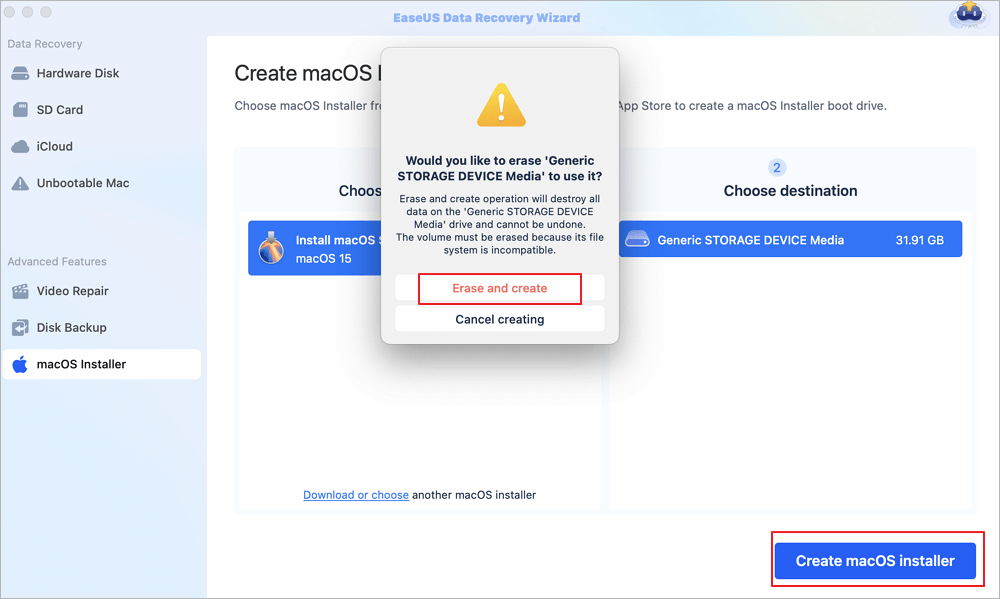
✨Step 2. Erase the USB and Create a macOS Installer
A notice window will appear to warn you this operation will remove everything on this USB. Make sure you have backed up data and nothing important is left on this USB, click the "Erase and create".

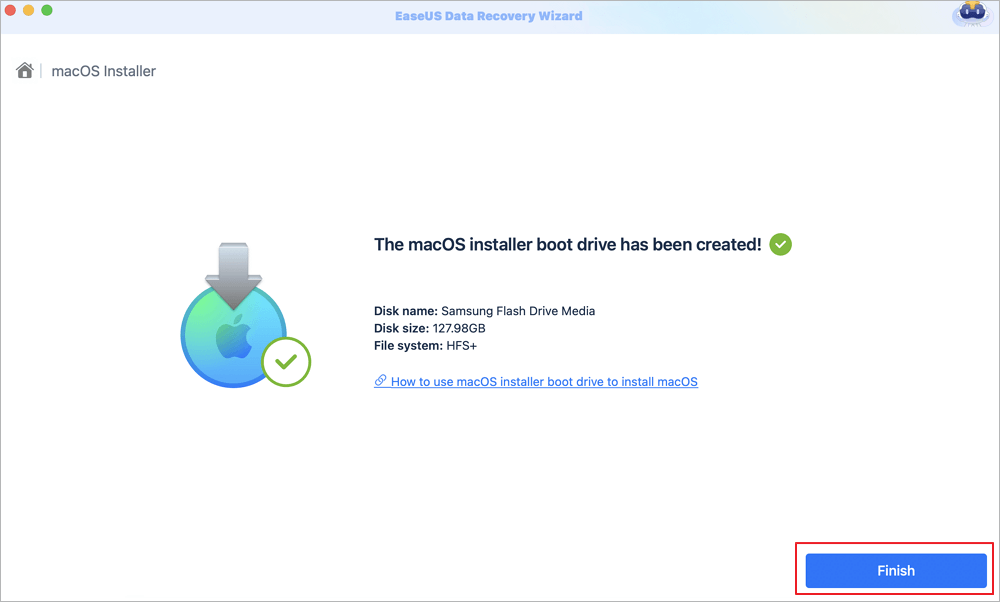
✨Step 3. Wait and Check How to Use macOS Installer
The software will automatically format the USB and download macOS installer files. After creating the bootable macOS installer, click the blue link on the interface to learn how to use the macOS Installer boot device to install macOS. Finally, click "Finish" to complete the whole process.

You can install macOS Sequoia beta from USB to upgrade to the final release, you can simply wait until the MacOS Sequoia public version is released. Then, you can install it from the Mac App Store or Software Updates.
Pro Tips: How to Recover Data Lost During Downgrade or Upgrade
When switching MacOS versions, you may eliminate critical files while downgrading or upgrading your system. For restoring lost data, EaseUS Data Recovery Wizard for Mac is one of the best tools for data recovery. Praised for its swift output, it offers support for multiple versions of macOS, which is why it can be called a versatile tool for file recovery.
It can search for files and folders even if the operating system has been substantially altered, like after upgrading or downgrading macOS. The program's interface is also friendly and allows users to restore lost files on macOS Sequoia in seconds. To use this software, you only need to follow a simple procedure, and you can scan your Mac for the lost files and then recover them. This data recovery tool for Mac is designed to help you efficiently retrieve your data, providing peace of mind during the upgrade or downgrade process.
Key Features:
- 🔴Recover lost files with a high success rate after macOS Sequoia upgrades or downgrades.
- 🟡Performs thorough scans to find and restore files even after major system changes.
- 🟠Retrieves lost or missing file after update macOS Sequoia.
Here's how to retrieve lost files on a Mac with EaseUS Data Recovery Wizard.
Step 1. Search for lost files
Select the disk location to search for lost files (it can be an internal HDD/SSD or an external hard drive) where you lost data and files. Click the "Search for lost files" button.

Step 2. Go through the scanning results
This software will immediately scan your selected disk volume and display pictures, documents, audio, videos, and emails on the left pane.

Step 3. Select the file(s) and recover
Click the data to preview, and click the "Recover" button to have them back.

Final Words
This guide covered how to uninstall macOS Sequoia Beta, downgrade to an earlier version, or upgrade to the final release. We walked you through the steps for removing the beta, reinstalling a stable macOS version, and using a bootable installer for older versions.
EaseUS Data Recovery Wizard for Mac is a great program that assists with data recovery in case you lose any crucial files during this process. It is a dependable option for data recovery because of its robust features and simplicity of usage. Get the EaseUS Data Recovery Wizard for Mac to protect your data while the system changes.
FAQ
Here are some simple FAQs related to this topic:
1. How to uninstall Sequoia beta?
Open the Apple menu and click "General" on the sidebar. Select "Software Update" from the General pane. Click the info button next to "Beta Updates." Choose "Off" from the drop-down menu in the pop-up and click "Done."
2. How to roll back from macOS Sequoia beta?
To enter Recovery Mode on your Mac, turn it off and restart it while gripping certain keys. While in Recovery Mode, use macOS Sequoia Beta to delete the disk using Disk Utility. Then, reinstall macOS Sonoma from the Recovery options.
3. How to uninstall macOS beta version?
To remove a macOS beta, you must first boot into Recovery Mode, delete the beta's installation disk, and then select the Stable macOS version to reinstall from the Recovery menu.
Was This Page Helpful?
Dany is an editor of EaseUS who lives and works in Chengdu, China. She focuses on writing articles about data recovery on Mac devices and PCs. She is devoted to improving her writing skills and enriching her professional knowledge. Dany also enjoys reading detective novels in her spare time.
Finley is interested in reading and writing articles about technical knowledge. Her articles mainly focus on file repair and data recovery.
Related Articles
-
What Is Ubuntu Format Disk Command Line? How to Use It [Your 2025 Fresh Guide]
![author icon]() Tracy King/2025-01-24
Tracy King/2025-01-24 -
How to Set Up Windows 11 Without Microsoft Account
![author icon]() Brithny/2025-01-24
Brithny/2025-01-24 -
Resident Evil 4 Save File Location & Config File Location [All You Want to Know]
![author icon]() Rel/2025-01-24
Rel/2025-01-24 -
Fix Dragon's Dogma 2 Not Launching [Possible Solutions]
![author icon]() Oliver/2025-01-24
Oliver/2025-01-24
EaseUS Data Recovery Services
EaseUS data recovery experts have uneaqualed expertise to repair disks/systems and salvage data from all devices like RAID, HDD, SSD, USB, etc.