Are you having trouble initiating a video call on your Mac? There are different applications on Mac that enable users to do video calls. If you cannot interact with others over video calls, the built-in camera or external webcam is not working correctly. Several Mac users have reported the inability of the built-in camera of the Mac to work efficiently.
It is understandable that the camera is one of the most critical applications on Mac. It would be best to have it for professional presentations, social meetings, etc. Moreover, there are several third-party apps that use the in-built camera of the system. The camera not working will affect these apps too.
In that case, it is vital to implement solutions to immediately fix the issue. This article will discuss the different fixes to resolve the Mac camera not working.
| Workable Solutions | Step-by-step Troubleshooting |
|---|---|
| Quit macOS Camera Processes | Launch Terminal. For that, you need to click on Applications > Utilities > Terminal...Full steps |
| Choose the Right Camera | For that, you need to first open the app. After that press Command + Comma...Full steps |
| Allow Camera Access | Go to the Apple menu. Click on System Settings from the drop-down menu...Full steps |
| Other Woking Solutions | Restart your Mac > Check the Camera in Mac's System Report > Remove Apps Screen Time Limit...Full steps |
How to Fix Camera Not Working on macOS?
Is your Mac camera not working? Not to worry! There are multiple solutions one can adopt to fix this issue. To simplify it, we have attached a video regarding the same.
- 0:55 Reset SMC and NVRAM
- 1:31 Kill Camera Assistant
- 2:02 Allow Camera for specific apps
- 2:41 Update to the latest macOS version
- 3:00 Use an external camera
Now let us take a look at the different solutions listed here.
Method 1. Quit macOS Camera Processes
Killing the MacOS Camera processes can help in resolving the camera not working problem. If you fear data loss, having a backup of the critical files will help. To quit camera processes, take a look at these steps.
Step 1. Quit the applications that use the camera.
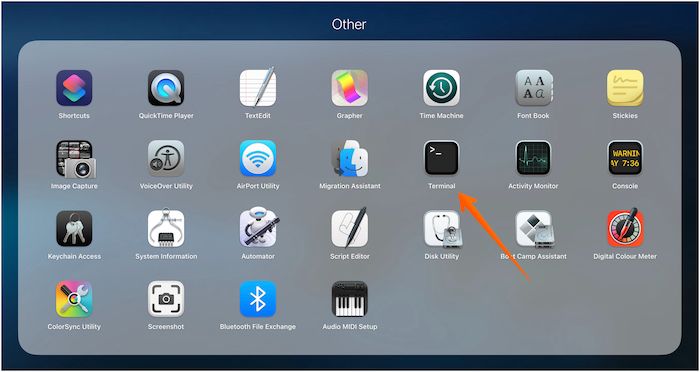
Step 2. Launch Terminal. For that, you need to click on Applications > Utilities > Terminal.
Step 3. Type sudo killall VDCAssistant. Press the Enter key.
Step 4. Type sudo killall AppleCameraAssistant. Press the Enter key.
Note: If the system asks, you might need to enter the admin password.
You must restart the system and see if the problem is resolved. If not, you will need to move on to other solutions.
Method 2. Choose the Right Camera in the App's Settings
Did you know wrong settings within an app can lead to a dysfunctional camera? That's right! You might have mistakenly made some wrong setting choices within an app that uses the camera. However, it is vital to identify the mistake and fix it.
For that, you need to first open the app. After that press Command + Comma. This will lead you to the preferences. Now, you can see the camera settings.
Besides, if you have more than one camera connected to the system, opt for the right one. In case of confusion, choose the in-built camera of Mac. You can also fix the Zoom camera not working issue with this method.
Method 3. Allow Camera Access on Mac
Sometimes, updating the system can lead to disruptions in camera permissions. In that case, you must reset them again.
For that, take a look at the steps you must follow –
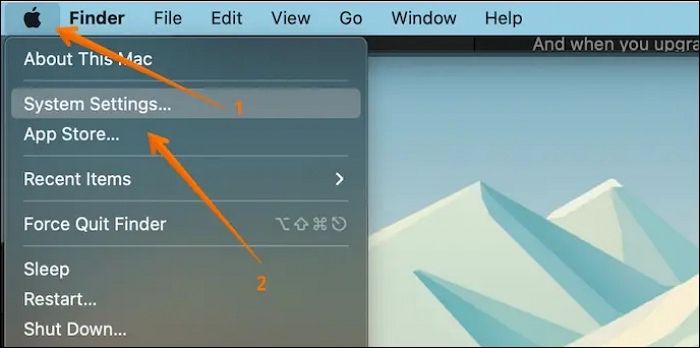
Step 1. Go to the Apple menu. Click on System Settings from the drop-down menu.
Step 2. Now, choose Privacy & Security. After that, go to the Privacy tab.
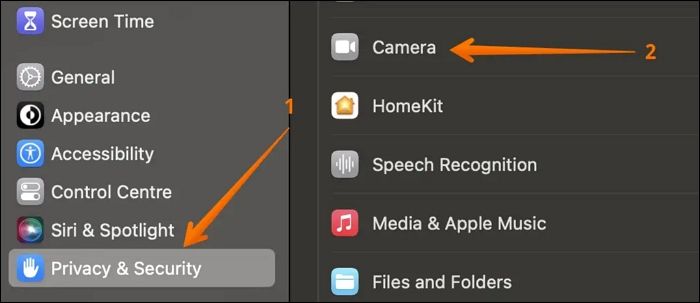
Step 3. On the left side, select Camera. Take a look at the apps and choose the ones for which you want access to the camera.
Step 4. Quit the window. Open any app that uses the camera and see if it's working.
Method 4. Restart your Mac to Make the Camera Working
Sometimes, the simplest solution yields the best results. Have you tried restarting the system to fix the issue? You never know when the problem might get resolved.
To restart the system, all you have to do is follow some simple steps. Click on the Apple icon. When you see the drop-down menu, opt for the Restart option. The system will shut down and restart after a few seconds.
Method 5. Check the Camera in Mac's System Report
Another solution to the Mac Camera not working is checking the System Report. For that, here are the steps to follow.
Step 1. Go to the Apple icon. Choose System Settings.
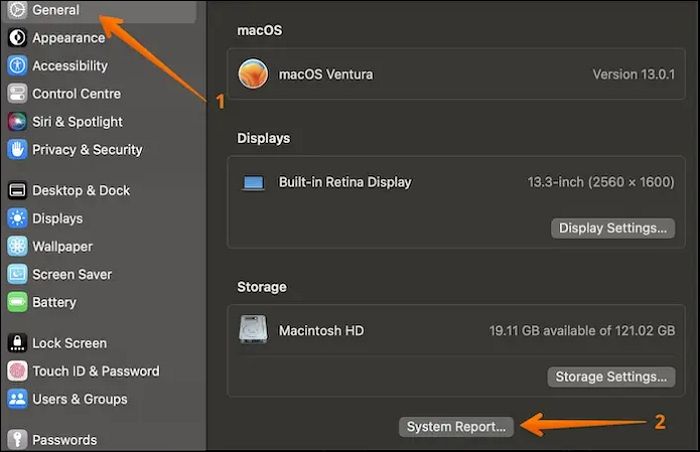
Step 2. Go to the General tab from the left-hand sidebar. Click on System Report by scrolling in the right-hand side settings panel.
Step 3. After that, click on Hardware. Select Camera. Now you will get all the information related to the camera.
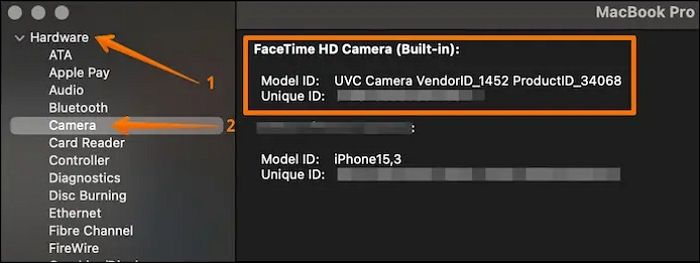
Note: The system cannot detect the camera if you don't find this information. In that case, there is nothing you can do. You have to contact the Apple Support team to resolve the problem.
Method 6. Remove Apps Screen Time Limit on macOS
Is the camera working for one app but not working for another? In that case, you must first be sure about the problem. Open different apps and see where the camera is working. Here, the issue might be related to the screen time of the apps.
Removing the screen time limit aids in fixing the problem. Check out the steps here.
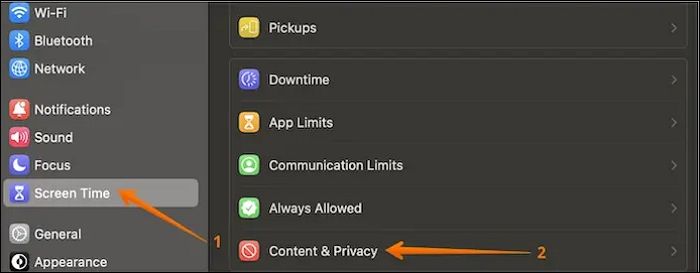
Step 1. Go to the Apple menu. Choose System Settings.
Step 2. Select Screen Time from the left-hand panel. Go ahead with Content & Privacy.
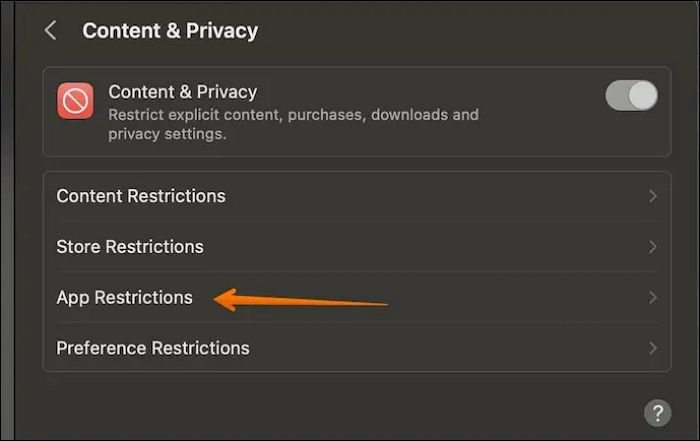
Step 3. In the next window, you need to select the App Restrictions option.
Step 4. Ensure the Allow Camera is turned on in the Allowed section.
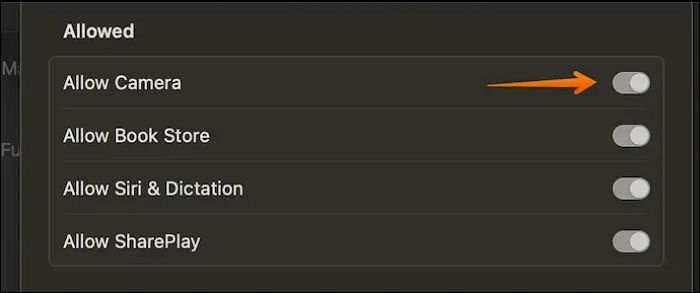
Reopen the camera to see if the issue is resolved.
Method 7. Update to the Latest macOS to Fix Mac Camera
In some cases, glitches related to the existing macOS can lead to the camera not working. Here, the solution is to update the macOS. That way, you get the latest version and fix the issue simultaneously.
Take a look at the steps you can adopt to update to the recent macOS.
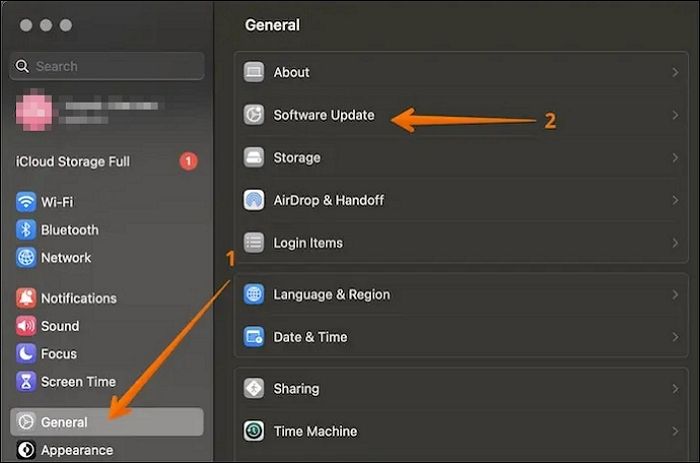
Step 1. Go to the Apple menu and select System Settings from the drop-down.
Step 2. Click on General from the left-hand panel, followed by Software Update. If updates are available, you need to select Upgrade Now.
If there are no upgrades, you need to visit another time to check if there are updates.
Bonus Tip: How to Recover Lost Videos on Mac
Have you encountered data loss during the upgradation to the latest macOS version? In that case, data retrieval is essential. For that, you can take assistance from professional data recovery software. Try EaseUS Data Recovery Wizard for Mac for hassle-free data restoration.
EaseUS Mac USB recovery software is a professional data recovery tool that aids in the retrieval of different types of data. Moreover, the platform is easy to use and aids in the easy recovery of data with simple steps. It also comes with exciting features, making it a desirable choice.
- You can recover Mac deleted files, videos, music files, documents, and other files.
- Retrieve data from hard drives, SSD, USB flash drives, pen drives, etc.
- Send the data recovered to cloud storage like Google Drive, Dropbox, etc., without issue.
- With this software, you can preview the files you want to recover.
- You can scan lost data and choose the one you want to restore with the file filter option.
Step 1. Select the drive to be scanned
In the main EaseUS Data Recovery Wizard window, there will be a list of the drives connected to your Mac. Select the drive you need to recover lost/deleted files from, and click the "Search for lost files" button.

Step 2. Select your lost data/files
EaseUS Data Recovery Wizard for Mac will immediately scan your selected disk volume and display the scanning results on the left pane. You can sort the results to find the wanted files if you are looking for certain files.

Step 3. Recover lost/deleted data
Once you have found the desired files, preview the files and then click "Recover" to begin the recovery of your deleted/lost Mac files.

Conclusion
The Mac camera not working is a frustrating problem. Attending meetings or presentations becomes difficult. That is why you need to opt for various solutions right away.
To fix the issue, you can update the latest macOS versions, check out the System Report, restart the system, etc. However, it would be best to consider data loss before adopting these solutions.
An efficient data recovery program is excellent if you suffer from data loss. You can download and install EaseUS Mac data recovery software. The tool is easy to use and highly reliable. If you haven't used this software yet, try it out today!
MacBook Pro Camera Not Working FAQs
You can apply these solutions to fix the MacBook Pro Camera not working. However, to know more, look at the below-listed questions and answers.
1. How do I reset my Mac camera?
To reset the Mac camera, you need to launch Terminal. After that, type - sudo killall VDCAssistant and sudo killall AppleCameraAssistant. Now, hit the Enter key. If asked, you will need to enter the admin password.
2. Why is my Mac camera showing a black screen?
There are various reasons that can explain the black screen of the Mac camera. For starters, it can be due to the blocked lens. Besides, it can also be due to issues with the driver software responsible for the camera's efficient working.
3. How do I open the camera on Mac?
To open the camera on Mac, go to the Finder app. Choose Applications and double-click on the Photo Booth. Check if the green light is on to know if the camera is active.
4. How do I turn on the camera on my Mac?
To turn on the camera on your Mac, go to Applications. Choose Photobooth and wait for the green light to be activated. The green light is an indication that the app is working perfectly fine.
Was This Page Helpful?
Brithny is a technology enthusiast, aiming to make readers' tech lives easy and enjoyable. She loves exploring new technologies and writing technical how-to tips. In her spare time, she loves sharing things about her game experience on Facebook or Twitter.
Related Articles
-
PC Stuck in Boot Loop After RAM Upgrade (Causes & Fixes)
![author icon]() Larissa/2026-04-15
Larissa/2026-04-15 -
Windows 11 Keeps Crashing - All Methods to Fix
![author icon]() Jerry/2025-07-04
Jerry/2025-07-04 -
How to Factory Reset Toshiba Laptop [Detailed Info]
![author icon]() Jerry/2026-04-15
Jerry/2026-04-15 -
How to Erase All Content and Settings on Mac [macOS Ventura/Monterey]
![author icon]() Dany/2026-06-30
Dany/2026-06-30
EaseUS Data Recovery Services
EaseUS data recovery experts have uneaqualed expertise to repair disks/systems and salvage data from all devices like RAID, HDD, SSD, USB, etc.