If you're looking for the best solutions to format internal hard drives in Mac, you're at the right place. Formatting the internal hard drive becomes necessary when selling your Mac or hard disk, creating issues like malware, corrupted files, space issues, etc. So, what will you do in such a case?
All you need to do is go through the detailed guide mentioned below to get rid of the internal hard drive Mac data. We'll go through the best format for the Mac internal hard drive, followed by the different methods for the Mac hard drive. Our guide lets beginners and professionals start their internal hard drive formatting journey. Starting with the best format.
What is the Best Format for Mac Internal Hard Drive?
It is necessary for Mac users to know a few details before handling Mac's internal hard drive. The most important feature is the different drive formats, confirming whether a specific hard drive is compatible with Mac. Hence, beginners and professionals need to understand the best format for Mac internal hard drives.
So, let us know in detail about the top four hard drive formats:
1. Apple File System or APFS: It was launched in 2017 and was used in macOS Sierra. It was created with flash storage Solid-State Drives (SSDs), which are widely used in Mac Mini's, iMac Pro, iMac, MacBook Pro, MacBook, etc. APFS quickly shares data from one file to another and can magically duplicate the files within seconds. The only concern with APFS is that it is not an ideal format for the external hard drive.
2. Hierarchical File System or HFS: It is the default formatting option in Mac that comes while formatting the internal hard drive. The macOS Extended (Journaled) is the improved version of HFS+ and comes with macOS Extended Case Sensitive as the next option.
- 2.1 MacOS Extended (Journaled): It follows storing media on the drive while preventing the files from getting corrupted. The only concern with MacOS Extended (Journaled) is that it can be used for Mac only.
- 2.2 MacOS Extended Case Sensitive: It has an additional case-sensitive feature along with all key features of the macOS Extended (Journaled) version. The only concern with MacOS Extended Case Sensitive is that it can create duplicate files due to simple human errors.
3. New Technology File System or NTFS: It is the widely used internal hard drive format for Windows devices. NTFS is perfect for Windows but comes with a single concern: It creates ready-only drives and prevents users from modifying or adding content to the drive.
4. Extensible File Allocation Table or exFAT: It is the perfect internal hard drive format for Windows and Mac devices. It solves the device issues by removing the file size and volume size limitations. The only concern with exFAT is that it can create corrupted files and require quick file backups.
NTFS or exFAT for HDD, SSD, M.2, NVMe
The dialog box that shows these two options will not explain to you the difference between the two. But, you don't have to worry anymore.
Hence, it is easy for the users to go for the best format for the Mac internal hard drive. APFS was the first in-built format, with macOS Extended (Journaled) and macOS Extended Case Sensitive being the perfect choices. Coming to Windows, users can go for NTFS, while the cross-platform file exchange format is exFAT.
How to Format Internal Hard Drive Mac?
- Fix 1: Format the Internal Disk with Disk Utility
- Fix 2. Use Terminal to Format Internal Hard Drive for Mac
The different Mac internal hard drive formats, like APFS, HFS, NTFS, exFAT, etc., are easy to understand. After going through their details, users can select the format based on the device's needs. Let us now move to the detailed steps to format the internal hard drive Mac. The top two methods for internal hard drive formatting are:
Method 1: Format the Internal Disk with Disk Utility
Disk utility is a free Mac device application. It can be quickly accessed for formatting storage devices, startup disk, SSD or Mac's main hard drive, USB flash drive, etc. All you need to ensure is that you must have data backup as formatting clears all data currently stored in the drive. It is easy to format the internal hard drive in Mac using the disk utility feature with the quick steps mentioned below:
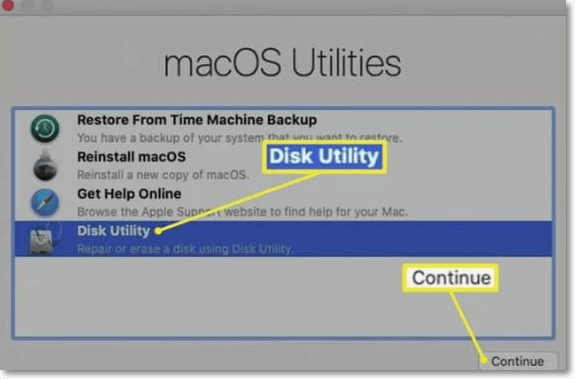
Step 1. Start the Mac from macOS Recovery by immediately pressing and holding "Command + R" to open the “Utilities” window.
Step 2. Click the "Disk Utility" option from the "Utilities" window in the macOS Recovery by clicking "Continue."
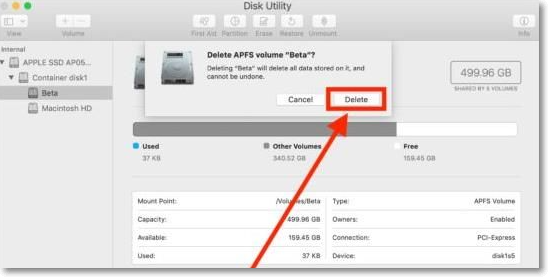
Step 3. Find the data volume with the hard drive name and select the data volume.
Step 4. Click "Edit" followed by "Delete APFS Volume" from the menu bar or click the "delete button ( - )" in the disk utility toolbar.
Step 5. Select "delete" from the pop-up.
Step 6. After deleting the volume, select the hard drive name in the sidebar and press the "Erase' button, followed by entering the new name.
Step 7. Select the APFS format option, or you can go with the recommended Mac format by default. Once done, select "Erase."
Step 8. Quit the disk utility in the "Utilities" window and reinstall macOS if looking to start this menu.
Method 2. Use Terminal to Format Internal Hard Drive for Mac
The second method is to use the terminal to format the internal hard drive Mac. The terminal application allows access to the command line. The quick steps for the same are:
Step 1. Open the terminal application using Launchpad, Spotlight, or in Applications/ Utilities/ folder.
Step 2. The "diskutil" command is used with different flags and eraseDisk verbs for different disk selections. The basic syntax for the same is:
diskutil eraseDisk FILE_SYSTEM DISK_NAME DISK_IDENTIFIER
Step 3. The different commands for formatting internal hard drive for Mac based on the four different disk formatting options are:
- 3.1 Formatting internal hard drive to MacOS External Journaled (JHFS+) from terminal in Mac OS X
- diskutil eraseDisk JHFS6 DiskName /dev/ DiskNodeID
- 3.2 Formatting internal hard drive to MacOS Extended (HFS+) from terminal in Mac OS X
- diskutil eraseDisk HFS+ DiskName /dev/ DiskNodeID
- 3.3 Formatting internal hard drive to MS-DOS fat32 from the command line in Mac OS X
- diskutil eraseDisk FAT32 DiskNameGoesHere /dev/ DiskNodeIDHere
- 3.4 Formatting internal hard drive to ExFAT from the command line in Mac OS X
- diskutil eraseDisk ExFAT DiskName /dev/ DiskNodeID
Step 4. It is easy to select the common file format in the disk after completely erasing from the options like JHFS+, HFS+, FAT32, ExFAT, etc.
Final Verdict
No more fuss in formatting the internal hard drive on Mac devices after going through the article above. Mac users can format the internal hard drive due to storage issues, malware, selling the system, etc. The first step that is necessary is to select the best format for the Mac internal hard drive from APFS, HFS, NTFS, exFAT, etc.
We've mentioned the top two methods in formatting the internal hard drive on Mac, including using disk utility or Terminal. It is easy for the users to go through the detailed steps of these methods, helped by images. All you need to do is go through the guide mentioned above and learn all details about internal hard drive formatting for your Mac.
Was This Page Helpful?
Daisy is the Senior editor of the writing team for EaseUS. She has been working at EaseUS for over ten years, starting as a technical writer and moving on to being a team leader of the content group. As a professional author for over ten years, she writes a lot to help people overcome their tech troubles.
Written by Tracy King
Tracy became a member of the EaseUS content team in 2013. Being a technical writer for over 10 years, she is enthusiastic about sharing tips to assist readers in resolving complex issues in disk management, file transfer, PC & Mac performance optimization, etc., like an expert.
Related Articles
-
What Does Shrink Volume Do? How to Safely Shrink Volume?
![author icon]() Sherly/2024-01-11
Sherly/2024-01-11 -
[Detailed Answer] Is Cloning A Hard Dive Safe & How to Clone
![author icon]() Cici/2024-03-18
Cici/2024-03-18 -
Fix Mac Finder Search Not Working in 5 Proven Ways
![author icon]() Brithny/2024-02-18
Brithny/2024-02-18 -
{Solved}How to Fix No Audio in Windows 11?
![author icon]() Daisy/2024-01-11
Daisy/2024-01-11

EaseUS Data Recovery Services
EaseUS data recovery experts have uneaqualed expertise to repair disks/systems and salvage data from all devices like RAID, HDD, SSD, USB, etc.