| Workable Solutions | Step-by-step Troubleshooting |
|---|---|
| Fix 1. End process in Task Manager | Press Ctrl + Alt + Delete to open Task Manager > click Details > select explorer.exe...Full steps |
| Fix 2. Repair corrupted file system | Run cmd as administrator > type sfc /scannow and hit Enter ...Full steps |
| Fix 3. Remove AutoPlay | Open Control Panel > choose AutoPlay > uncheck "Use AutoPlay for all media and devices"...Full steps |
File Explorer Keeps Opening by Itself
Have you ever experienced this kind of thing? Every time you try to close File Explorer, it keeps opening automatically. When you type something on your document, File Explorer keeps popping up, interrupting your typing. It's very frustrating. You might have scanned for the virus, but nothing found. In general, File Explorer keeps opening results from the following causes.
- There is something wrong with the file explorer, or the file explorer is crashing.
- The system files have missing or corrupted.
- AutoPlay is turned on and it is by default selected to open File Explorer to show the contents of your external drive.
How to Fix File Explorer Keeps Popping Up Without Losing Data
The File Explorer keeps crashing or popping up happens from time to time. If you are also encountering this issue, manually fix it with the help of methods below.
Method 1. End File Explorer in Task Manager
- Press hold the Ctrl + Alt and Delete key on your keyboard to open Task Manager.
- Click on "Details", select "explorer.exe" and click "End task" at the right-bottom of the screen.
- Click "File" and click "Run new task".
- Type explorer.exe and click on "OK".
- Restart your computer.
If the File Explorer still keeps opening on its own, move to method 2 to restore and repair missing or corrupted system files.
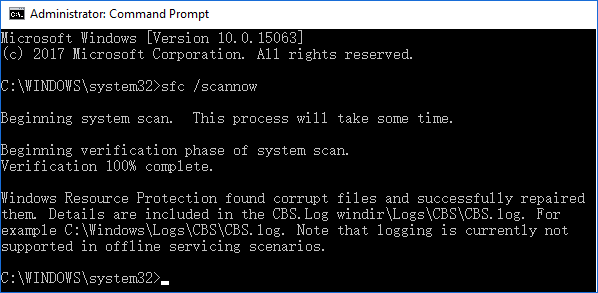
Method 2. Repair Corrupted System Files
SFC (System File Checker) is a command-line utility in Windows that allows users to scan for corruptions in Windows system files and restore corrupted files. You can try this way to solve "File Explorer keeps opening" issue.
- Click the Start button and type cmd. Right-click the Command Prompt and choose "Run as administrator".
- Type sfc /scannow and press Enter to run a full system scan.
Leave the Command Prompt to run. It may take between 5-10 minutes. After the process is finished at 100%, if everything goes well, you would get the message "Windows Resource Protection did not find any integrity violations". If you see a message "Windows Resource Protection found corrupt files and successfully repaired them", it means that you have successfully repaired missing or corrupted system files in Windows 10 with SFC.
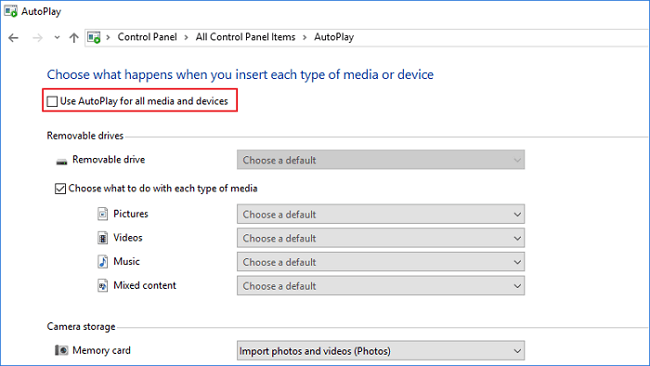
Method 3. Remove AutoPlay
If you are experiencing "File Explorer opens randomly" whenever connecting an external drive to your computer, then the issue might be caused by the AutoPlay feature. And the reason for "File Explorer keeps popping up" is that your external drive has a loose connection. And it keeps disconnecting/connecting, which forces your system to open File Explorer constantly.
- Open the Control Panel and choose AutoPlay.
- Uncheck the option "Use AutoPlay for all media and devices".
- Click "Save". After this, you won’t see File Explorer keeps opening every time you insert a USB device.
How to Recover Lost Files with Data Recovery Software
Although File Explorer keeps opening won't cause data loss usually, other problems or operations on Windows computers pose a threat to data safety. Data loss can be caused by accidental deletion, storage device formatting/damage, system crash, virus attack, partition loss, etc. To entirely and quickly recover lost files on Windows 10/8/7, we highly recommend you try EaseUS Data Recovery Wizard. It enables you to recover deleted files in Windows 10 with ease.
Download this data recovery tool and start to restore your data now!
Step 1. Run EaseUS Data Recovery Wizard. Choose the drive where you lost files and start scanning by clicking "Search for Lost Data". This software allows you to recover lost data from all devices, including HDD, SSD, USB drive, SD card, pen drive, camera, etc.

Step 2. Browse the full scan results. You can choose the file type you need by clicking on the file type filter. EaseUS data recovery software supports 1000+ file types like photos, videos, documents, emails, audio files, and many more.

Step 3. Select the files you want to preview. Click "Recover" and set a storage location or Cloud drive to save the recovered data.

Was This Page Helpful?
Dany is an editor of EaseUS who lives and works in Chengdu, China. She focuses on writing articles about data recovery on Mac devices and PCs. She is devoted to improving her writing skills and enriching her professional knowledge. Dany also enjoys reading detective novels in her spare time.
Brithny is a technology enthusiast, aiming to make readers' tech lives easy and enjoyable. She loves exploring new technologies and writing technical how-to tips. In her spare time, she loves sharing things about her game experience on Facebook or Twitter.
Related Articles
-
How to Factory Reset PS4 [2024 Complete Guide]
![author icon]() Larissa/2024-11-27
Larissa/2024-11-27 -
How to Fix Windows Boot Manager Boot Failed [Full Guide]
![author icon]() Cici/2024-11-27
Cici/2024-11-27 -
( Top 5 Picks) Linux Bootable USB Creator [2024 Updated]
![author icon]() Jerry/2024-11-25
Jerry/2024-11-25 -
Mac Internet Recovery Mode, How to Start Up [Full Guideline]
![author icon]() Jaden/2024-10-25
Jaden/2024-10-25

EaseUS Data Recovery Services
EaseUS data recovery experts have uneaqualed expertise to repair disks/systems and salvage data from all devices like RAID, HDD, SSD, USB, etc.