Windows is among the most renowned operating systems in the world, with features that explain the varying operability of the OS. While they are designed to execute many vital tasks, they are built to provide ease of use to their users. Such is the case with Windows, which tried to bring improvement in its user experience.
In Windows 10, the OS came up with a great feature under its belt, which was named "Reserved Storage." This article is all about discussing Reserved Storage Windows 10 and providing users with a guide on how they can enable and disable it across their devices.
An Overview of Reserved Storage Windows 10
The Reserved Storage feature was introduced in Windows 10 version 1903, which changed the methodology of handling disk space. As users mostly faced issues with managing their disk spaces, the need for a reserved space was the need of the hour. Therefore Windows 10 provided the update of taking out some reserved storage from HDD, which will be dedicated to the system tasks.
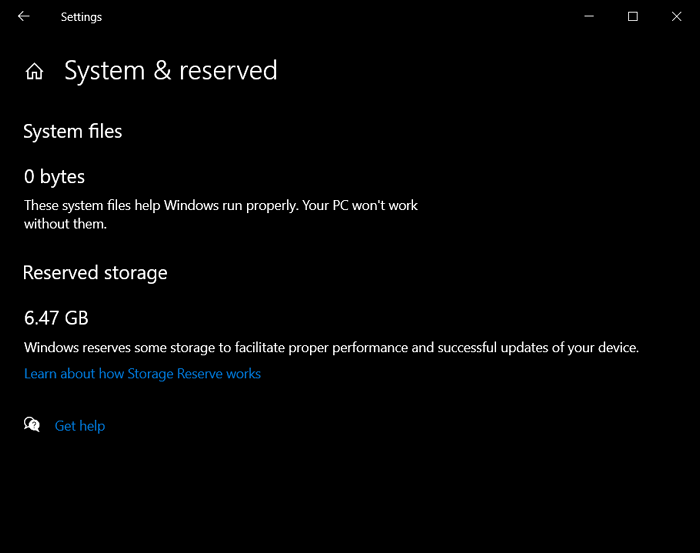
While almost 7GB of disk space is reserved for the OS, this will help them store updates, temporary files, applications, and system cache (Windows SSD cache included). It provides a smoother flow of operations for the OS, which would drive adaptability and accessibility according to the environment. The size of the Reserved Storage Windows 10 is believed to vary over time. It majorly depends on the utility of the system and its smooth workflow.
Having the Reserved Storage feature across your Windows 10 computer is lucrative in many ways. While it prevents the complete use up of the disk storage across the computer, it smoothens the operability of the device many times. To give users more control over this feature, it is always up to them to enable and disable the feature of Reserved Storage across their Windows 10 devices.
How to Enable Reserved Storage Windows 10?
Reserved Storage Windows 10 is one of the features with its pros and cons in terms of usability across the device. This is why it is up to the user to control the use of this feature within their Windows 10 device. If you wish to enable it across your computer, there are two different methods and approaches. Let's see how you can enable Reserved Storage on your Windows 10:
Method 1: Through the Registry Editor
Method 2: Through Command Prompt
Method 1: Through the Registry Editor
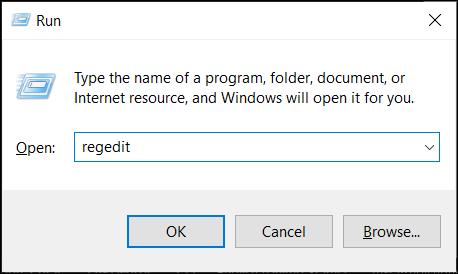
Step 1: You need to start by launching the Run program on your computer. Use the shortcut keys of "Windows + R" to process. Once the window appears on the front, type in "regedit." This will open up the Registry Editor in front of you.
Step 2: You need to navigate the following path across the Registry Editor. For that, you can easily copy and paste this across your address bar:
Computer\HKEY_LOCAL_MACHINE\SOFTWARE\Microsoft\Windows\CurrentVersion\ReserveManager
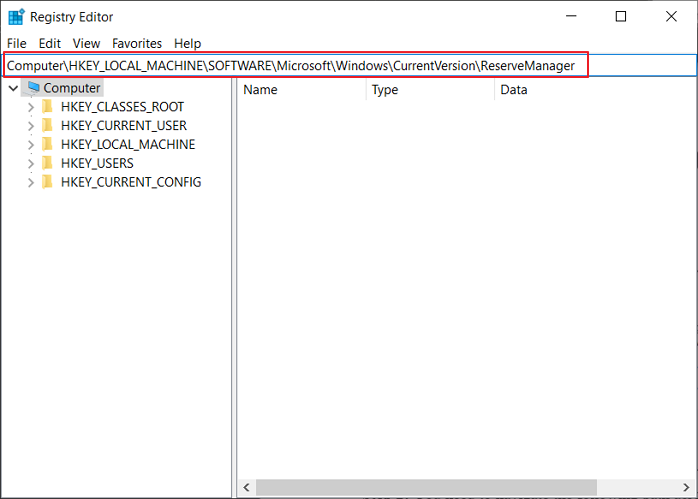
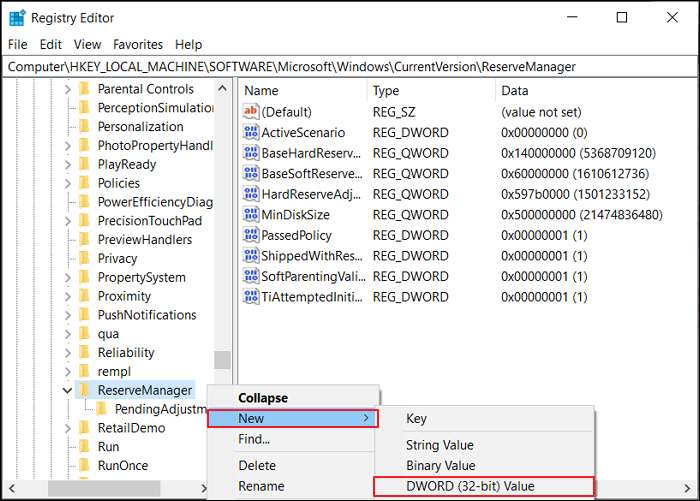
Step 3: As you search through this address, ensure that the "ReserveManager" folder is in the list.
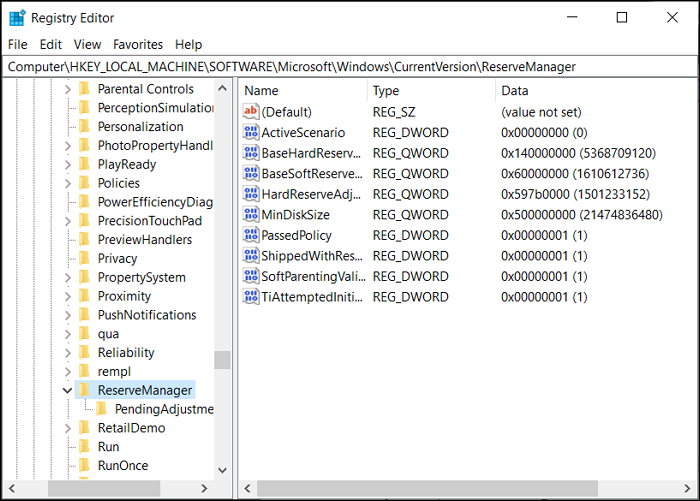
Step 4: On the right-sided panel, right-click on the vacant area and select the option of "New." You need to add a "DWORD (32-bit) Value." Name the registry key as "ShippedWithReserves."
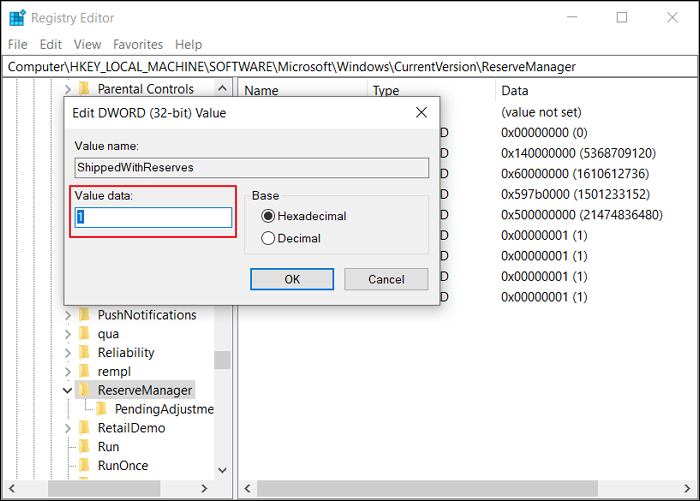
Step 5: You need to open the registry key by double-clicking it. Type the value of "1" across the "Value data:" space and click "OK." Restart your computer to make the changes.
Method 2: Through Command Prompt
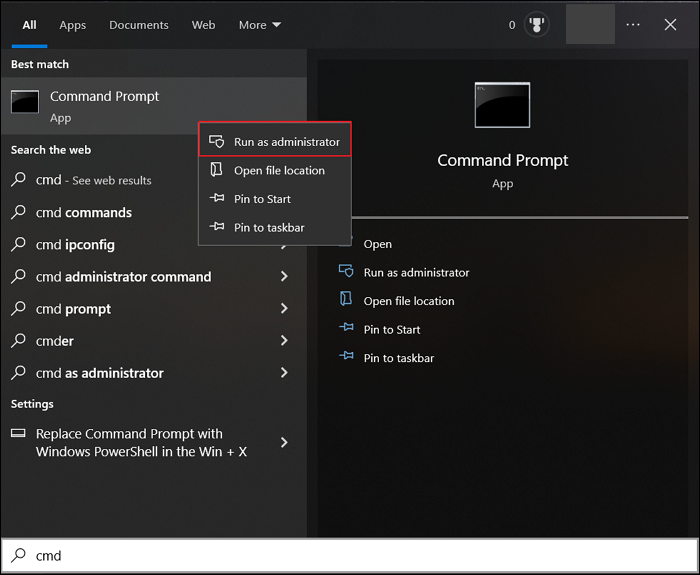
Step 1: To start the Command Prompt, go across the "Search" icon on the taskbar and type "cmd." As the results appear, right-click on the "Command Prompt" option and select the option of "Run as administrator."
Step 2: This will open up the Command Prompt in front of you. Next, you must ensure that the Reserved Storage feature is turned on. For that, type in the following command in the CMD:
DISM /Online /Get-ReservedStorageState
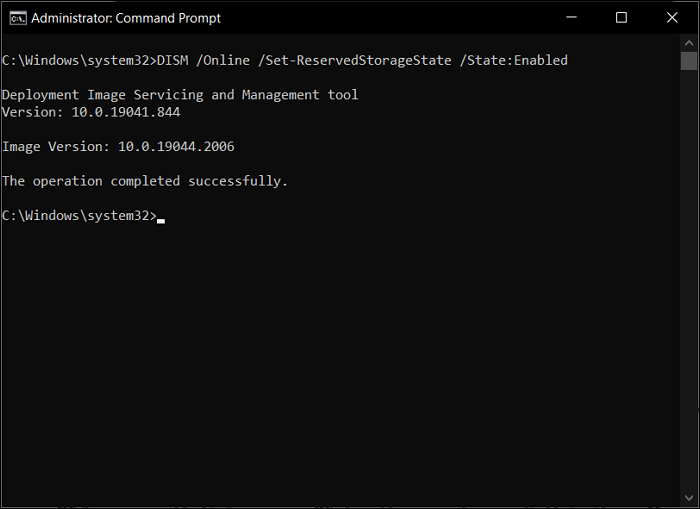
Step 3: If you wish to enable your Reserved Storage Windows 10 feature, you need to provide the following command:
DISM /Online /Set-ReservedStorageState /State:Enabled
How to Disable Reserved Storage Windows 10?
While you can enable this feature across Windows 10, you can also try to disable it with ease. You can also work through two methods to disable the feature across your Windows 10. Look through the methods to know more about the process in detail:
Method 1: Through the Registry Editor
Method 2: Through Command Prompt
Method 1: Through the Registry Editor
Step 1: Access the "Search" icon on the taskbar and type "Run" to launch the Run program. As it opens up, type in "regedit" to open the Registry Editor.
Step 2: Add in the following path navigation across the address bar on the top:
Computer\HKEY_LOCAL_MACHINE\SOFTWARE\Microsoft\Windows\CurrentVersion\ReserveManager
As you move into the respective address, find and select the "ReserveManager" folder in the left-sided panel.
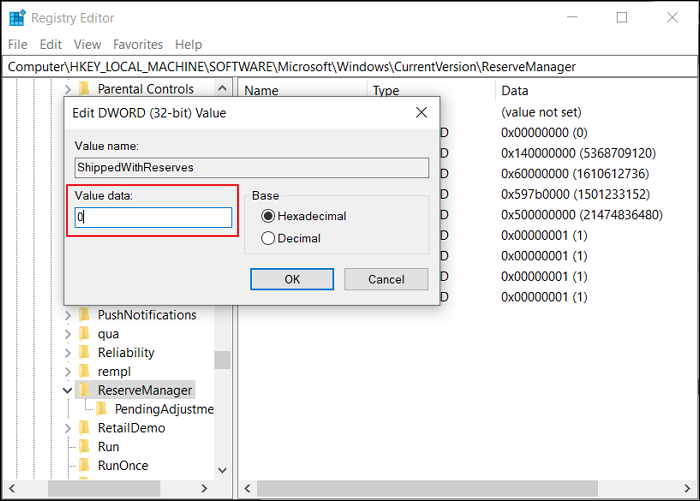
Step 3: On the right-handed panel, search for "ShippedWithReserves" and double-click to open it. Insert the value of 0 across the "Value data:" section and click "OK." You will then need to restart your Windows 10 computer to apply the changes.
Method 2: Through Command Prompt
Step 1: To start Command Prompt as an administrator, you need to type in "cmd" across the Search tab of your Windows 10. As you observe the results across it, find the option of "Run as administrator" in the window's right pane.
Step 2: With the command prompt opened up, check the status with the following command:
DISM /Online /Get-ReservedStorageState
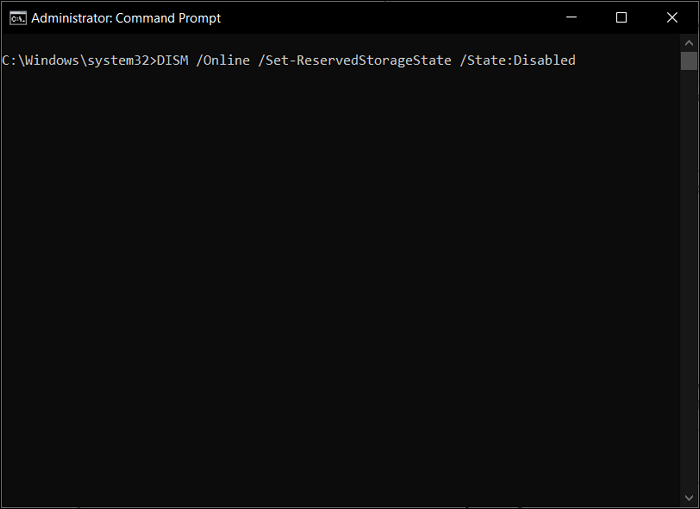
On assessing the status, you can use this command to disable the feature across your Windows 10:
DISM /Online /Set-ReservedStorageState /State:Disabled
Final Words
This article has reviewed and assessed the feature of Reserved Storage Windows 10 and provided users with an insight into how they can use this function. With the methods available for enabling and disabling this feature, you would surely get to know how you can utilize this feature across your Windows device.
Reserved Storage FAQs
While you get to know more about the Reserved Storage feature across Windows 10, specific questions may arise in the user's mind. For that, we have outlined some important questions as follows:
1. Can I remove reserved storage for Windows 10?
Yes, you can remove or disable the Reserved Storage across your Windows device. You can also decrease the required space by uninstalling the available optional features.
2. Do I need reserved storage in Windows 10?
Multiple files need to be processed across the Windows device. With limited spaces, having no dignified space would get quite complicated for Windows and lead to unresponsive processes. To avoid this and ensure a smooth operation of Windows, you provide a certain reserve of your storage to help it easily manage its updates, system caches, applications, and temporary files. This would avoid all abnormal operations of the Windows device.
3. What is using all my storage Windows 10?
If you wish to check out where the storage is being consumed across Windows 10, open up "Settings" across your computer and proceed to the "System" section. There, find out the option of "Storage" and check out the section of the C: drive. You will get to see what is taking up the hard drive space. Navigate to the "Show more categories" option for viewing other file types. You can also view the use of the storage of other drives across the "View storage usage on other drives."
Was This Page Helpful?
Daisy is the Senior editor of the writing team for EaseUS. She has been working at EaseUS for over ten years, starting as a technical writer and moving on to being a team leader of the content group. As a professional author for over ten years, she writes a lot to help people overcome their tech troubles.
Written by Tracy King
Tracy became a member of the EaseUS content team in 2013. Being a technical writer for over 10 years, she is enthusiastic about sharing tips to assist readers in resolving complex issues in disk management, file transfer, PC & Mac performance optimization, etc., like an expert.
Related Articles
-
MacBook Password Not Working! 6 Proven Solutions to Fix It
![author icon]() Jaden/2026-06-17
Jaden/2026-06-17 -
Solved: System Restore Is Restoring the Registry Windows 11/10/8/7
![author icon]() Brithny/2026-06-17
Brithny/2026-06-17 -
How to Fix Outlook Rules Not Working [8 Ways Included]
![author icon]() Jerry/2025-07-04
Jerry/2025-07-04 -
Windows Update Something Went Wrong - How to Fix?
![author icon]() Jerry/2026-06-18
Jerry/2026-06-18
EaseUS Data Recovery Services
EaseUS data recovery experts have uneaqualed expertise to repair disks/systems and salvage data from all devices like RAID, HDD, SSD, USB, etc.