If you are an avid gamer, you should know about DXGI_ERROR_DEVICE_REMOVED error. It often appears out of nowhere, causing your game to crash.
A DXGI error is a DirectX mainly caused by drivers, system specification, and graphic card issues. However, there are many ways to resolve this error. In this article, we shall teach you how to fix DXGI_ERROR_DEVICE_REMOVED on Windows 10/11.
What Is DXGI_ERROR_DEVICE_REMOVED?
The DXGI_ERROR_DEVICE_REMOVED is a DirectX relating to your graphic card. It occurs when the graphic card loses contact with your computer.
There can be plenty of reasons for this error. When a computer is overclocking, the graphic card heats up. The card disables with computer, resulting in DXGI error. Similarly, an incompatible graphic card can induce this flaw. The outdated drivers can also force your system to display the DXGI_ERROR_DEVICE_REMOVED error.
To play games like Arma, Battlefield, and GeForce experience, you should keep a check on your graphic card, drivers, and system specifications to avoid this error.
How to Fix DXGI_ERROR_DEVICE_REMOVED?
If you are struggling to get rid of DXGI_ERROR_DEVICE_REMOVED problem, don't go away. We shall teach you 5 ideal ways to fix this error to give you an uninterrupted gaming experience. They are:
- Fix 1. Turn Off the Shadow Play
- Fix 2. Change the Registry
- Fix 3. Turn Off the Anti-Aliasing Feature
- Fix 4. Uninstall and Reinstall the Graphics Drivers
- Fix 5. Roll Back Driver Updates
1. Turn Off the Shadow Play
In games like GeForce Experience, shadow play is a hardware acceleration feature useful for screen recording. You can remove the DXGI error by simply disabling this feature.
That's you can do it.
Step 1. Click the "GeForce Experience" shortcut on your laptop and choose Run as administrator
Step 2. Visit the "General" tab present on the left panel and turn off the "In-Game Overlay" or "Share" features.
Step 3. Select "Apply" and save the changes on your computer.
Step 4. Reboot the computer and see that the error has been removed.
2. Change the Registry
The fatal error direct3d driver returned the error code, which is a message for DXGI error, can be cleared by making the right adjustment in the registry key.
You can do it by following these steps.
Step 1. Type Window+ R on your home screen to open the Run Dialog Box
Step 2. Write "Regedit" in the dialog box and press the "Enter"
Step 3. Search for the "Register Editor", and find the below path in the left panel
Computer\HKEY_LOCAL_MACHINE\SYSTEM\CurrentControlSet\Control\GraphicsDrivers
Step 4. After selecting the "GraphicsDrivers", right-click the blank space and choose "New > DWORD (32-bit) Value"
Step 5. Give the name "TDR Level" to DWORD with its value being 0.
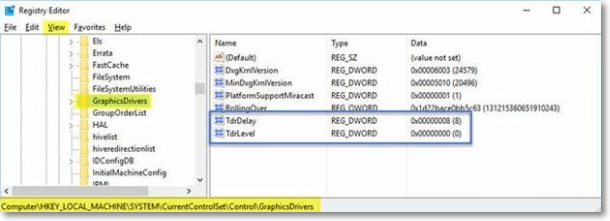
Step 6. Save the changes and restart your computer. The error will be removed.
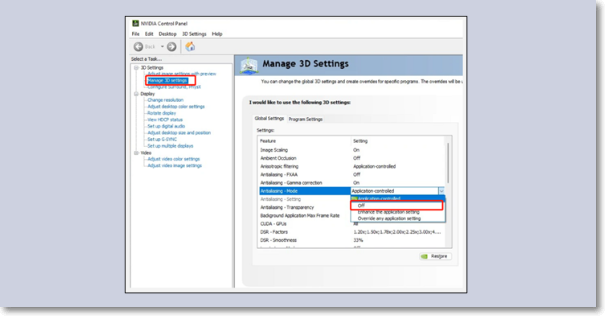
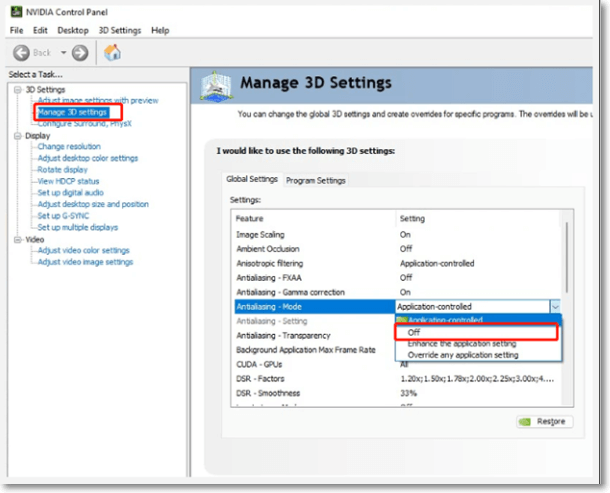
3. Turn Off the Anti-Aliasing Feature
The anti-aliasing feature of graphic software improves the quality of the output display. However, it can result in DXGI error. If you find such situation, you should turn it off from your NVidia Control Panel.
Step 1. Right-click on your desktop and select the Nvidia Control Panel from the options.
Step 2. Choose "Manage 3-D settings" of the control panel. After that, go to "Global Settings" to find "Anti-Aliasing Feature".
Step 3. Turn all these settings to "Off". Click on "apply and save the changes". Check that the error has been removed.
4. Uninstall and Reinstall the Graphics Drivers
The drivers are the main reason for this error. So, to cope with you can simply uninstall the drivers and let Windows install its own. The system will automatically find compatible drivers for the smooth functioning of your program file.
The process is quite simple for this.
Step 1. Search "Device Manager" on your home screen. It will show your PC name and the list of all installed devices.
Step 2. Find the affected device and select its "properties"
Step 3. Click on the "Driver" and then select "Update Driver"
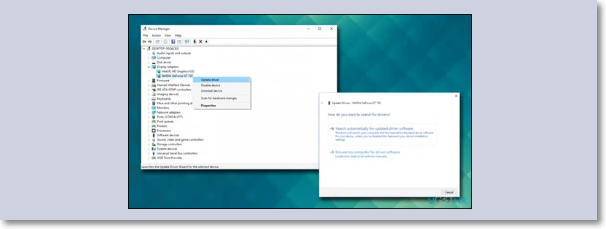
Step 4. Choose "Search Automatically for updated Driver".
Step 5. The windows will find and install it. Restart your computer, the DXGI will not appear again.
5. Roll Back Driver Updates
The DGXI can occur due to driver updates as well. If the updated driver isn't compatible with your gaming software, you need to remove the update and get back the initial version. This will solve the error.
This is the procedure to remove any driver update
Step 1. Visit "Device Manager" of your PC and find the recently updated software.
Step 2. Press the Right-click to see its "Properties".
Step 3. In the properties window, go to "Driver" settings and select "Roll Back Driver"
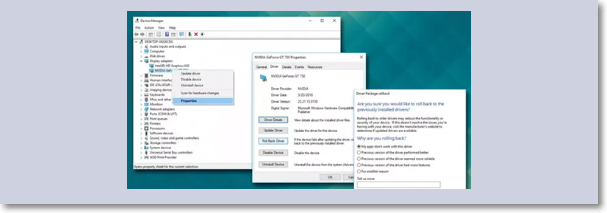
Step 4. Restart the system, DXGI error isn't there.
The Bottom Line
For any quality gaming experience, consistency is the key. The unforced interruptions in the display kill the charm. The DXGI error can crash your gaming graphics resulting in either the loss of your progress or the complete shutdown. The error can occur due to the graphic card, drivers, and overclocking of your PC.
In this article, we have presented five ways to remove DXGI error. All these methods are workable with Windows 10-11. You can choose any method based upon your system requirements and personal preference.
Do let us know your thoughts about the article.
Was This Page Helpful?
Daisy is the Senior editor of the writing team for EaseUS. She has been working at EaseUS for over ten years, starting as a technical writer and moving on to being a team leader of the content group. As a professional author for over ten years, she writes a lot to help people overcome their tech troubles.
Written by Tracy King
Tracy became a member of the EaseUS content team in 2013. Being a technical writer for over 10 years, she is enthusiastic about sharing tips to assist readers in resolving complex issues in disk management, file transfer, PC & Mac performance optimization, etc., like an expert.
Related Articles
-
[Detailed Info] The Elder Scrolls V: Skyrim Saves Location
![author icon]() Rel/2026-06-18
Rel/2026-06-18 -
How to Reinstall Windows 10 Without CD (3 Ways)
![author icon]() Tracy King/2025-07-10
Tracy King/2025-07-10 -
How to Factory Reset ASUS Laptop from BIOS🔥
![author icon]() Jerry/2025-07-04
Jerry/2025-07-04 -
Ghost of Tsushima Director's Cut Save File Location - How to Find & Backup?
![author icon]() Jerry/2025-07-04
Jerry/2025-07-04
EaseUS Data Recovery Services
EaseUS data recovery experts have uneaqualed expertise to repair disks/systems and salvage data from all devices like RAID, HDD, SSD, USB, etc.