System Restore is a useful feature in Windows 10 that creates a copy of all critical system and registry files and saves them as Restore Points. Creating a system restore point is a good way to deal with uncertain system failures and data corruption issues easily. However, many Windows 10 users are currently facing issues when trying to create system restore points. According to Windows 10 users, they are getting different errors at the time of creating system restore points. Thus, they continuously seek solutions to resolve the issue at the earliest opportunity. Fortunately, this article mentions some best solutions to resolve the can’t create restore point Windows 10 issue. Check them out and eliminate this issue using the mentioned solutions.
Overview of Can't Create Restore Point Windows 10
Notably, there could be many reasons for this issue. Yet, these are some of the most common causes of the can't create restore point issue in Windows 10.
- Improper Functioning of Event System & Task Scheduler Services
- Third-Party Antivirus Software
- Fault With System Restore Service
- Issues With Volume Shadow Copy
- Hard Disk Errors
- Disabled System Protection
- Third-Party Applications Interruption
1. Ensure System Restore Is Enabled
One solution to this issue is to ensure that the System Restore feature is enabled. You may need to use the Group Policy Editor to check the same. Follow the below-mentioned steps to check whether the System Restore option is disabled or not.
Step 1. Press the Window + R key combination to open the Run program.

Step 2. Type gpedit.msc in the Open section.

Step 3. Hit Enter to open the Group Policy Editor.
Step 4. Head to Computer Configuration -> Administrative Templates -> System -> System Restore in the Group Policy Editor.
Step 5. Review the condition of the Turn off Configuration and System Restore options in the State column.

Step 6. Double-click the Turn off Configuration option, set this option to Not Configured, and click on Apply.
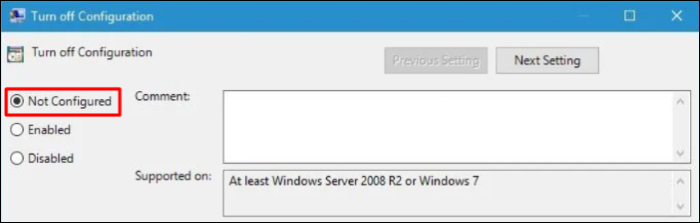
Step 7. Do the same with the Turn off System Restore option.
Step 8. Reboot your system and try creating a restore point again.
2. Disable Built-in Antivirus & Third-party Antivirus Software
One of the causes of this issue could be antivirus software. We recommend disabling the integrated real-time protection feature and third-party antivirus tools for a while. Then, try to create a system restore point.
2.1 Disable Built-in Real-time Protection Feature
Step 1. Press the Windows + I key to open the Settings app.
Step 2. Head to the Update & security section and click on Windows Security.
Step 3. Click on Manage settings under the Virus & threat protection settings section.

Step 4. Disable the Real-time protection option by clicking on the toggle.
Step 5. Once the Real-time protection is disabled, try creating a restore point to see if it's working.
2.2 Disable Third-Party Antivirus Software
Step 1. Press the Windows key in the taskbar and type Settings.
Step 2. Click on Apps and then head to the Apps & features tab.
Step 3. Search the antivirus tool in the Apps section and right-click on it.
Step 4. Select Uninstall from the options and confirm the uninstall.
Quick Tip: You can also disable the antivirus shields of the tool for a while instead of disabling the entire software.
Step 5. Once done, try using the restore point again to check if it’s working or not.
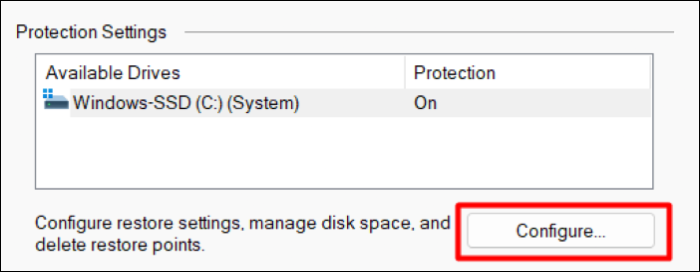
3. Turn on System Protection Option
System Protection is an essential Windows function that protects all the data stored on the system. You need to ensure that the System Protection option is enabled to eliminate this issue from your Windows 10 system. Below are the steps to turn on the System Protection feature.
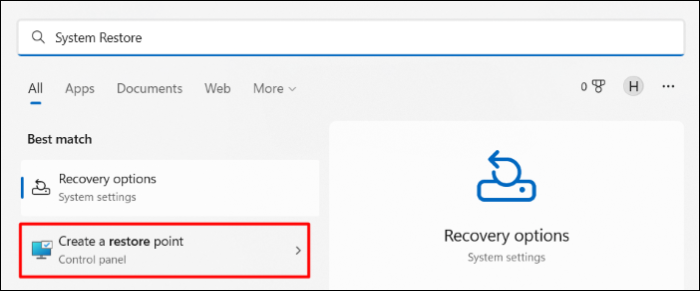
Step 1. Press the Windows key, and type System Restore in the Search Bar.
Step 2. Open Create a system restore point from the Best match section.
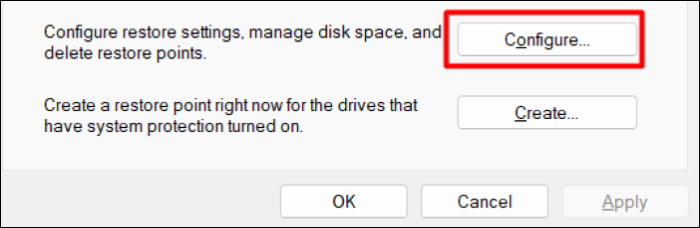
Step 3. Click on Configure.
Step 4. Ensure that the Restore settings option is set to Turn on system protection.
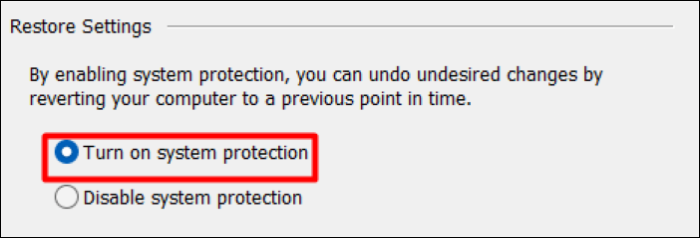
Step 5. Click Apply and then OK.
4. Check Essential Services Are Enabled
Many Windows 10 users asked the same query in the Microsoft Community. All thanks to one of the Windows experts for coming up with this solution. They recommended turning on the Volume Shadow Copy service and setting it to Automatic. You can check the steps below to enable the Volume Shadow Copy service.
Step 1. Open Run and type services.msc in the Search Box.

Step 2. Search for Volume Shadow Copy in the Services section and double-tap on it.

Step 3. Ensure that the service is Running. If not, then click on the Start button to enable the service.
Step 4. Set the Startup type setting to Automatic, not Manual.
Step 5. Follow the same steps (Step 1-Step 4) with Event System and Task Scheduler services.
5. Check For Hard Disk Error
Errors in your hard drive could also be one of the reasons for this issue. You can automatically fix all the existing hard drive errors by executing a command in the Command Prompt. Follow the below-mentioned steps to do the same.
Step 1. Run the Command Prompt with administrative privileges.

Step 2. Copy-paste chkdsk /r X in the Command Prompt and hit Enter.
Note: Change the ‘X’ with the hard disk you want to target in the scan.
Step 3. Once the command is executing, type Y and press the Enter key.
Step 4. Reboot the system and let it scan for errors with your hard disk and fix them.
6. Run DISM and SFC Scan
One of the most common causes for the improper working of the System Restore feature is corrupted system files. Fortunately, a quick command can fix all the corrupted system files. Follow the below-mentioned steps to replace corrupted files and resolve the issue.
6.1 Run Deployment Image Servicing and Management Scan to Repair Windows 10 Image
Step 1. Open Command Prompt with admin rights.
Step 2. Copy-paste DISM /Online /Cleanup-Image /CheckHealth and press the Enter key.
Step 3. You need to wait for a few minutes to let the repair process complete.
Step 4. Once the DISM command is executed, reboot the PC and create a restore point.
6.2 Run System File Checker Scan to Fix Corrupted Files
Step 1. Run Command Prompt with admin rights.
Step 2. Type SFC /scannow and hit the Enter key.
Step 3. Scanning will now begin and may take a few minutes to complete.
Step 4. When the scan is completed, restart the PC. You may now be able to create and restore system restore points.
7. Ensure Enough Memory Is Assigned to System Restore
The System Restore option creates a copy of all the important system files and registry files and saves them in your system's storage. Hence, it requires enough space to do so. There could be a possibility that the system hasn't provided enough space for the System Restore feature. In that case, you must ensure that the system has assigned enough memory to the System Restore feature to create and store restore points. Below are the steps to give more storage to the System Restore feature in Windows 10.
Step 1. Open the System Restore settings.
Step 2. Head to the System Protection tab in the System Restore settings.

Step 3. Click on the Configure button.
Step 4. You can now see a slider at the bottom of the pop-up. Use the slider to change the disk space assigned to the System Restore function. We suggest assigning at least 300MBs to this feature for correct working.

Step 5. Click on Apply and at last, OK.
8. Try Creating Restore Point Manually
The System Restore feature automatically creates restore points at specific intervals. If your system isn't making system restore points, you can follow the steps to create a system restore point.
Step 1. Open the System Restore settings and move to the System Protection tab.
Step 2. Click on Create in the System Protection tab.
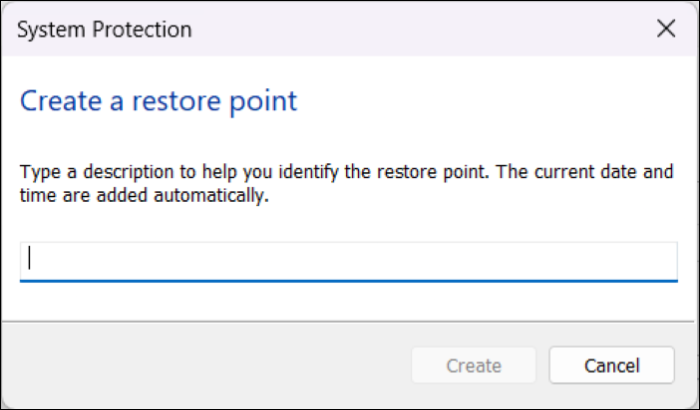
Step 3. Give a name to your restore point on the Create a restore point pop-up.
Step 4. Click on the Create button to add the restore point.
Step 5. Once the restore point is created, you will get a completion message.
9. Run System Restore from Safe Mode
We install new applications on our Windows system every day or another. Sometimes, those applications clashes with other essential services, like the System Restore feature. To ensure that any third-party app isn’t causing the issue, you can try using this feature in Safe Mode. Follow the mentioned steps to use System Restore in safe mode.
Step 1. Open the Settings and move to the Update & security section.
Step 2. Click on Recovery in the Update & security tab.

Step 3. Click on Restart under the Advanced startup section.
Step 4. Your system will now restart and display advanced startup settings. Choose Troubleshoot on the Advanced options page.
Step 5. Click Startup settings on the Advanced options section.
Step 6. Select Restart to get some extra booting options.
Step 7. Press F or F5 on your keyboard to boot into Safe Mode with Networking functionality.
Step 8. Press the Windows + R key combination and type msconfig in the search bar.
Step 9. Head to the Boot tab and check the Safe Mode checkbox.
Step 10. Hit Apply and restart the PC. Press 8 during the reboot process to boot into safe mode.
Step 11. Open the System Restore settings again and create a system restore point.
10. Tweak System Restore Settings From Registry Editor
Many Windows 10 users reported that tweaking System Restore settings from the Registry Editor can fix the issue. Here are the steps to modify the System Restore settings.
Step 1. Open Windows Search and type Regedit in the Search Bar.
Step 2. Navigate to the mentioned path:
HKEY_LOCAL_MACHINESOFTWAREMicrosoftWindows NTCurrentVersionScheduleTaskCache
Step 3. You need first to take a backup of the TaskCache registry key. So, right-click the TaskCache registry key and select Export.
Step 4. Give a name to this backup key and save it.
Step 5. Once done, head to the mentioned path:
HKEY_LOCAL_MACHINESOFTWAREMicrosoftWindows NTCurrentVersionScheduleTaskCacheTreeMicrosoftWindows
Step 6. Right-click on the key and select the Delete option from the system.
Step 7. In the end, close all the windows and restart your computer.
11. Reset the Windows 10 PC
You don't need to worry if none of the mentioned solutions works because this will resolve the can't create restore point issue. The last solution is to reset the PC without deleting the existing files and apps. Follow the mentioned steps to reset your Windows 10 PC.
Step 1. Head to System Setting’s Update & recovery section.
Step 2. Click on Recovery to open additional settings.
Step 3. Click on the Reset this PC button under the Get Started section.
Step 4. Select the Keep my files option to keep your system files intact while refreshing the system.
Step 5. Wait until the reboot completes, and try using the same feature again when it’s done.
What Other Way You Can Use to Protect Your Computer?
We always suggest Windows users use the backup tool and integrated backup features as a precaution. You never know when the System Restore feature will stop functioning.
We recommend using the EaseUS Todo Backup tool in this case. It's a perfect tool for taking automatic system backups. Even if the System Restore option doesn't work, this tool will still take regular backups.
You won’t need to worry even if your system breaks down because your backup will be one click away from you. You can recover your backups anytime, anywhere, and on any PC. One of the best features is that you get 250GB worth of cloud storage free to store all your Windows 10 system backups or other files. You must try the EaseUS Todo Backup tool to back up your Windows 10 system timely.
Frequently Asked Questions
Here in this section, we have covered some FAQs about the can't create restore point issue in Windows 10 issue. We suggest reading this section clears all your doubts regarding this topic.
Why Can't I Create a Restore Point in Windows 10?
There could be several reasons for this issue, such as improper functioning of the Volume Shadow Copy service. However, in most cases, third-party antivirus tools are the culprit of this issue.
How Do I Force a Restore Point?
Open the System Protection settings and click on Create. Enter a name for the new restore point. Then, click on the Create button. You can now view the restore point in the System Protection setting by clicking on the System Restore option.
Final Thought
Creating system restore points before upgrading and installing a new application is an excellent way to prepare your Windows system for uncertain conditions. But, this is still impossible for some Windows 10 users. Some Windows 10 are unable to create system restore points. The above-mentioned solutions can help resolve the can't create restore point Windows 10 issue. We assure you that any of the solutions will indeed give you relief in this deteriorating situation.
Was This Page Helpful?
Daisy is the Senior editor of the writing team for EaseUS. She has been working at EaseUS for over ten years, starting as a technical writer and moving on to being a team leader of the content group. As a professional author for over ten years, she writes a lot to help people overcome their tech troubles.
Related Articles
-
Mac Error Code 8072 Occurs? Check Here to Get Rid of It
![author icon]() Jaden/2025-01-24
Jaden/2025-01-24 -
Fixes for An Error Occurred While PowerPoint Was Saving the File
![author icon]() Sherly/2025-01-24
Sherly/2025-01-24 -
My Computer Turns on but the Screen Is Black Windows 10, How to Fix
![author icon]() Jaden/2025-01-24
Jaden/2025-01-24 -
How to Fix Mac Stuck on Loading Screen [6 Straightforward Methods]
![author icon]() Dany/2025-01-24
Dany/2025-01-24
EaseUS Data Recovery Services
EaseUS data recovery experts have uneaqualed expertise to repair disks/systems and salvage data from all devices like RAID, HDD, SSD, USB, etc.