What Causes BitLocker Recovery Mode?
Windows OS integrates a BitLocker feature that protects the drive from data theft or unauthorized access. No doubt, it's an excellent data protection feature. But it becomes hectic due to the repeated BitLocker boot loop, and it asks you to enter the recovery key in the BitLocker recovery screen, which you don't even remember.
The BitLocker recovery Screen usually triggers when -
- 💻Your system's hardware changes
- 🔨Your PC is in BIOS
- ❌You have installed a faulty update
If you've also got stuck out of your computer because of not remembering the BitLocker recovery key, read this troubleshooting guide until the end. Thus, we've shared 8 working fixes to bypass the BitLocker recovery screen in this guide.
| Workable Solutions | Step-by-step Troubleshooting |
|---|---|
| 1. Bypass the Recovery Screen |
|
| 2. Change the Boot Way |
|
| 3. Revise the Program or Disk |
|
| 4. Disable Startup Options |
|
| Recover BitLocker Encrypted HDD | When your encrypted hard disk suffers significant data loss, you should recover data...Full steps |
How to Fix BitLocker Recovery Screen After Booting?
As mentioned above, the BitLocker recovery screen could occur for varied reasons and prevent you from accessing your Windows system. But you can still bypass the BitLocker recovery screen by implementing the below-mentioned workarounds. Also, before trying them, make sure to safeguard all your data.
| ✍️Note: Before we suggest the methods, there is an important thing you should know. Some methods can be followed in a Windows account, while others can be in Windows Recovery. If your Windows C Drive uses BitLocker, you can only use options in the Recovery methods. |
Method 1. Suspend BitLocker Protection
If you get the BitLocker recovery screen every time you boot your system and don't want to see it again, we suggest you suspend the BitLocker protection on your Windows PC. Follow the below-mentioned steps to know how to do the same:
Step 1. Open your Windows system's "Control Panel" utility using your preferred method.
Step 2. Once Control Panel is opened, go to its "System and Security" section.
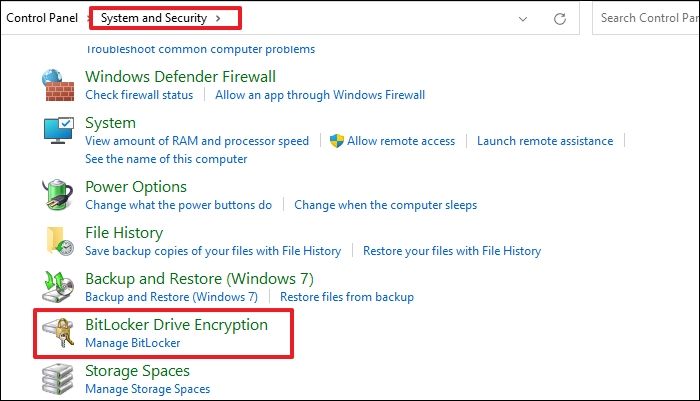
Step 3. Click on "BitLocker Drive Encryption" and "Suspend Protection" to temporarily turn off BitLocker.
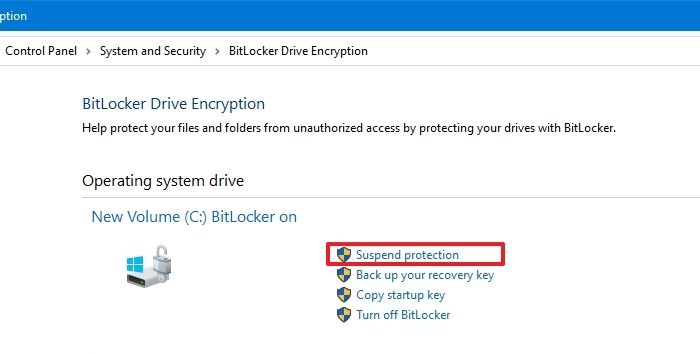
That's it! You'll not see the BitLocker recovery screen when you restart your Windows system.
Method 2. Enter the BitLocker Recovery Key
The easiest way to bypass the BitLocker recovery screen is to enter the correct recovery key. Most users save their recovery keys in their USB drives.
Thus, we also suggest you check your USB drive and check whether you can bypass the screen. If you can't find the BitLocker recovery key, contact your administrator.
When setting up BitLocker, the system prompts you to save it to your Microsoft Account and print it. If you choose that option, you may want to look into that.

How to Find BitLocker Recovery Key [Top 4 Solutions Without Data Loss]
This article discusses four simple ways to find a BitLocker recovery key on your Windows PC. Read more >>
Method 3. Switch to the Legacy Boot
Another possible workaround to eliminate the BitLocker recovery screen is to switch the system's BIOS mode from UEFI to Legacy. So try the same on your Windows system and check if it works.
Below are the exact steps to change your Windows system's BIOS mode to Legacy with ease:
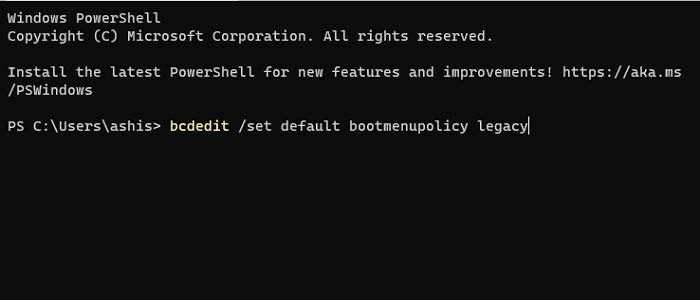
Step 1. Press the Windows + R keys simultaneously to open your system's "Run" utility.
Step 2. Type cmd in the Run's search box and press "Enter" to open it on your PC.
Step 3. Copy-paste the below-mentioned command into the Command Prompt app and press Enter.
Step 4. Restart your system and check whether the BitLocker recovery screen is still appearing.
bcdedit /set default bootmenupolicy legacy
Method 4. Uninstall the Newly Inserted Hardware
The BitLocker recovery screen usually triggers when you change your system's hardware components. So, if you've recently made changes to your PC's hardware, consider reverting them and checking whether the BitLocker recovery screen still appears.

How to Get, View, Remove Windows 10 Update
Windows 10 is the major operating system. Viewing history updates or removing the update are highly related to Windows. Read more >>
Method 5. Remove the Protectors from the Startup Disk
If you cannot log in to your computer even after entering the right BitLocker recovery key in the BitLocker recovery screen, consider unlocking BitLocker using the Command Prompt utility.
Manage-bde is a command-line tool for advanced users to use additional options not displayed in the BitLocker control panel.
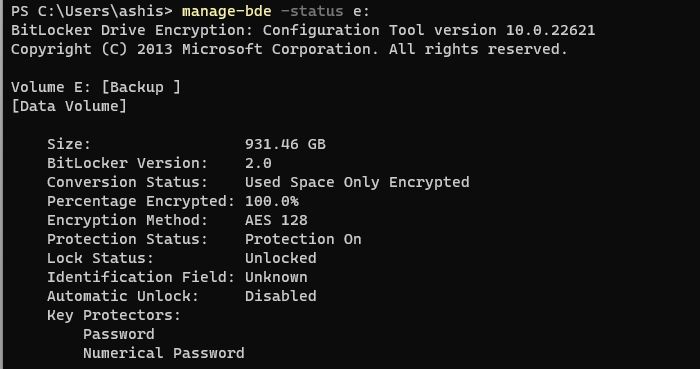
We've mentioned the steps to disable the BitLocker feature using the CMD utility below:
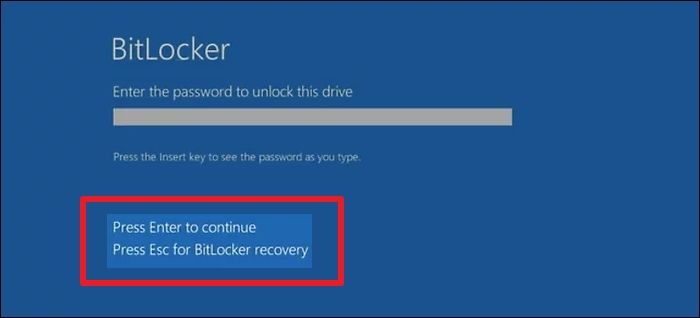
Step 1. On the BitLocker recovery screen, press "Esc" and click "Skip this drive" at the bottom right corner.
Step 2. Select the "Advanced" tile on the next screen and click the "Command Prompt" option.
Step 3. Once Command Prompt is opened, copy-paste the below command into it and press "Enter":
manage-bde -unlock D: -password
Note: You must replace "yourpassword" in the above-listed command with the password you have added to your drive as additional security.
Step 4. Execute the below-listed command in the console and press the "Enter" key to disable protectors:
manage-bde -protectors -disable D:
Step 5. Restart your Windows and check if the BitLocker recovery screen still comes.
Let us learn more ways to bypass BitLocker Recovery screen. What's more, don't forget to mark this passage by sharing it on Facebook, Twitter, or SNS.
Method 6. Reset Your Forgotten BitLocker Pin
If you're using an organization account and forgot the BitLocker recovery key, you can try resetting it. It's pretty easy to do so, and the below instructions demonstrate the same:
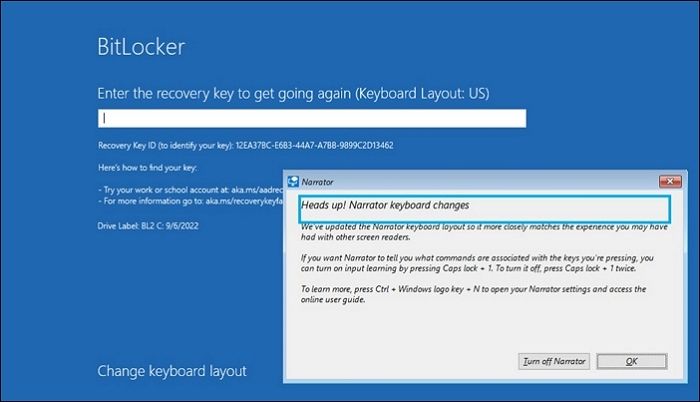
Step 1. Press the "Esc" key on your keyboard once you're on the BitLocker recovery screen.
Step 2. You'll now see the recovery key ID on the screen. But it'll only be there for a few minutes. So note it down somewhere or take a picture before it goes away.
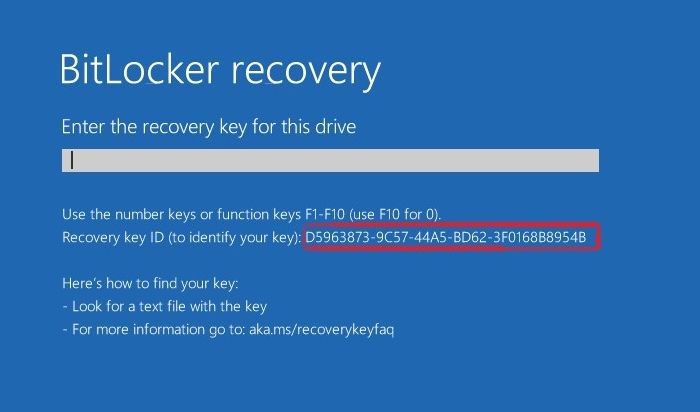
Step 3. Once noted, contact your system administrator and provide the recovery key ID to them.
Step 4. Your administrator will now find the recovery key based on your provided recovery key ID.
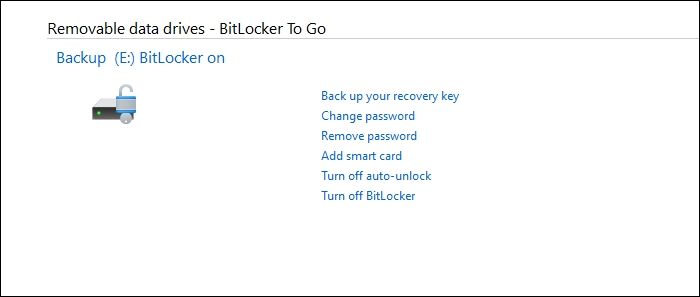
Method 7. Turn Off Auto-Unlock Option
Windows comes with Auto-unlock pre-enabled, and keeping this option enabled all the time can constantly display the BitLocker recovery screen.
Due to this, we suggest you check whether the Auto-unlock option is enabled on your Windows system. If yes, then consider disabling it on your Windows system by trying the below-mentioned steps:
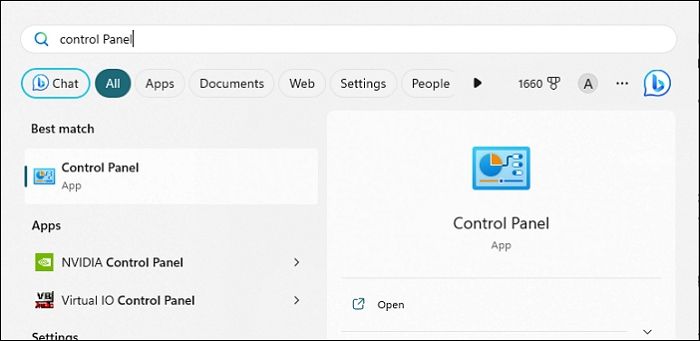
Step 1. Open the "Windows Search Box" using the Windows key and type Control Panel.
Step 2. Choose "Control Panel" from the Best match section to open it on your system.
Step 3. Go to Control Panel's "System and Security" section and click on "BitLocker Drive Encryption".
Step 4. Once in the BitLocker Drive Encryption window, click "Turn off auto-unlock".
LEARN MORE
Still curious? Click here to learn about How to Recover from Formatted Encrypted Drive With Key
Method 8. Enable or Disable Secure Boot
Some users mentioned bypassing the BitLocker recovery screen by enabling/disabling the Secure Boot on their system. Considering this, we suggest you do the same and check the issue's status. So follow the steps to enable/disable Secure Boot:
Step 1. Press the Esc key on your keyboard on the BitLocker recovery screen and then click Skip this drive.
Step 2. On the next screen, click the "Troubleshoot" option and select "Advanced options".
Step 3. Go to its "Boot" section on the "UEFI Firmware Settings" page and look for Secure Boot.
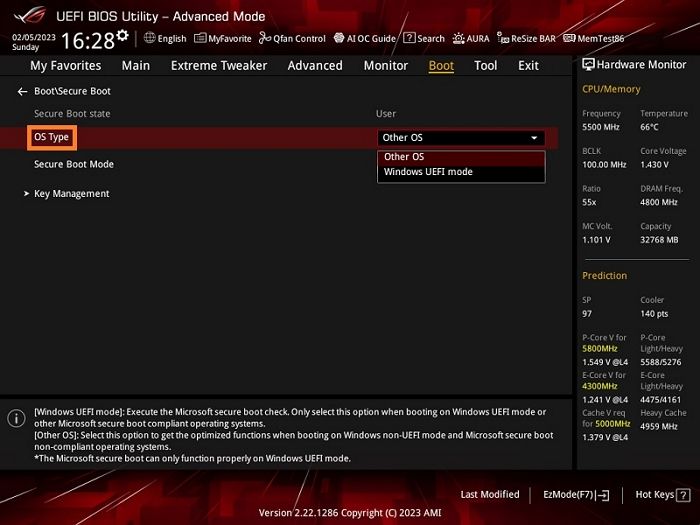
Step 4. Set Secure Boot to another available option. For instance, if it was already enabled, try disabling it and then confirm the issue's status.
Recover Data from BitLocker Encrypted Hard Drive
When your encrypted hard disk suffers significant data loss, you should recover data using the best data recovery software. EaseUS Data Recovery Wizard can decrypt your hard drive and recover data.
Here are some of the reasons you should use this data recovery software:
- The redesigned UI makes starting a recovery session a breeze. It does not require any technical knowledge to use.
- It can completely scan the device without causing any damage to the original data.
- It is compatible with practically all Windows OS, including Windows 11/10/8/7/Vista/XP.
Now follow the steps:
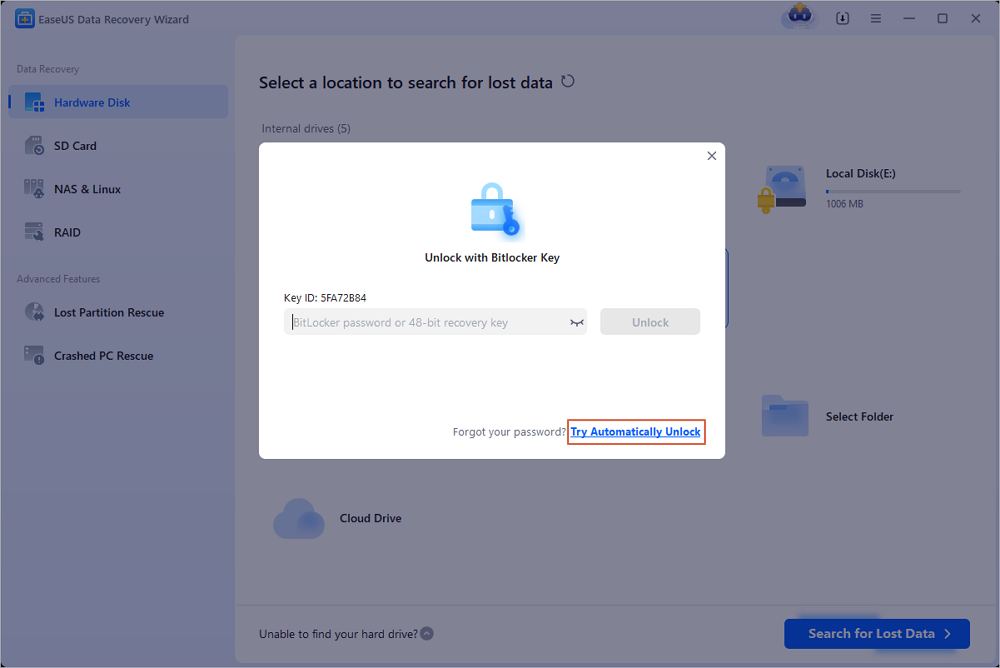
Step 1. Choose the encrypted drive to scan
Launch EaseUS Data Recovery Wizard, and you will see the BitLocker encrypted drive displayed there. Hover the mouse on the BitLocker partition or storage device from which you want to recover data. Then click "Search for Lost Data".
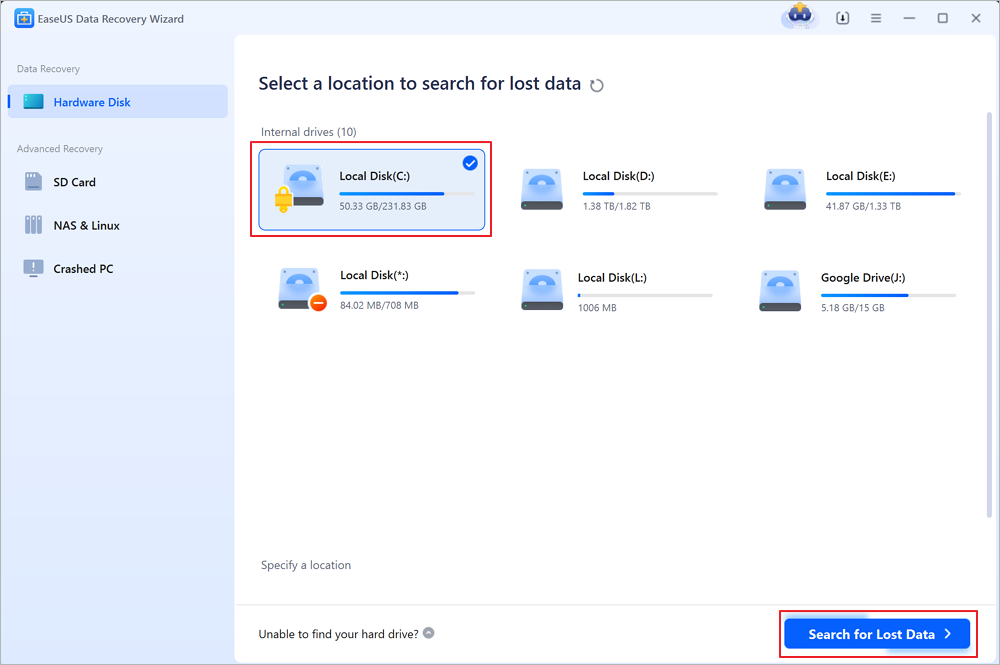
Note: If you don't have a key or password, you can use "Try Automatically Decrypt", which may help you scan your recovery key from your Microsoft account or your C drive, then decrypt the drive without providing your password.
Step 2. Select and preview scanned files
The software will start a quick scan for deleted files and perform advanced scan for more lost files from the BitLocker device. When the process completes, you can apply the "Filter" feature or use the search feature to find the lost files in a short time.

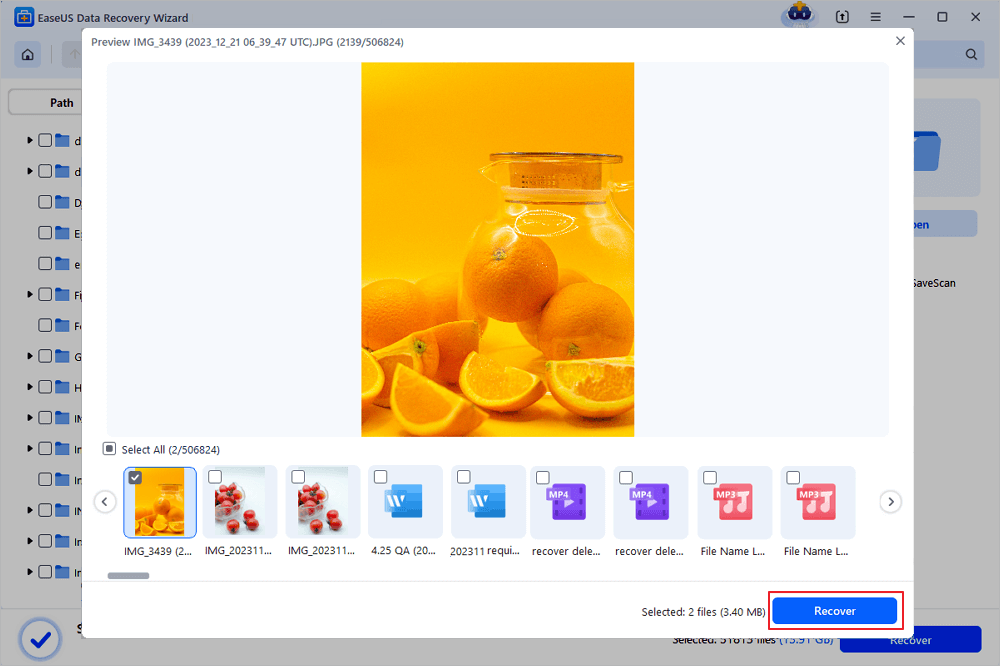
Step 3. Recover lost files from BitLocker encrypted hard drive
After previewing the file, click the "Recover" button to restore deleted or lost files from BitLocker encrypted partition on Windows. You can choose a cloud storage, such as OneDrive, Google Drive, etc., and click "Save" to save your recovered files.
Conclusion
BitLocker recovery screen is one of the most common yet irritating issues one can ever face when logging into their Windows system. The situation worsens when you don't know the BitLocker recovery key, and it becomes impossible to access the system.
Luckily, in this guide, we shared some working ways to bypass the BitLocker recovery screen asking for the BitLocker recovery key. We hope our shared workarounds helped you fix the issue. If yes, let us know which listed workaround resolved the issue.
BitLocker Recovery Screen FAQs
Below are some of the most commonly asked questions about the BitLocker recovery screen. Read all the listed questions and learn more about this in detail.
1. How Do I Get Out of the BitLocker Recovery Screen?
If you constantly get the BitLocker recovery screen when turning on your Windows computer, consider suspending the BitLocker protection in Control Panel.
2. How To Get the BitLocker Recovery Key With the Key ID?
On the BitLocker recovery screen, press the Esc key. After doing so, you'll see the recovery key ID on your screen, which you can use to get the Recovery Key.
3. How Do I Start My Laptop Without the BitLocker Recovery Key?
You can start your laptop without the BitLocker recovery key by disabling BitLocker in the Control Panel. Another way to log in without a recovery key is to enable/disable Secure Boot.
4. How To Remove BitLocker from BIOS?
If you're stuck at the BitLocker recovery screen and unable to bypass it, follow the below steps to directly move to the system's BIOS from there and disable BitLocker:
Step 1. Press the Esc key and click the "Skip this drive" option at the bottom left corner to proceed.
Step 2. On the next screen, click "Troubleshoot" and select the "UEFI Firmware Settings" option.
Step 3. Click the "Restart" button to restart your computer and access the UEFI firmware settings.
Step 4. Once in the BIOS or UEFI, go to the Security section and look for the TPM State option.
Step 5. Choose "TPM State" using the arrow keys and disable it. Disabling it will also make BitLocker unfunctional.
In case you're already logged in to your computer, follow the below path to enter your system's BIOS or UEFI and disable it:
Settings app > Recovery > Restart Now > Troubleshoot > UEFI Firmware Settings > Security > Disable TPM State
Was This Page Helpful?
Sherly joined EaseUS in 2022 and she has always loved writing articles and enjoys the fun they bring. She receives professional training here, focusing on product performance and other relative knowledge. She has written over 200 articles to help people overcome computing issues.
Jaden is one of the editors of EaseUS, who focuses on topics concerning PCs and Mac data recovery. Jaden is committed to enhancing professional IT knowledge and writing abilities. She is always keen on new and intelligent products.
Related Articles
-
BitLocker Boot Loop: How to Fix It and Boot Properly
![author icon]() Sherly/2026-06-30
Sherly/2026-06-30 -
BitLocker Drive Encryption Is Enabled on the Selected Partition - How to Fix
![author icon]() Sherly/2026-06-17
Sherly/2026-06-17 -
Unlock BitLocker Drive Without Recovery Key and Password Free [Full Guide]
![author icon]() Brithny/2026-06-16
Brithny/2026-06-16 -
BitLocker on External Hard Drive: Encrypt & Decrypt Without Recovery Key
![author icon]() Brithny/2026-06-16
Brithny/2026-06-16
EaseUS Data Recovery Services
EaseUS data recovery experts have uneaqualed expertise to repair disks/systems and salvage data from all devices like RAID, HDD, SSD, USB, etc.