How to Root Your Android Device
Summary
To recover your lost data by using EaseUS MobiSaver for Android, you should root your Android phones first.
To recover your lost data by using EaseUS MobiSaver for Android, you should root your Android phones first. But for the average user, rooting is not an easy job. One wrong move can make root failure and you may even end up with bricked handset. So here we offer you a detailed guide to help you root your Android devices easily.
Two options are available here for you to follow:
- Method 1. Root Android phone/tablets with Android SDK Root tool (Root Android devices without PC)
- Method 2. Root Android phone and tablets on PC
You may selectively follow either offered methods here to securely root your Android devices with ease now.
Method 1. Root Android phone/tablets with Android SDK root tool
Before you start to download Android SDK root tool to root Android phone or tablets, you have some preparation jobs that need to be done:
- Device shall be powered on.
- Leave at least 50% battery.
- Ensure Internet connection is all right; (WiFi network is suggested).
- Allow installation of apps from unknown sources: Settings > Security > Unknown Sources.
Step 1. Enable USB debugging and OEN Unlocking on Android Devices
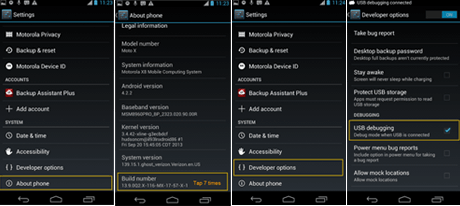
- 1. Go to Settings > Tap on About Phone > Find and tap on the Build Number several times to bring up the Developer Options;
- 2. Tap on the Back key to see the Developer Options > Tap on Developer Options > Check to enable USB Debugging and OEM Unlocking.
Step 2. Download and install Android SDK root tool on Android phone/tablets
Click on KinggoRoot.apk to free download and install Android SDK root took (The Kinggo Root tool supports you to root Android devices with one click.)
If the install process is blocked with "Install Blocked" error message, don't worry and follow below guidelines to get problems fixed:
Click Settings > Security > Check Unknown sources > Press back and find Downloads app and click KinggoRoot.apk to install.
Step 3. Root Android devices with KinggoToot.apk without PC
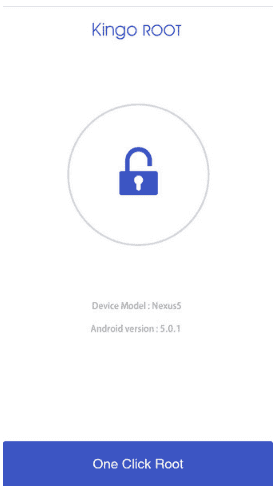
- 1. Launch "Kingo ROOT" app and click "One Click Root" to start the rooting process;

- 2. Wait for a few seconds till the result screen appears;
Please try KinggoRoot several times if the Android SDK root process is interrupted or uncompleted. If KingoRoot APK failed to root your device after several trials, please refer to KingoRoot Android (PC Version) to see how to root Android phone/tablets on PC.
Method 2. Root Android phones and tablets on PC
You'll also have 4 steps to follow for rooting Android phones and tablets on PC or computers:
Step 1. Free download and install Kingo Android Root on your computer.
Step 2. Enable USB debugging on your Android phone
- For Android 4.2 - 8.0 users:
- Enter "Settings" > Click "About Phone" > Tap "Build number" for several times until getting a note "You are under developer mode";
- Go Back to "Settings" > Click "Developer options" > Check "USB debugging".

- For Android 3.0 to 4.1 Users: Enter "Settings" > Click "Developer options" > Check "USB debugging".

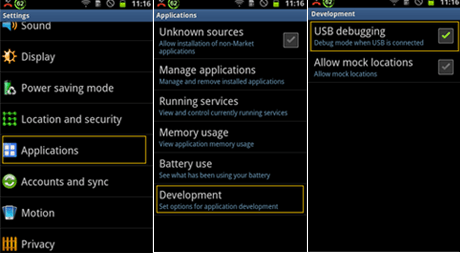
- For Android 2.3 or earlier: Enter "Settings" > Click "Applications" > Click "Development" > Check "USB debugging".

Step 3. Run Android Root and connect your phone to PC
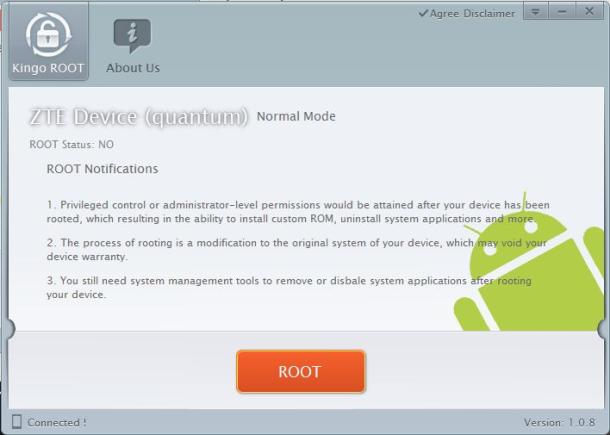
- Run Android Root and connect your phone to computer with its USB cable.
- You can see "Connected" in the lower-left corner when the software connecting your device successfully.

Step 4. Root your phone with one click
Click on "Root" button and wait patiently, then the software will help you do the rest job. During the process, your device will restart and after that, the root job is completed. It takes about 2 minutes.
Was This Page Helpful?
Related Articles
-
How to Recover Deleted Voicemail from Android and iPhone
![]() Brithny/2025-07-21
Brithny/2025-07-21 -
How to Get Deleted Snapchat Photos, Videos, and Messages Back
![]() Brithny/2025-07-21
Brithny/2025-07-21 -
![]() Brithny/2025-07-21
Brithny/2025-07-21 -
Android Data Recovery Software Free Download Full Version with Crack
![]() Brithny/2025-07-21
Brithny/2025-07-21
